Table of Contents:
- 1.About rule chains
- 2.Rule chain creation
- 3.Rule chain modification
- 4.Rule chain deletion
- 5.Rule chain configuration
- 6.About Nodes
1.About rule chains
The system provides a rule chain library for developers to configure message transformation, filtering, computation, and transmission on their own.
2.Rule chain creation
The system provides a default root rule chain that supports user use. No changes are made on the root rule chain, but the root rule chain is exported and re imported, and then modified and configured in the newly imported rule chain.
Firstly, follow the steps below to export the root rule chain. After clicking on export, the system will automatically download it, and the exported file will be in JSON format.

Re import the exported configuration into the system. After clicking on import, the system will directly jump to the configuration page of the newly imported rule chain. Simply click on the "Apply Change" button in the bottom right corner.
Re exit to the rule chain library menu to see the newly imported rule chain library configuration.
 4
4

3.Rule chain modification
Follow the steps below to modify the basic information of the rule chain. You can rename the rule chain imported in the previous section.


4.Rule chain deletion
You can delete a newly created rule chain by following the following steps.
note: the default root rule chain provided by the system cannot be deleted.

5.Rule chain configuration
If you need to configure the rule chain, you need to follow the following steps to enter the configuration page of the rule chain.


Next, we will explain the configuration of rule nodes that may be commonly used in different classes to manipulate data. As the default device configuration was applied in the creation of the previous device ,
the rule chain used in the default device configuration is the Root Rule Chain. Therefore, the following demonstrations are all configurations made in the Root Rule Chain.
6.About Nodes
6.1 filter
6.1.1 check fidles presence
This rule node is used to verify the existence of certain attributes in the message body or metadata, and distribute the message based on the verification results. The configuration content of this node includes:
- Name: required field, indicating the name of the node;
- Message field names: The name of the attribute to be verified in the message body, which is the content of the message actively sent by the device. Multiple attributes can be configured here, and after entering each attribute, press' Enter 'to enter;
- Metadata field names: The attribute names that need to be validated in the message metadata. The metadata is the data attached to the system and generally includes three metadata attributes: DeviceType, DeviceName, and ts. Multiple attributes can be configured here, and after entering each attribute, press' Enter 'to enter;
- Check that all specified fields are present: Select the box, and when performing the above attribute verification, connect each verification condition with "and"; When not selected, during the above attribute verification, each verification condition is connected by "or";
- Explanation: Non mandatory field, additional explanation;
According to the judgment result, there are two types of exits for this rule node: true and false.
A simple usage example is as follows:

6.1.2 script
This rule node allows developers to implement data filtering through programming, that is, to distribute messages using custom filtering rules. The configuration content of this node includes:
- Name: required field, indicating the name of the node;
- Function Filter: Code (customizing filtering rules through code), the function parameters include msg (message), metadata (metadata), msgType (message type pushed by the previous node), and the return value should be a Boolean value;
- Explanation: Non mandatory field, additional explanation;
According to the code logic, there are two types of exits for this rule node: true and false.
A simple usage example is as follows:

6.1.3 switch
This rule node allows developers to implement data grouping filtering through programming, that is, to distribute data using custom distribution rules. The configuration content of this node includes:
- Name: required field, indicating the name of the node;
- Function Switch: Code (customizing grouping rules through code), function parameters include msg (message), metadata (metadata), msgType (message type pushed by the previous node), return value should be a string array, indicating the path to be distributed;
- Explanation: Non mandatory field, additional explanation;
According to the code logic, the exit of this rule node is defined by the coding personnel, as shown in the example.
A simple usage example is as follows
return ['High temperature'];
} else if (msg.temperature < 18) {
return ['Low temperature'];
} else {
return ['Normal temperature'];
}
The above code defines three exits, namely High temperature, Low temperature, and Normal temperature. Therefore, when connecting to the next node, we need to customize the connection according to our defined exit path, as shown in the following figure. After completing the input, press "Enter" to create a link label, and then click "Add".


6.2 properties
6.2.1 calculate delta
This rule node is used to calculate the difference between the data in this message and the corresponding data in the previous message, and to refine and distribute the message content based on the calculation results. The configuration content of this node includes:
- Name: required field, indicating the name of the node;
- Input value Key: required field, the name of the attribute to be incrementally calculated;
- Output value Key: required field, the attribute name of the incremental value calculated and added to the message body;
- Decimals: Accuracy of incremental computation;
- Use cache: Select option to store the value of the previous data in memory, checked by default;
- Tell Failure if delta is negative: Select option. If the increment value is negative, it is considered a message processing failure and is checked by default;
- Add period between messages: Select option to add the time difference from the previous message in the message body, not checked by default. After selecting, you need to fill in the Period value key as the attribute name added to the message body as the calculated time difference;
- Exclude zero deltas from outbound message:Only output data with delta difference non-zero.
- Explanation: Non mandatory field, additional explanation;
According to the running results, there are three types of exits for this rule node: Success, Failure, and Other:
- Success: The data export for successful incremental calculation;
- Failure: The data exit for message processing failure. If Tell Failure if delta is negative is checked, the data with a negative increment will be calculated and output from this exit;
- Other: The data export for the attribute value to be incrementally calculated is missing from the message;
A simple usage example is as follows:

6.2.2 customer attributes
This rule node is used to add some attributes configured for users to the metadata of messages and distribute data based on the processing results. The configuration content of this node includes:
- Name: required field, indicating the name of the node;
- Latest telemetry: a selection option that will retrieve the latest attribute values reported remotely by the client based on the configured key. Unchecking it will query the server attributes of the client to which the device belongs, and it will be unchecked by default;
- Source telemetry key: input item, the name of the customer attribute to be added to the message metadata;
- Target attribute: Input item, the attribute name to be added to the message metadata, which appears in conjunction with the Source telemetry key and can add multiple pairs of attributes;
- Explanation: Non mandatory field, additional explanation;
According to the running results, there are two types of exits for this rule node: Success and Failure. When the customer to which the device belongs is not configured, data is output from the Failure exit.
This involves setting user attributes, which can be configured as follows.

A simple example of using this rule node is as follows:

6.2.3 customer details
This rule node is used to add some detailed information configured for users to the message and distribute data based on the processing results. The configuration content of this node includes:
- Name: required field, indicating the name of the node;
- Select entity details: Multiple options, select the detailed information of the customer to be added to the message (the information configured when creating the customer, including country, city, address, email, etc.), and the attribute name format of the added information is "customer-specific content name";
- Add selected details to message metadata: If checked, the corresponding information will be added to the metadata and passed to downstream nodes; If not checked, the corresponding information will be added to the data and passed to downstream nodes. Not selected by default;
- Explanation: Non mandatory field, additional explanation;
According to the running results, there are two types of exits for this rule node: Success and Failure. When the customer to which the device belongs is not configured, data is output from the Failure exit.
A simple usage example is as follows:

6.2.4 tenant attributes
6.2.5 tenant details
This rule node is used to add some detailed information configured for tenants to the message and distribute data based on the processing results. The configuration content of this node is exactly the same as that of the customer details rule node, and will not be repeated here.
A simple usage example is as follows:

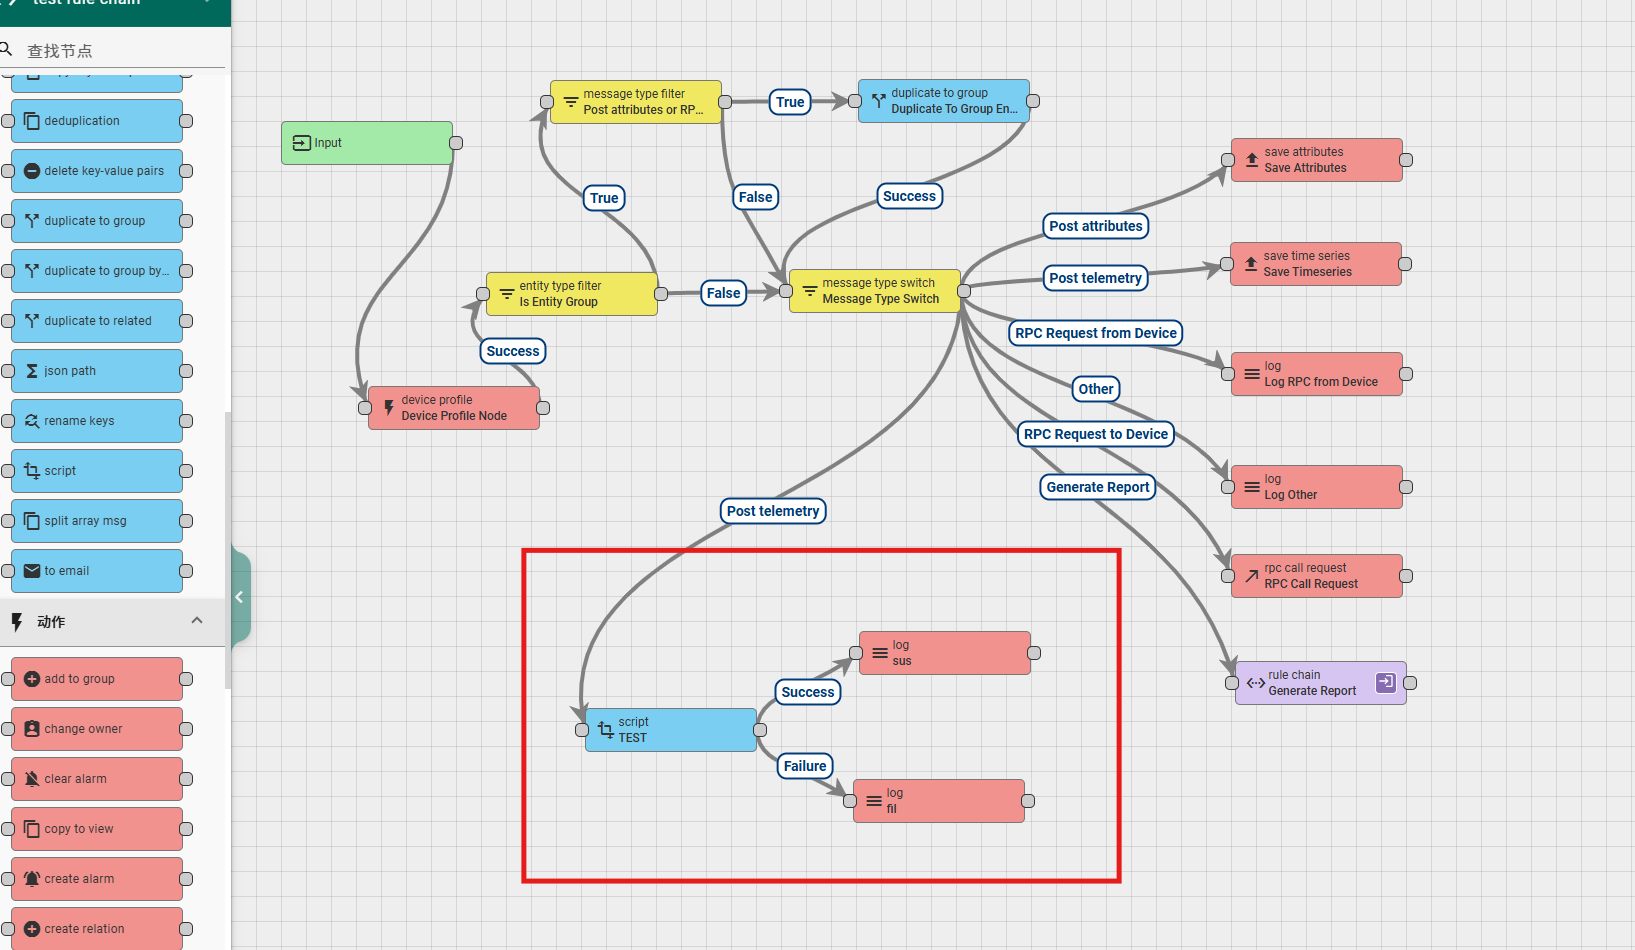
6.2.6 fetch device credentials
This node is used to add the device's key and token type to the message and pass it to downstream nodes. The node configuration includes:
Name: required field, indicating the name of the node;
Retrieve credentials to metadata: Select the option and add the device key information to the metadata. Otherwise, add it to the message data and select it by default;
Explanation: Non mandatory field, additional explanation;
According to the running results, there are two types of exits for this rule node: Success and Failure.
A simple usage example is as follows:
6.3 transformation
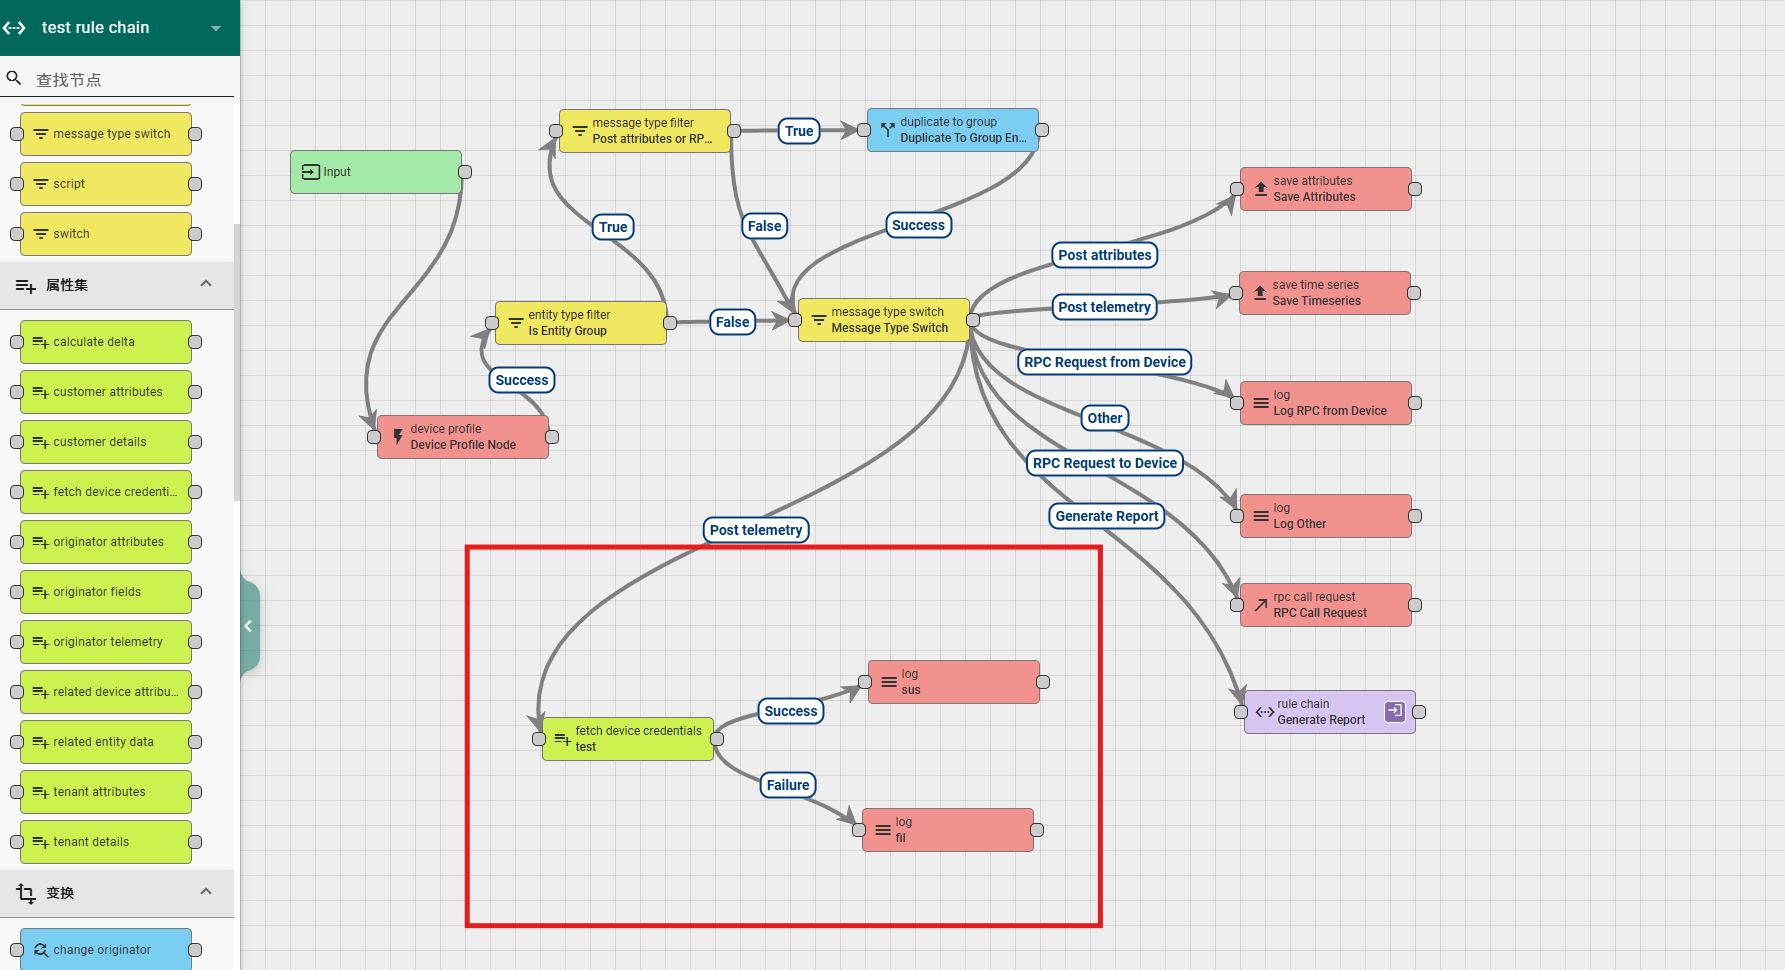
6.3.1 copy key-value pairs
This node is used to copy key values from metadata to data, or to copy key values from data to metadata. The node configuration includes:
Name: required field, indicating the name of the node;
Copy from: a selection option that allows you to choose the direction of copying, from data to metadata or from metadata to data.
The following input boxes allow you to enter the name of the attribute to be copied, and you can enter multiple names. After entering, press Enter to complete the typing once;
Explanation: Non mandatory field, additional explanation;
According to the running results, there are two types of exits for this rule node: Success and Failure.
A simple usage example is as follows:
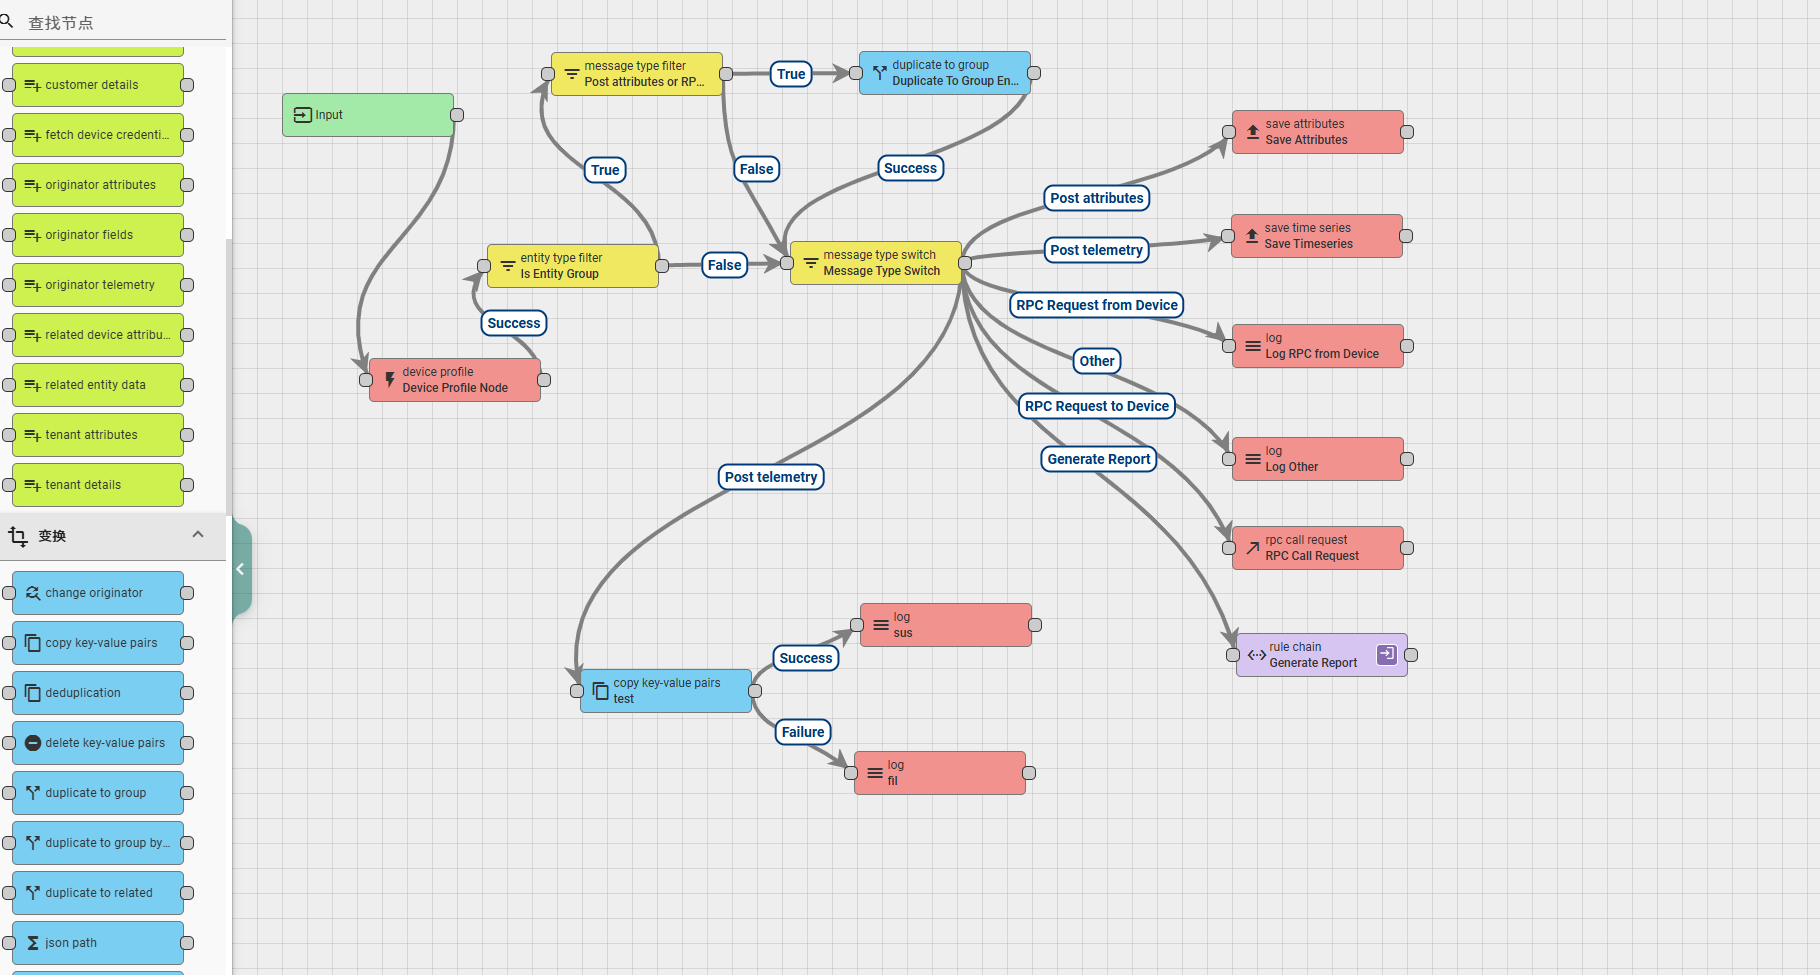
6.3.2 delete key-value pairs
This node is used to delete key values in data or metadata. The node configuration includes:
Name: required field, indicating the name of the node;
Delete from: Select an option that allows you to choose where to delete data, from the data, or from the metadata.
The following input boxes allow you to enter the name of the attribute to be copied, and you can enter multiple names. After entering, press Enter to complete the typing once;
Explanation: Non mandatory field, additional explanation;
According to the running results, there are two types of exits for this rule node: Success and Failure.
A simple usage example is as follows:
6.3.3 rename keys
This node is used to rename attributes in data or metadata. The node configuration includes:
Name: required field, indicating the name of the node;
Rename keys in: a selection option that allows you to choose where to change the data, either from the data or from the metadata.
The following Key name and New Key name appear in pairs, indicating the original attribute name and the new attribute name;
Explanation: Non mandatory field, additional explanation;
According to the running results, there are two types of exits for this rule node: Success and Failure.
A simple usage example is as follows:
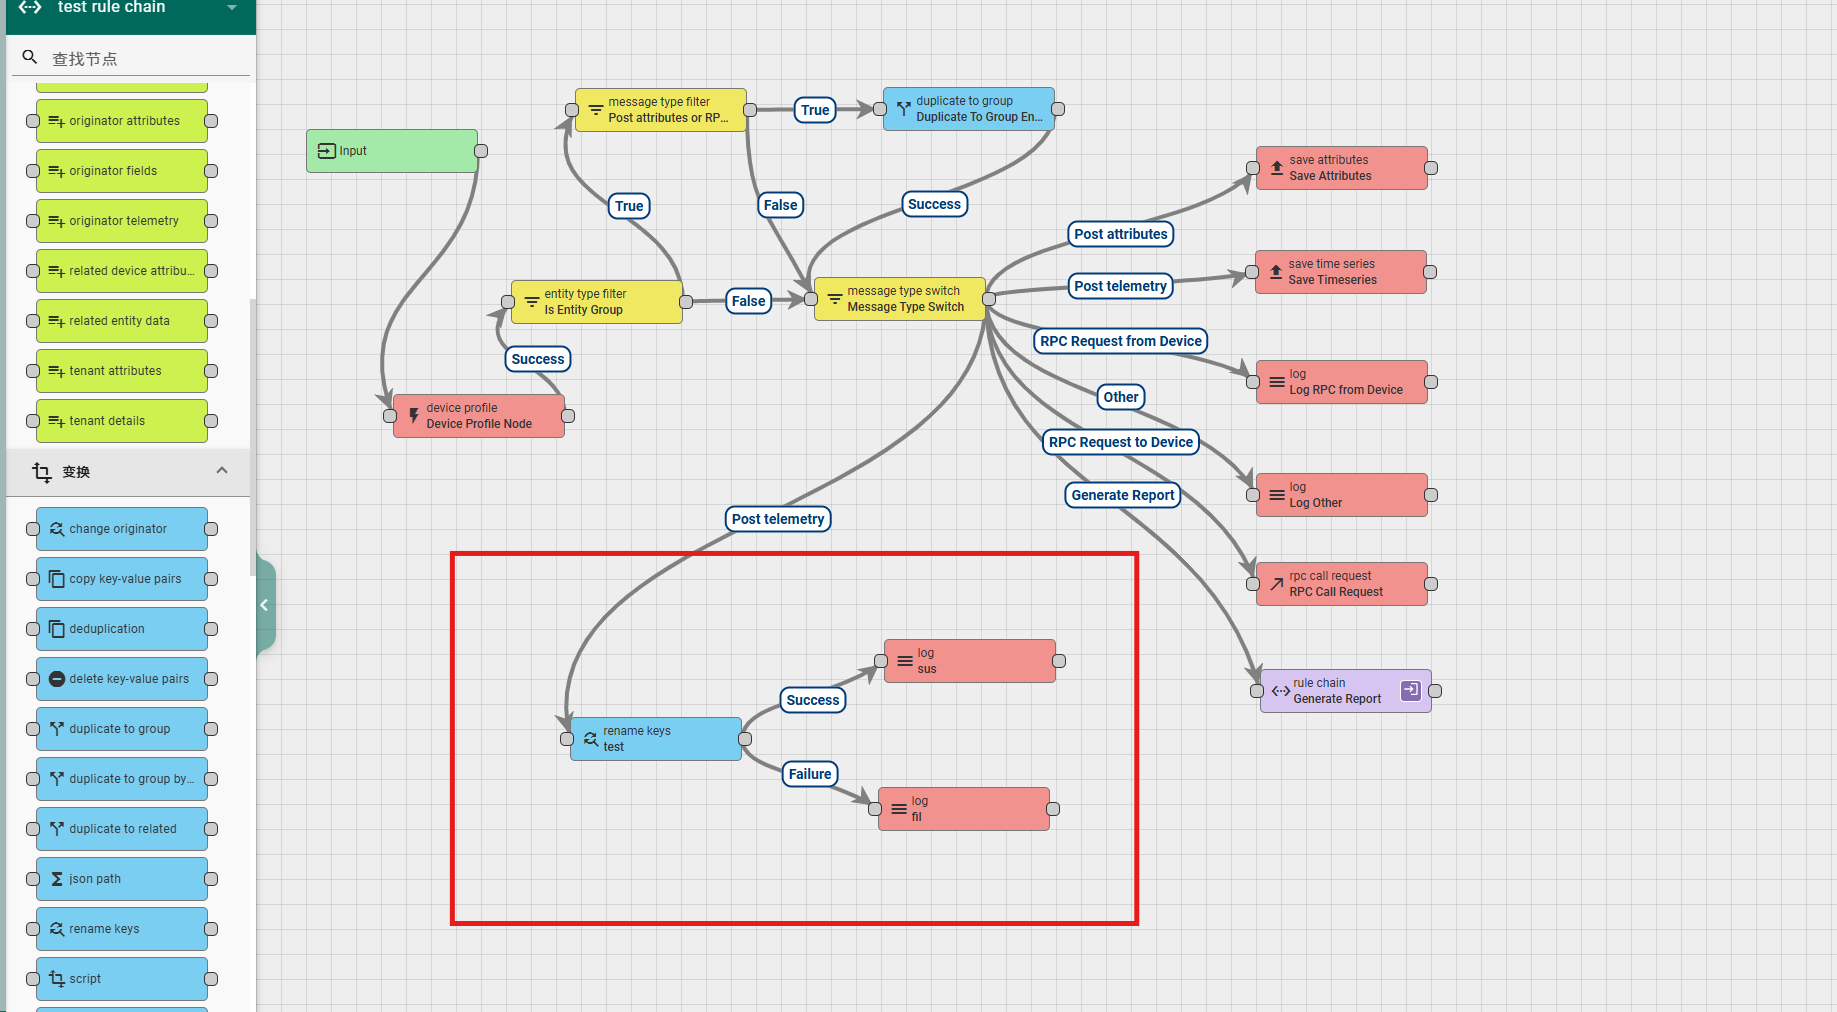
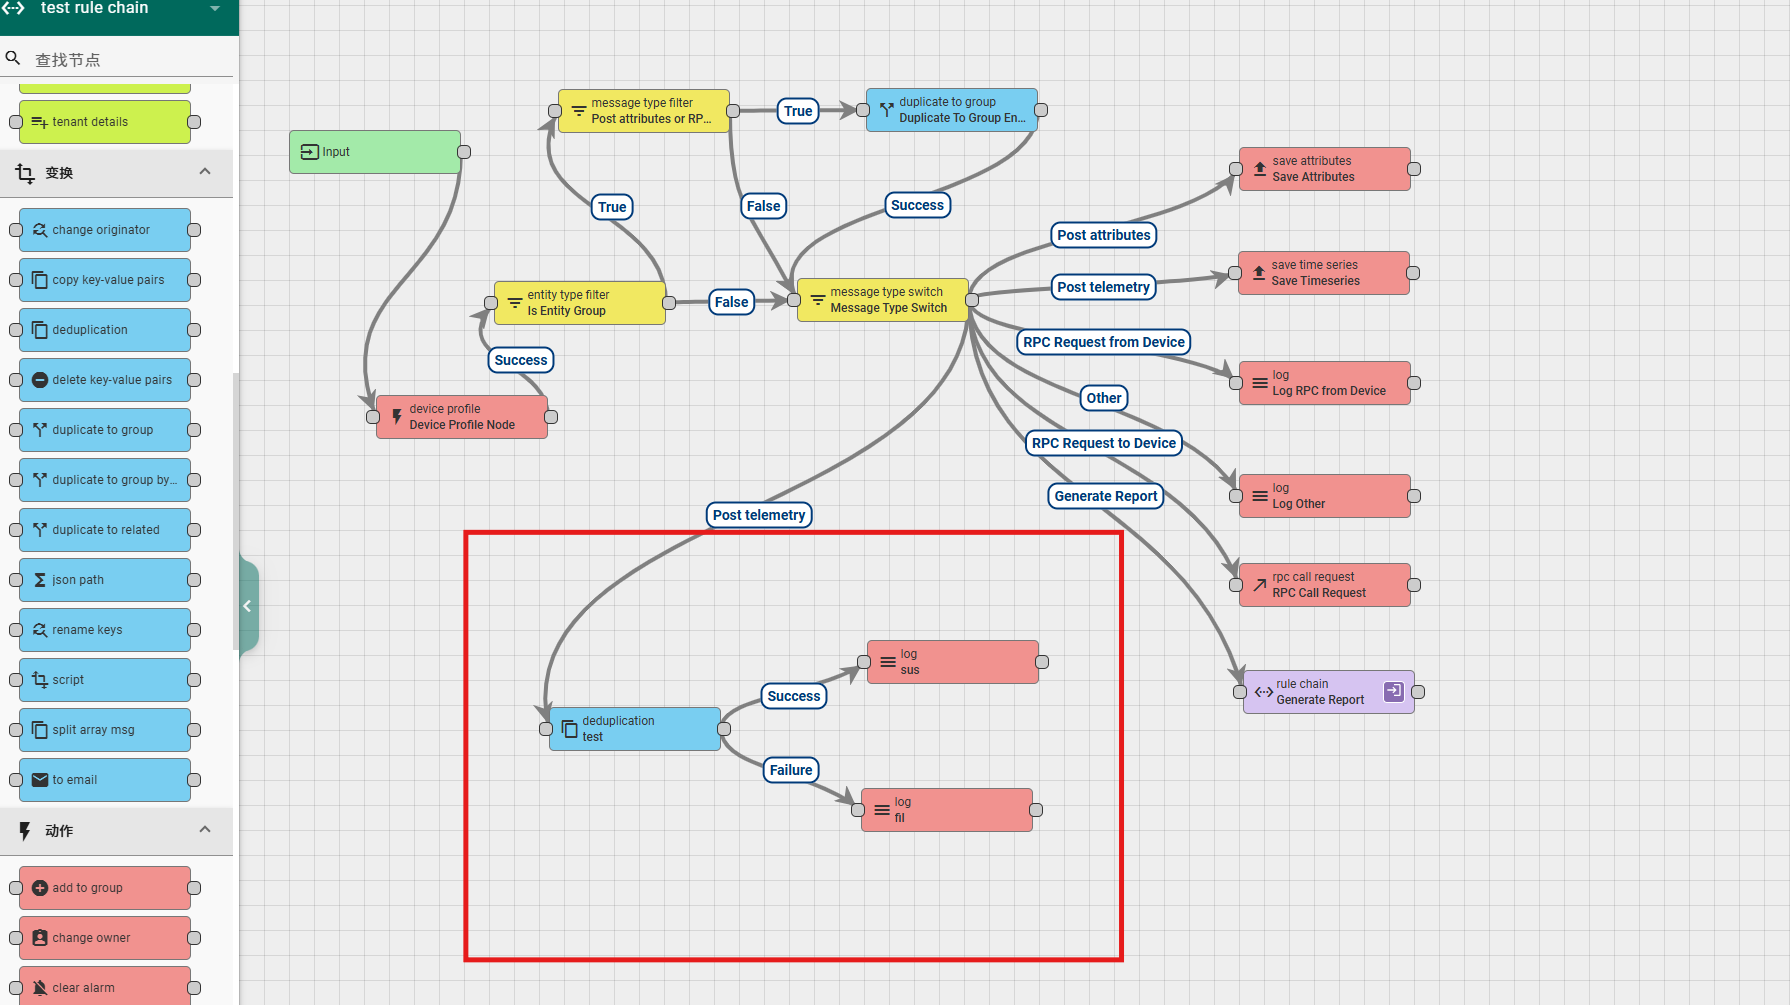
6.3.4 deduplication
This node can be used for message deduplication or changing the frequency of sending messages downstream. The configuration content of the node includes:
Name: required field, indicating the name of the node;
Interval: required field, indicating the time interval, that is, how often data is sent downstream;
Strategy: Select option, indicating the strategy for sending messages downstream. The system provides three strategies for developers to choose from, namely First Message, Last Message, and All Messages. The first two strategies are to send the earliest or latest data downstream, and the last strategy is to send a JSON string group of all data. When selecting the latter left strategy, it is also necessary to configure the Output message type and queue. The former is for message type configuration, while the latter is for queue configuration;
Explanation: Non mandatory field, additional explanation;
According to the running results, there are two types of exits for this rule node: Success and Failure.
A simple usage example is as follows:
When selecting the All Messages mode, the data format received by downstream nodes is as follows:
"msg": {
"temperature": 26,
"humidity": 31
},
"metadata": {
"deviceType": "default",
"deviceName": "device-01",
"ts": "1703490713006"
}
}, {
"msg": {
"temperature": 12,
"humidity": 16
},
"metadata": {
"deviceType": "default",
"deviceName": "device-01",
"ts": "1703490718019"
}
}, {
"msg": {
"temperature": 15,
"humidity": 16
},
"metadata": {
"deviceType": "default",
"deviceName": "device-01",
"ts": "1703490723041"
}
}, {
"msg": {
"temperature": 13,
"humidity": 10
},
"metadata": {
"deviceType": "default",
"deviceName": "device-01",
"ts": "1703490728061"
}
}, {
"msg": {
"temperature": 12,
"humidity": 18
},
"metadata": {
"deviceType": "default",
"deviceName": "device-01",
"ts": "1703490733073"
}
}]
6.3.5 script
This node allows developers to customize data transformations through code, and can modify the content and format of data sent downstream through code logic. The node configuration content is as follows:
Name: required field, indicating the name of the node;
Function Transform: Code (customizing transformation rules through code), the input parameters of the function include msg (message), metadata (metadata), msgType (message type pushed by the previous node), and the return value should be in a fixed format {msg: newMSG, metadata: newMetadata, msgType: newMgType}, where the value is the object we have changed;
Explanation: Non mandatory field, additional explanation;
According to the running results, there are two types of exits for this rule node: Success and Failure.
A simple usage example is as follows:
Transform logical code:
msg.timestamp = metadata.ts;
msg.province = 'GUANGDONG';
msg.city = 'SHENGZHENG';
return {
msg: msg,
metadata: metadata,
msgType: msgType
};
Data received by downstream nodes:
"temperature": 21,
"humidity": 15,
"timestamp": "1703491991280",
"province": "GUANGDONG",
"city": "SHENGZHENG"
}
Example usage: