
Table of contents:
The template defines what will be in the report, while the scheduler determines when and to whom it will be delivered.
In this guide, we'll walk through the basic steps of using Reporting in ThingsEye , and create a report template with automated delivery configured for two different customers.
1. Create the report template
By default, you are assumed to know how to create a report template. If not, please consult this wiki::Create report
2. Scheduling the report for customers
Key points for correct scheduling
To ensure the report is generated correctly and contains accurate data, you must specify:
- Report recipients – the users who will receive the generated report (e.g., managers or clients).
- User account – the account under which the report will be generated. This defines the data scope and permissions applied to the report.
Example:
- If the report should include only devices owned by Customer A, you must set the User field to the email address of a user belonging to Customer A when scheduling the report.
- Likewise, to schedule a report for Customer B recipients, use the email address of a Customer B user in the User field.
This ensures the report will only display devices and data accessible to that specific user.
2.1 Scheduling a report for CustomerA users
First, we'll set up automated delivery of the report for all CustomerA users. The report will be generated on behalf of Alec , the administrator for this customer.
- Go to the “Scheduling” tab on the “Reporting” page.
- Сlick the “+ Scheduled Report” in the top-right corner to create a new scheduler event.

- In the scheduling dialog, provide the following details:
- Give your schedule event a clear title, for example: Report for Customer A
- Event type – always set to Create report.
- Report template – select the previously created Daily Devices Alarm Report template.
- User – specify the user account on whose behalf the report will be generated: Alec@thingseye.io (Alec — CustomerA administrator).

- Set the recipients:
- In the “Recipients” field, click Create new to create a new recipient group.
- Enter a name for the notification recipient group.
- Select Customer users filter.
- Set Customer to Customer A.
- Click “Add”.
- In the “Recipients” field, click Create new to create a new recipient group.

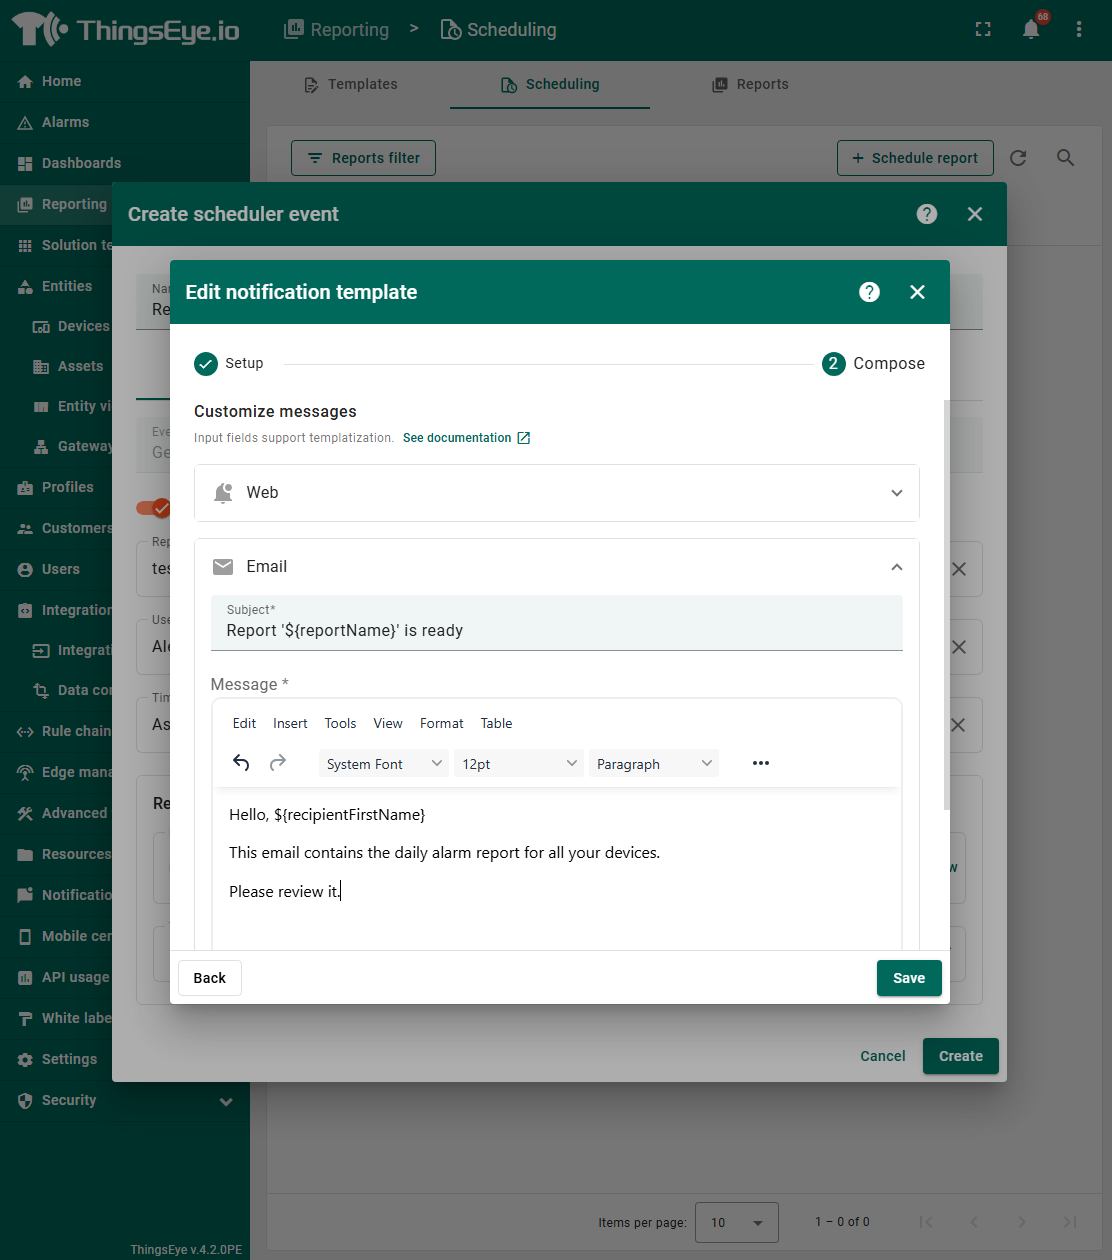
- Notification template & delivery methods:
- Select an existing notification template (defines how the report will be delivered) and edit it.
- Add Email as a delivery method alongside Web. Click “Next”.
- Add the subject and body text for the email notification to which the PDF report will be attached. Click “Save”.


2.2 Set up the schedule
Go to the Schedule tab.
- Start time – set the date and time of the first run.
- Time zone – choose the applicable time zone.
- Enable Repeat:
- Interval – select Daily.
- End date – set an end date or leave blank for ongoing delivery.
- Finally, click “Create” to save and apply the scheduler event.
Now, every day at the scheduled time, all Customer A users will automatically receive a report with the latest information about their device alarms.

2.3 Result
Each user from customerA receives their own individual report containing only the entities they have access to.
The system automatically sends the reports daily at the scheduled time, without any manual intervention.
At the time specified in the scheduled events, all users of Customer A will receive notifications along with the generated report on their device alarms.
Notifications will be delivered through two channels:
1. Web UI notification
- A notification about the generated report will appear in the ThingsEye Web UI.
- Tenant Users can open the report directly within the ThingsEye interface.
Important:
- Only Tenant Users can view generated reports directly in the ThingsEye Web UI.
- Customer users do not have access to reports in the Web UI — they can only receive them through Email or Slack.
If your recipients are customer users, make sure at least one of these delivery channels is selected.

2. Email notification
- An email will be sent to the user with the subject and message you configured in the notification template.
- The email will have the report attached as a PDF file, which can be opened and viewed in the browser or downloaded.
