Outdoor & Indoor signal measuring Solution End User Guide V1.1
- 1. Introduction//名字已修改,以下内容中“LA66”全部替换成“LA66USB LoRaWAN Adapter”
- 2. How to Build?
- 3. How To Use?//图片显示问题已修复,硬件使用方法已放到小节头(即插即用,自动判断室内外)
1. Introduction//名字已修改,以下内容中“LA66”全部替换成“LA66USB LoRaWAN Adapter”
1.1 What is Outdoor & Indoor signal measuring Solution?
To help customers identify optimal sensor placement locations, we have designed a one-click signal strength measurement solution. All you need is one LA66 USB LoRaWAN Adapter and a Dragino account.
The outdoor signal measurement solution supports simultaneous testing with multiple gateways. It allows for both individual gateway signal map display and combined signal overlay from multiple gateways.
For indoor signal measurement, due to the complex layout and numerous obstacles, the user needs to walk to a suitable location before starting the measurement. Measurement points can then be marked on an indoor map, with flexible options to add or remove markers.
Both dashboards support data export.
1.2 Features
- Extensive support
- Only a LA66 USB LoRaWAN Adapter and one Dragino account are needed, the gateway and LNS can be freely matched.//格式已修正
- High-accuracy sensors
- Reliable data readings
- Real-Time measuring
- Button to switch receiving data or stop
- Continuous measuring
- User-Friendly Interface
- Intuitive dashboard design
1.3 Specifications
- Mobile Support: Dedicated mobile app for on-the-go monitoring
- Device Manual: LA66 USB LoRaWAN Adapter User Manual
2. How to Build?
2.1 Network Structure//图片已替换

The network structure consists of end nodes and gateways, which work together to measuring signal strength. You can replace gateway and Network Server with which you using.(It should be supported LoRaWAN)
2.1 Get Account
To begin, contact your local representative to obtain a customer account or send mail to support@dragino.cc
2.2 Get Device And Configuration//新增烧录固件详细说明(一般情况下用出厂自带的默认固件即可)
1.Reach out to your local representative to acquire the necessary devices for your signal measuring solution. These devices include:
- End Nodes: LA66 USB LoRaWAN Adapter
- Gateway(If you want):For data transmission.
2.Burn bootloader & firmware for LA66 USB LoRaWAN Adapter
- Bootloader: We ship the LA66 USB LoRaWAN Adapter with a boot loader by default( More detail: https://wiki.dragino.com/xwiki/bin/view/Main/User%20Manual%20for%20LoRaWAN%20End%20Nodes/LA66%20USB%20LoRaWAN%20Adapter%20User%20Manual/#H1.10A0UpgradeFirmwareofLA66USBLoRaWANAdapter:~:text=is%20as%20below%3A-,1.10%C2%A0%20Upgrade%20Firmware%20of%20LA66%20USB%20LoRaWAN%20Adapter,-1.10.1%20Update%20method)
- Firmware: If your device didn't have bootloader or firmware, please burn the latest bootloader & firmware for it in the following way: https://wiki.dragino.com/xwiki/bin/view/Main/User%20Manual%20for%20LoRaWAN%20End%20Nodes/LA66%20USB%20LoRaWAN%20Adapter%20User%20Manual/#H1.10A0UpgradeFirmwareofLA66USBLoRaWANAdapter:~:text=20model/%23H3.2.1UpdateafirmwareviaDraginoSensorManagerUtility.exe-,1.10.2%20Update%20method%3A%C2%A0For%20LA66%20without%20bootloader,-Explanation%3A
Ensure that all devices are pre-registered on Dragino before use//移至章末另起一节
2.3 Register Devices & Gateways on LNS
2.3.1 Register Device
1.Have a check of package box to get DEVEUI/ APPEUI/ APPKEY(OTTAKEY)

2.Register on LNS and replace decoding
- Decoding for ChirpStack:
return {
data: Decode(input.fPort, input.bytes, input.variables)
};
}
function bytesToString(bytes) {
return decodeURIComponent(bytes.map(b => '%' + b.toString(16).padStart(2, '0')).join(''));
}
function Decode(fPort, bytes, variables) {
var data = {};
if (bytes.length >= 9) {
data.flag = bytes[0];
data.Node_type = "Caculate AVG";
data.latitude = parseFloat(((bytes[1] << 24 >>> 0 | bytes[2] << 16 | bytes[3] << 8 | bytes[4]) / 1e6).toFixed(6));
data.longitude = parseFloat(((bytes[5] << 24 >>> 0 | bytes[6] << 16 | bytes[7] << 8 | bytes[8]) / 1e6).toFixed(6));
// 剩余字节为 title(如果存在)
if (bytes.length > 9) {
const titleBytes = bytes.slice(9);
data.title = bytesToString(titleBytes);
}
}
return data;
}
- Decoding for TTN:
function format(shijianchuo){
//shijianchuo是整数,否则要parseInt转换
var time = new Date(shijianchuo);
var y = time.getFullYear();
var m = time.getMonth()+1;
var d = time.getDate();
var h = time.getHours();
var mm = time.getMinutes();
var s = time.getSeconds();
return y+'-'+add0(m)+'-'+add0(d)+' '+add0(h)+':'+add0(mm)+':'+add0(s);
}
function Decoder(bytes) {
var data={};
var doorflg
if (bytes[0]===1){
doorflg = "indoor"
}
else{
doorflg = "outdoor"
}
if (bytes.length==13){
data.doorflg = doorflg
data.latitude=parseFloat(((bytes[1]<<24|bytes[2]<<16|bytes[3]<<8|bytes[4])/1000000).toFixed(6));
data.longitude=parseFloat(((bytes[5]<<24|bytes[6]<<16|bytes[7]<<8|bytes[8])/1000000).toFixed(6));
timestamp1=bytes[9]<<24|bytes[10]<<16|bytes[11]<<8|bytes[12];
data.timestamp=timestamp1;
data.beijintime=format((timestamp1+28800)*1000);
return data;
}
else if(bytes.length==9){
data.doorflg = doorflg
data.Node_type = "Caculate AVG"
data.latitude=parseFloat(((bytes[1]<<24|bytes[2]<<16|bytes[3]<<8|bytes[4])/1000000).toFixed(6));
data.longitude=parseFloat(((bytes[5]<<24|bytes[6]<<16|bytes[7]<<8|bytes[8])/1000000).toFixed(6));
return data;
}
}
- If you using other LNS, you can code yourself(The first nine bits of the uploaded data are the flag bit + position, and the rest are the title) or send mail to support@dragino.cc)
2.2.2 Register Gateway(If you use Dragino's gateway)//删除网关配置介绍
2.4 LNS Connection Method//已更新标题
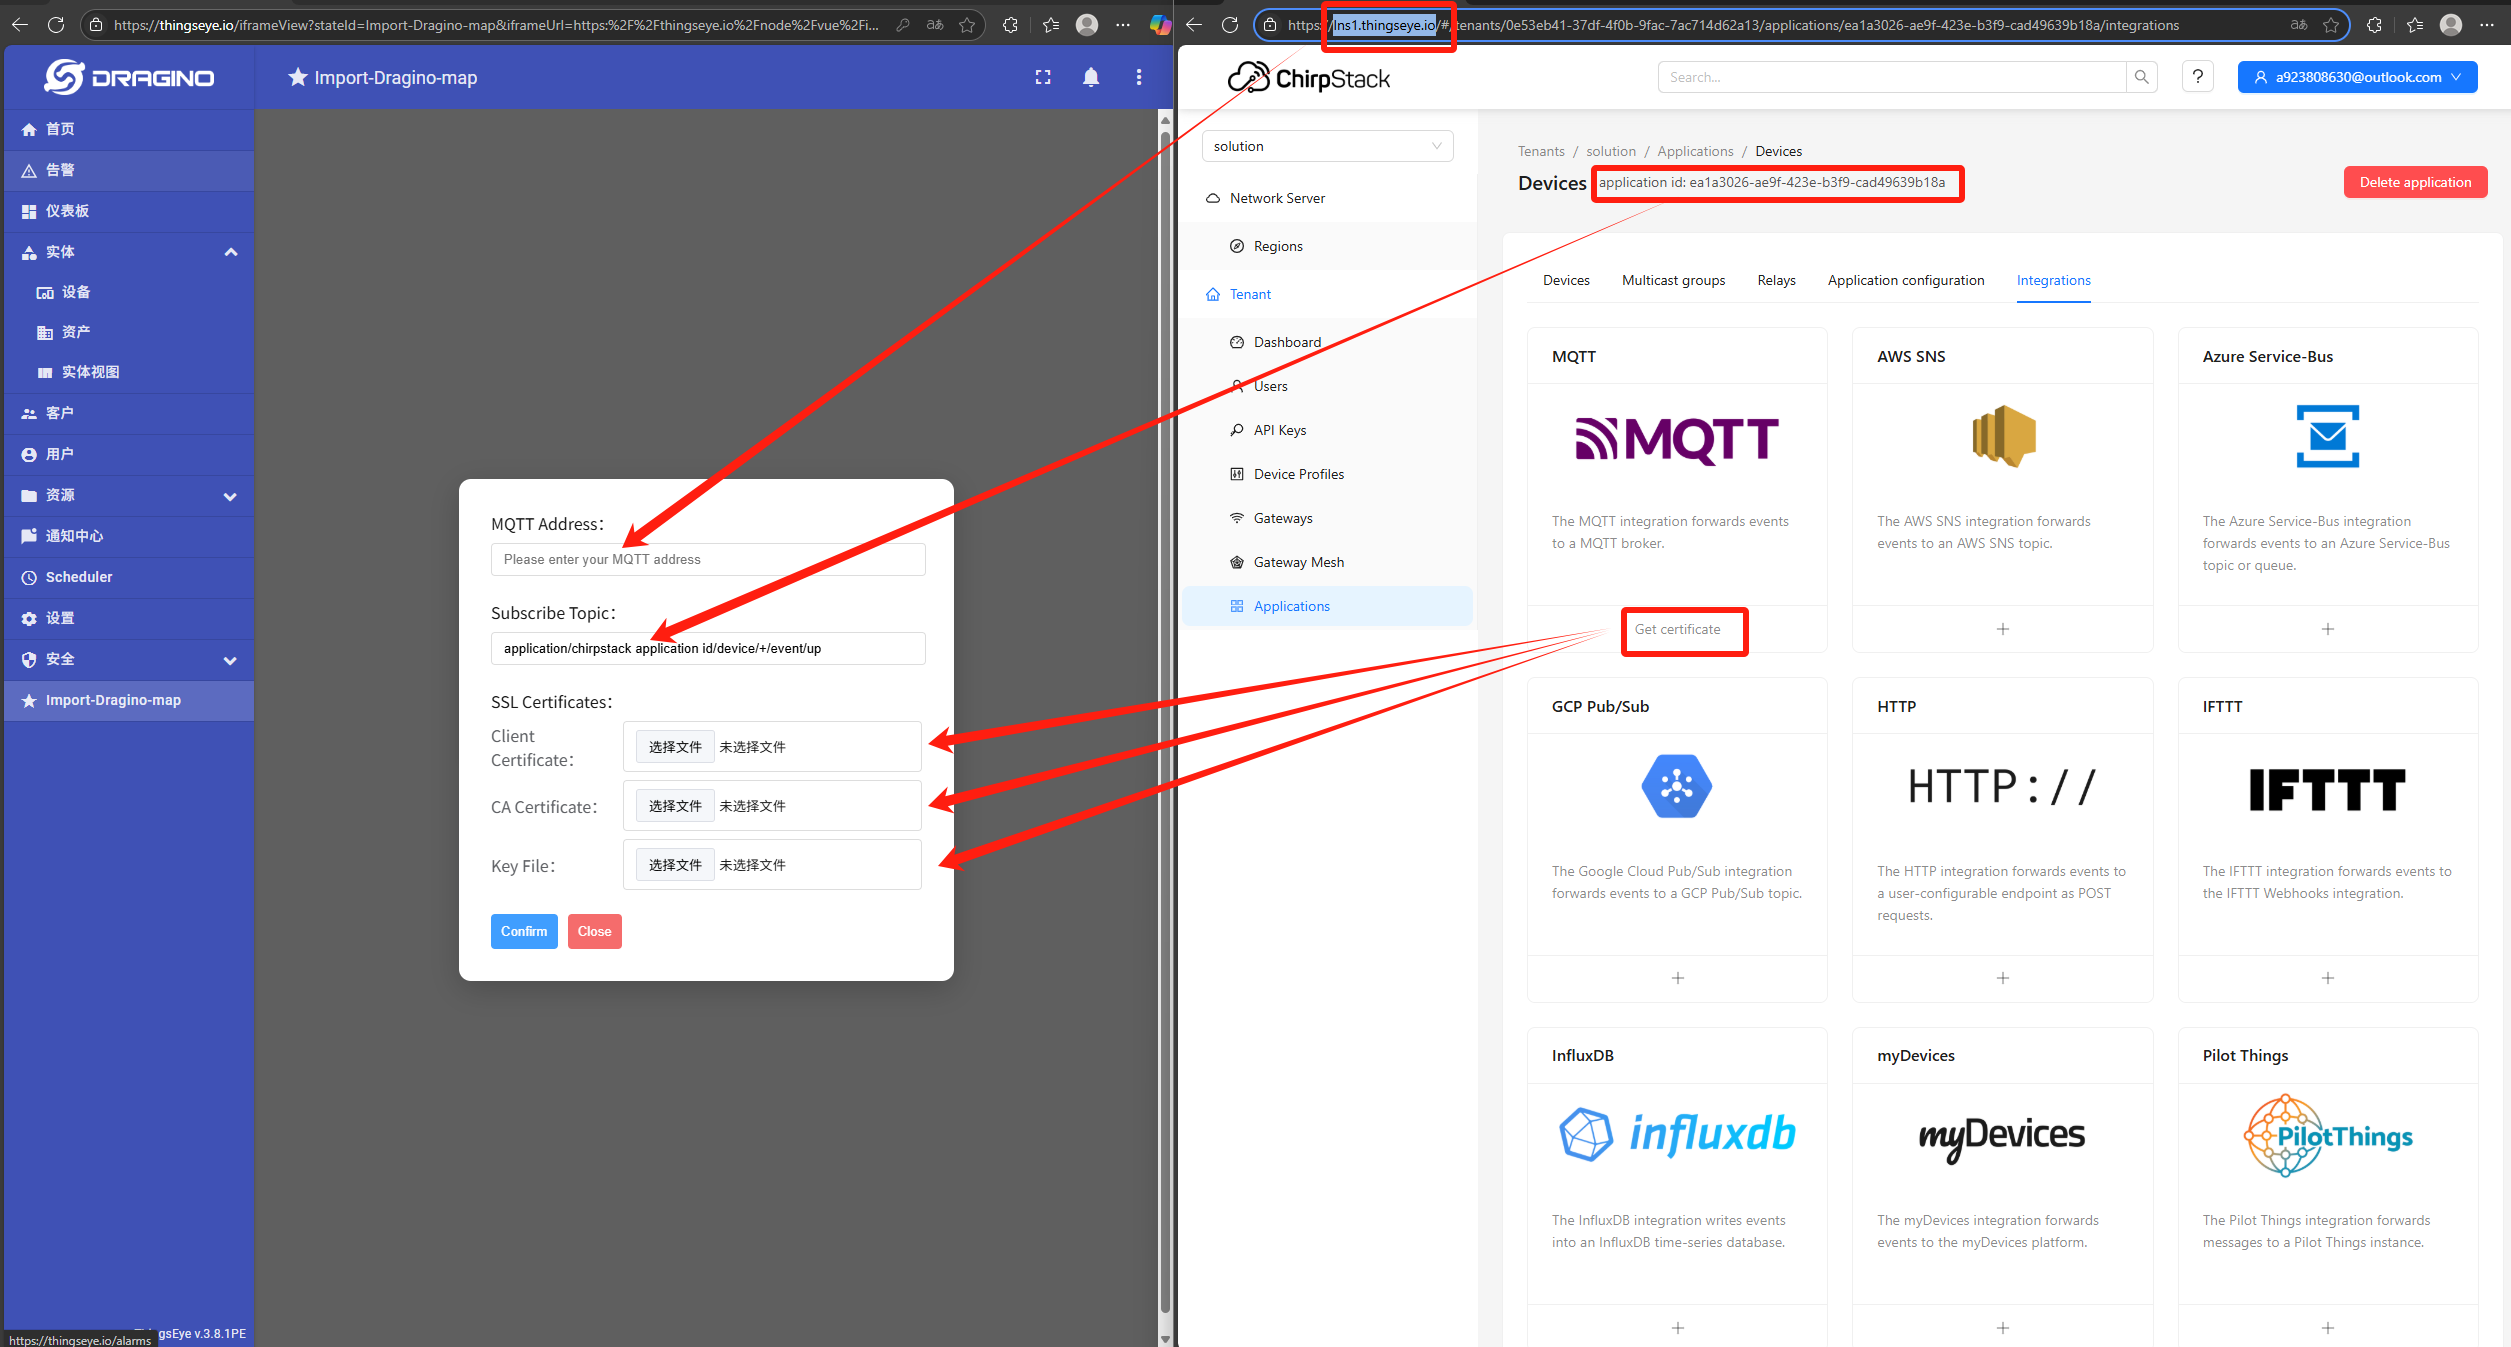
Choose LNS: After log in Dragino platform, click the button "Import-Dragino-map"and choose the LNS you using.

Example of TTN//已增添详细文字说明

Account & Passwork: Imput your TTN account and password to use API port.
MQTT Address: Imput public address (Don't imput Port)
Example of ChirpStack//已增添详细文字说明
MQTT Address: Your MQTT server address or the cloud server address you use
Subscribe Topic: The default for Topic is: application/chirpstack application id/device/+/event/up(Replace"chirpstack application id" with the one which is actually used)
SSL Certificates: Copy the contents of the certificates and paste them into the linked file below, a total of three certificates are required(Integrated Certificate File demo Download Address: https://github.com/ThingsEye-io/te-platform/tree/main/chirpstack)
Check:Whether the device is connected to the platform through LNS

Check: Whether the device profile is Caculate AVG. Change it if it not.


3. How To Use?//图片显示问题已修复,硬件使用方法已放到小节头(即插即用,自动判断室内外)
3.1 Outdoor_signal dashboard
Outdoors_signal supports viewing both the signal coverage of a single gateway and the combined coverage of all gateways.
3.1.1 Create the gateway layer.
This solution is pre-configured. Under normal circumstances, when the device successfully uploads information through gateways, it will automatically generate the corresponding assets and put them in the Layer.
The layer will be named after the gateway's IMEI, and you can set a label. At the same time, there will be a dashboard that collects all gateway signals and displays them in an overlay named after the user's registered email address.
The following are special cases:
1.Can't see new gateway layers:
Click the center button on the right to add a gateway layer. (Please create all devices that can accept the current LA66 USB LoRaWAN Adapter frequency band; otherwise, the received data will not be displayed.)
For example, here we created a gateway with the ID a84041fdfe27e8fa
You can click here to modify the gateway layer ID (it must correspond one-to-one with the gateway ID that will receive the data).
 👉
👉
By the way, you can click here to delete the gateway layer.

Click row of gateway layer will turn to the detail page, this page will be blank before gateway upload data.
 👉
👉 
Click the top-left corner to return.

2.Can't see new gateway layers, and displayed "Asset with such name already exists!":
Turn to Assets to have a check weather it profiles is "Outdoors_signal" or "AL_Zone" .

If not, have a set.


3.1.2 Measuring
Insert the LA66 USB LoRaWAN Adapter into phone or tablet, press the button to switch to ON and start detection. Click the button in the top-right corner of the main page to start receiving data. Data will be uploaded every 6 seconds based on the tablet's location. Simply move the tablet to measure signal strength from different places.


👇

When the gateway received the first set of data, the current gateway will appear in the left-side list of the gateway interface. When received the second set of data, the current signal strength will be displayed on the right-side map.
The measured data will be displayed in translucent dots of different colors, green represents a good signal, and red represents a poor signal.

You can click here to edit the device remarks.

You can click here to delete the device (deletion is irreversible, please proceed with caution).

All data collected by the gateways will also be displayed in All_signal simultaneously.

3.1.3 Turn OFF to stop measuring
Once the current location's detection is complete, press the button again to switch to OFF and pause detection.

👇

3.2 Indoors_signal dashboard
Indoors_signal supports measuring and marking the signal strength of all locations on the indoor floor plan.
3.2.1 Import the map
Drag the map image here and click √ to import.

3.2.2 Measuring
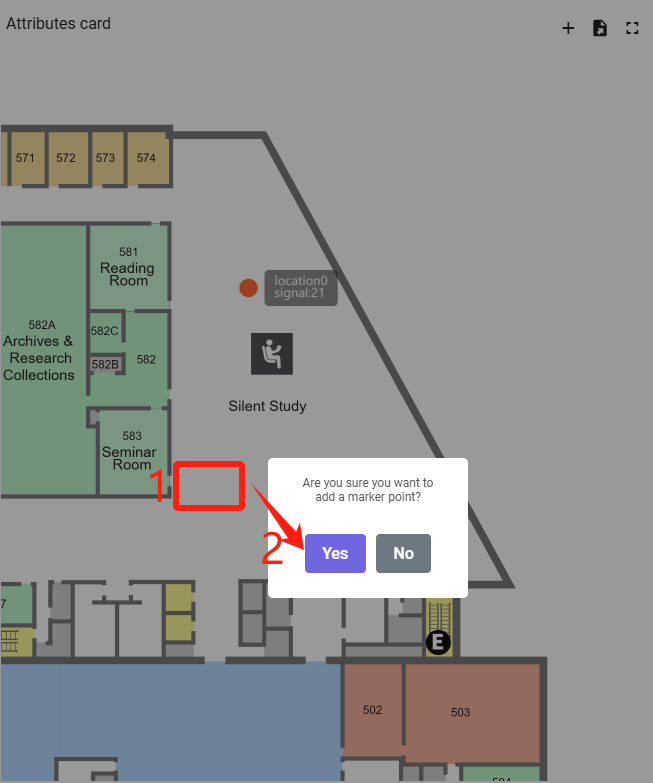
1.Mark on map where you want to measuring than click Yes.

2.Move to the measurement point, insert the LA66 USB LoRaWAN Adapter , and press the button to switch to ON, then you can see the new data renewing.

3.Mark the next place which to be measured than move to the measurement point.Repeat the above steps to measure(Remeber: Mark point before move.)

4.Click button to Off to stop measuring.

3.2.3 Delete point
Click the marking points, then click yes.

4. Use of Tablet
For added convenience, you can use a tablet to access the platform.
