User and Customer Management
Overview
Applicable Role: Tenant Administrator.
In ThingsEye, a Customer is a logical organisational unit under a tenant, used to isolate data and provide controlled access to IoT resources. A customer can represent a department, a company branch, or an external customer. Through customers, tenants can delegate access to resources such as devices, assets, and dashboards to specific organisational units while maintaining clear ownership boundaries and enforcing permission control via ThingsEye's RBAC model.
A User is an entity that has credentials to authenticate and access the platform. Each user belongs to a specific tenant or customer. Users that belong to a customer are referred to as "Customer Users" (i.e., "End‑Users" in this manual) and have read‑only permissions to view dashboards and other resources assigned by the Tenant Administrator. Customer Users cannot create devices, assets, or dashboards; they can only view assigned resources.
In the ThingsEye hierarchy, the Tenant Administrator has full control over a specific tenant environment and can create and manage customers and customer users, as well as control their access to tenant resources. Tenant Administrators can directly manage customer assets, devices, dashboards, and edge nodes from the customer details page.
1. Create a Customer
Procedure
Step 1: Go to the Customers page
Select "Customers" from the left navigation menu to go to the customer list page. The "All" customer group is displayed by default.
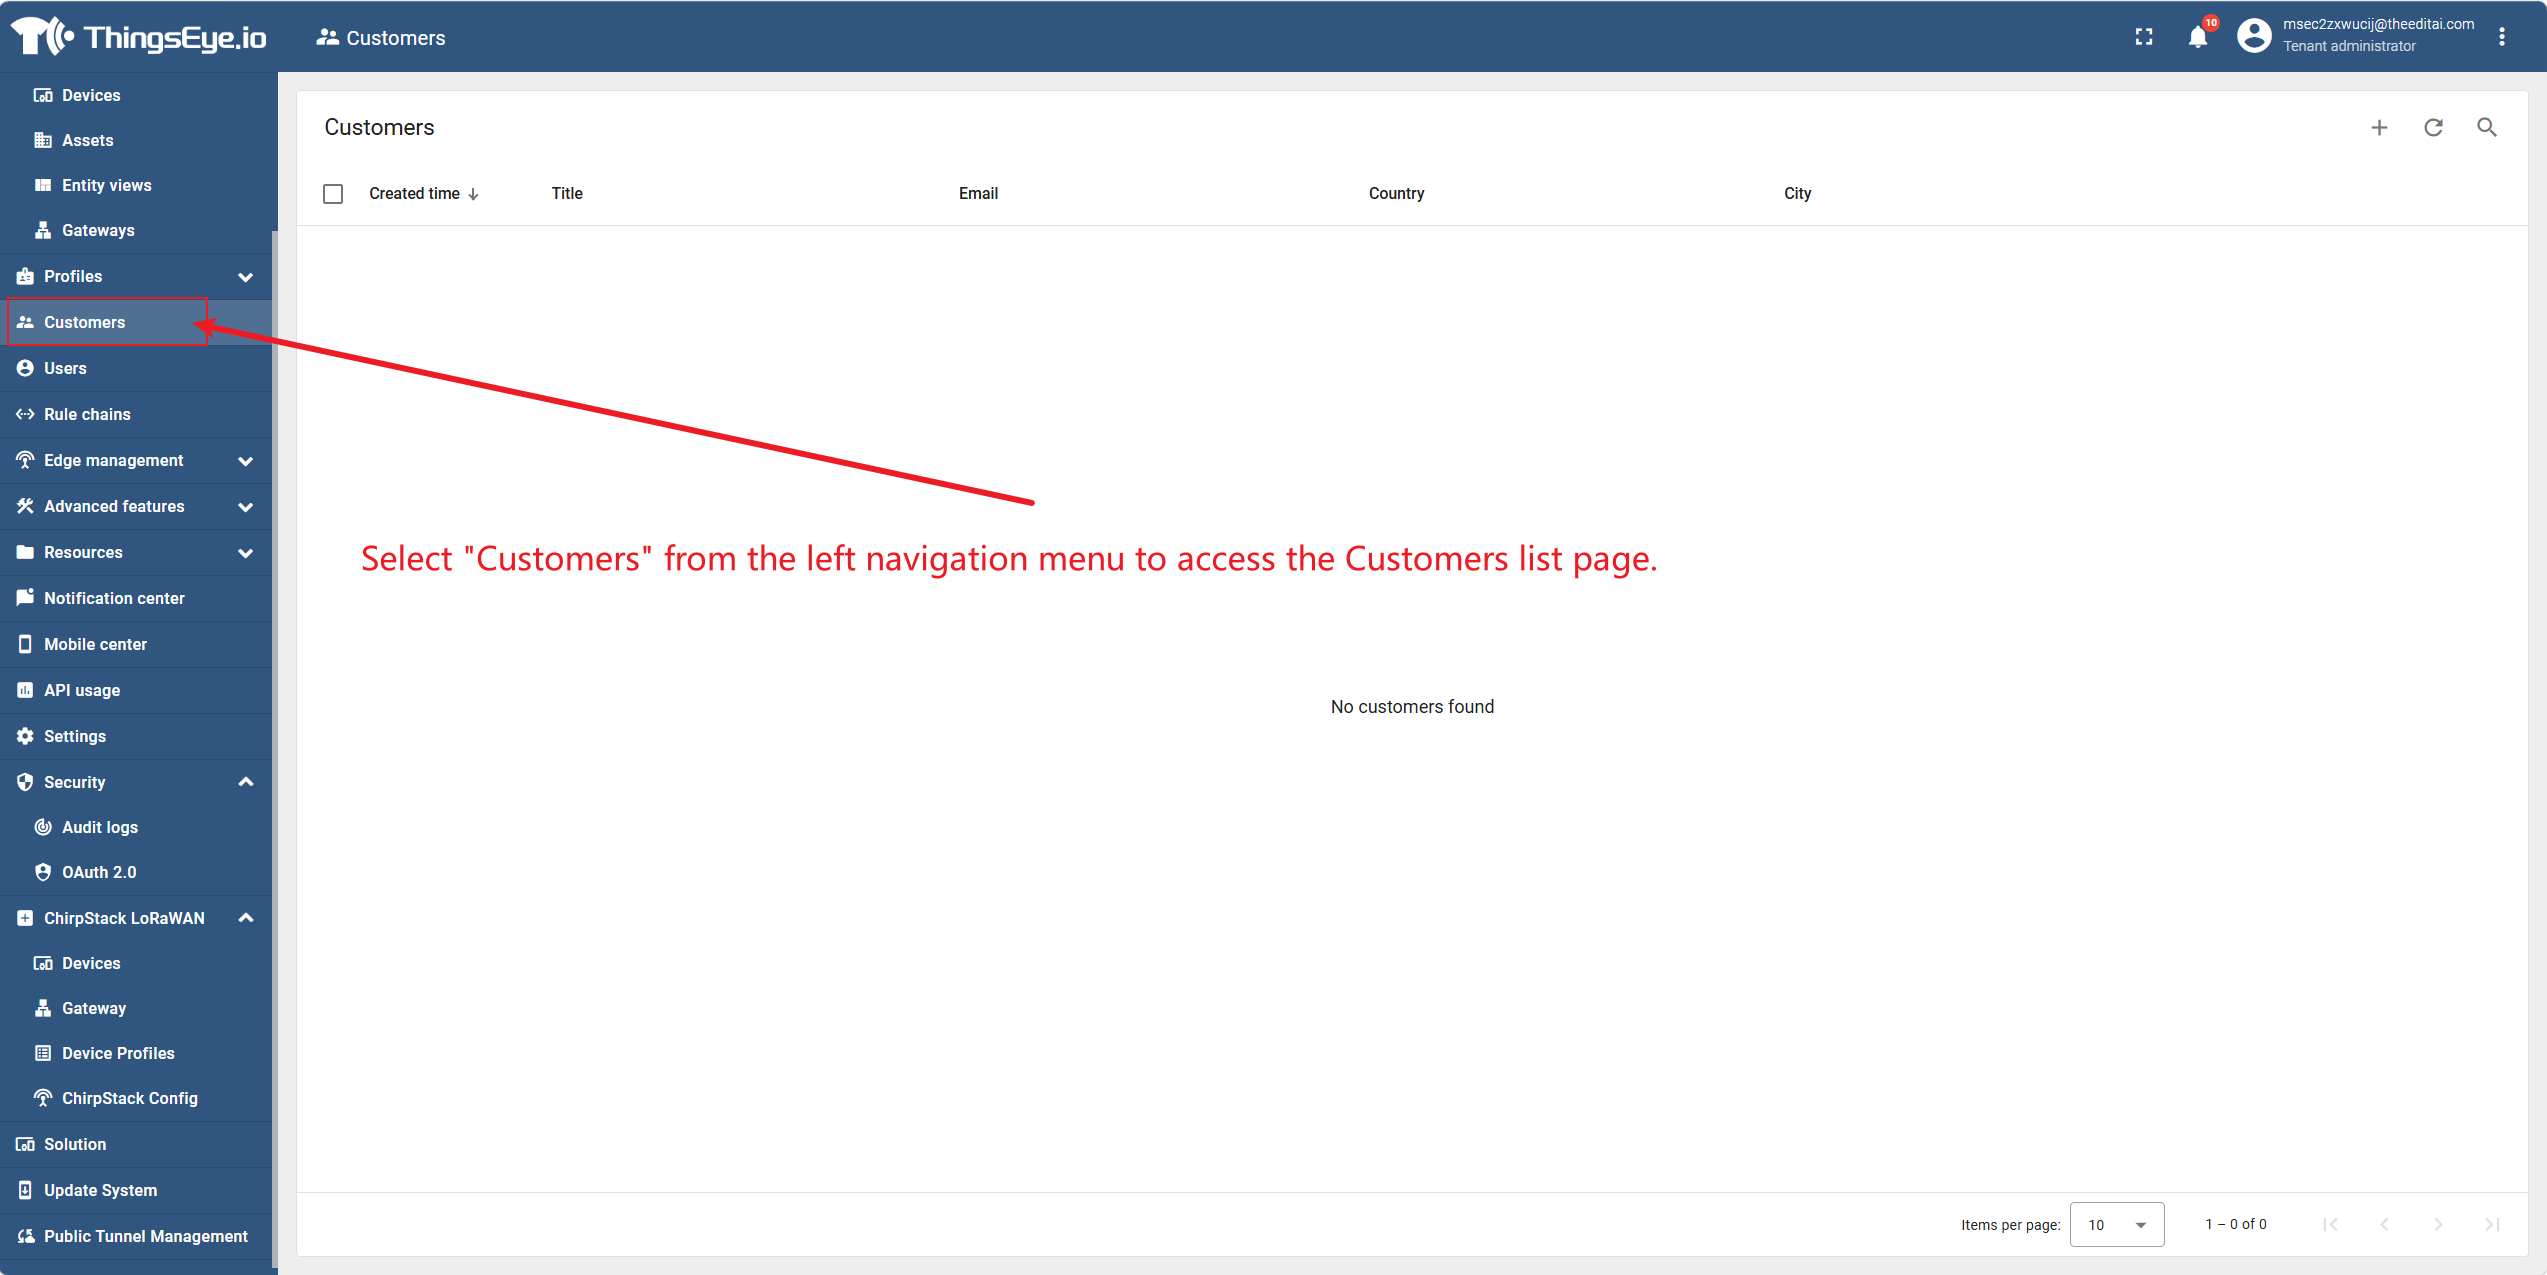
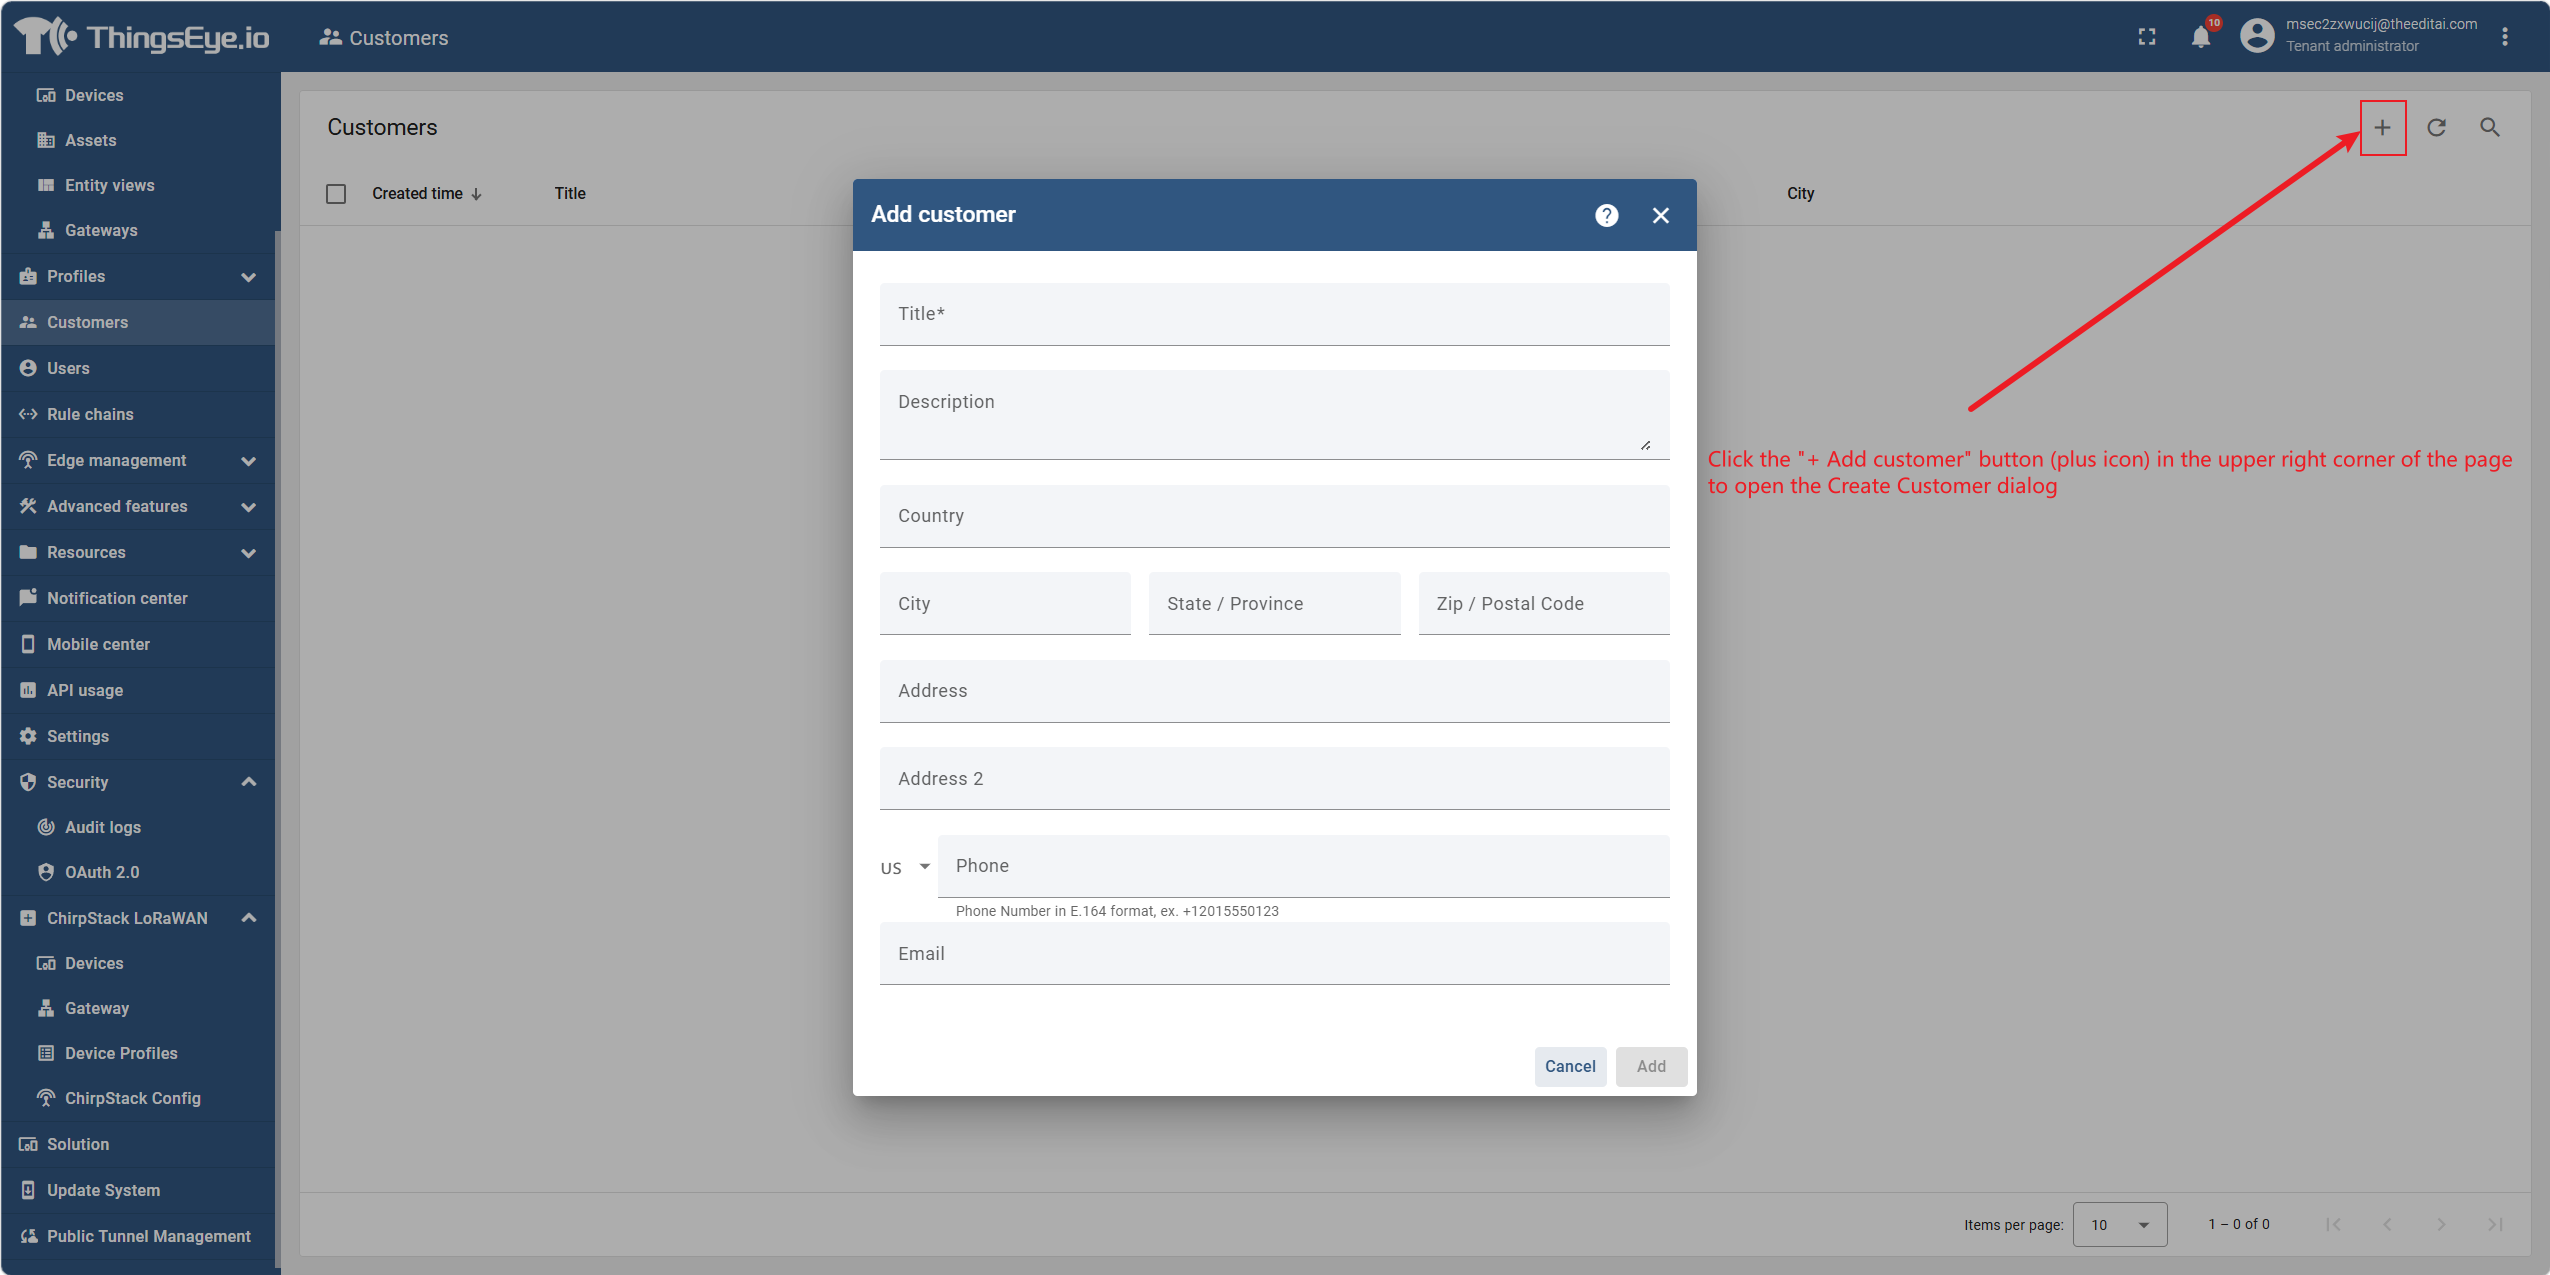
Step 2: Open the Create Customer dialog
Click the "+ Add Customer" button (plus icon) in the upper‑right corner of the page to open the Create Customer dialog.
Step 3: Fill in basic customer information
Fill in the basic customer information in the dialog.
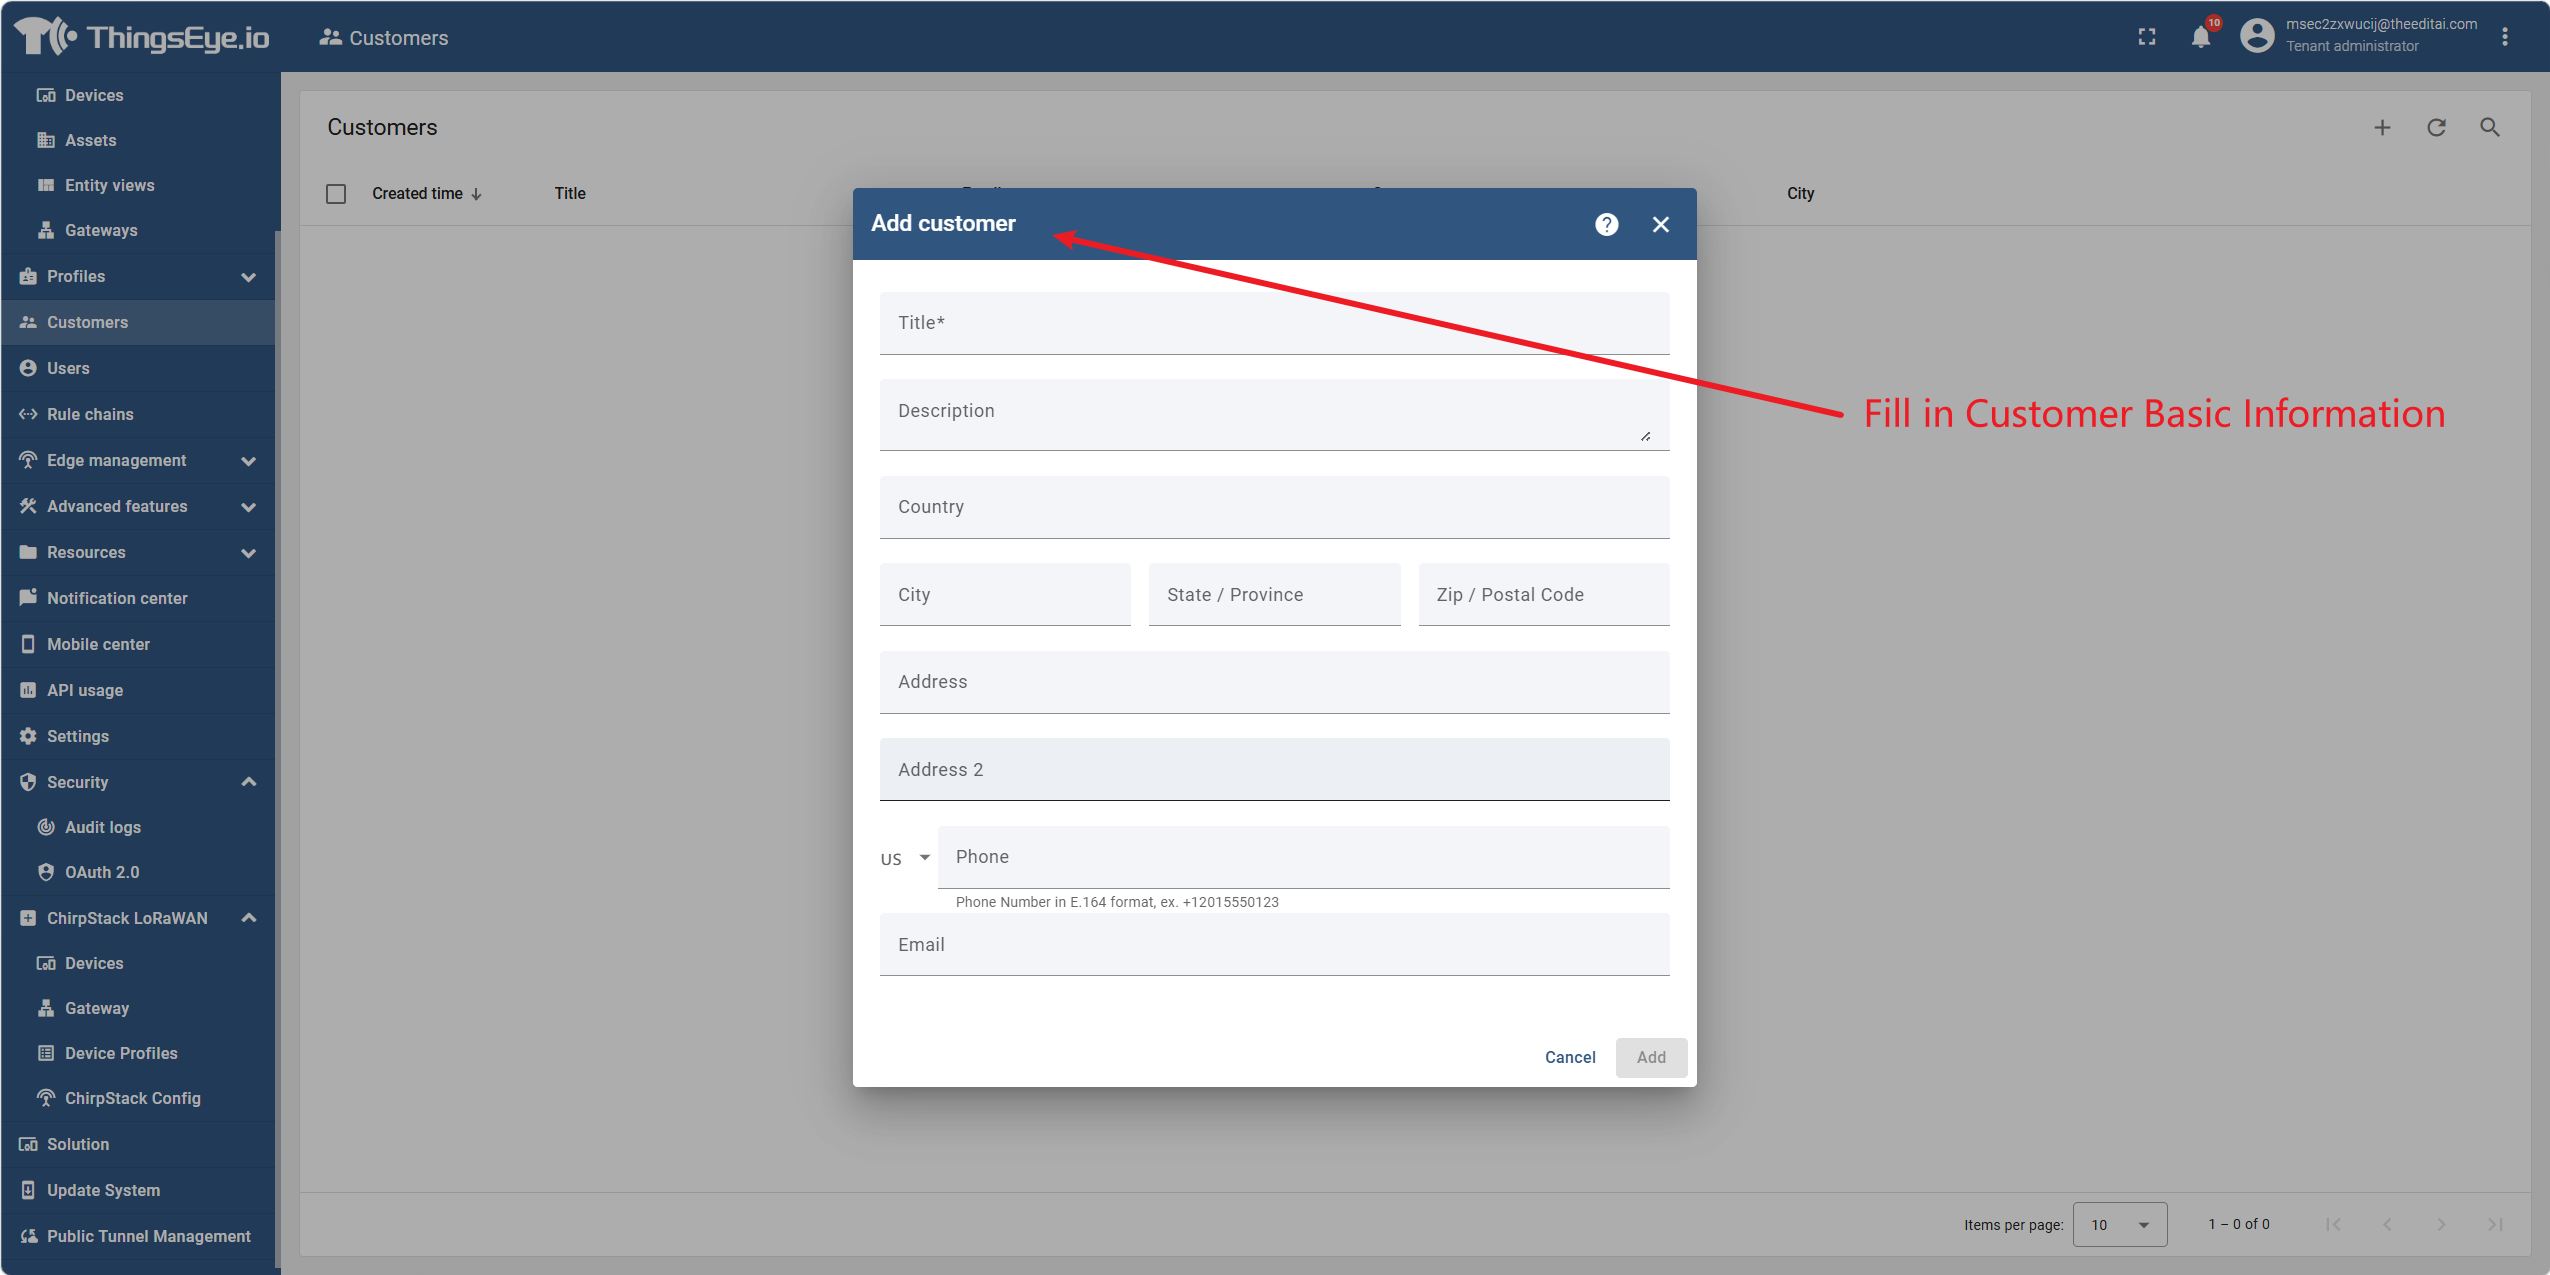
Note: The Title field is required; all other fields are optional.
Step 4: Configure owners and groups (optional)
Some versions support configuring owners and groups when creating a customer. Click the "Next: Owners and Groups" button to go to the second step.
- Owners: You can assign different owners to this customer; leaving it blank defaults to the current Tenant Administrator.
- Groups: You can assign the customer to an existing group or create a new customer group.
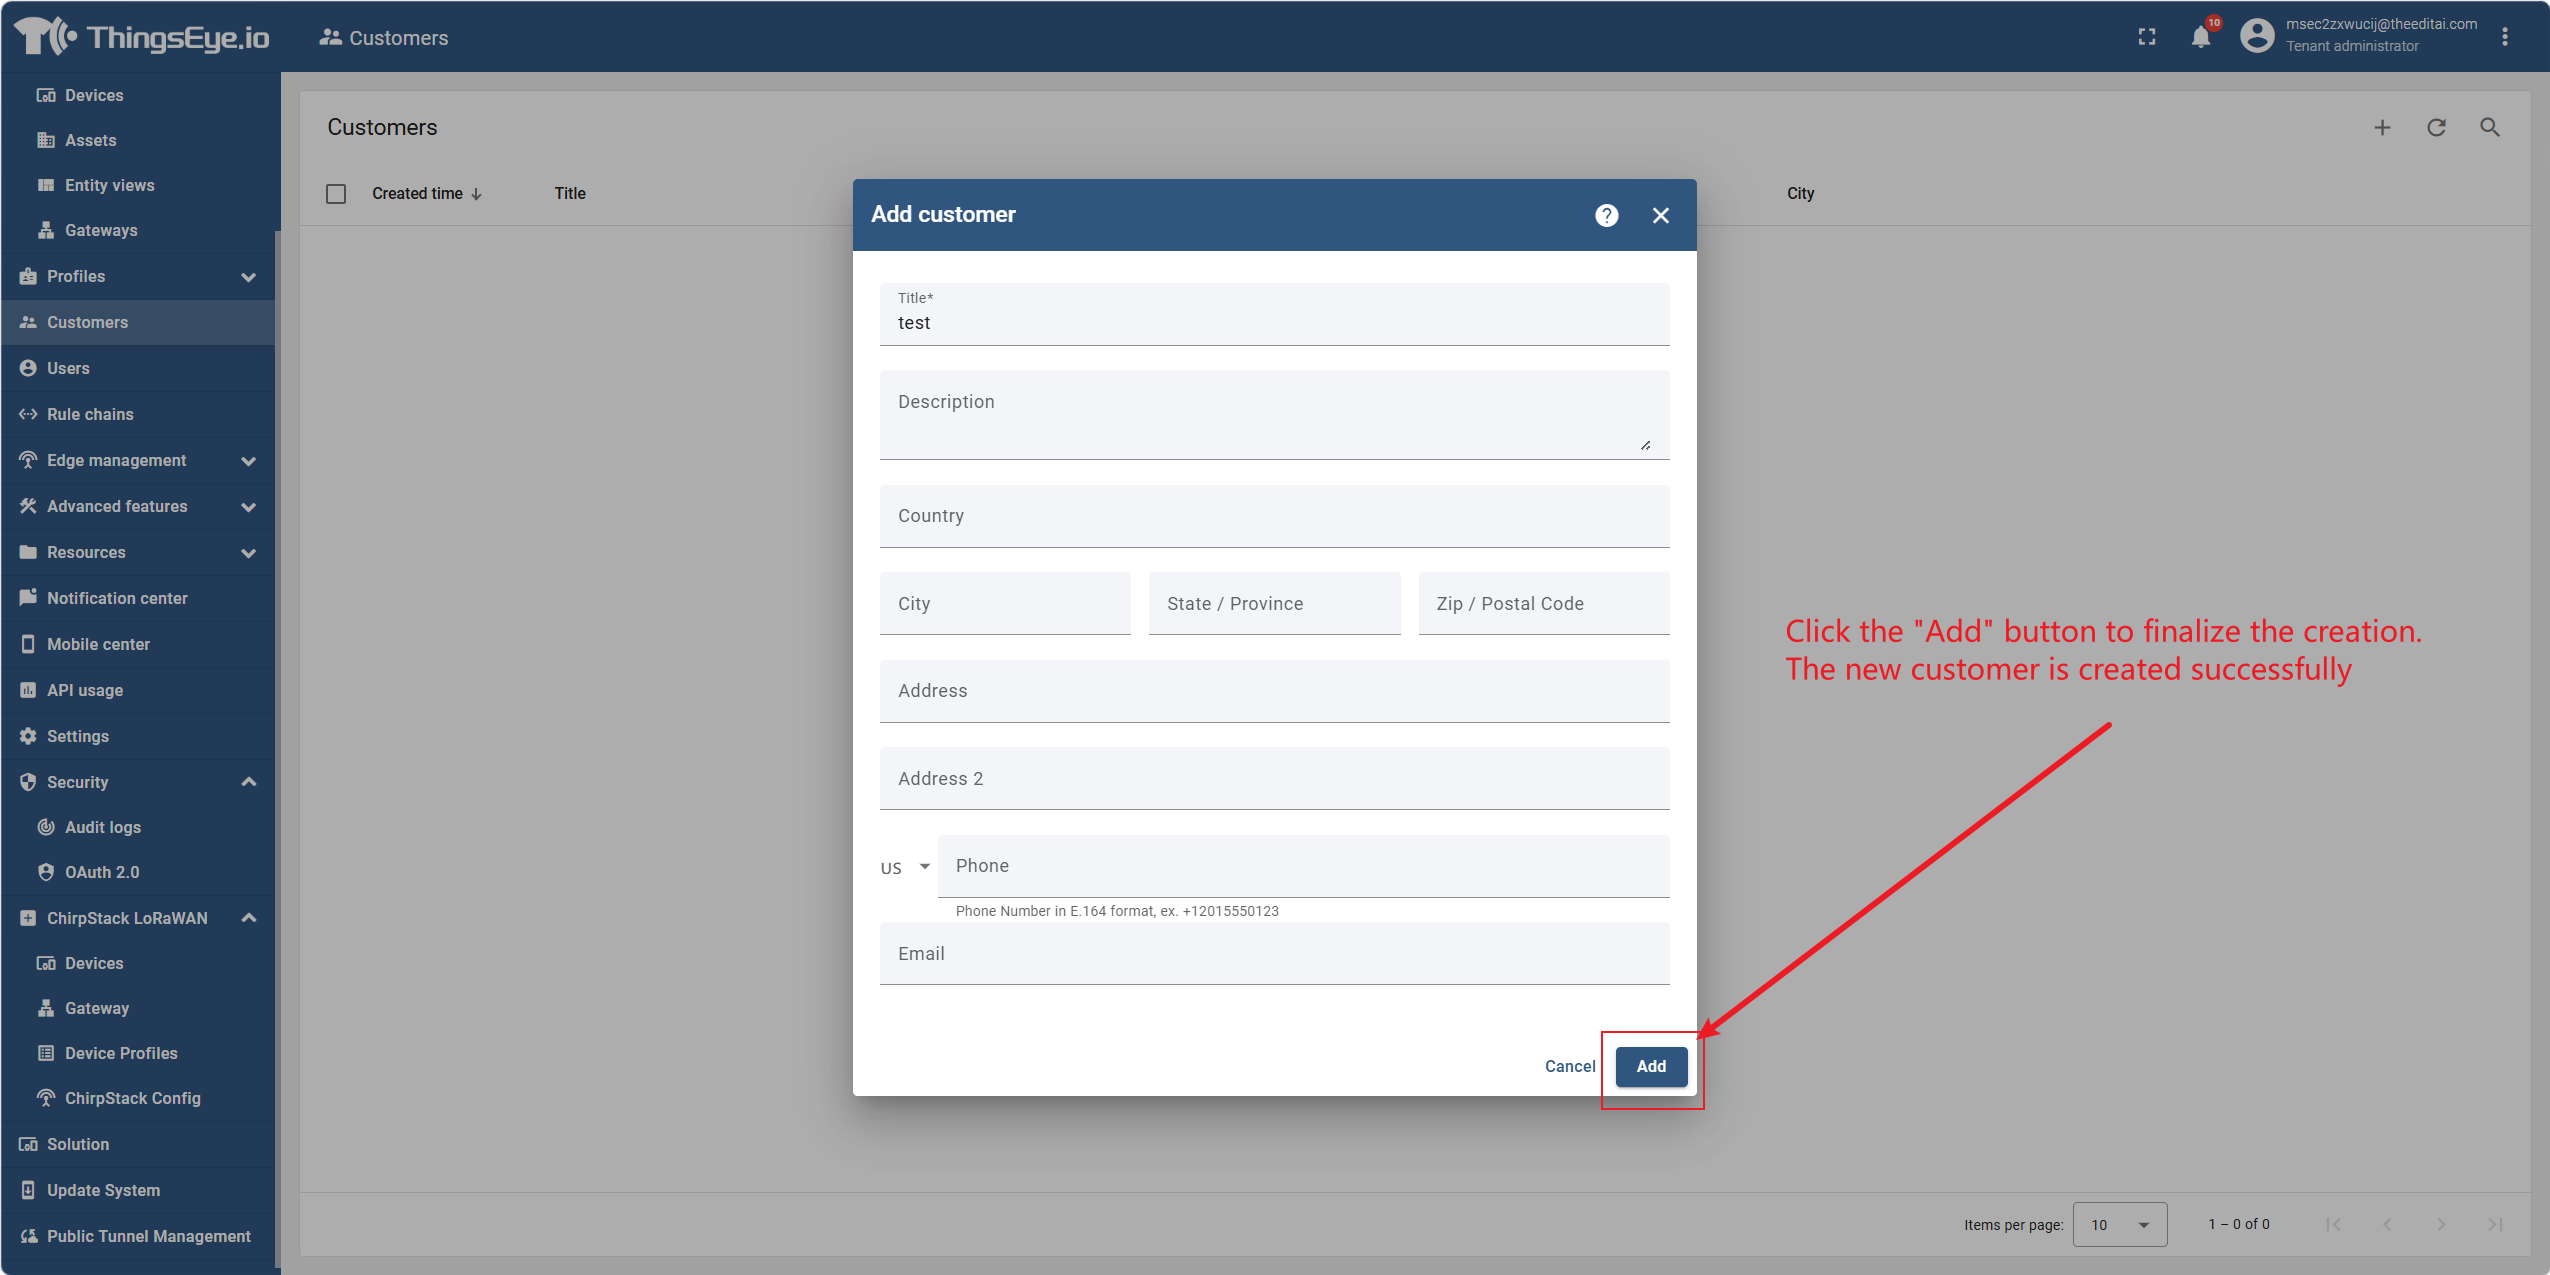
Step 5: Complete the creation
Click the "Add" button to complete the creation. After the new customer is successfully created, it will appear in the customer list. You can directly manage the customer's users and entities (devices, assets, dashboards, etc.) from the customer row in the list.
2. Edit a Customer
Procedure
Step 1: Go to the Customers page
Select "Customers" from the left navigation menu to go to the customer list page.
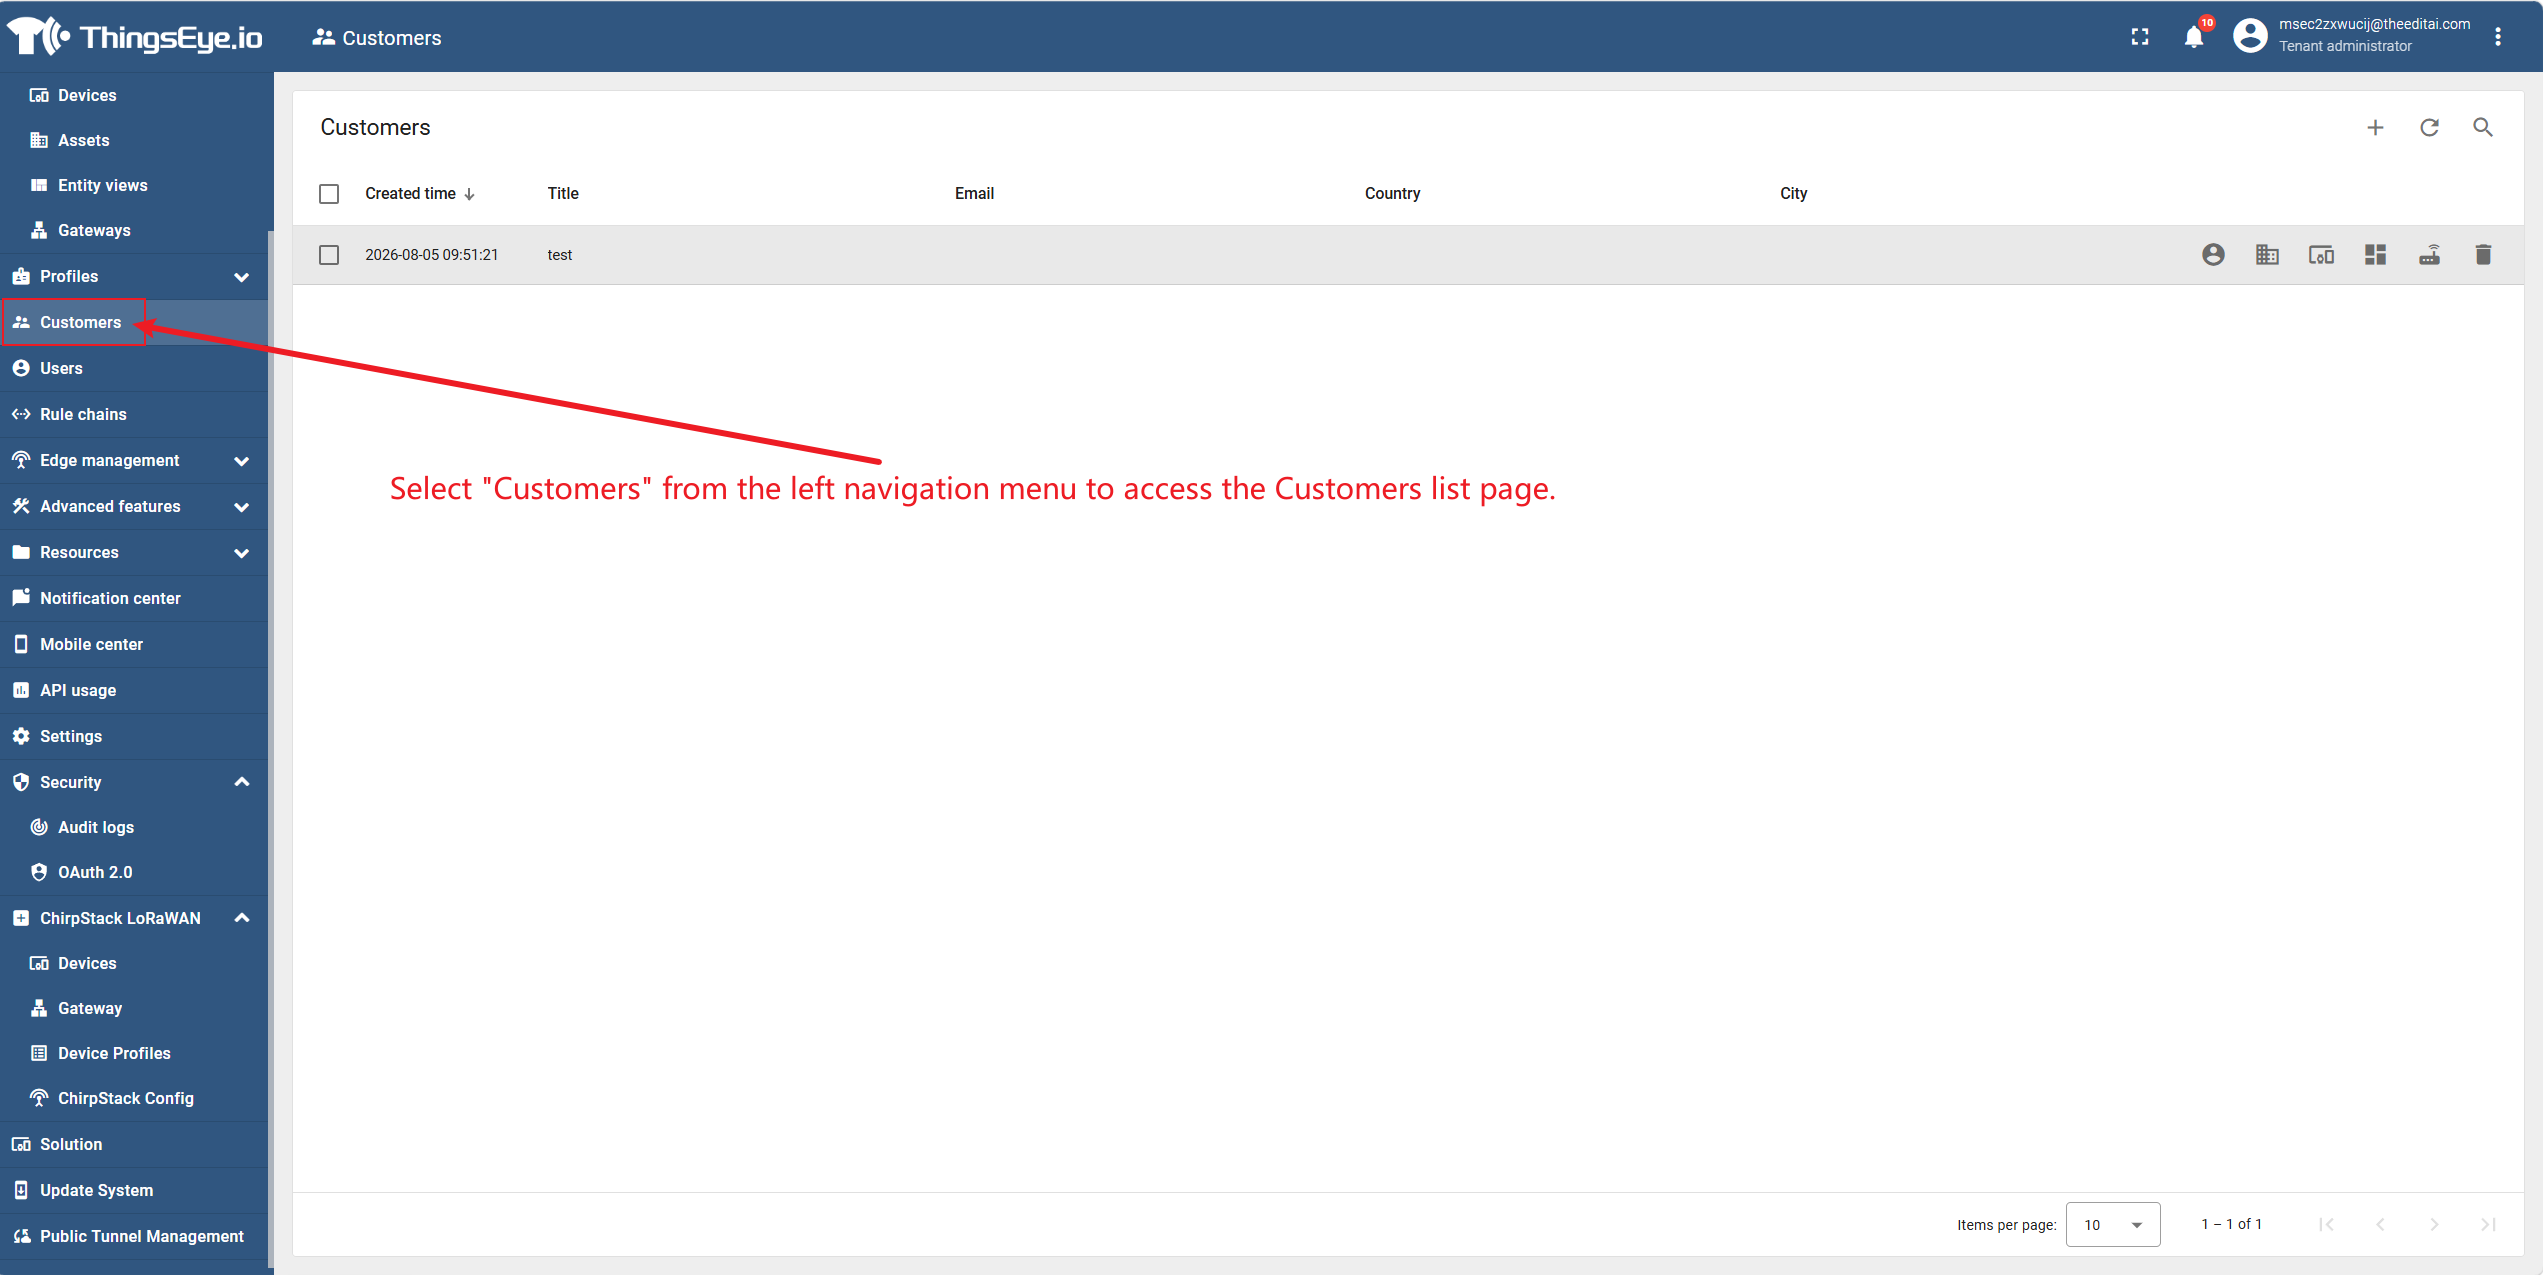
Step 2: Open the customer details
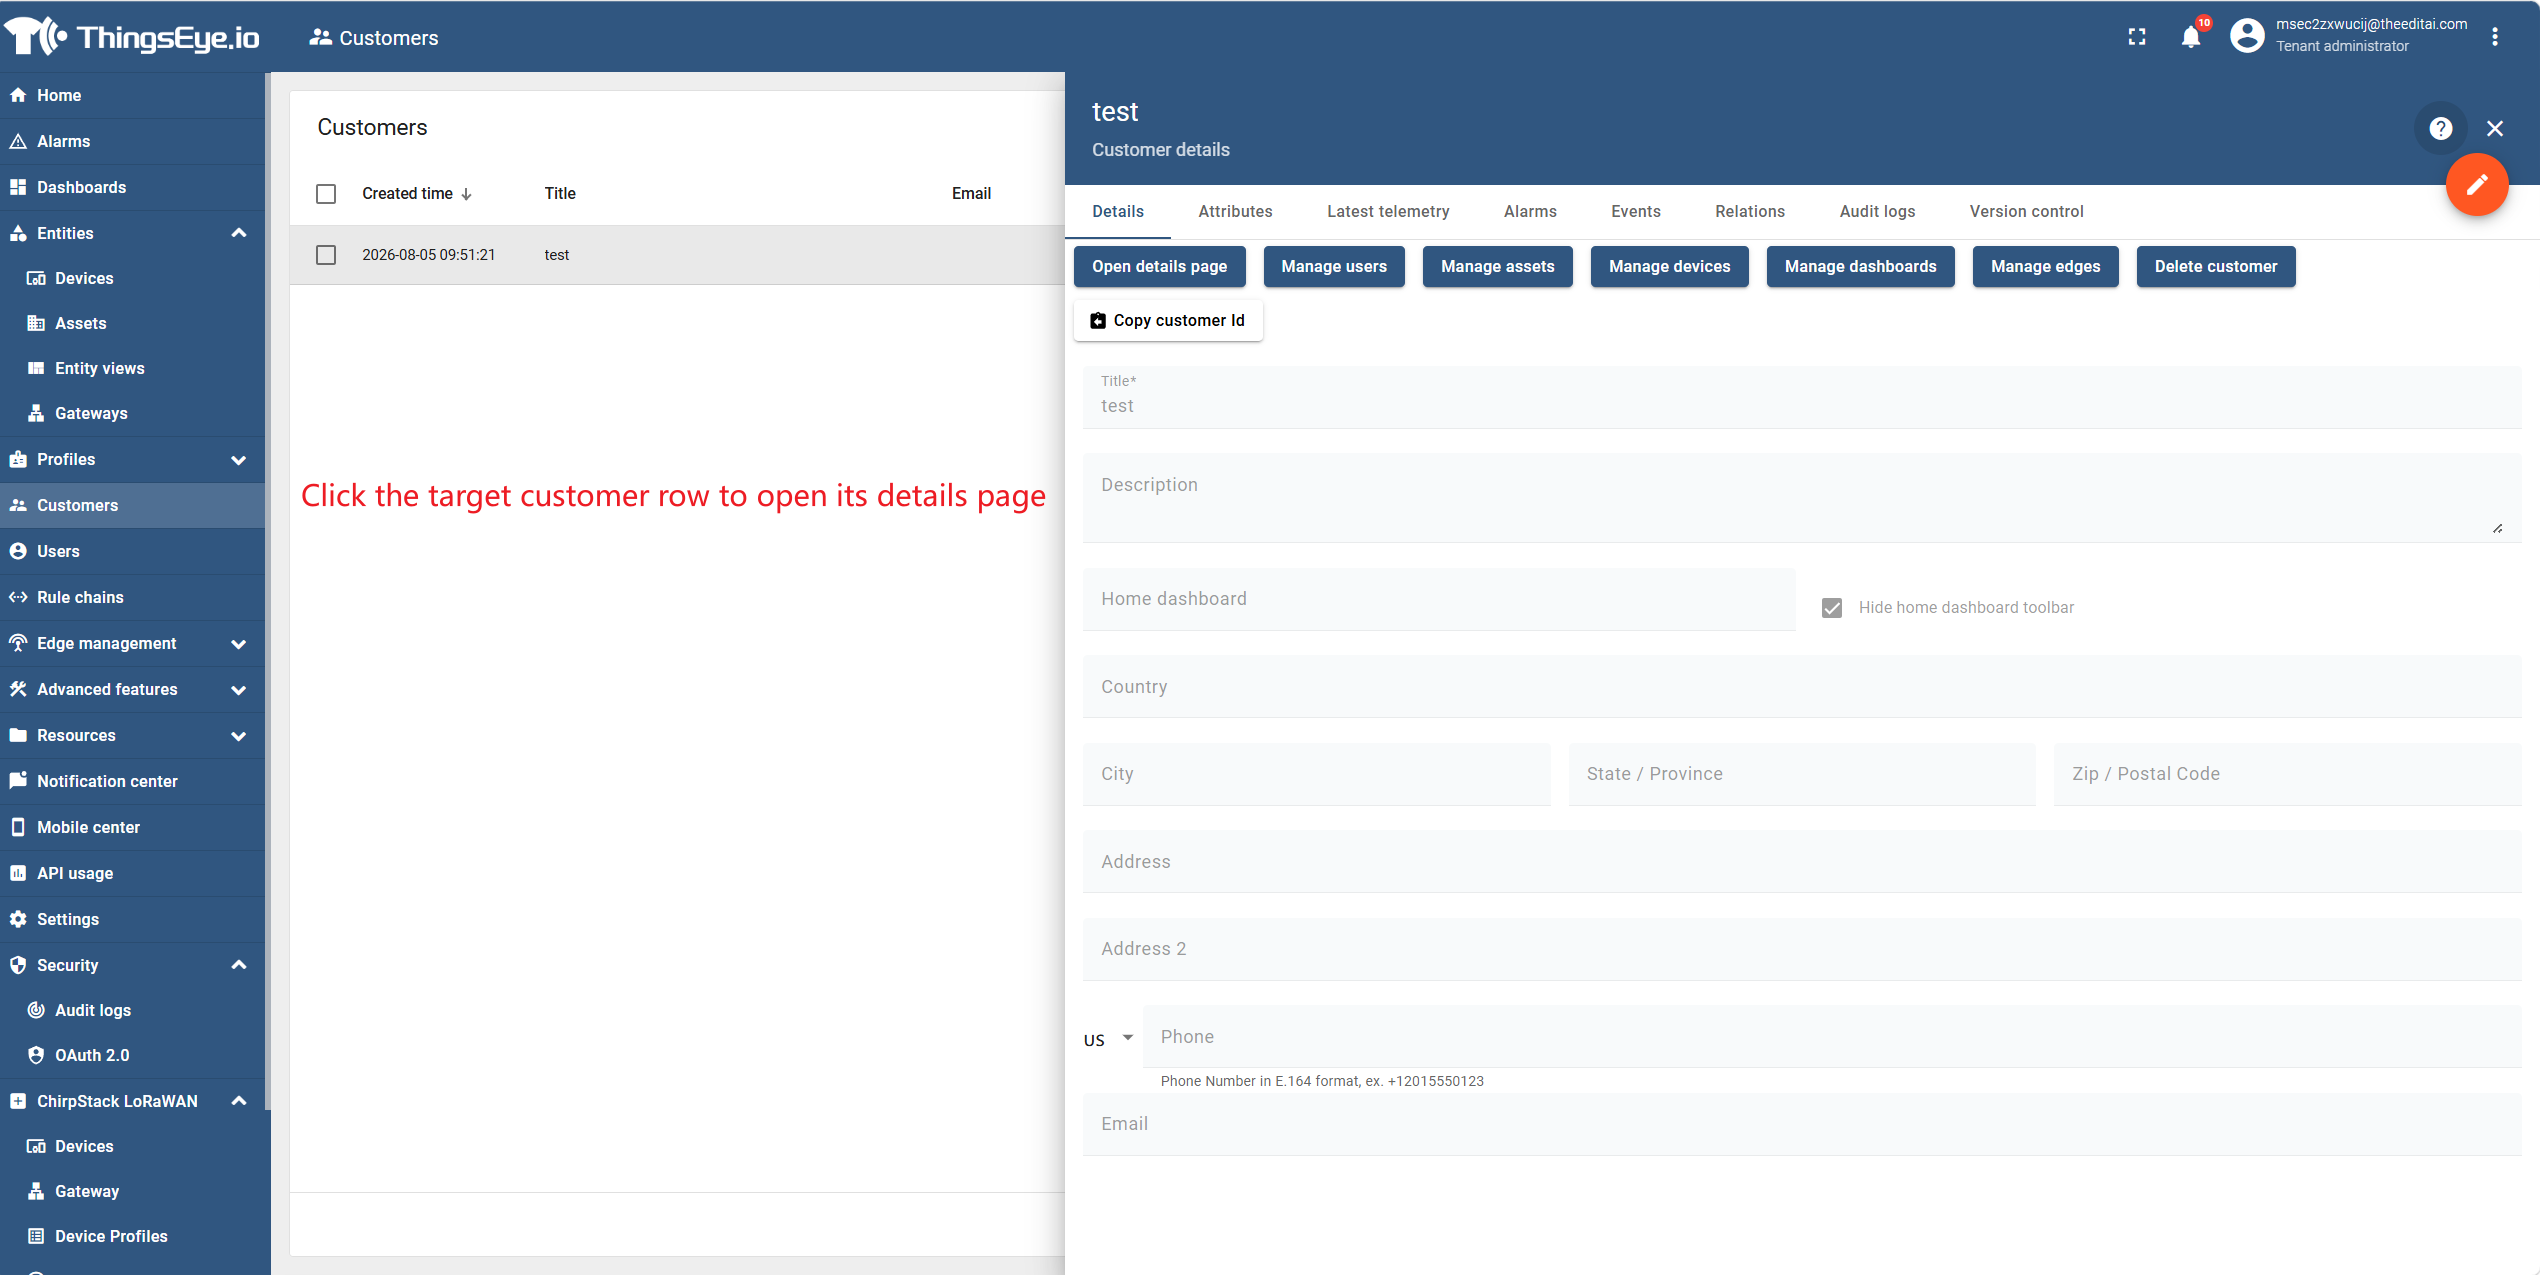
Click the row of the target customer to open its details page.
Step 3: Enter edit mode
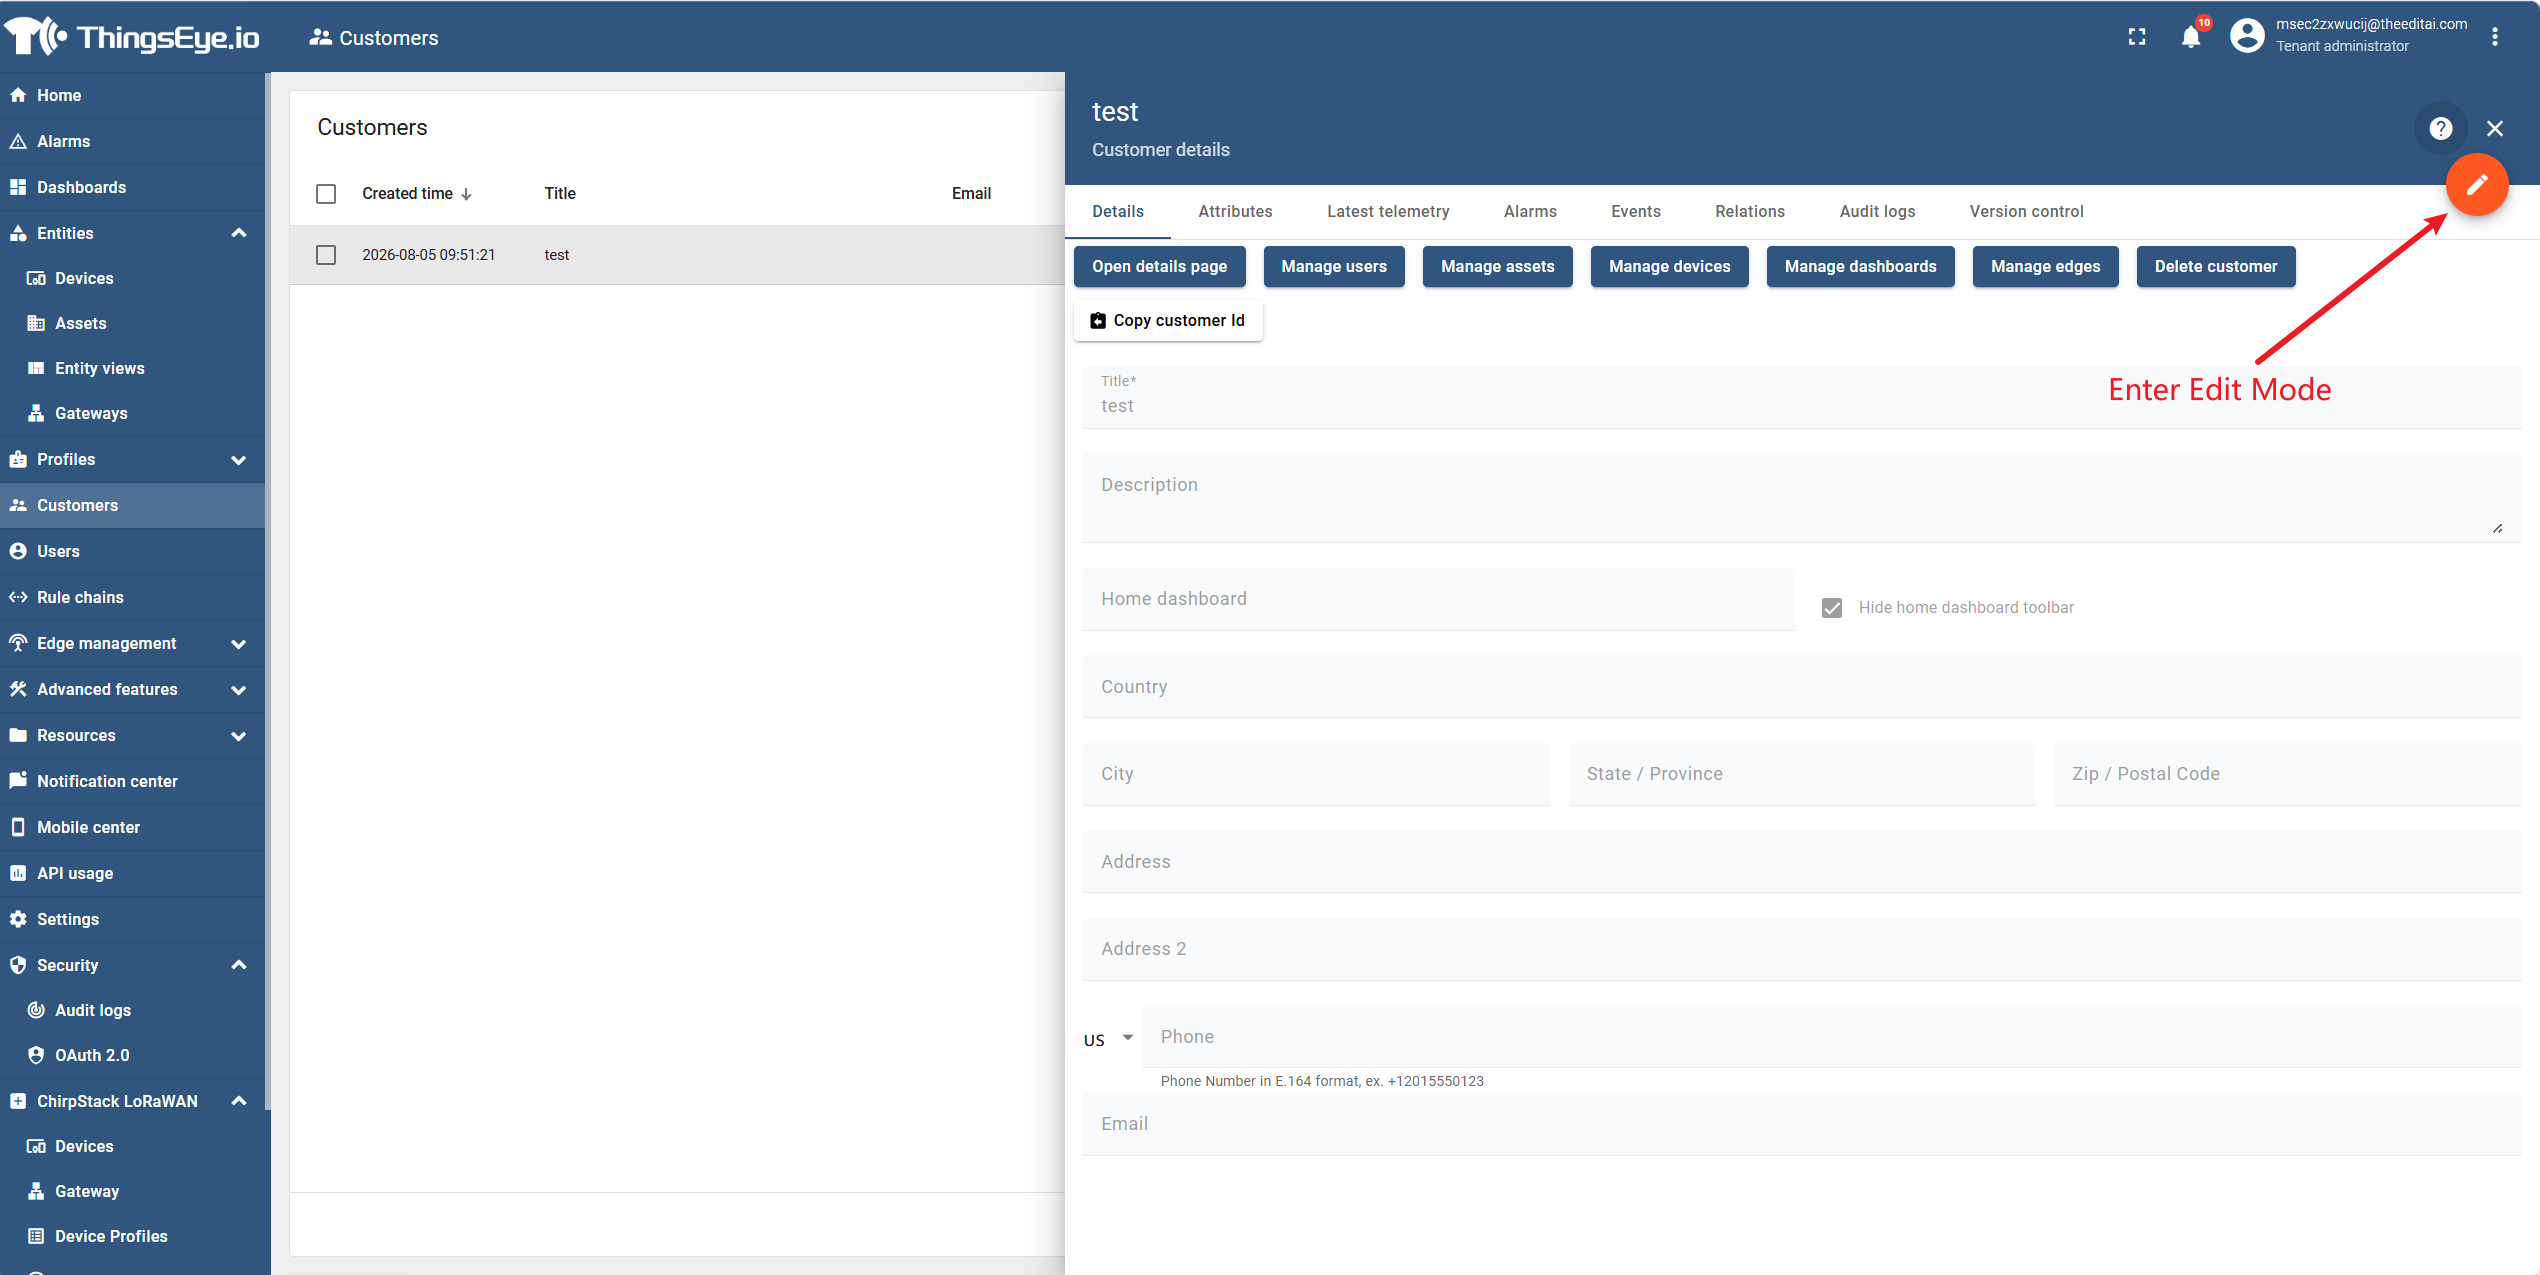
On the customer details page, click the orange pencil icon (edit button) to enter edit mode.
Step 4: Modify customer information
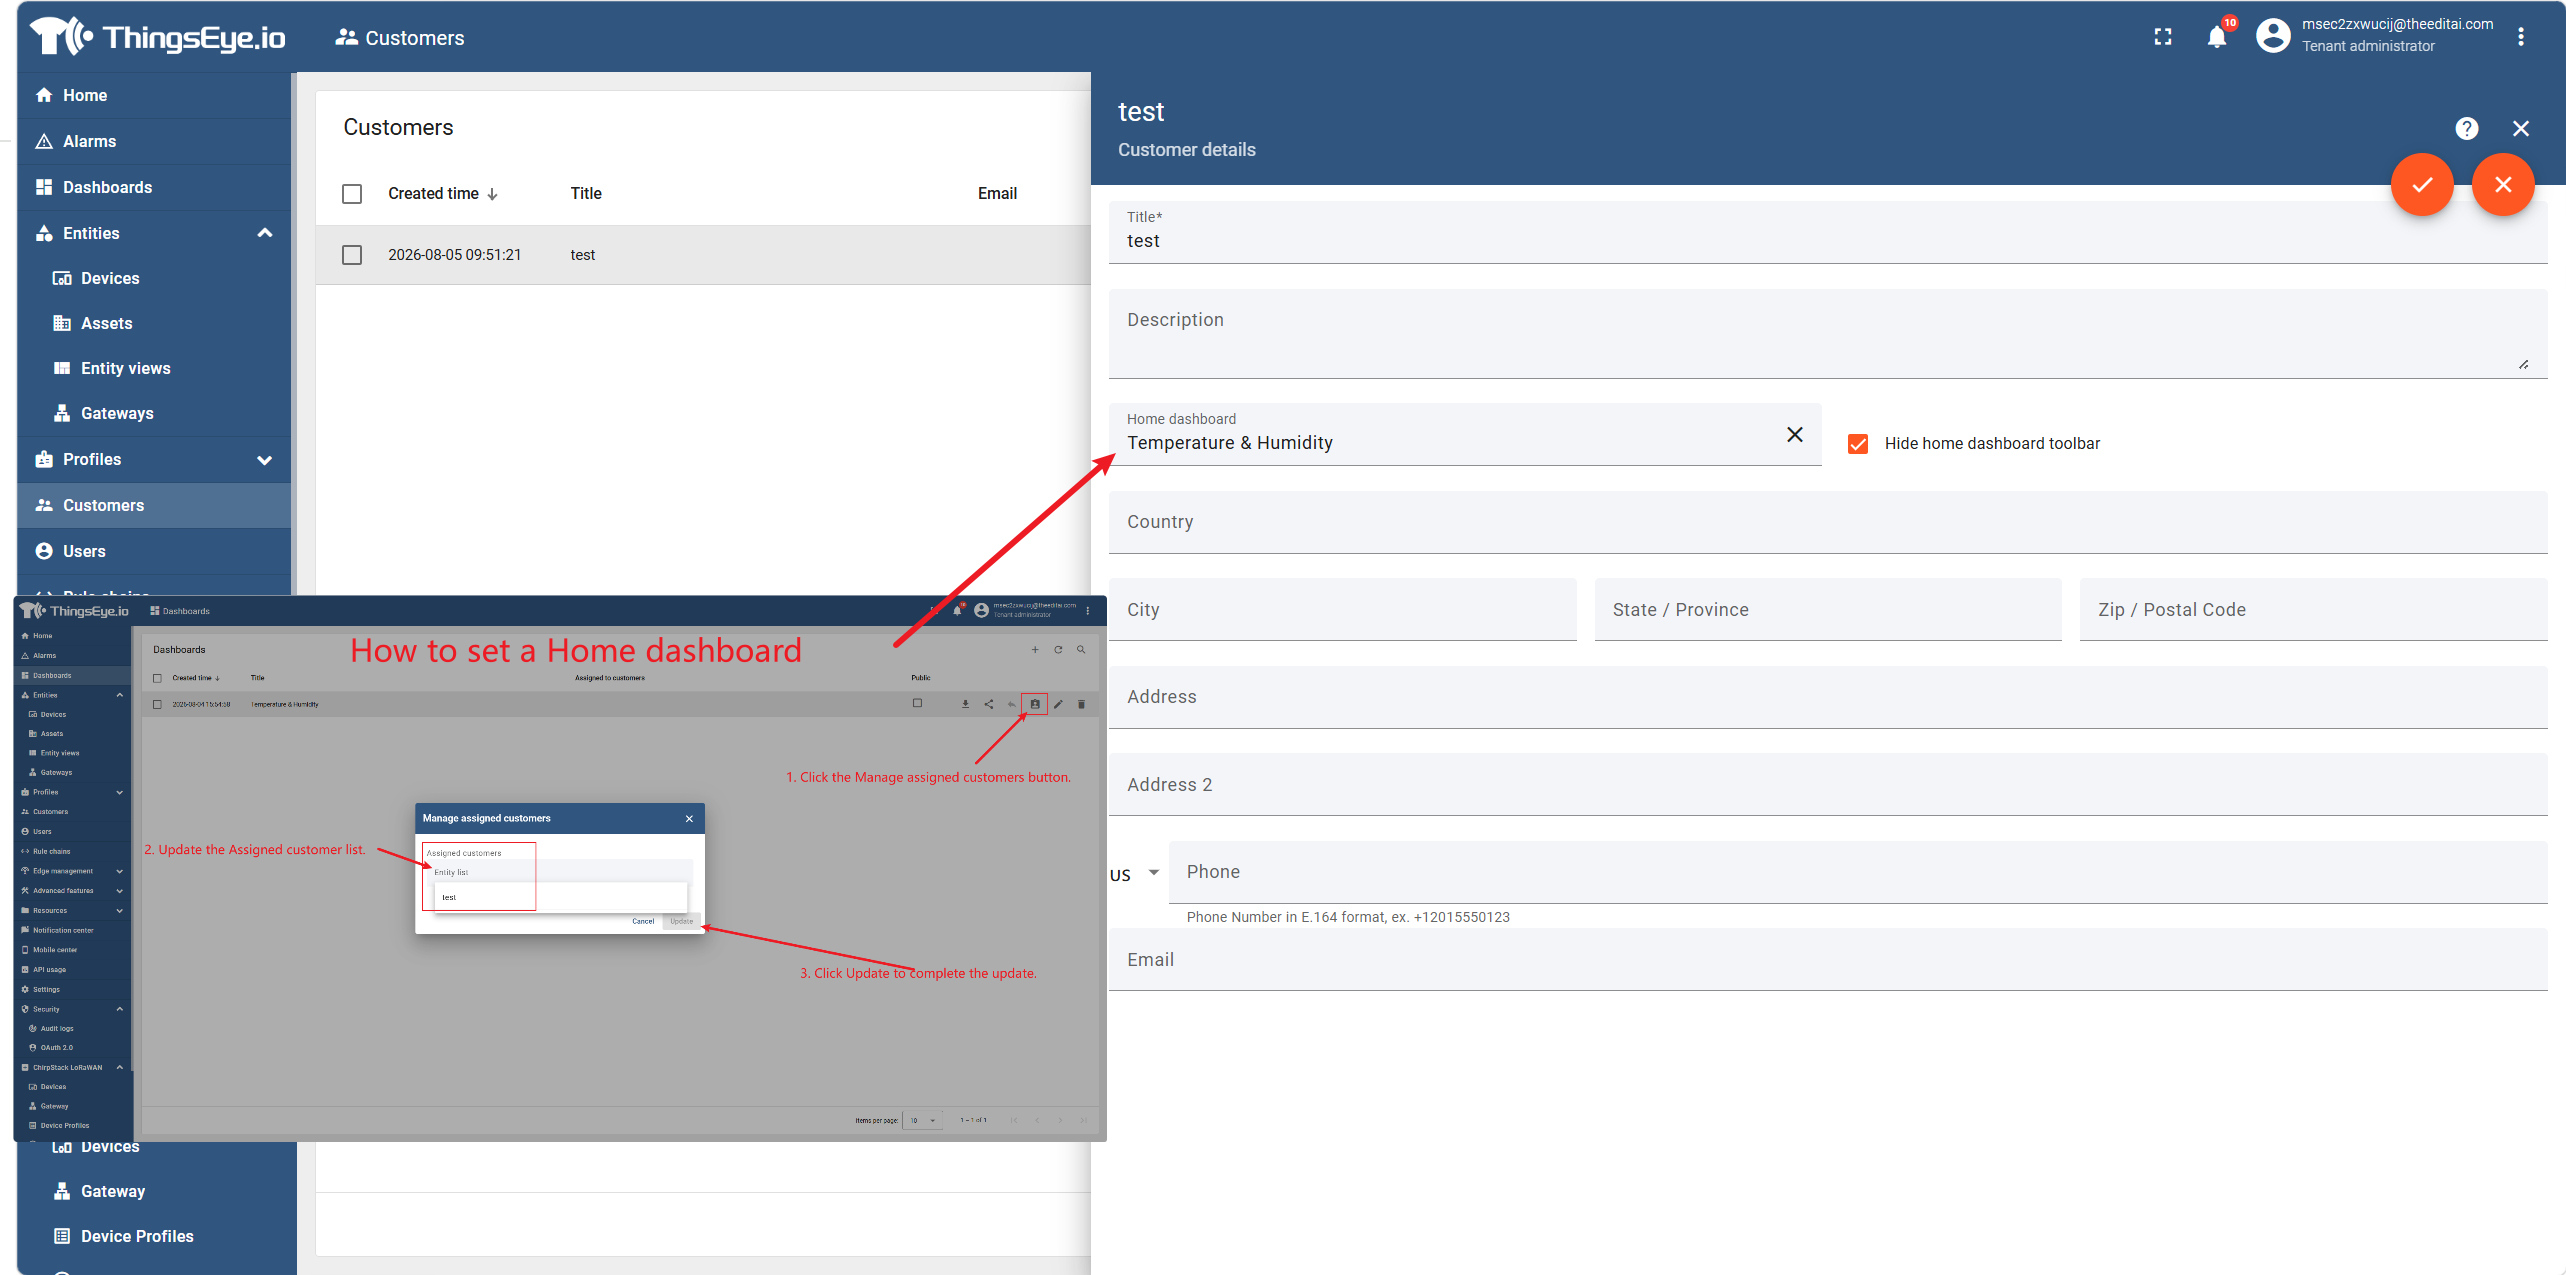
In edit mode, modify the fields that need updating.
Note: The Title field is required and cannot be left empty. The "Home Dashboard" field dropdown list only displays dashboards that already exist under the current tenant.
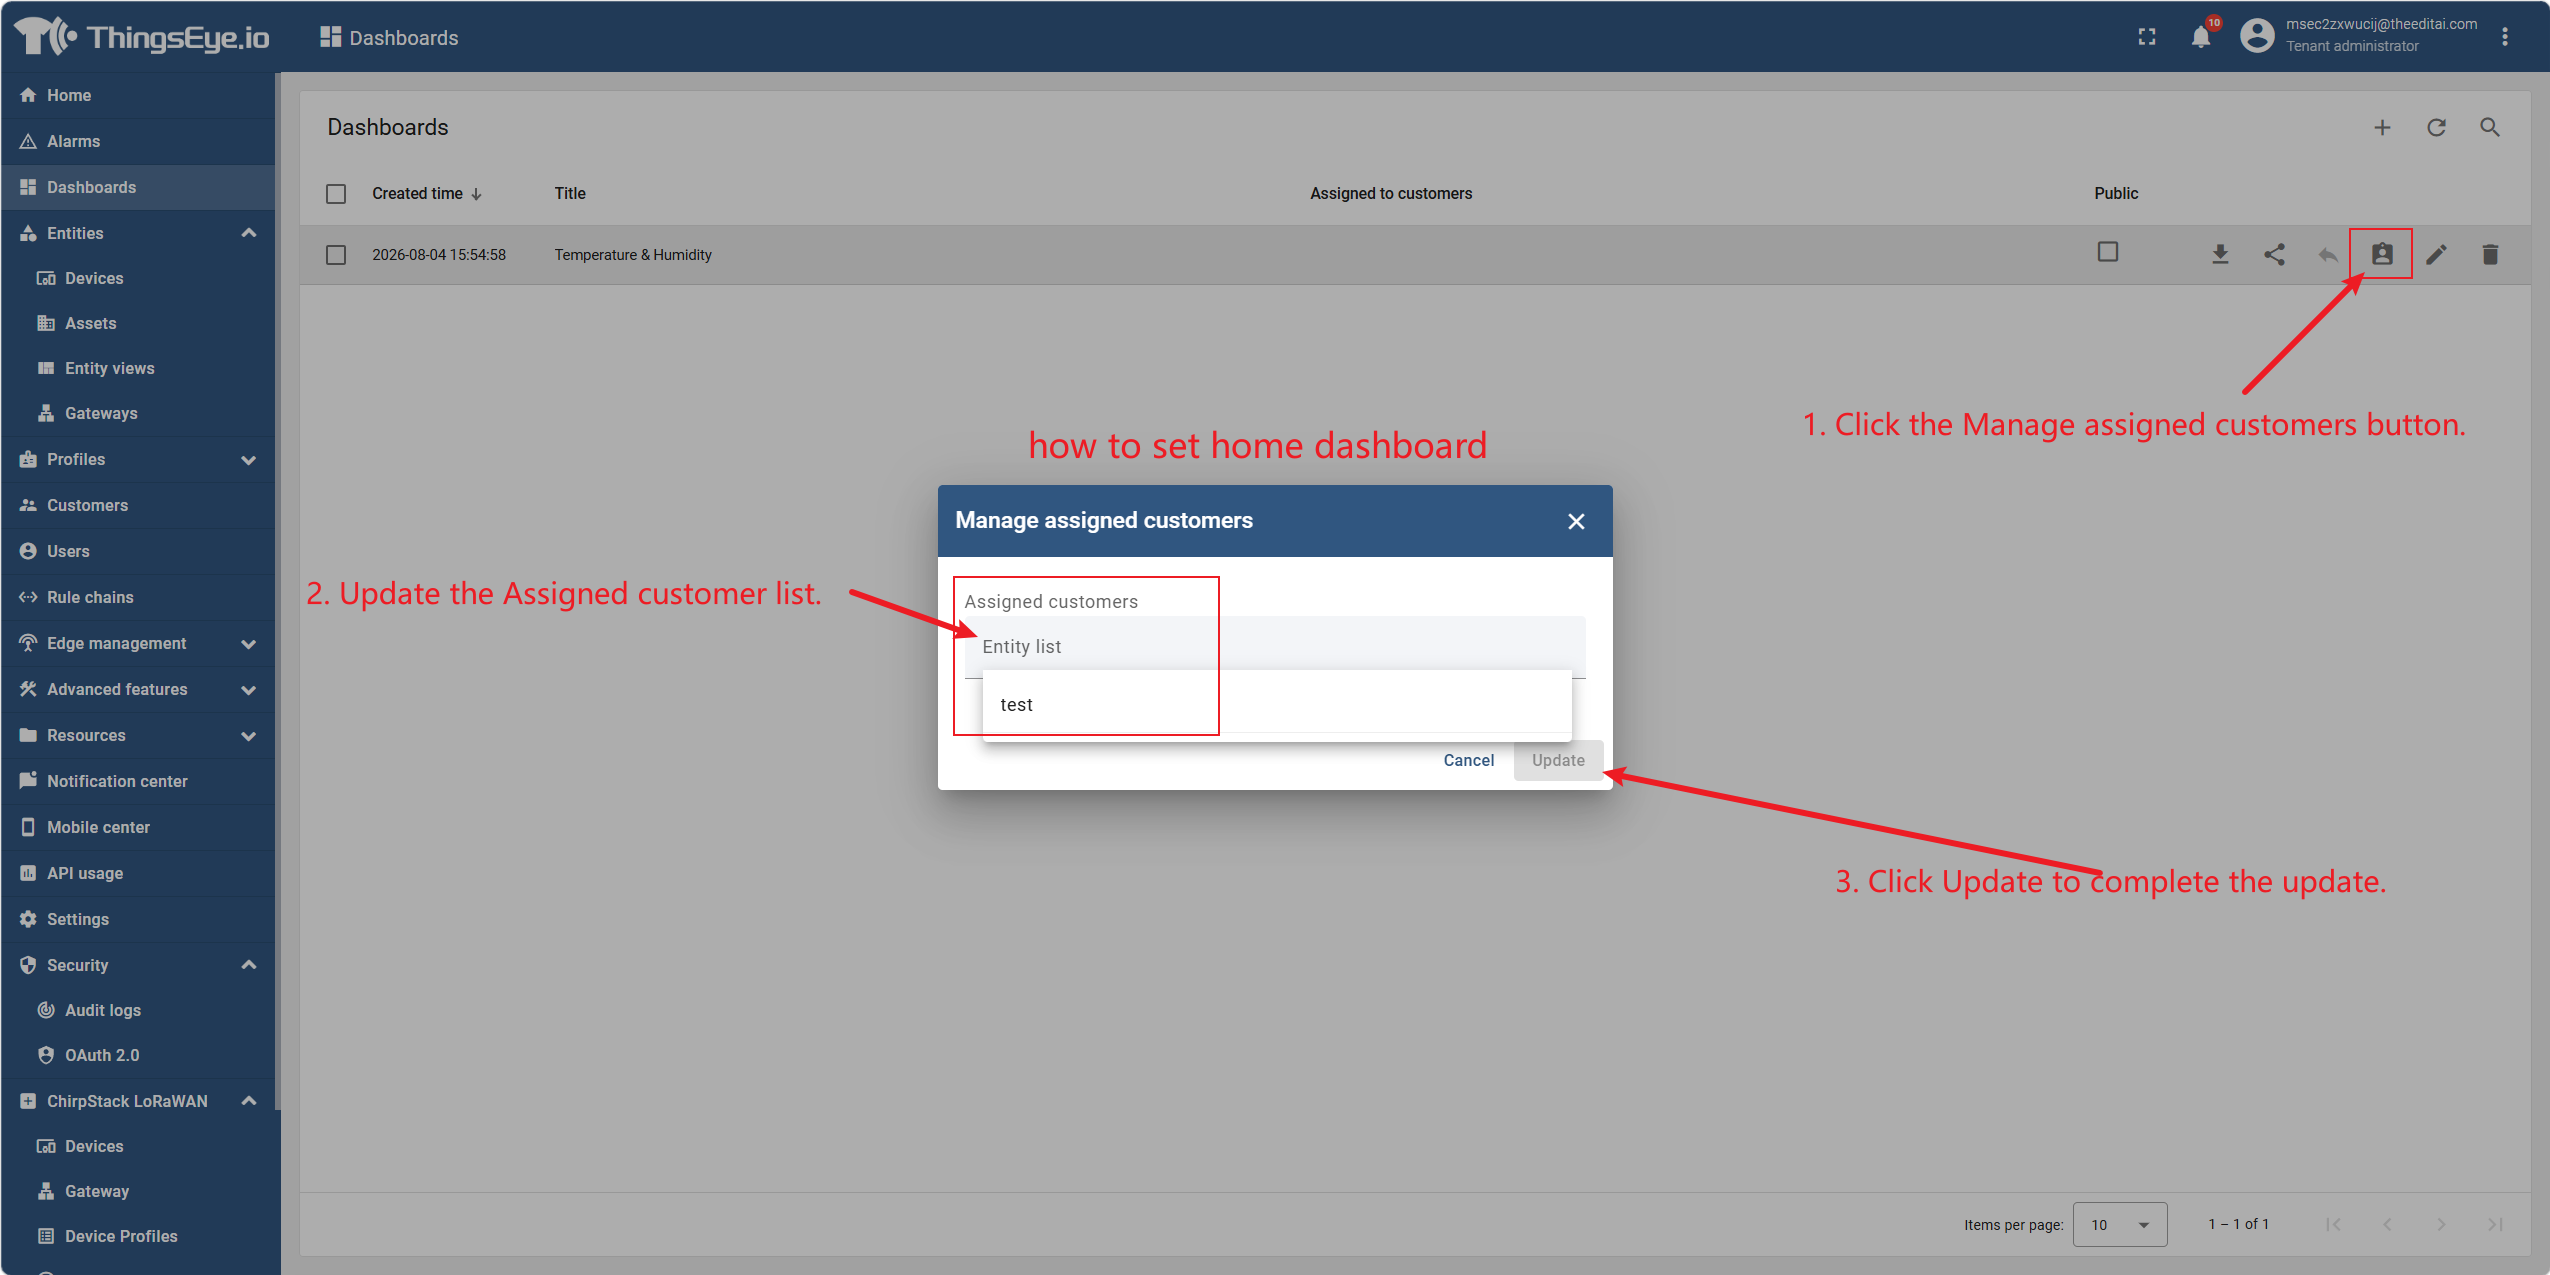
Step 5: Save changes
After modification, click the "Apply Changes" button to save. To discard changes, click the "Cancel" button to exit edit mode.
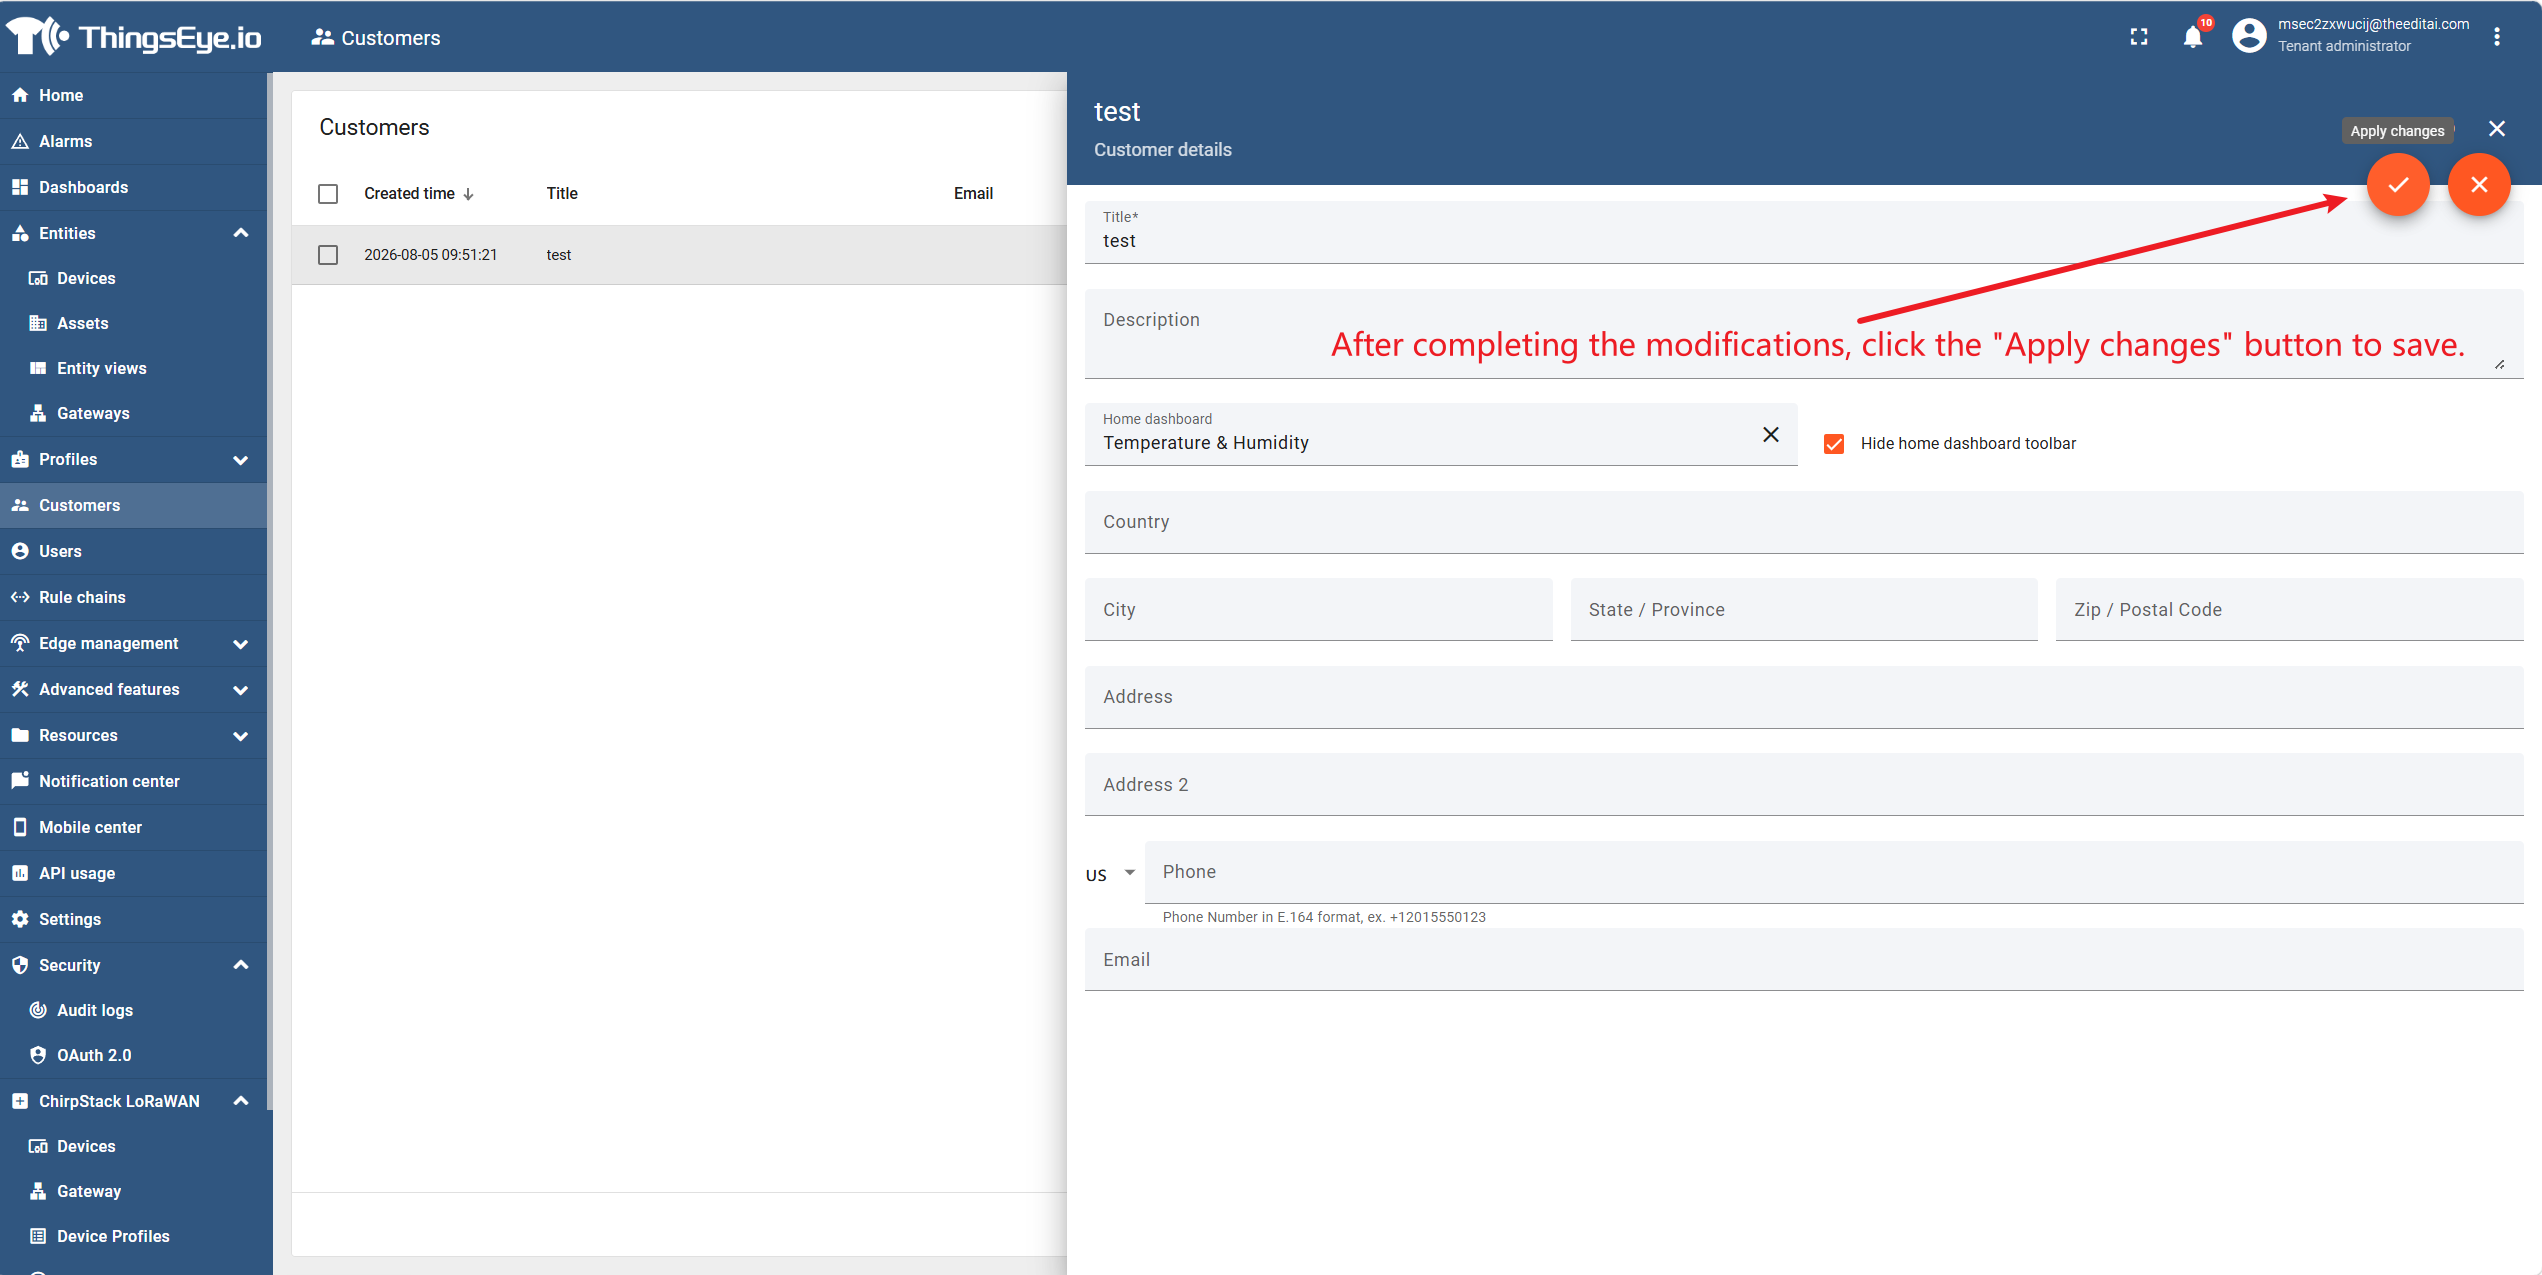
3. Delete a Customer
There are two ways to delete a customer: delete directly from the customer list or delete from the customer details page. Tenant Administrators may choose either method according to preference.
Method 1: Delete directly from the customer list
On the customer list page, locate the row of the target customer, click the trash can icon at the end of the row, and then click "Confirm" in the confirmation dialog to complete the deletion.
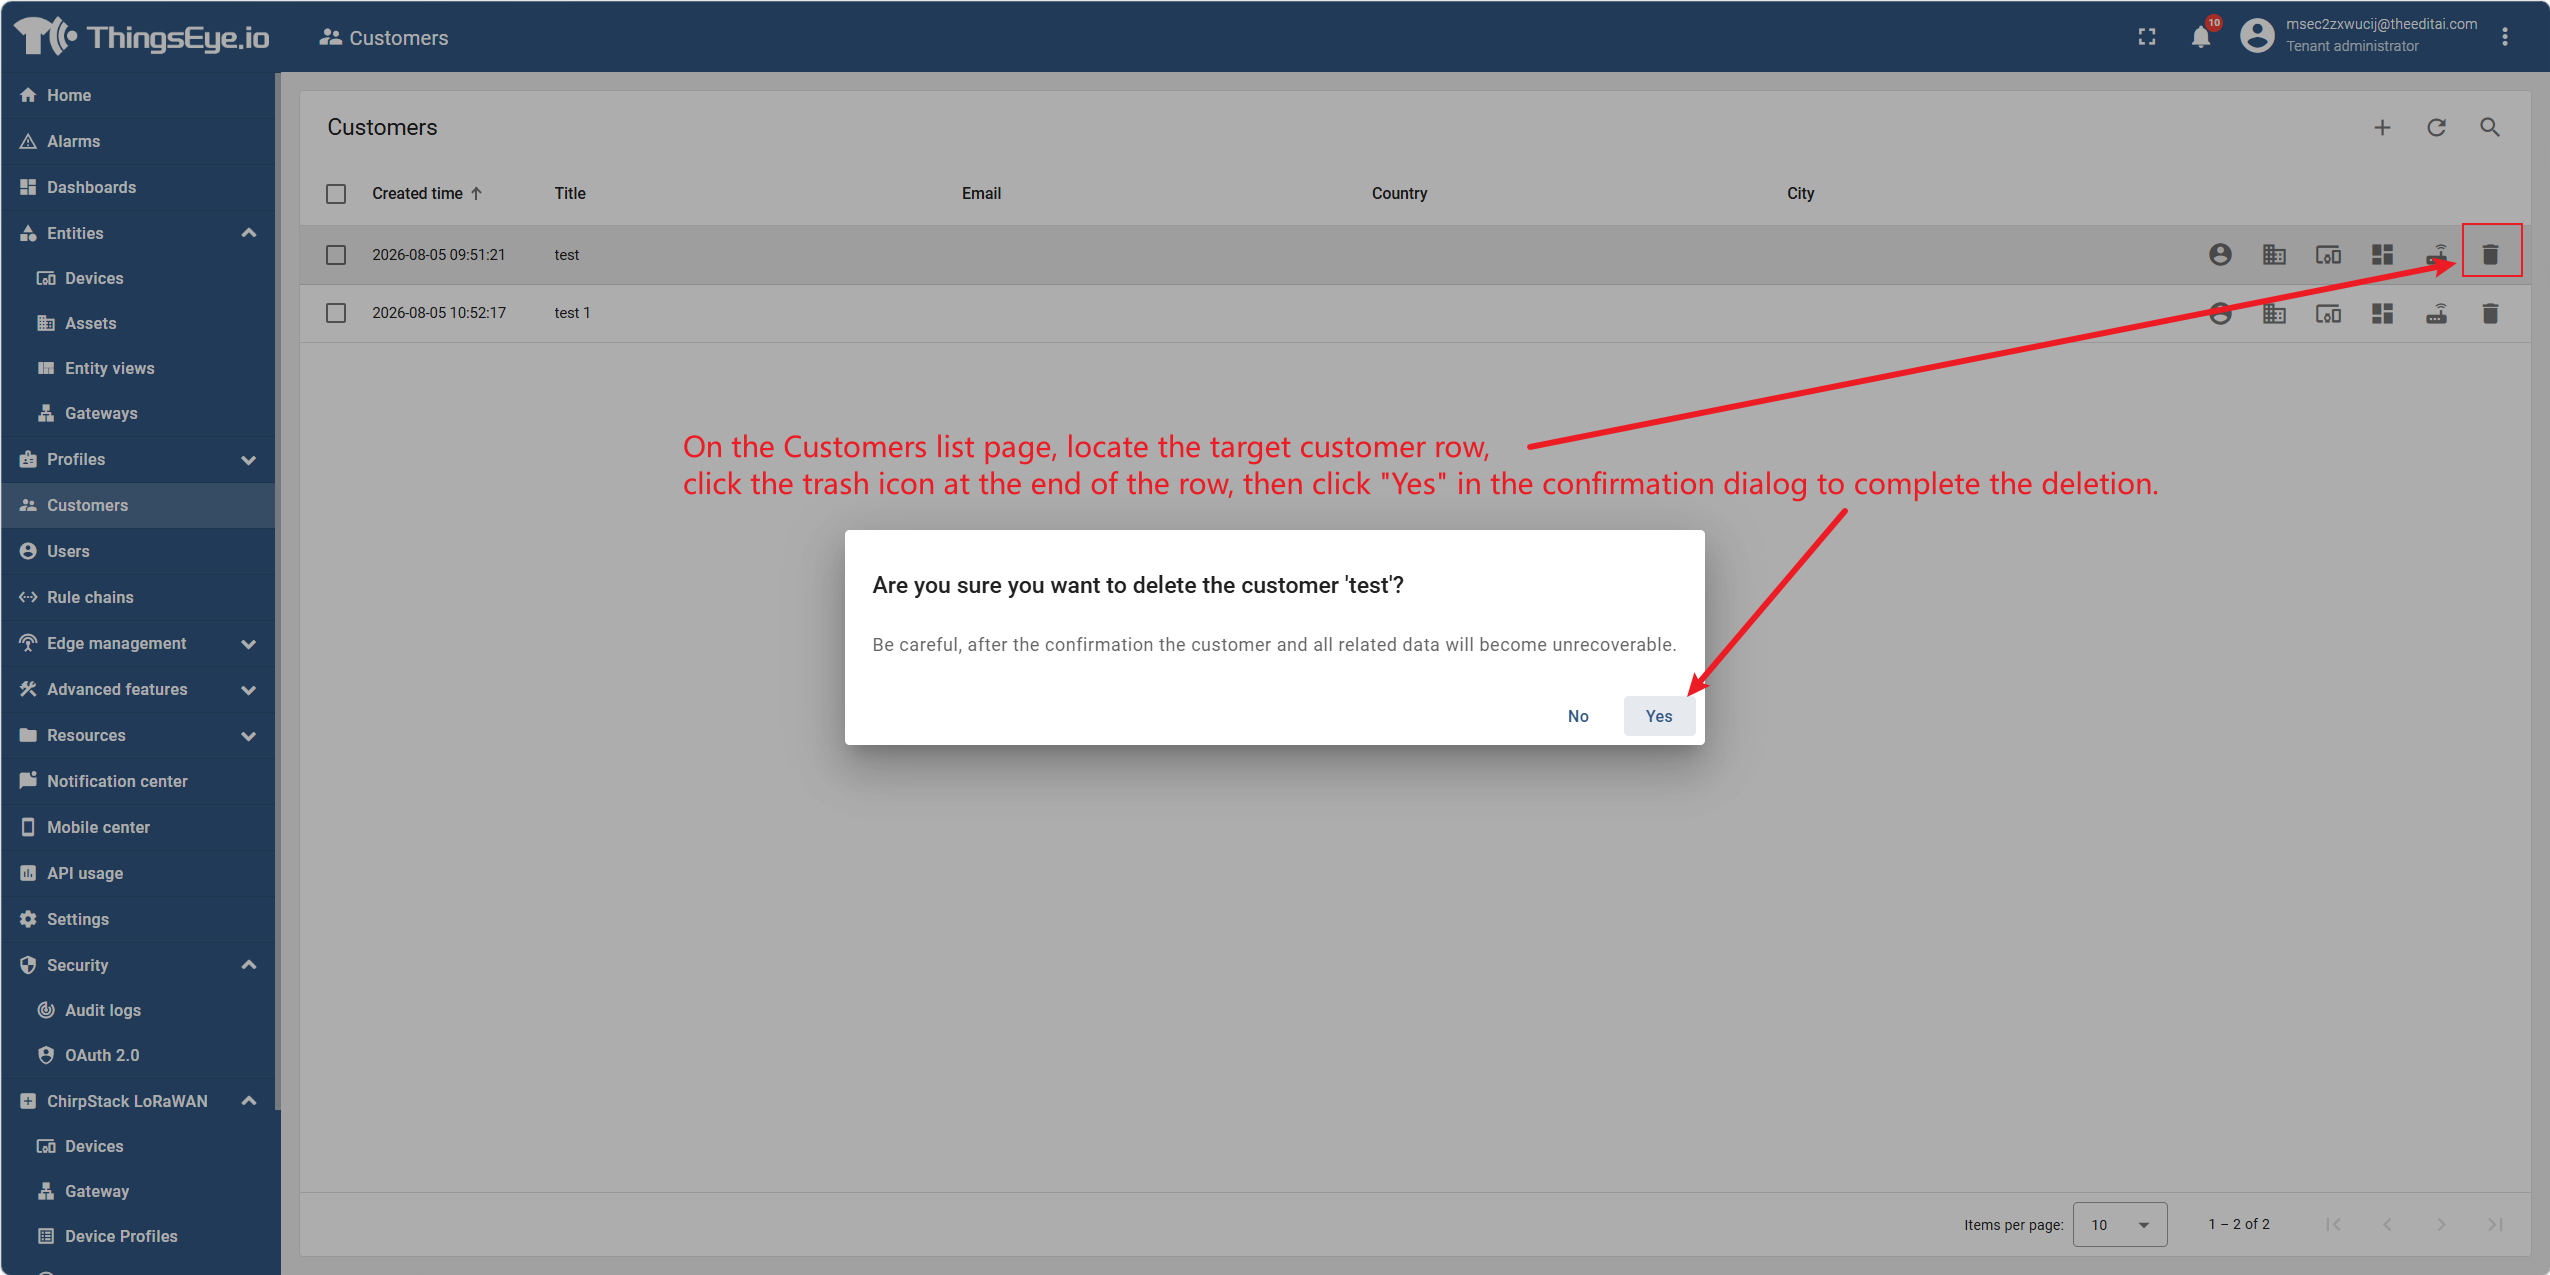
Note: Deleting a customer removes all associated users under that customer. Devices, assets, and dashboards assigned to this customer will be unassigned, but the entities themselves will not be deleted.
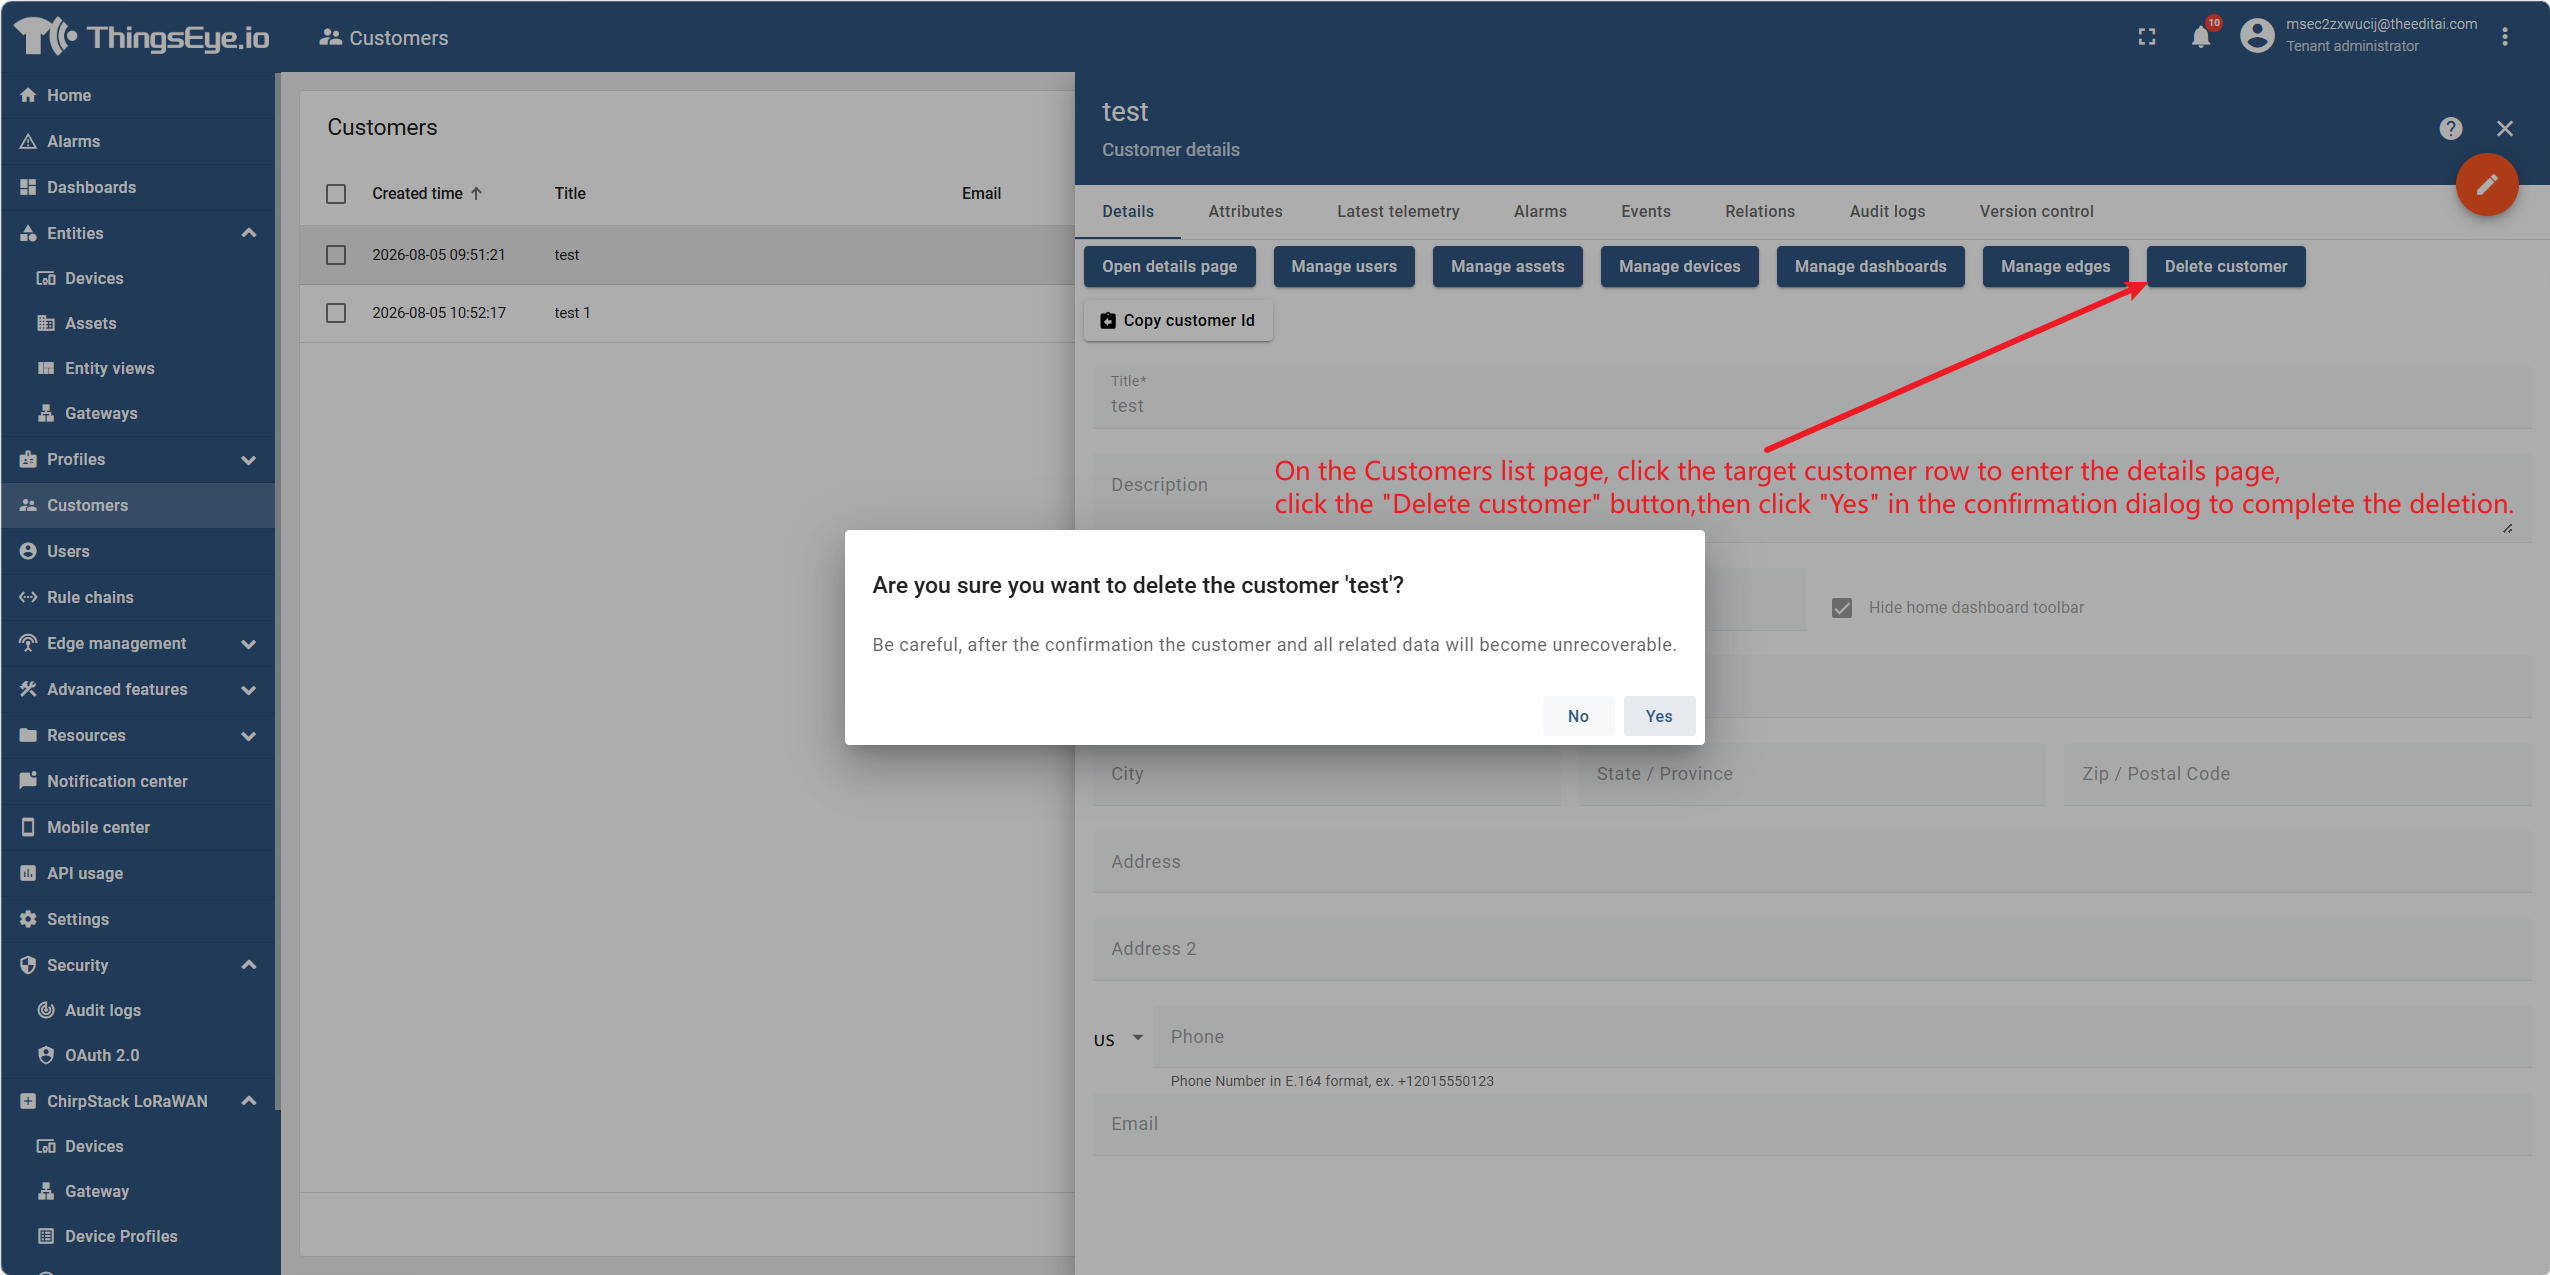
Method 2: Delete from the customer details page
On the customer list page, click the row of the target customer to go to the details page, click the "Delete Customer" button, and then click "Yes" in the confirmation dialog to complete the deletion.
Bulk delete multiple customers
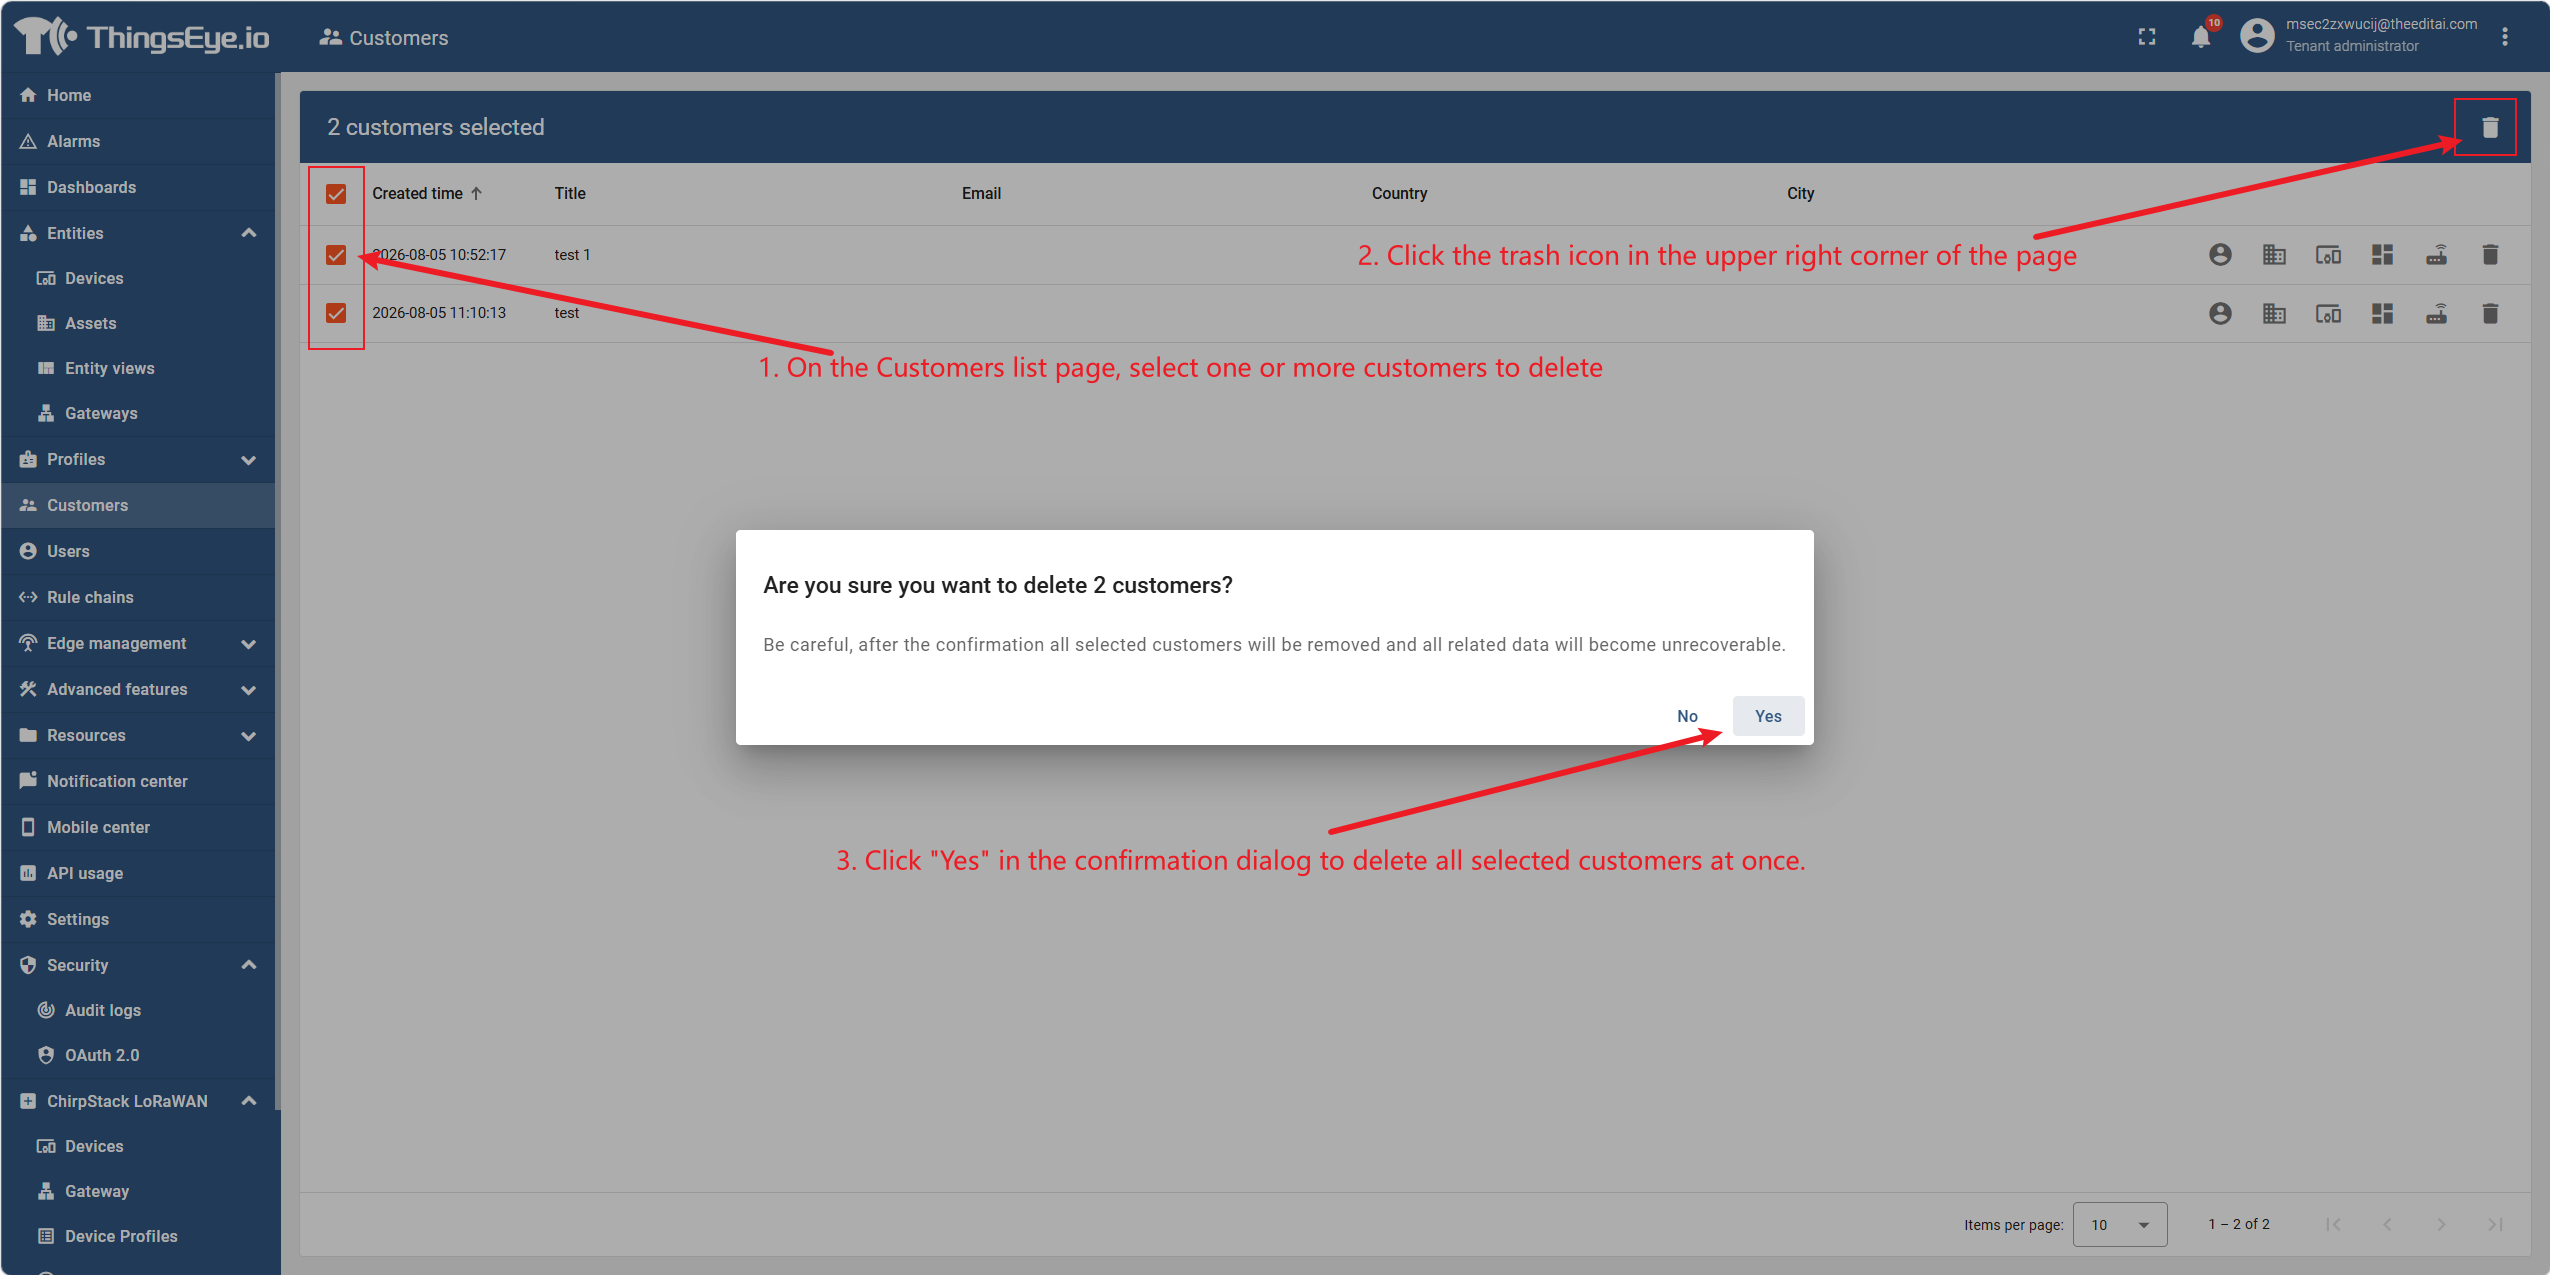
On the customer list page, select one or more customers to delete, click the trash can icon in the upper‑right corner of the page, and then click "Yes" in the confirmation dialog to delete all selected customers at once.
Important Considerations
| Item | Description |
|---|---|
| Irreversibility | Deleting a customer is irreversible; data cannot be recovered. Confirm the target customer before execution. |
| Associated Users Removed | Deleting a customer removes all associated customer users under that customer. |
| Entities Unassigned, Not Deleted | Devices, assets, and dashboards assigned to this customer will be unassigned, but the entities themselves will not be deleted. |
| Secondary Confirmation Required | Each deletion operation requires secondary confirmation in a pop‑up dialog to prevent accidental operations. |
4. Create a User
Critical Path Warning: To create an ordinary end‑user, you must enter via the "Manage Customer Users" entry from the customer details page. If you create from the left "Users" menu, you will generate a "Tenant Administrator" account, which has tenant‑level administrative permissions. Be sure to choose the entry point carefully.
Procedure
Step 1: Go to the customer user management interface
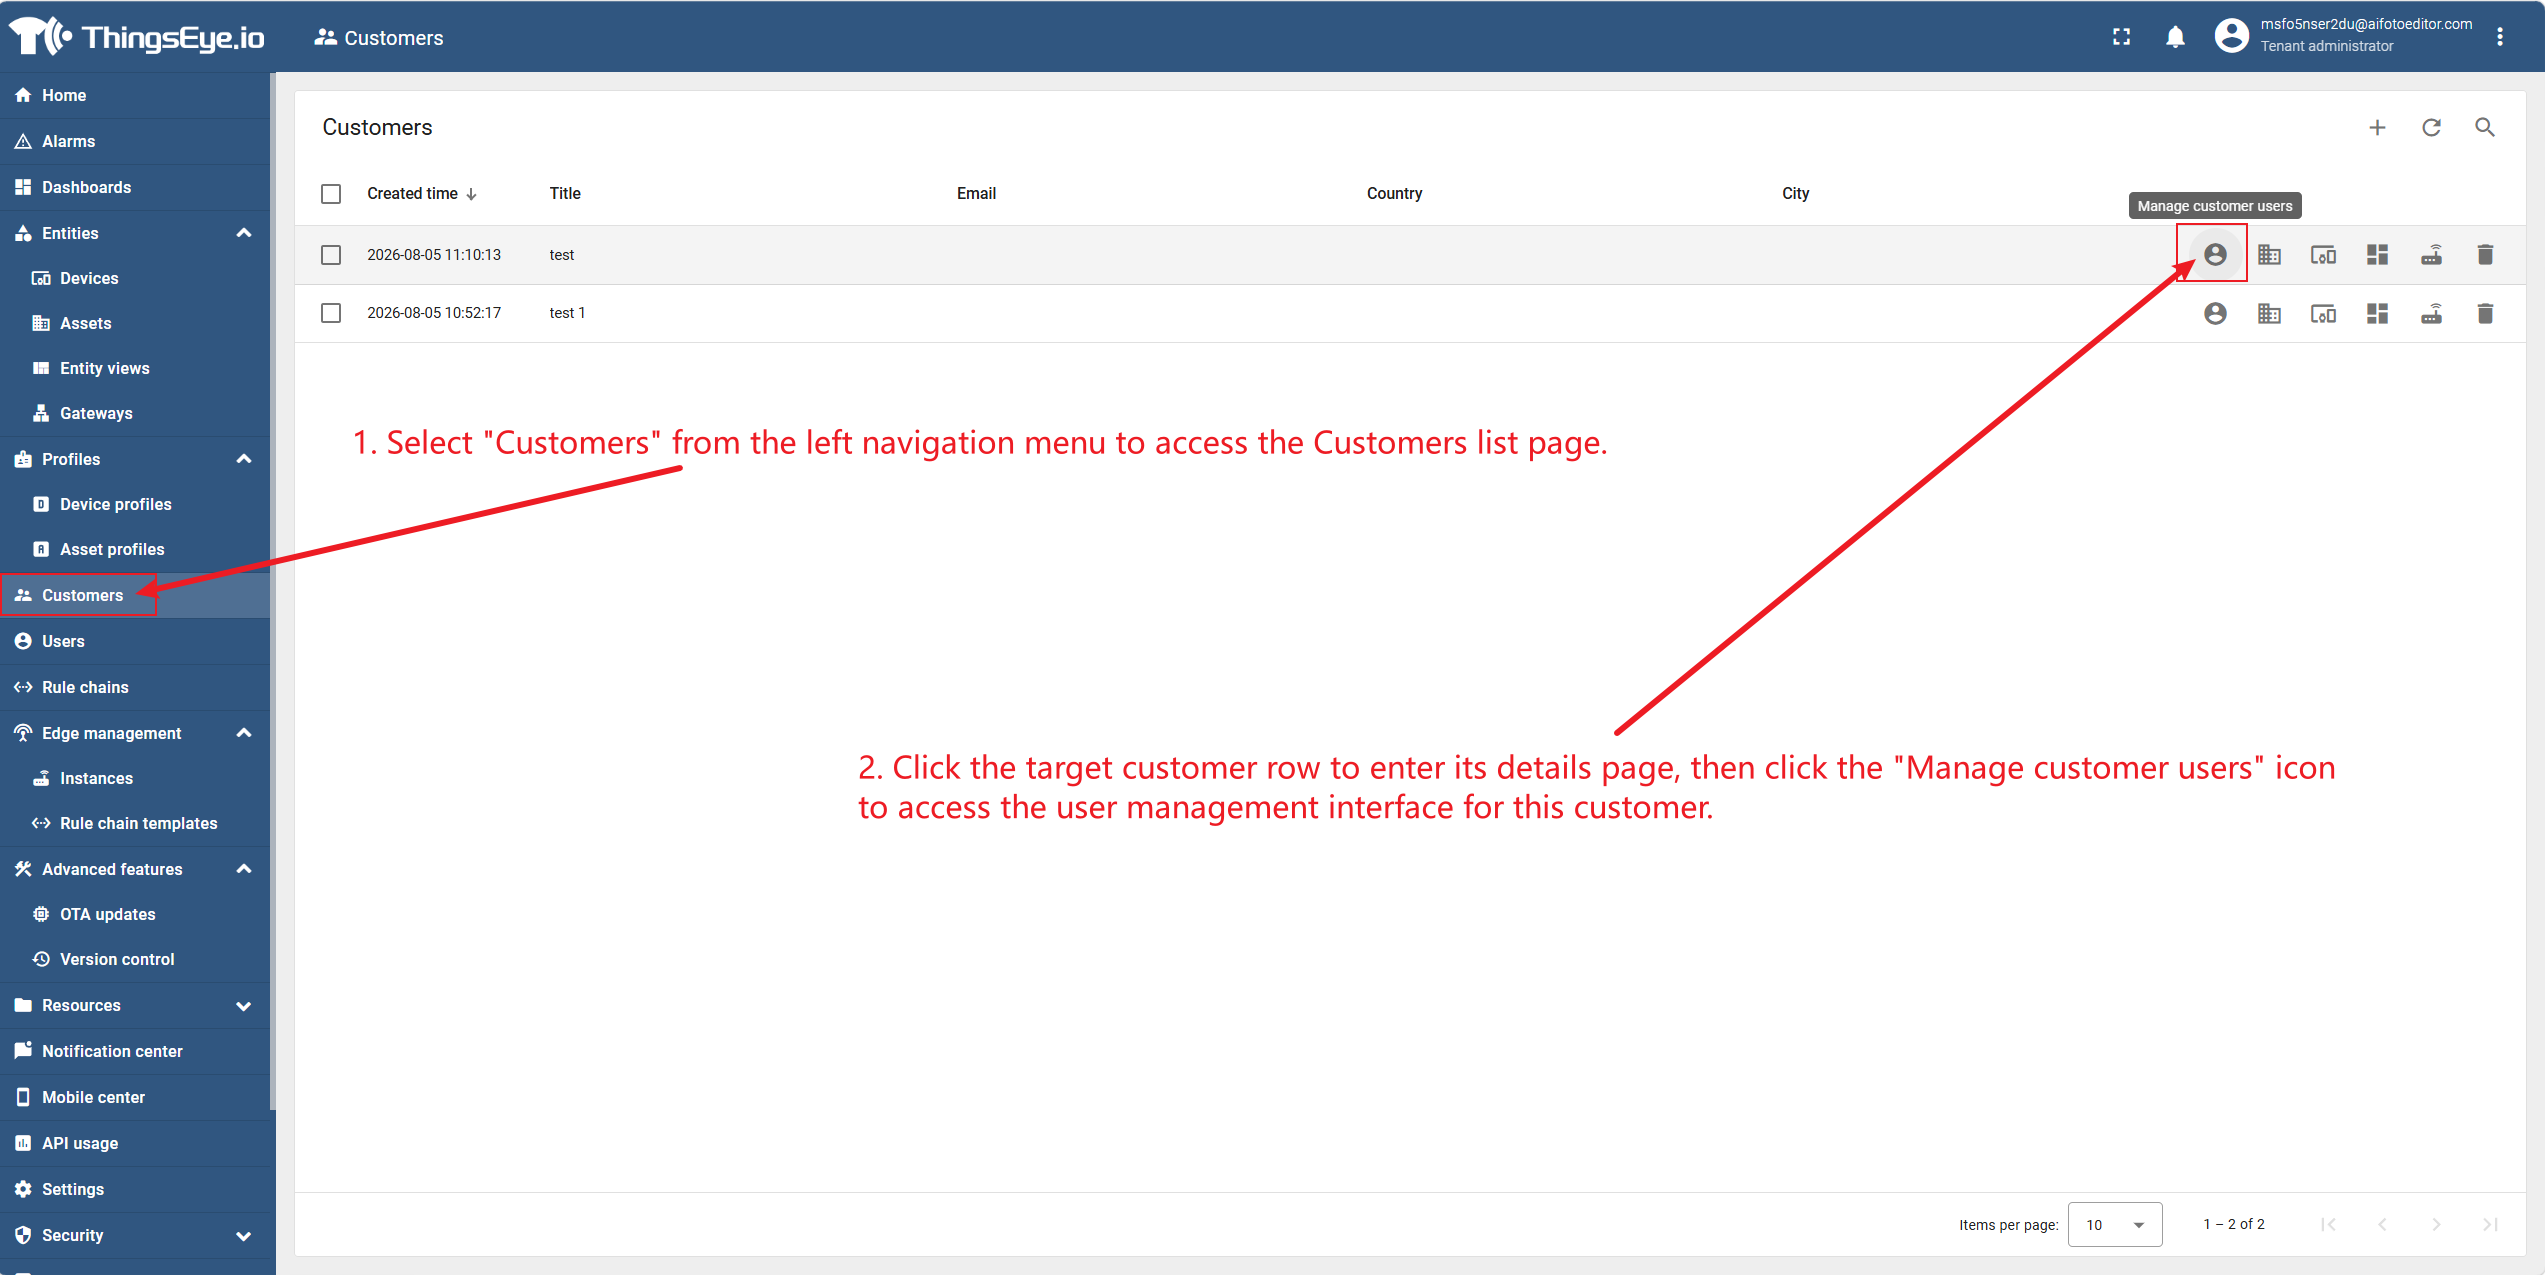
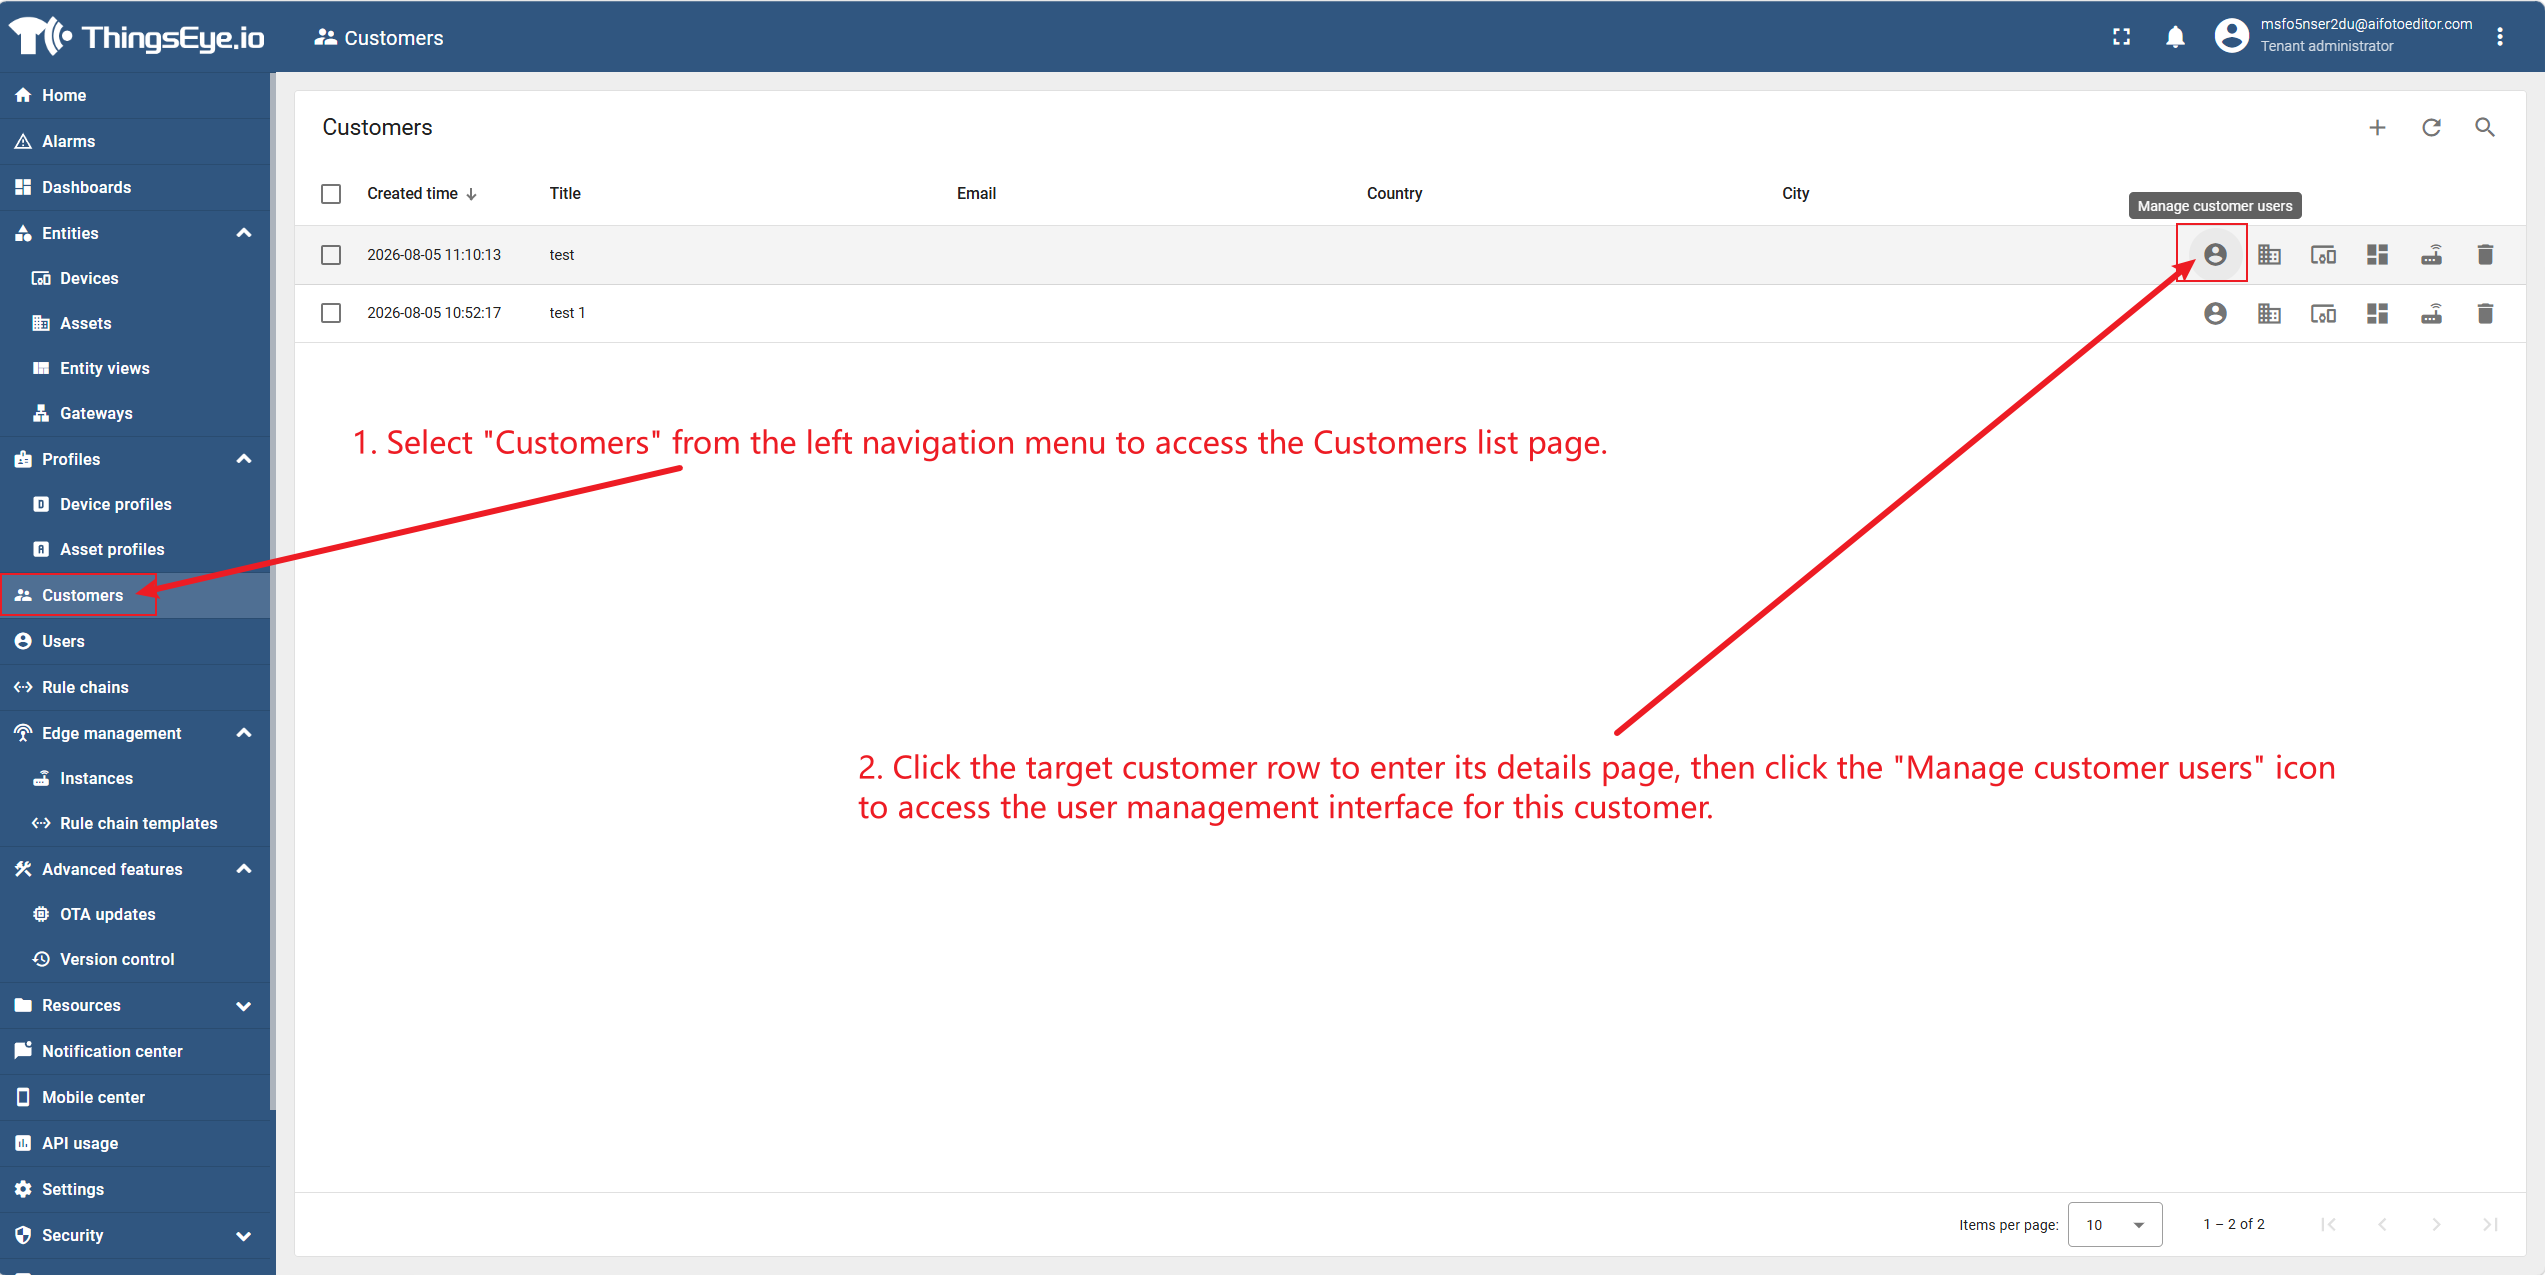
Select "Customers" from the left navigation menu to go to the customer list page. Click the row of the target customer to go to its details page, then click the "Manage Customer Users" icon to go to that customer's user management interface.
Step 2: Fill in user information
In the user management interface, click the "+ Add User" button to open the Add User dialog, then fill in the basic user information.
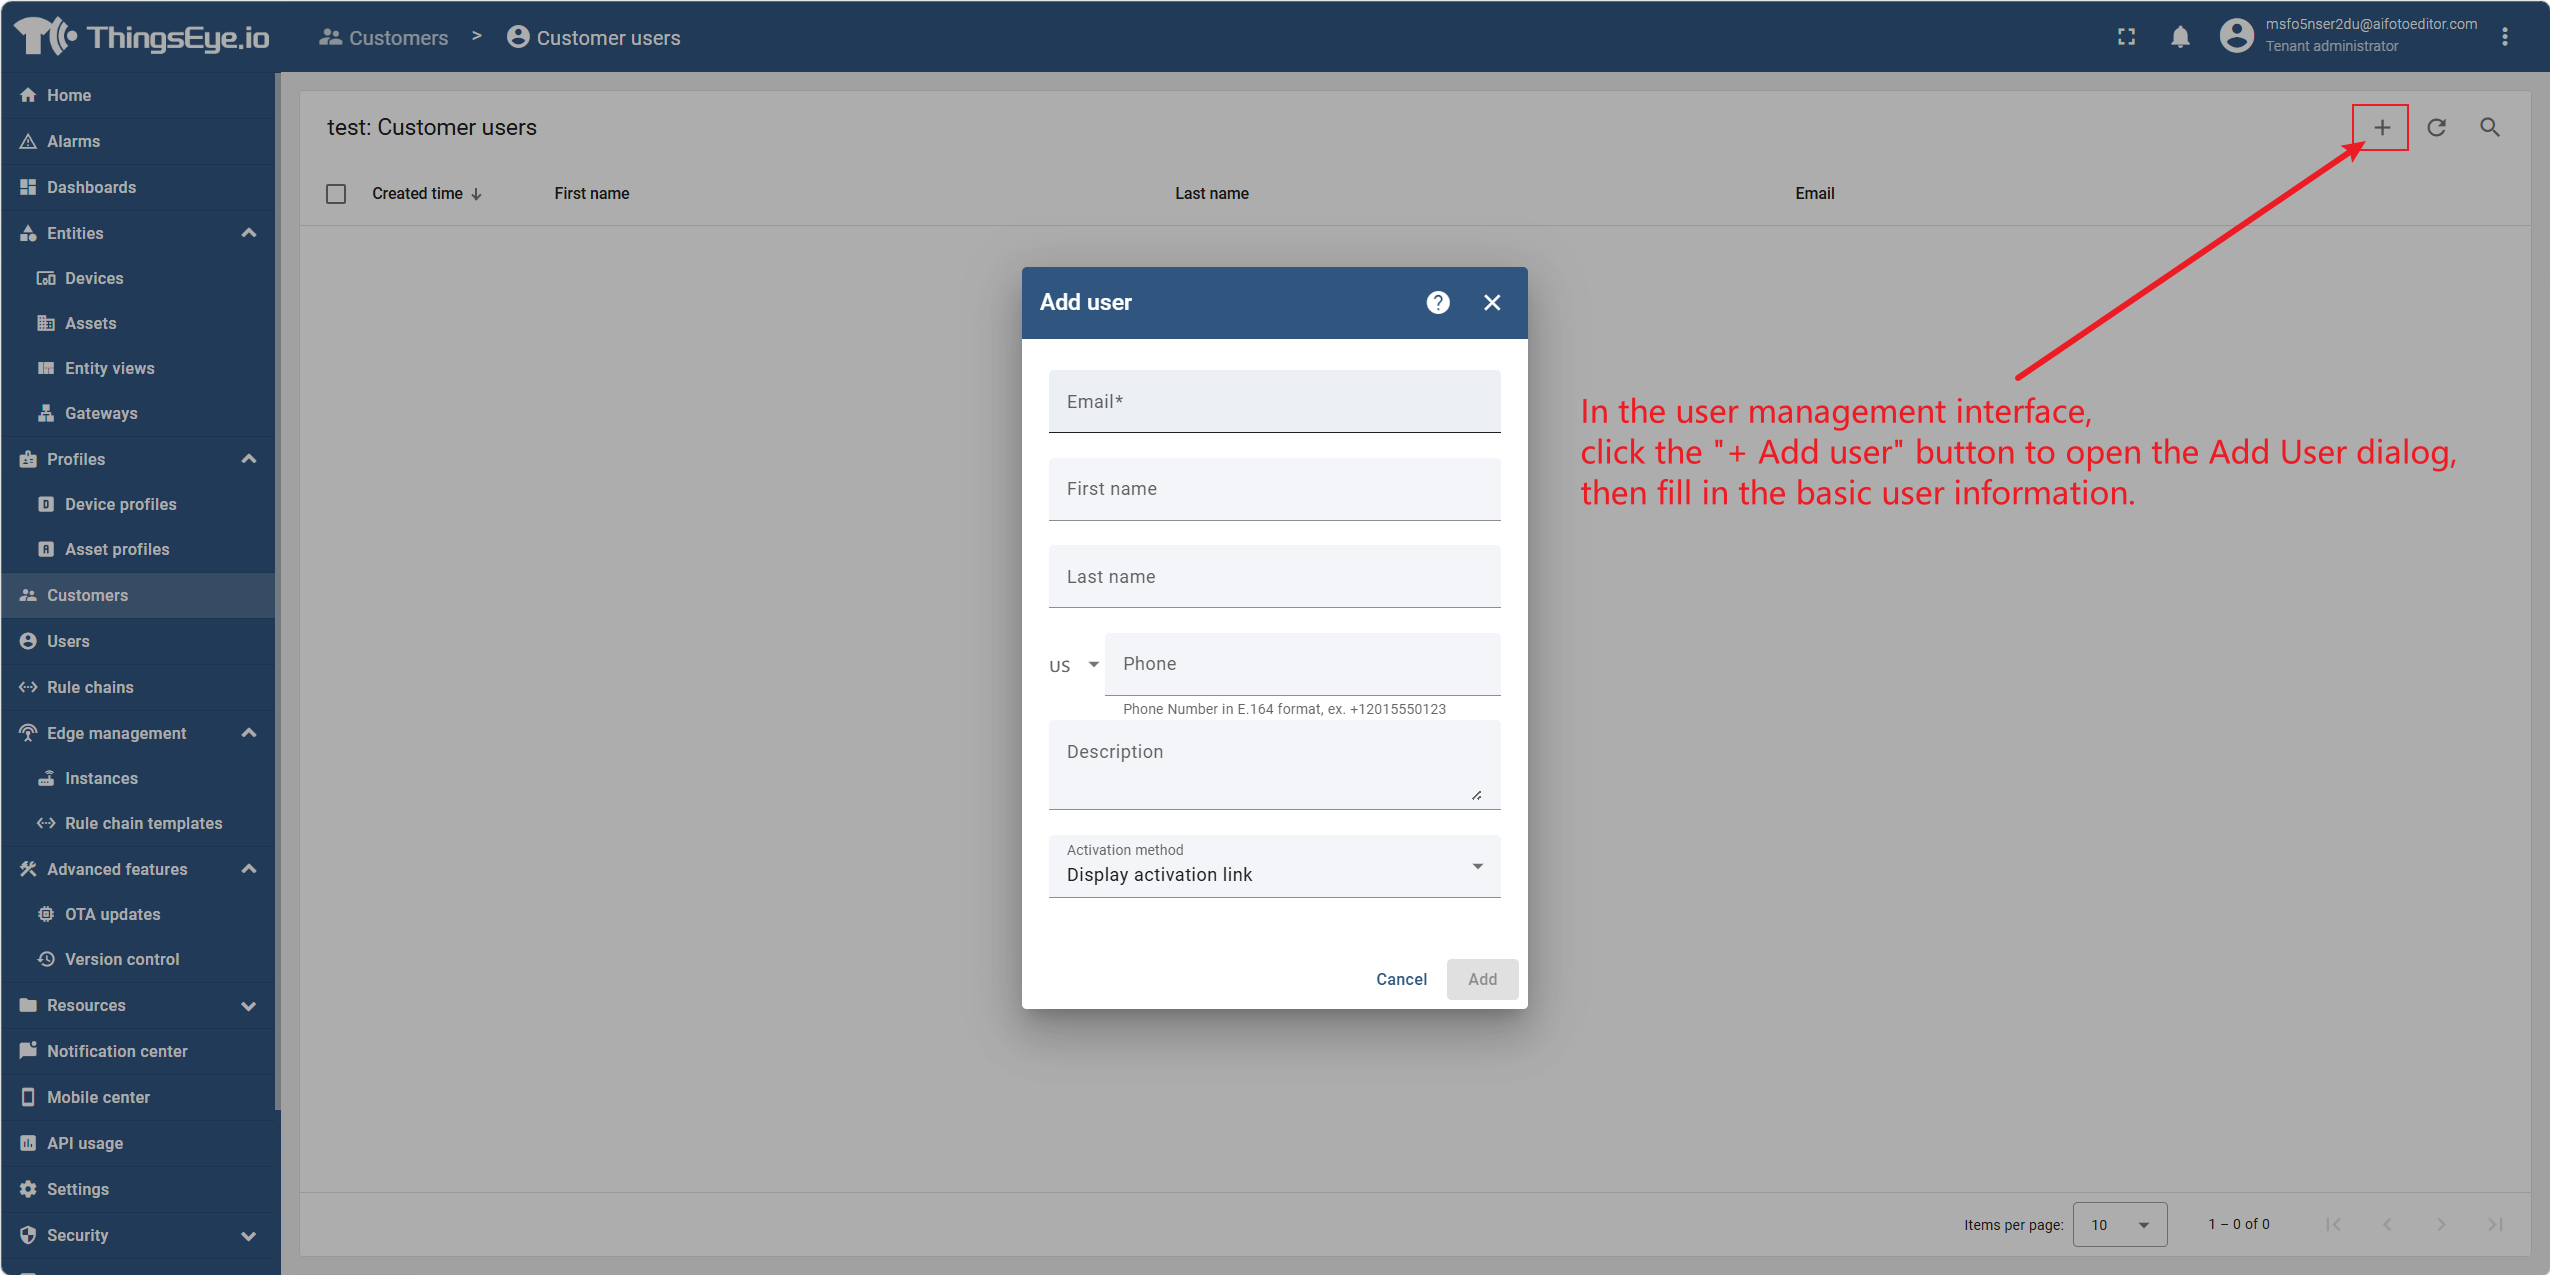
Note: The Email field is required and serves as the login credential and unique identifier. All other fields are optional.
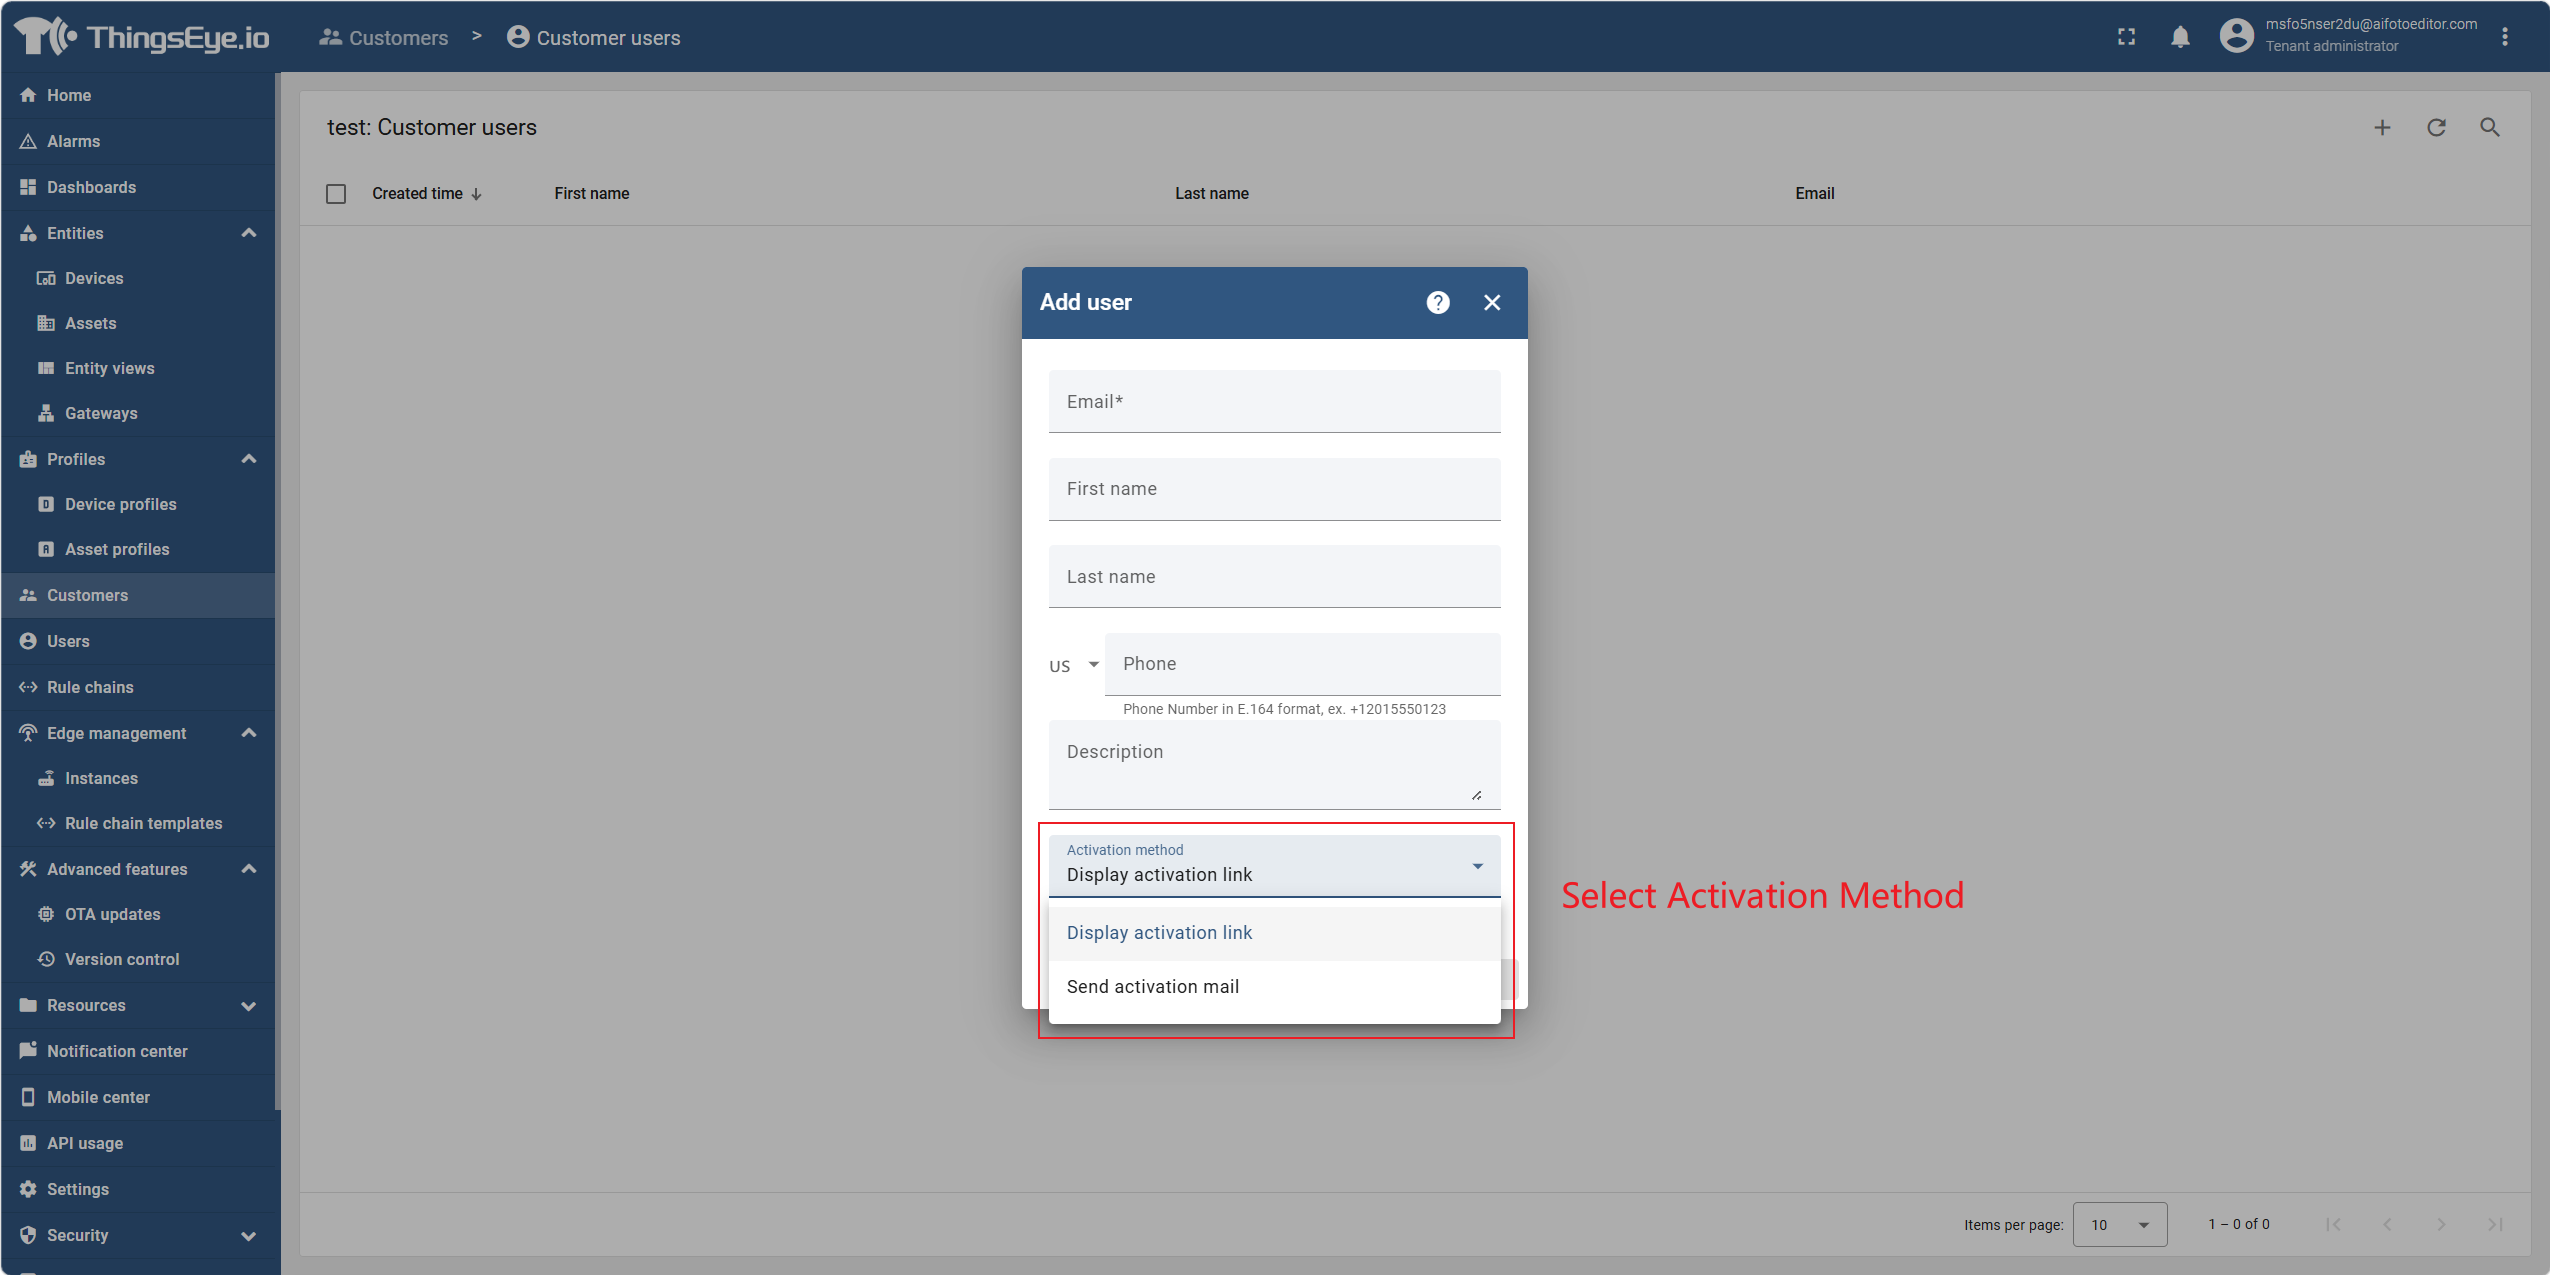
Step 3: Select the activation method
In the dialog, select the account activation method. ThingsEye provides two activation methods:
| Method | Description |
|---|---|
| Show Activation Link | The system generates an activation link; the Tenant Administrator manually copies it and sends it to the user. The user clicks the link and sets a password to complete activation. |
| Send Activation Email | The system automatically sends an invitation email containing the activation link to the user's email address. The user sets a password via the link in the email to complete activation. |
Important Note: Regardless of which activation method is chosen, the password is set by the user during first‑time activation and is not preset by the Tenant Administrator. If "Send Activation Email" is selected, ensure that the System Administrator has properly configured the SMTP email service.
Step 4: Complete the creation
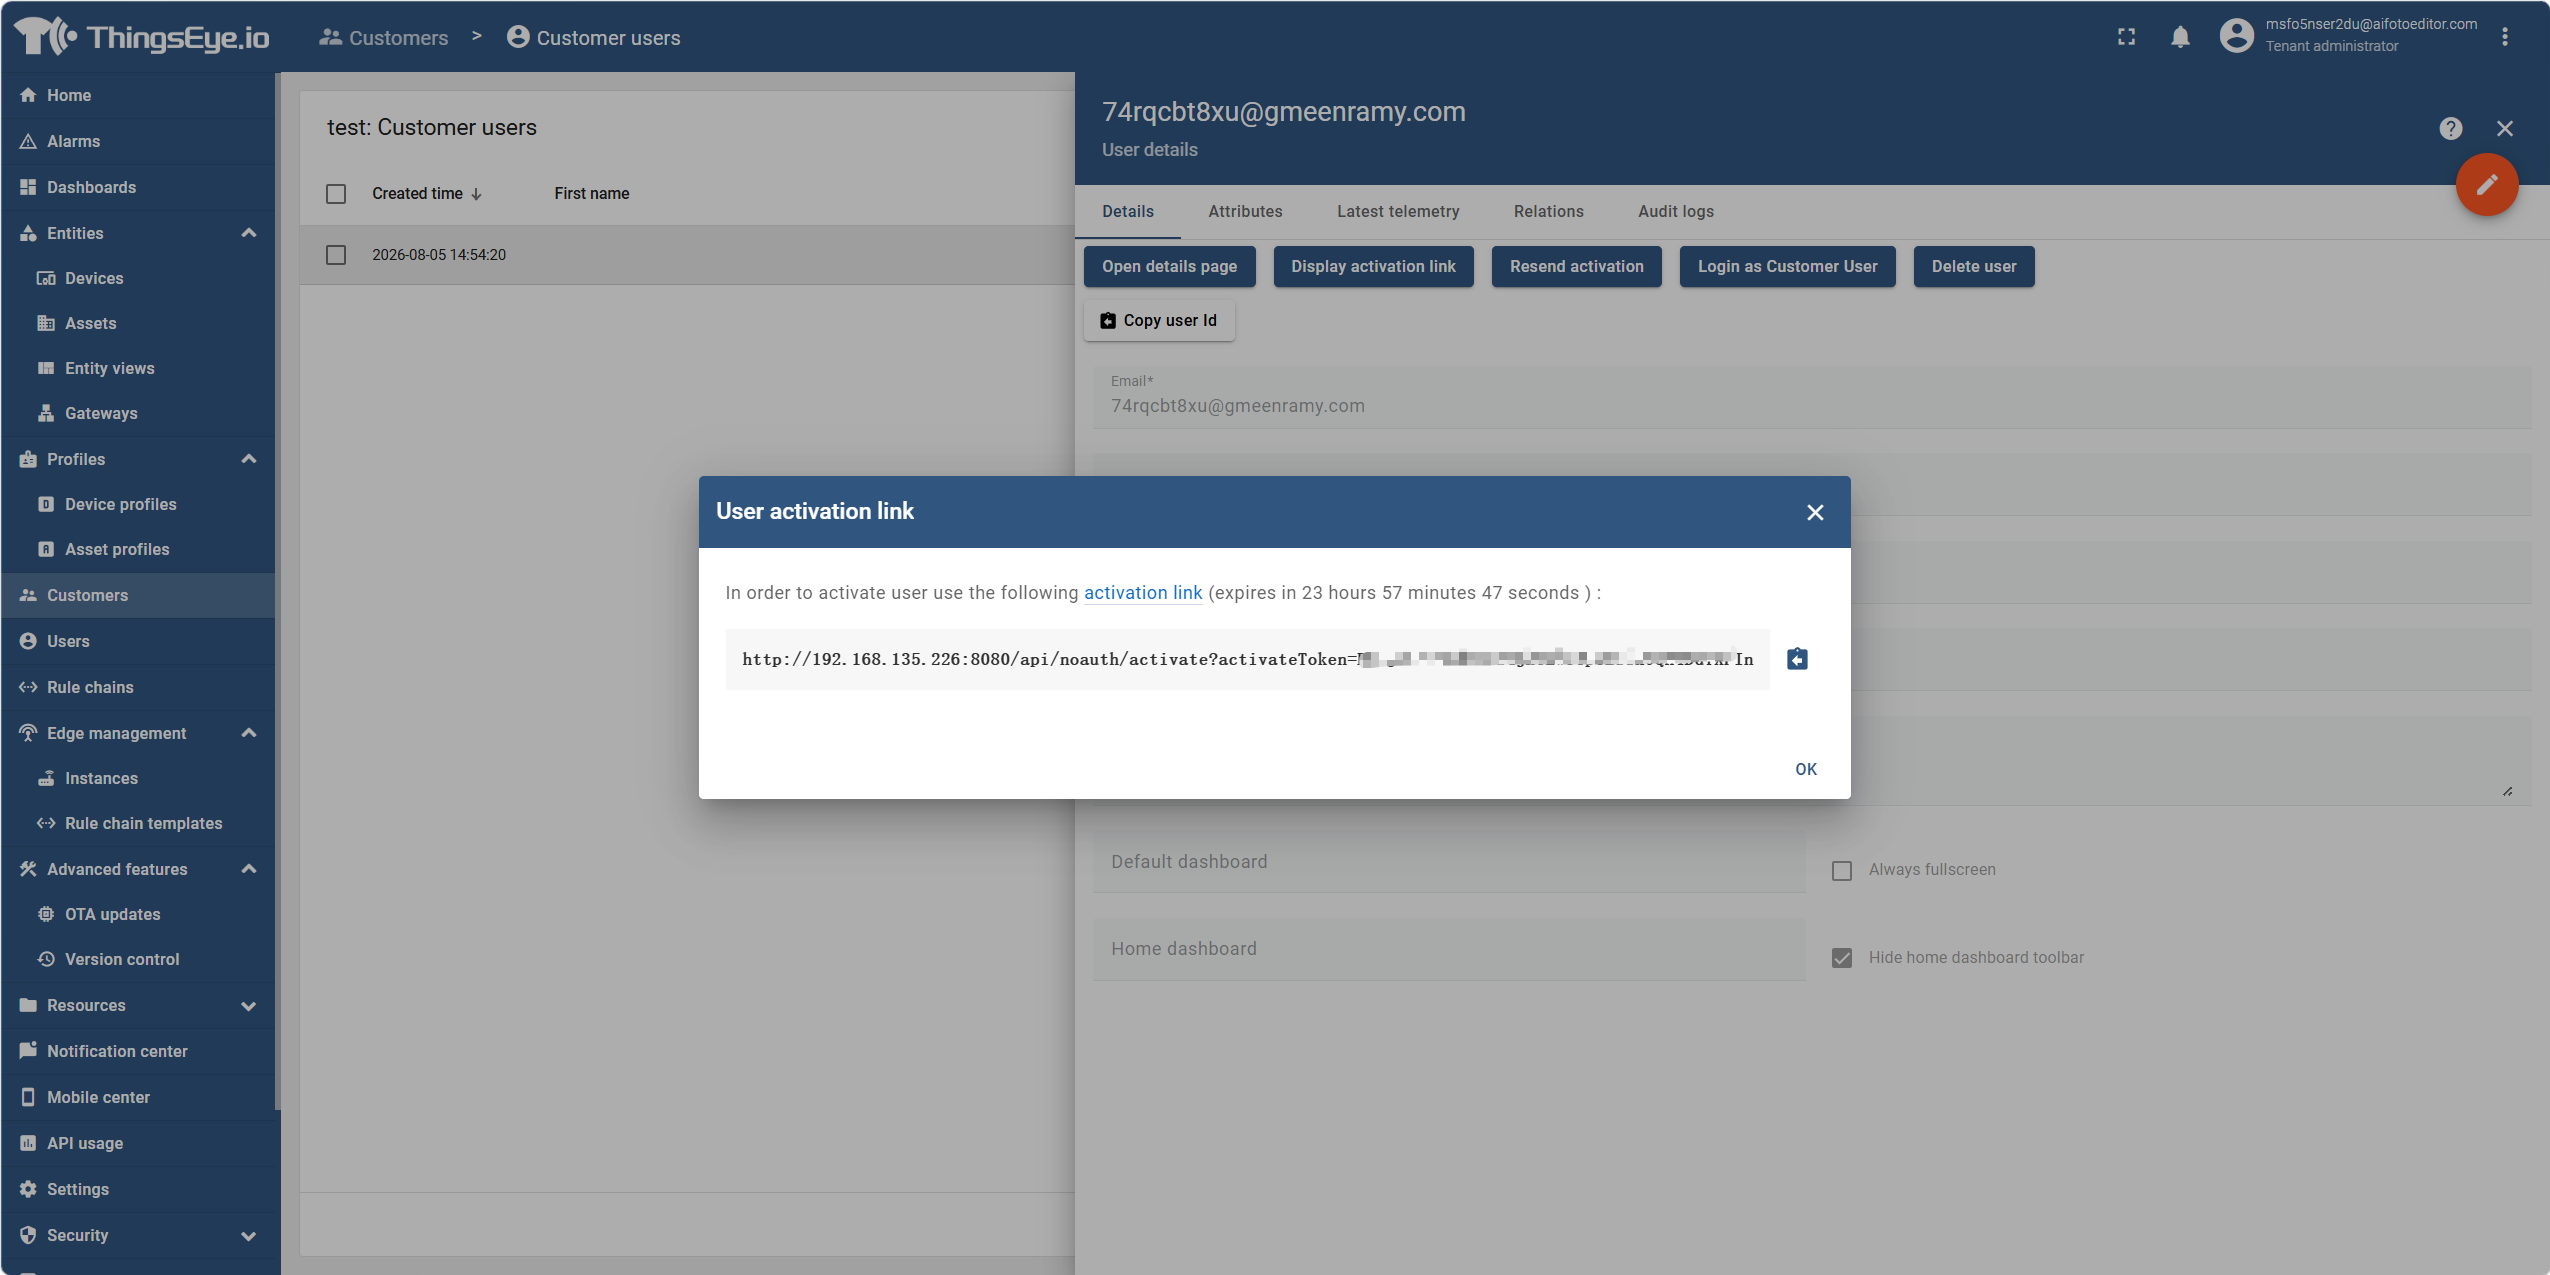
Click the "Add" button to complete the user creation. Users created this way are automatically assigned to the current customer, meaning the user's role is a Customer User and can only view devices, assets, and dashboards within the scope of that customer.
- If "Show Activation Link" is selected, the system generates an activation link that needs to be copied and securely sent to the user.
- If "Send Activation Email" is selected, the system automatically sends the activation invitation to the user's email.
After successful creation, the new user will appear in the customer user list. The user must set a password via the activation link before they can log in to the platform.
Supplementary Note on Creation Entry Points
This section describes creating a user from the Customer details page; users created this way automatically become Customer Users.
If you create a user from the "Users" menu in the left navigation bar, you are creating a Tenant Administrator, who belongs to the tenant rather than a specific customer and has tenant‑level administrative permissions.
| Creation Entry | Role | Permission Scope |
|---|---|---|
| Customer Details → Manage Customer Users | Customer User | Resources within that customer only |
| Users Menu | Tenant Administrator | Tenant‑level administrative permissions |
5. Edit a User
Procedure
Step 1: Go to the customer user management interface
Select "Customers" from the left navigation menu to go to the customer list page. Click the row of the target customer to go to its details page, then click the "Manage Customer Users" icon to go to that customer's user management interface.
Step 2: Enter edit mode
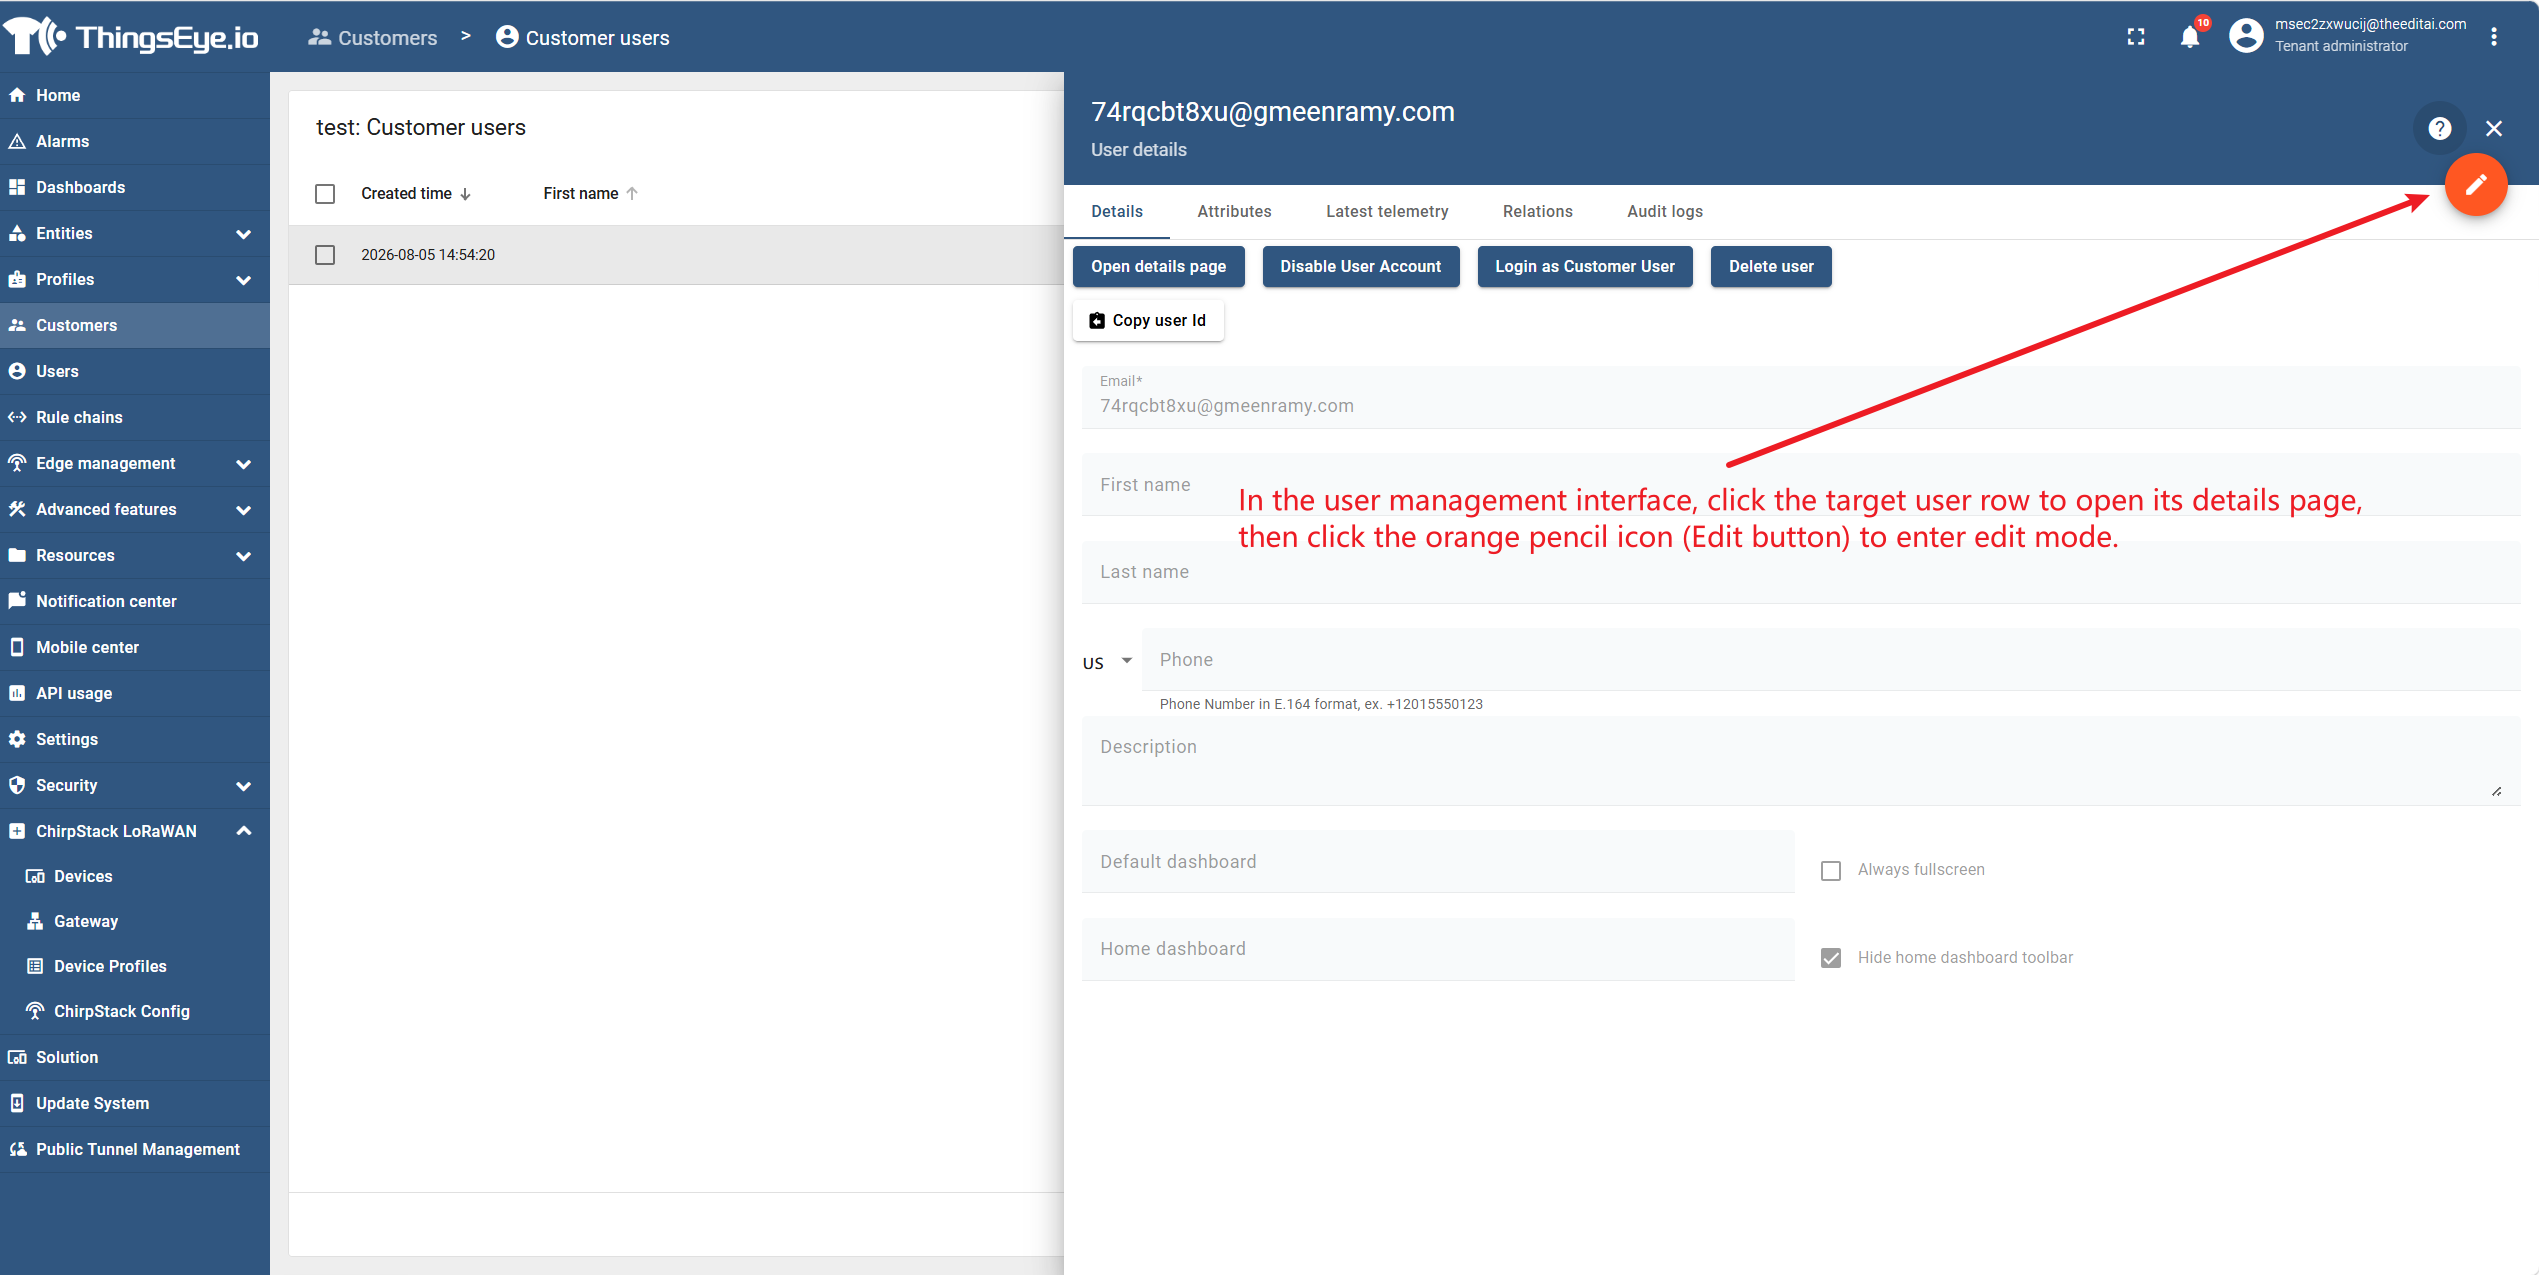
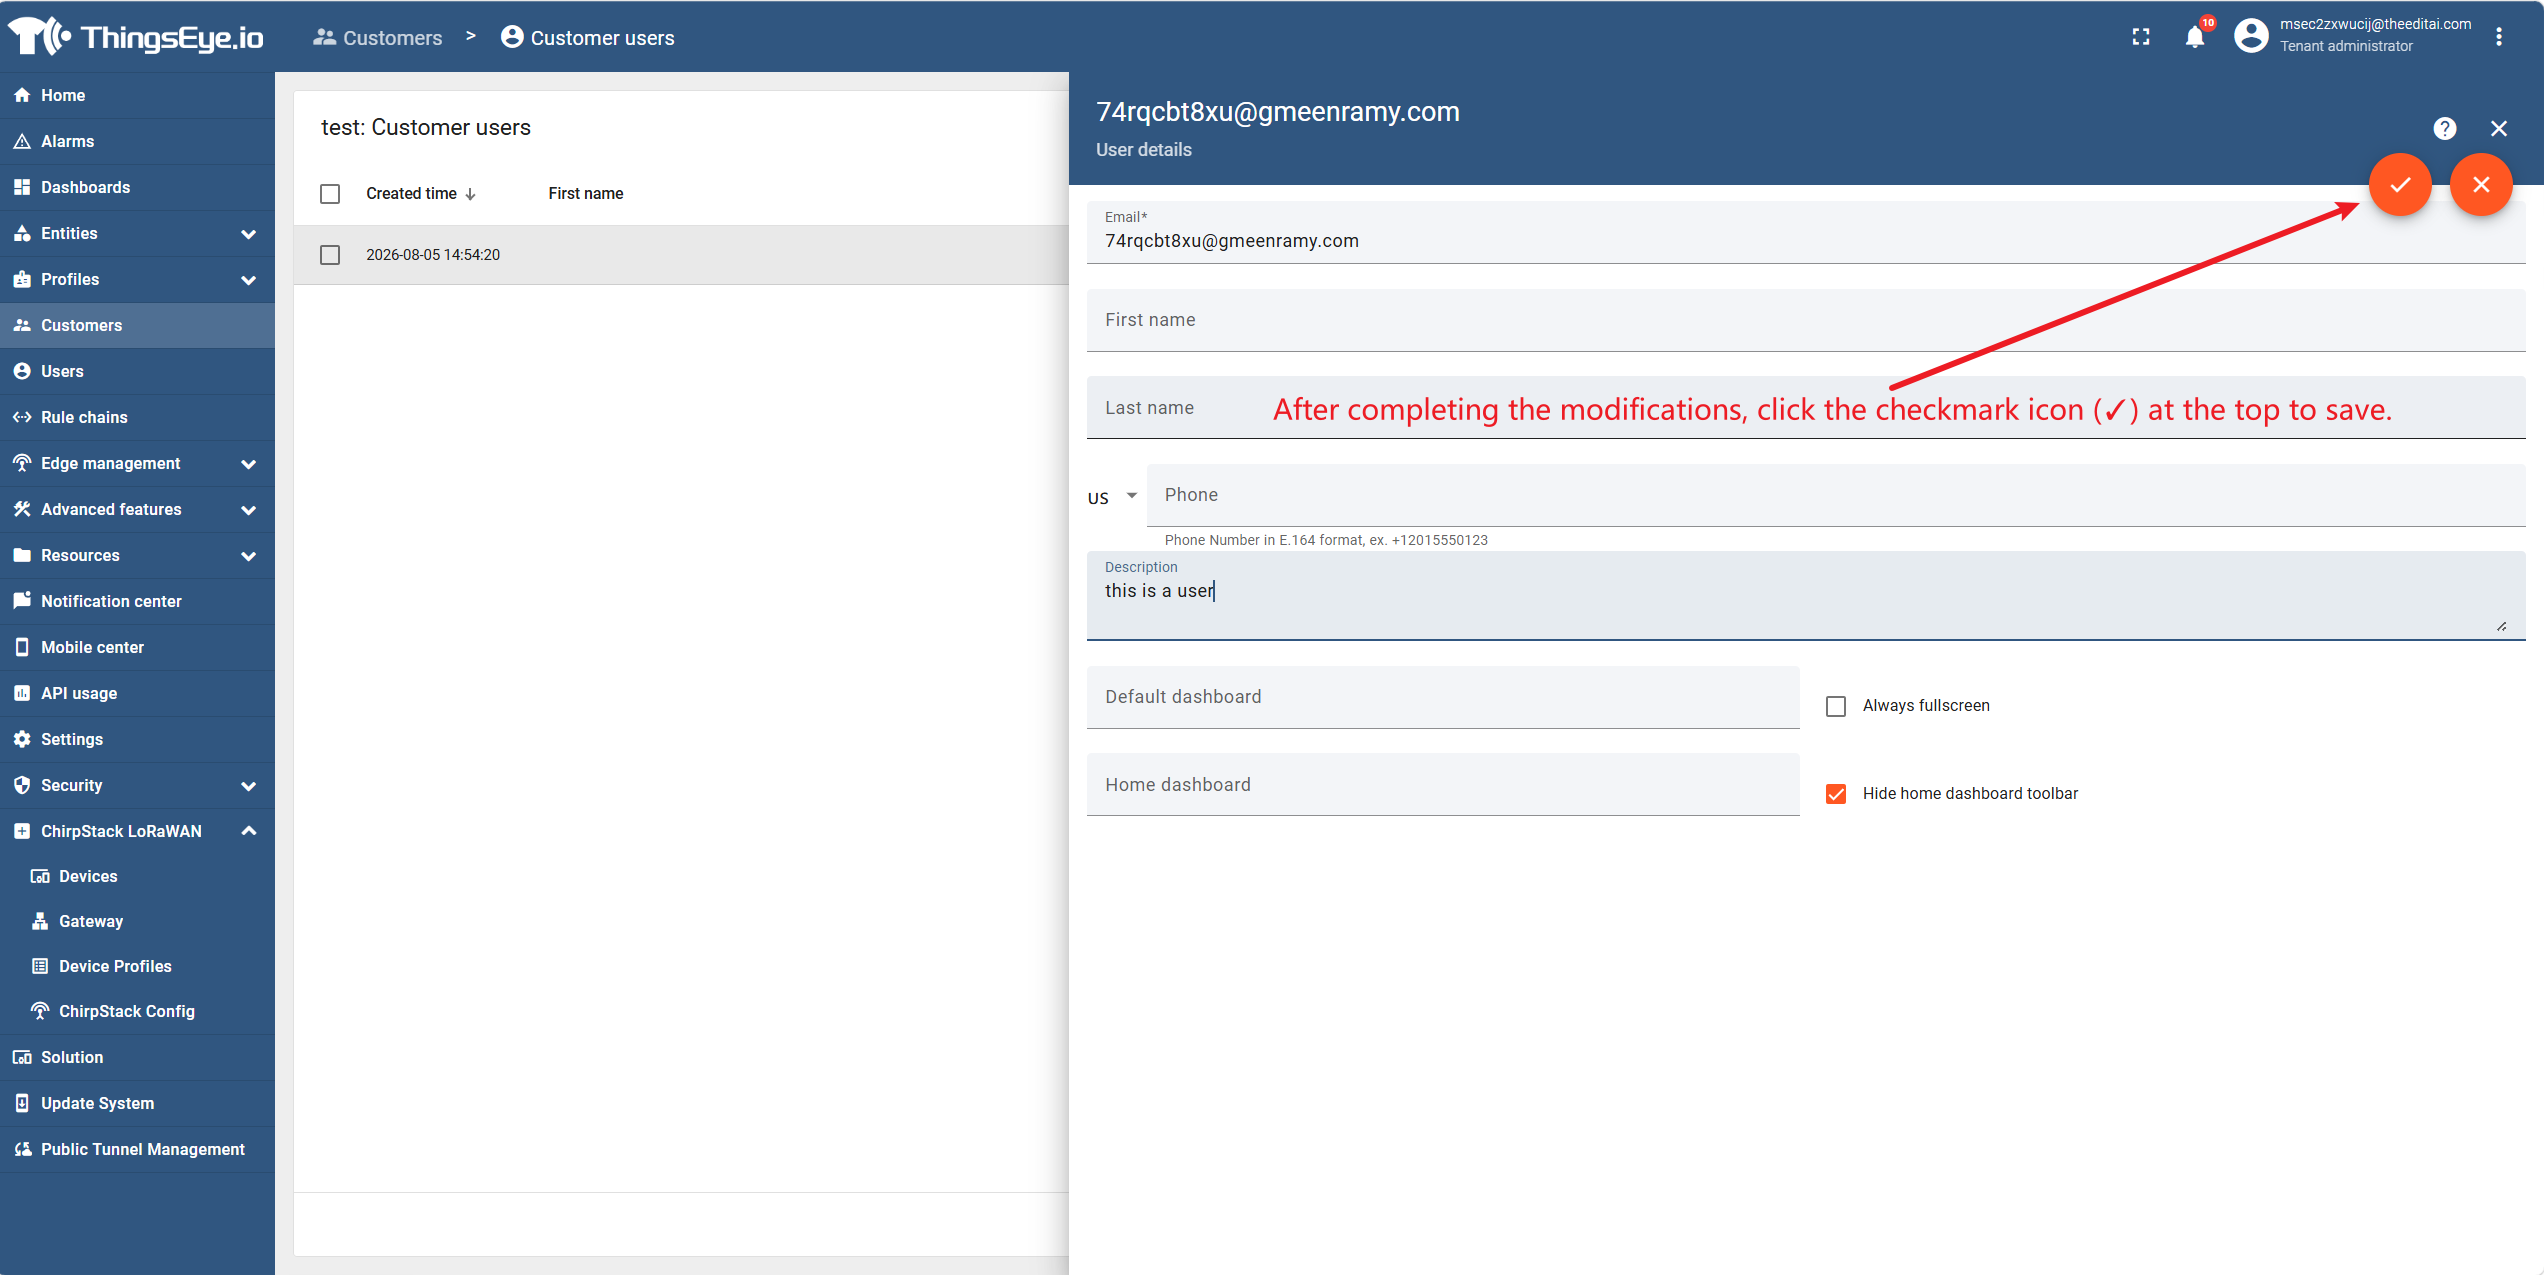
In the user management interface, click the row of the target user to open its details page, then click the orange pencil icon (edit button) to enter edit mode.
Step 3: Modify user information
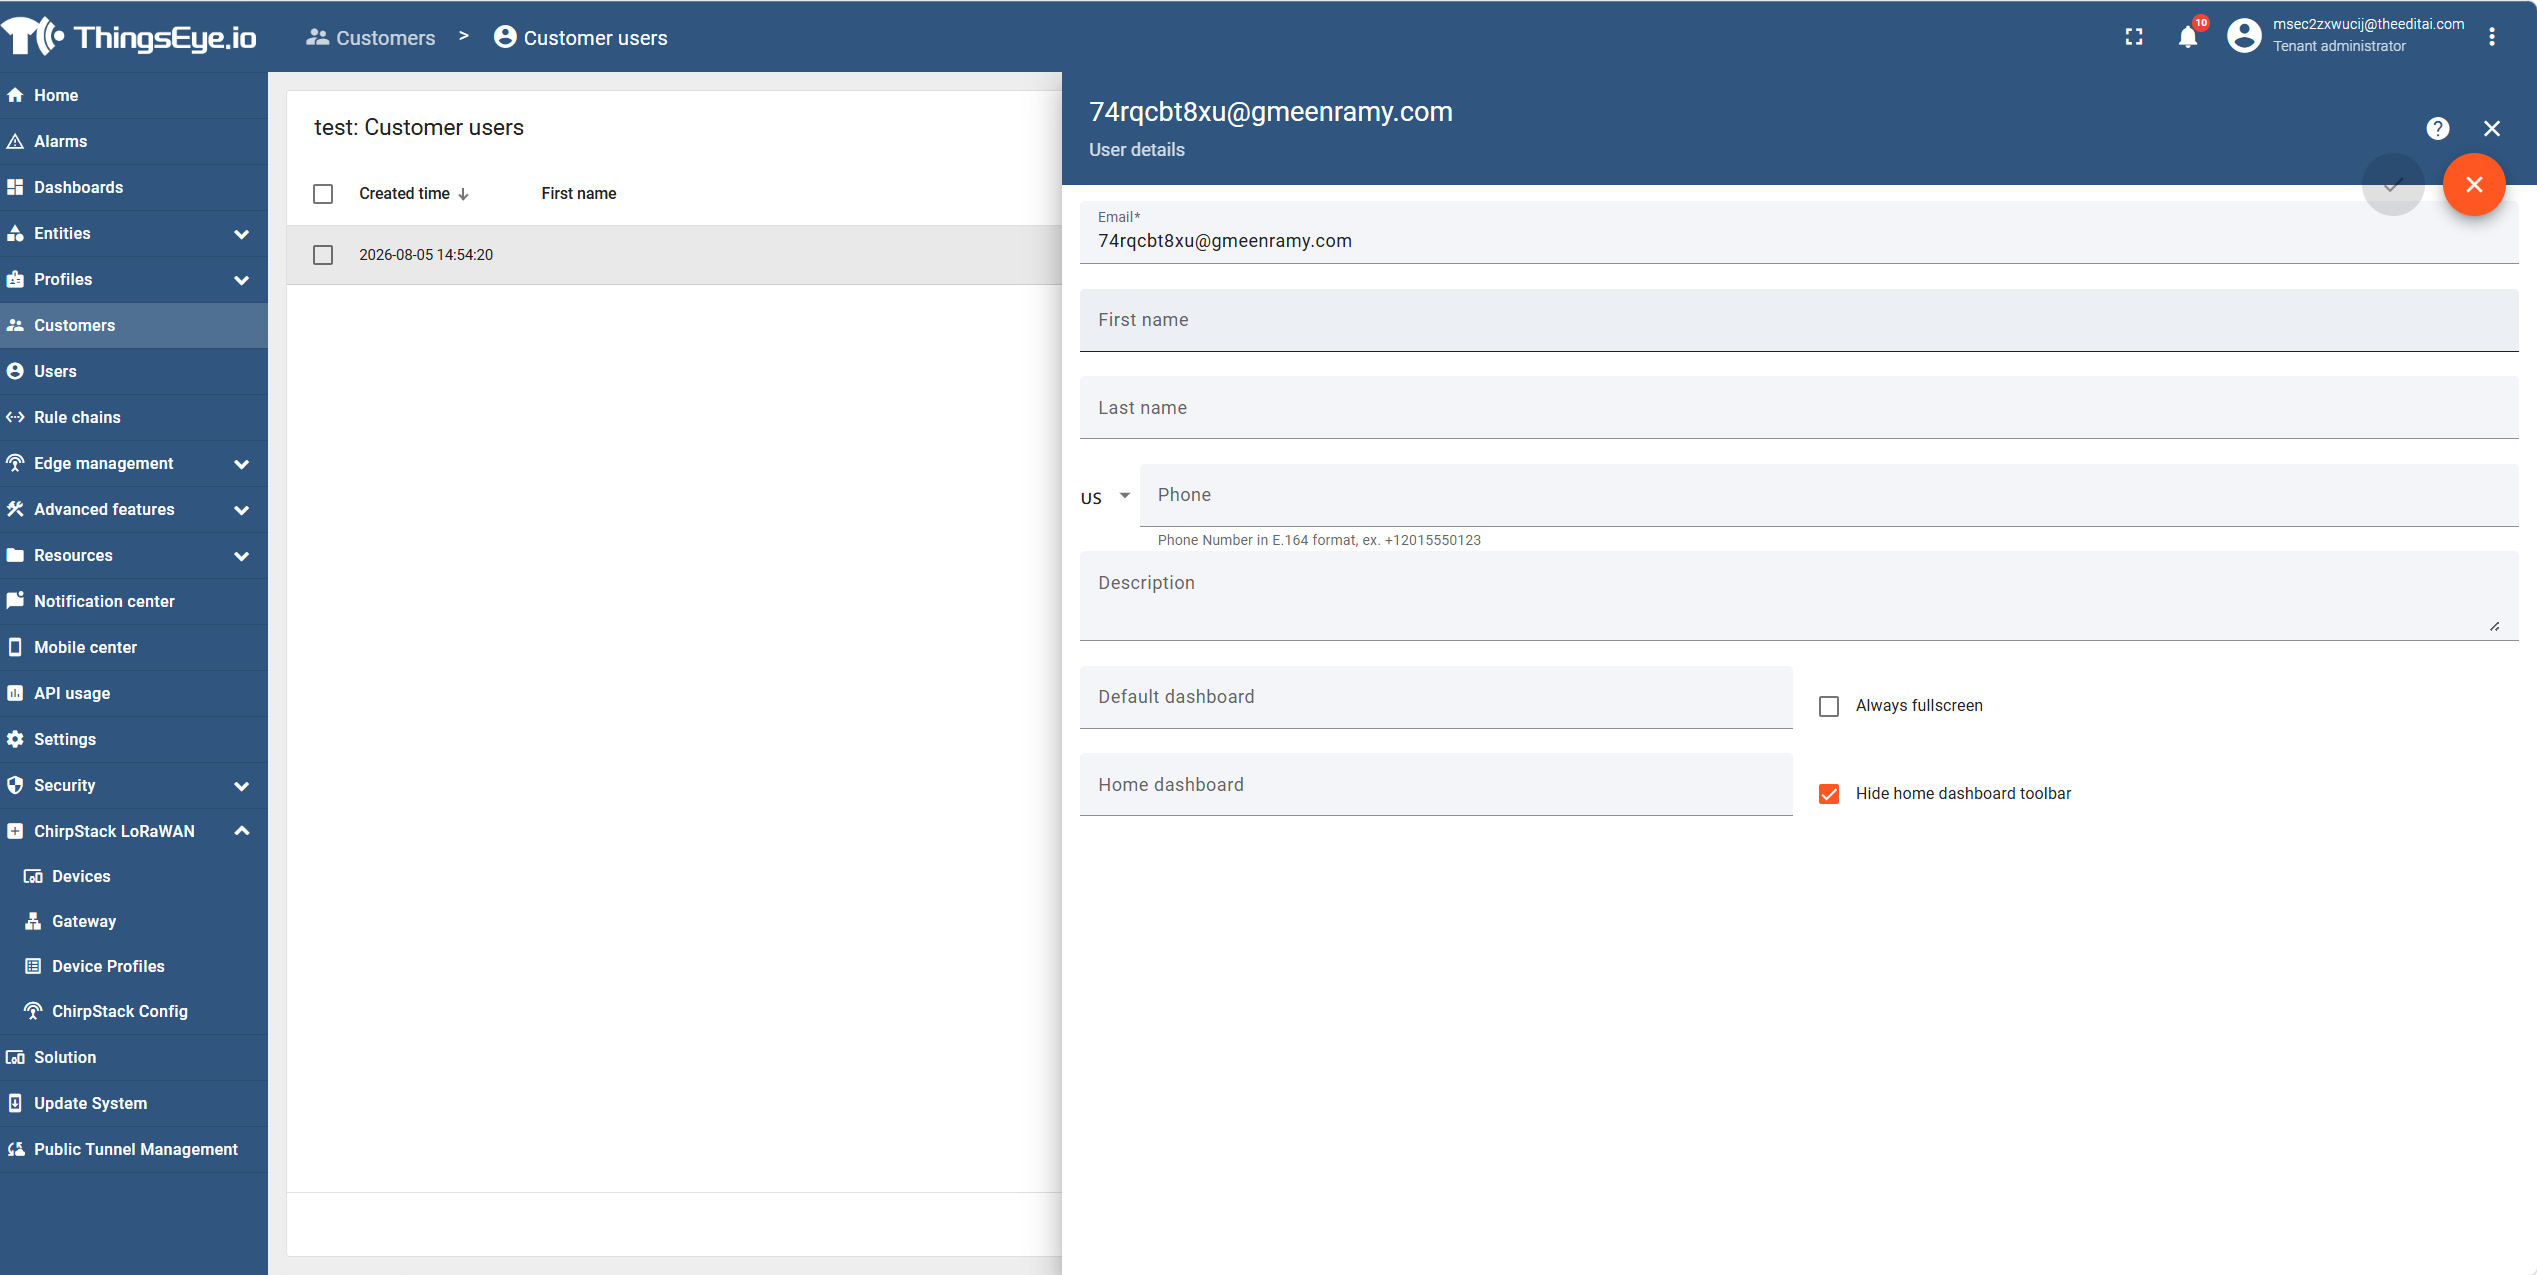
In edit mode, modify the fields that need updating.
Note: The Email field is required and cannot be left empty. All other fields are optional.
Step 4: Save changes
After modification, click the checkmark icon (✓) at the top to save. To discard changes, click the "✕" button to exit edit mode.
Account Status Management
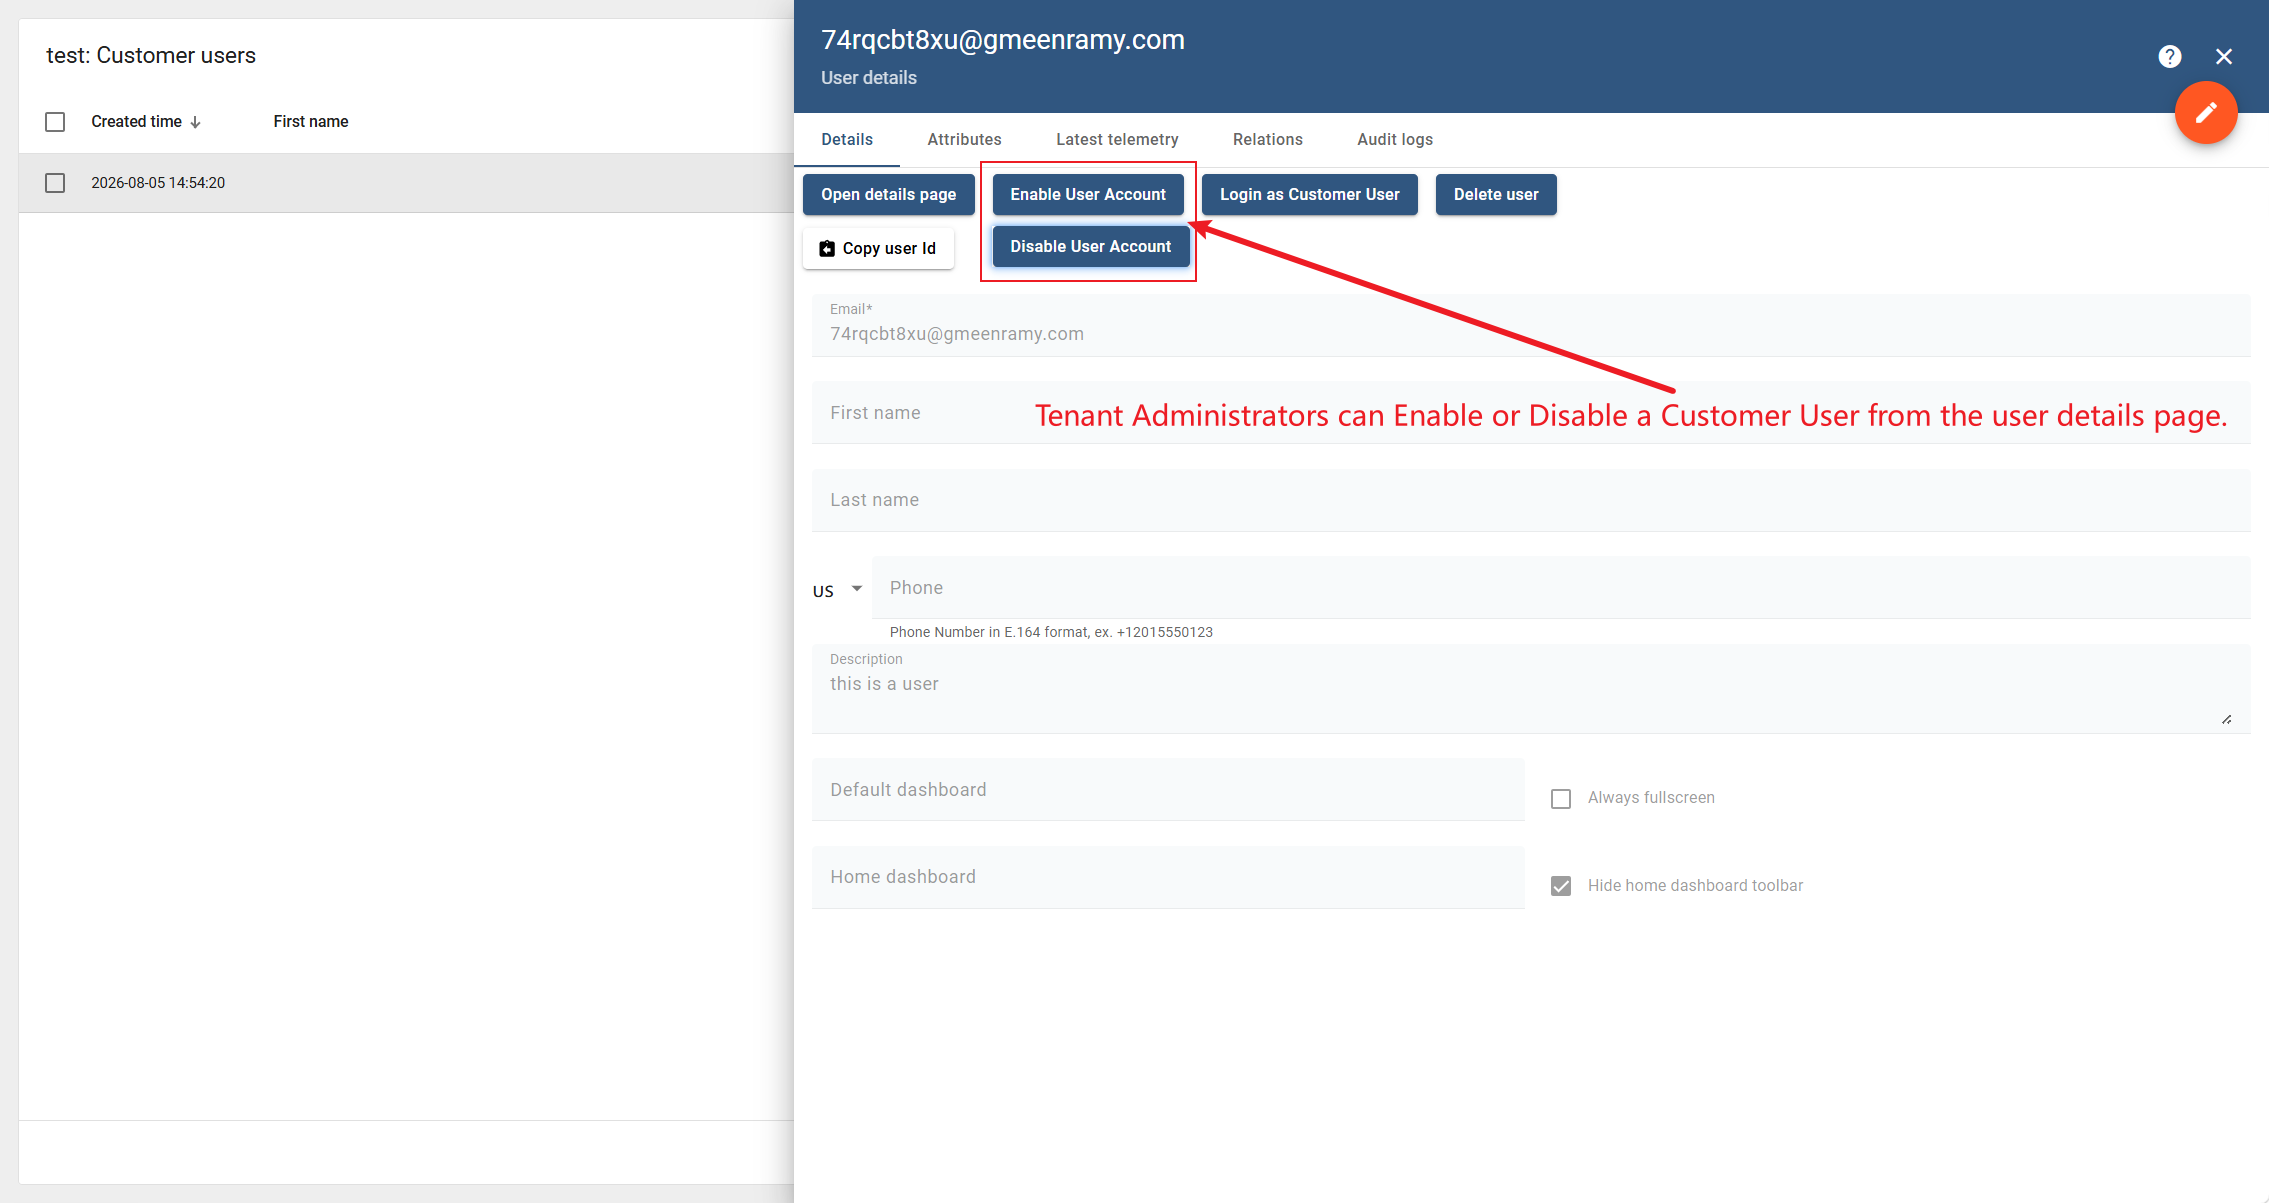
Tenant Administrators can enable or disable a customer user on the user details page.
- Disable a user: Click the "Disable User Account" button on the details page; the user account will be deactivated. The user cannot log in to the platform after being disabled.
- Enable a user: Click the "Enable User Account" button on the details page; the user account will be restored to active status.
Activation Link Management
If a user has not completed account activation or needs to retrieve a new activation link, the Tenant Administrator can perform the following operations on the user details page:
- Show Activation Link: Regenerates and displays an activation link for the administrator to manually send to the user.
- Resend Activation: The system automatically resends the activation invitation email to the user's email address.
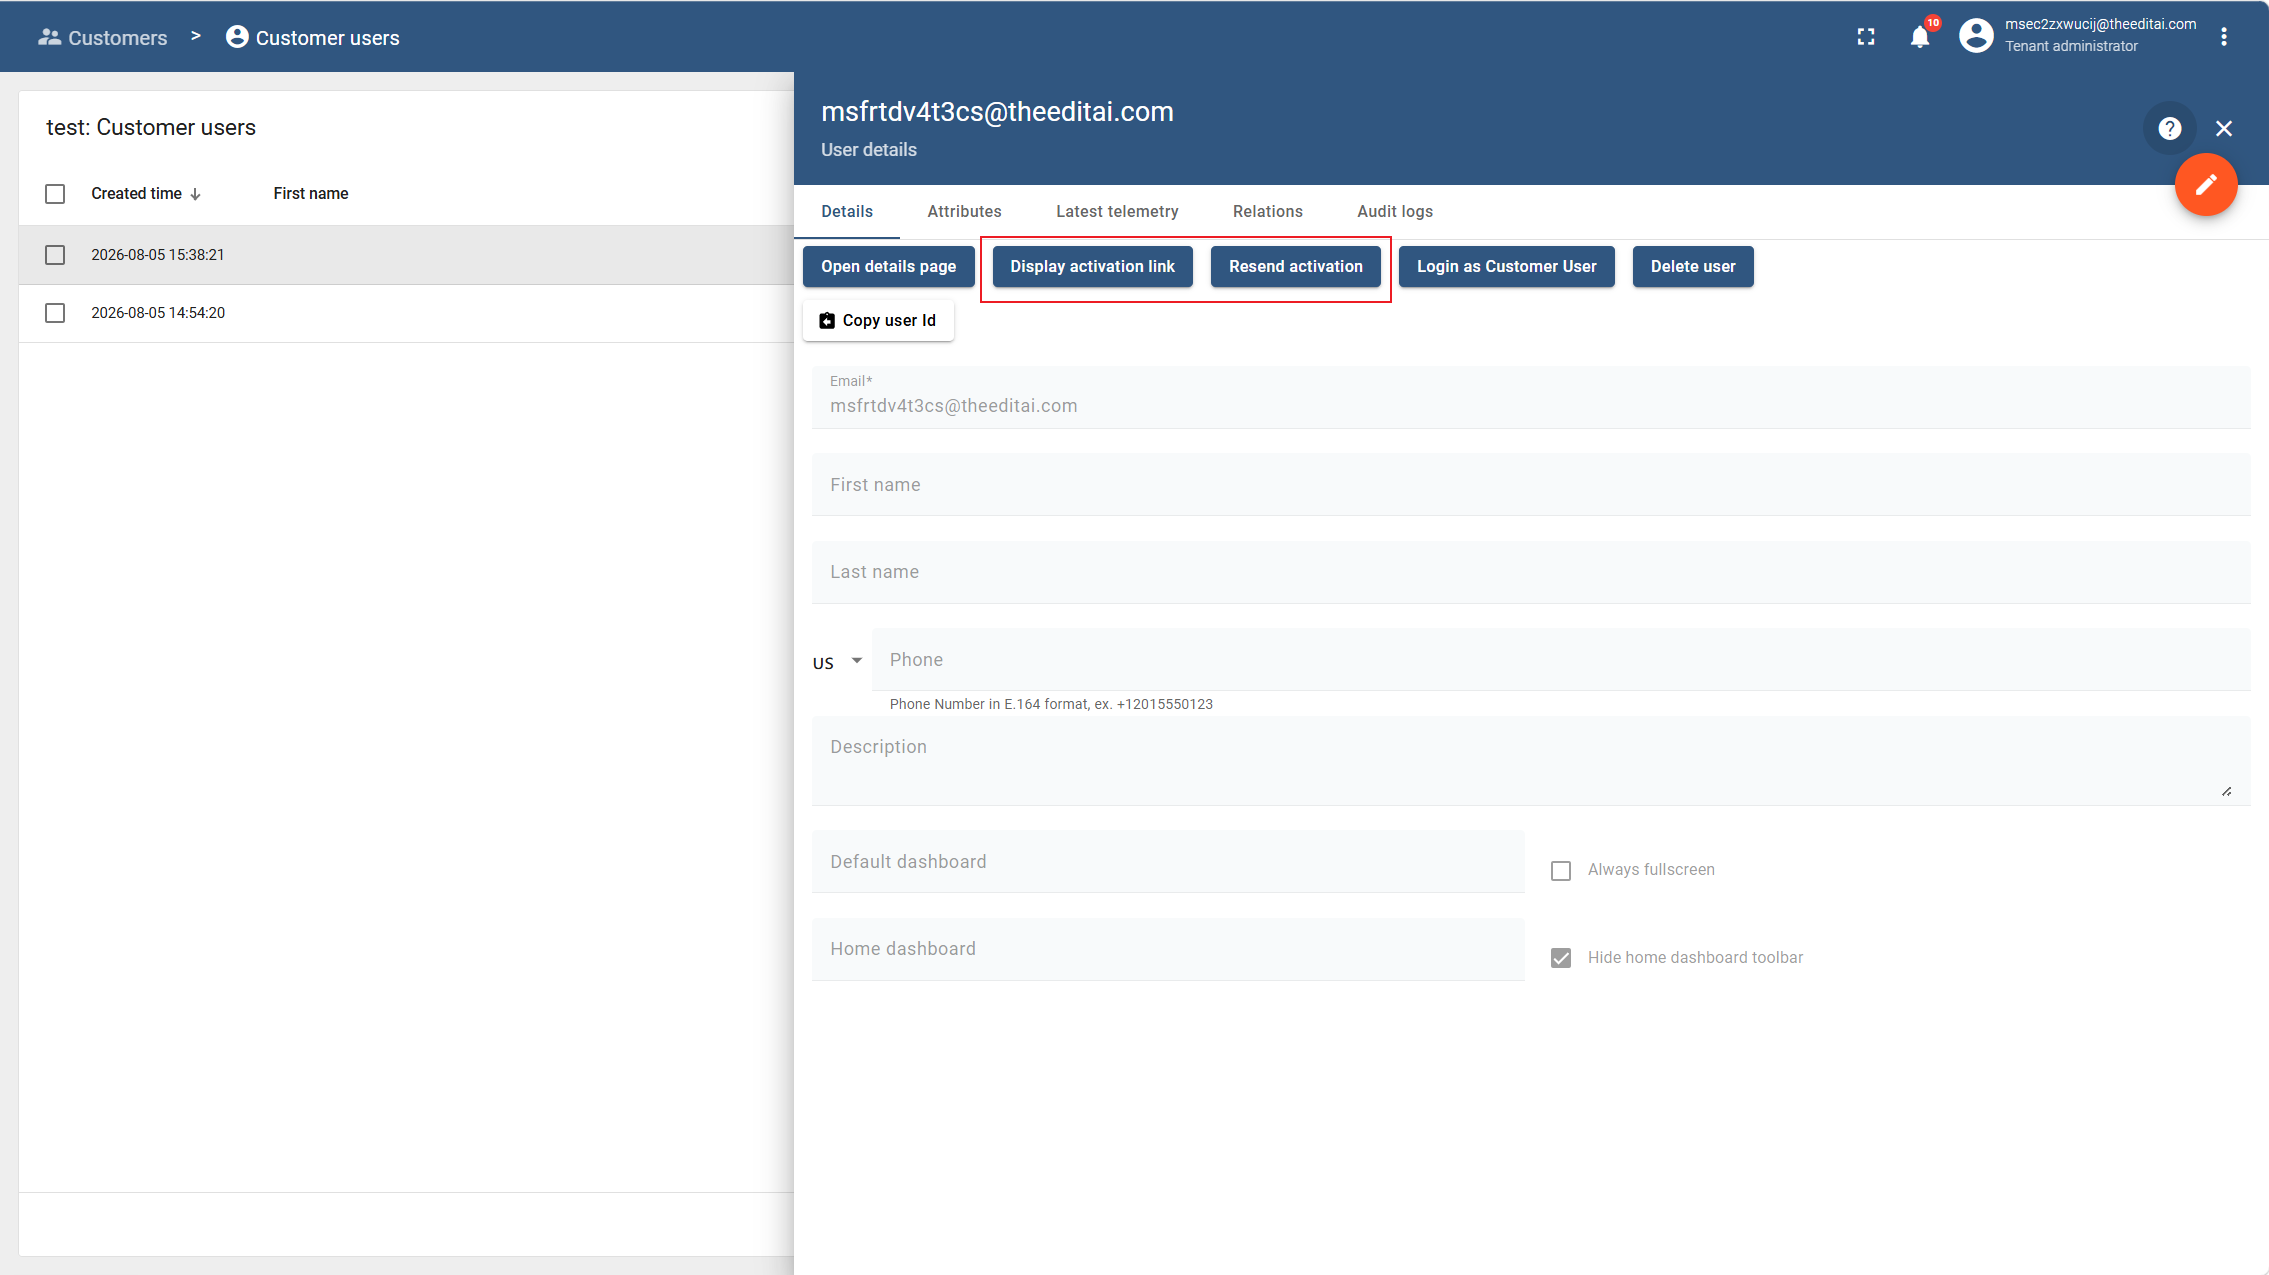
User Behavior After Password Reset: After performing "Show Activation Link" or "Resend Activation", the user will receive an email containing an activation link. When the user clicks the link, they will be taken to the password setup page, where they can directly set a new password. This operation immediately invalidates the old password; no separate temporary password needs to be communicated by the administrator. Regardless of whether the user account was previously activated, clicking the link will reset the password.
Important Considerations
| Item | Description |
|---|---|
| Email Uniqueness | When changing the email address, the new email must be unique across the platform and must not duplicate any other user's email. |
| Disable Impact | After being disabled, the user cannot log in to the platform, but their previously created entities or assigned resources are not affected. |
| Activation Link Validity | Activation links typically have a validity period; if expired, a new one must be regenerated and sent. |
6. Delete a User
There are two ways to delete a customer user:
Method 1: Delete from the user management interface
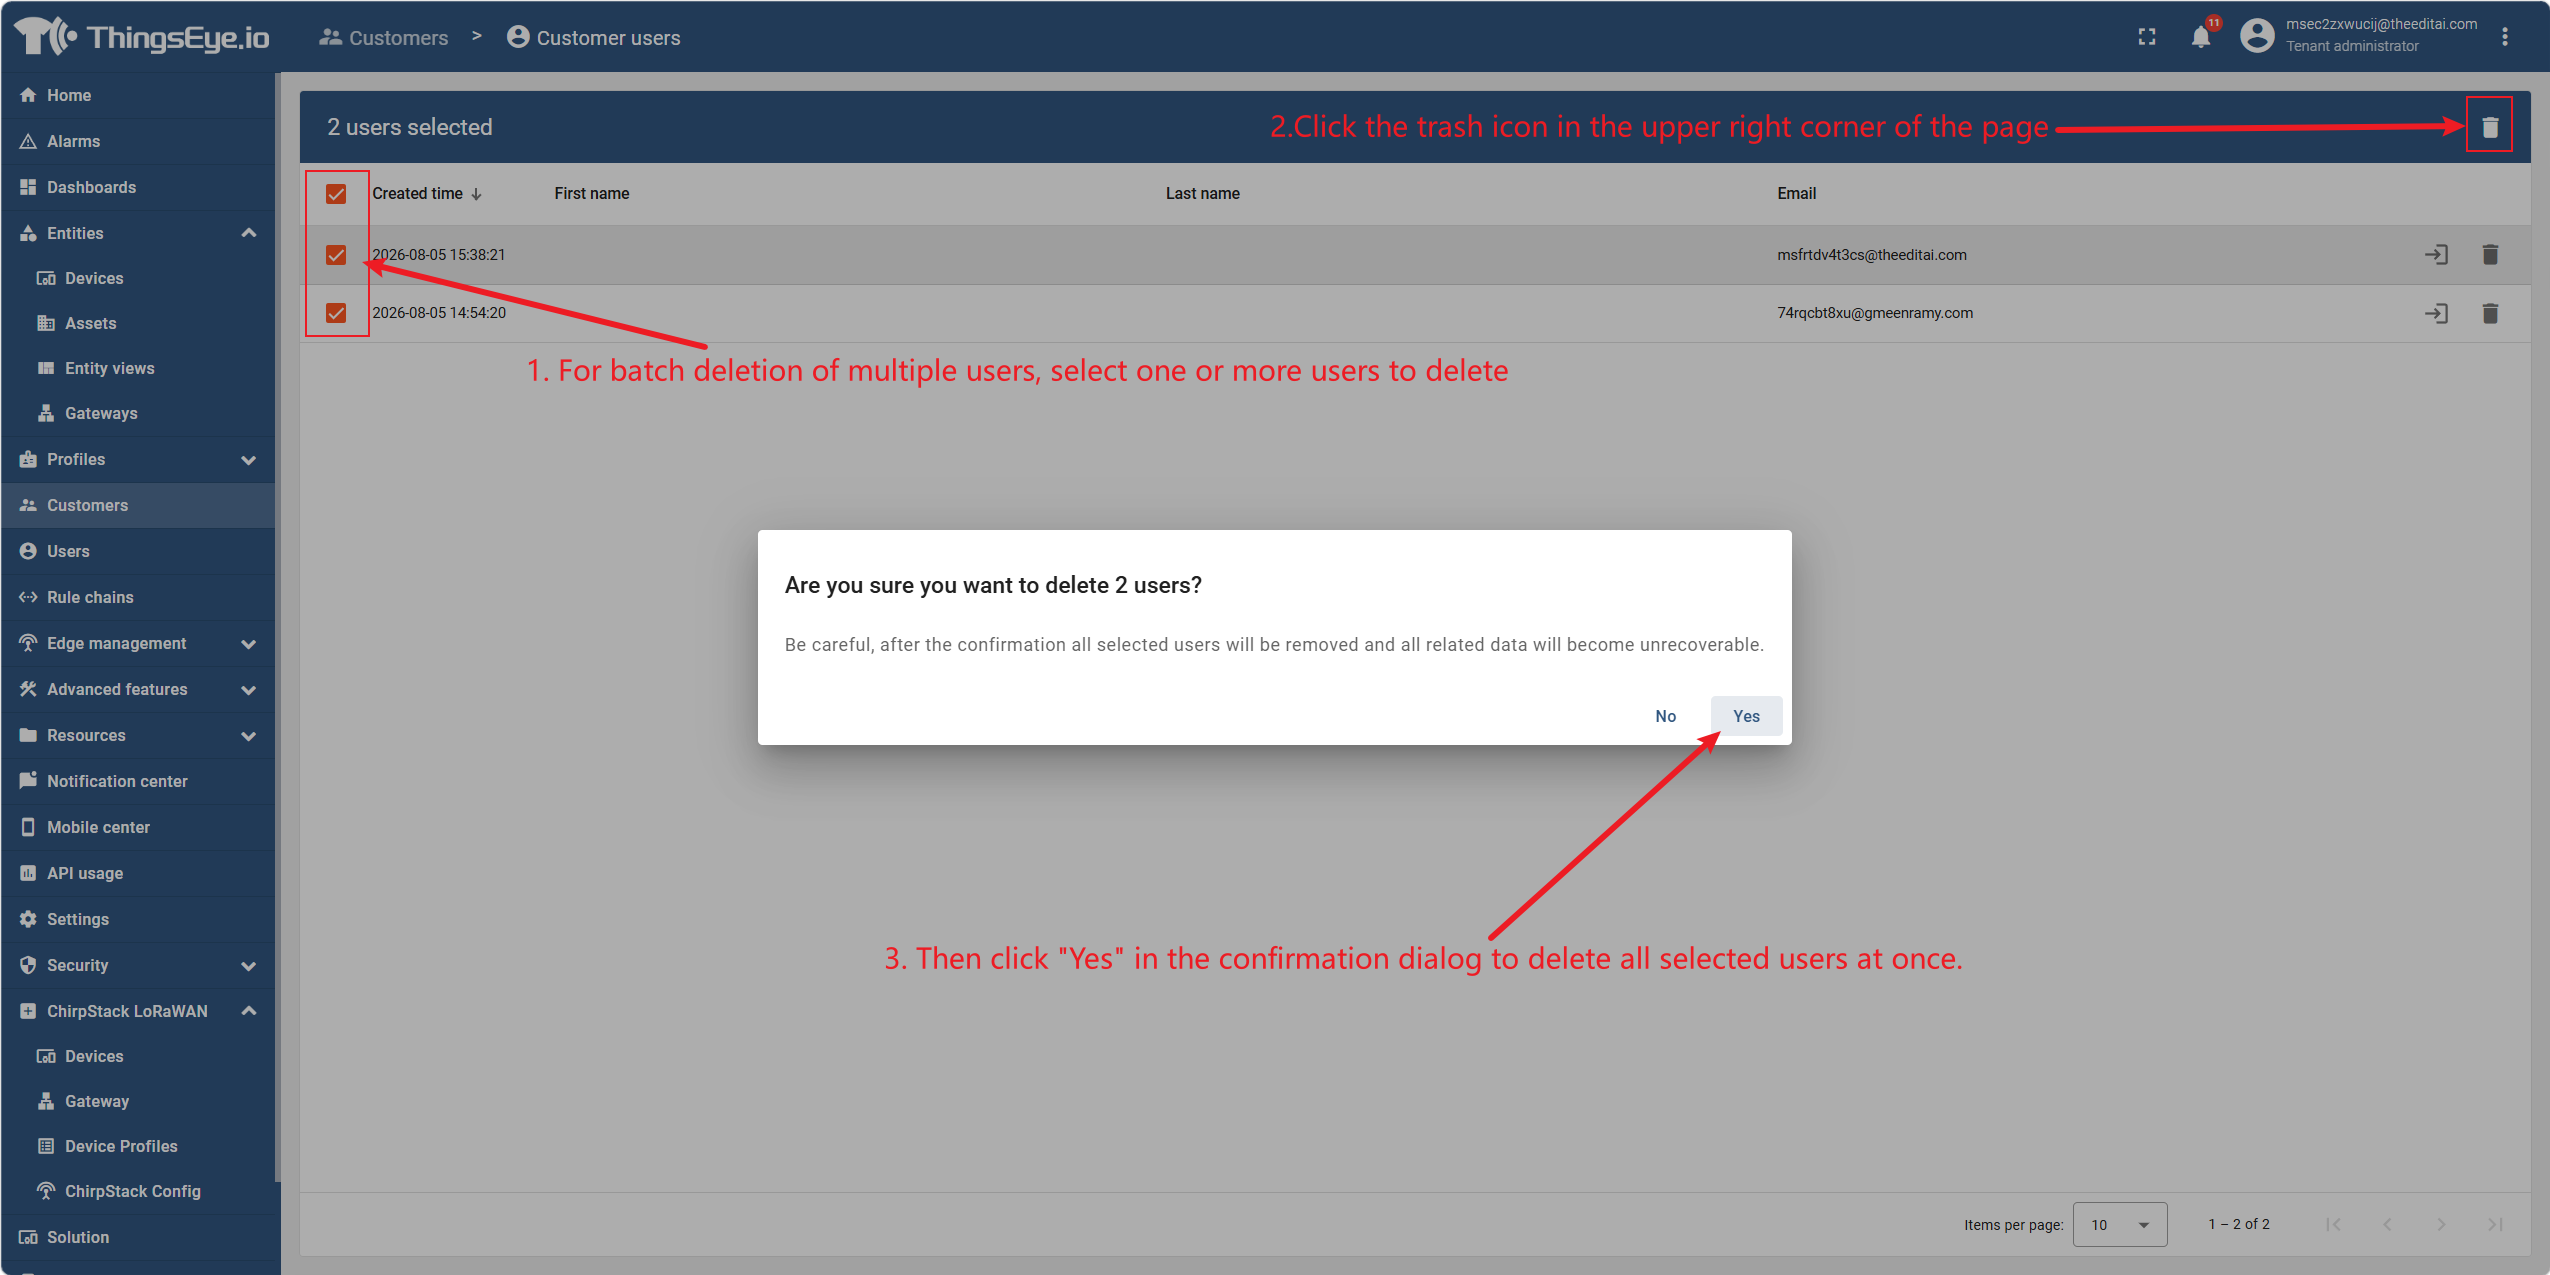
In the customer user management interface, locate the row of the target user, click the trash can icon at the end of the row, and then click "Yes" in the confirmation dialog to complete the deletion.
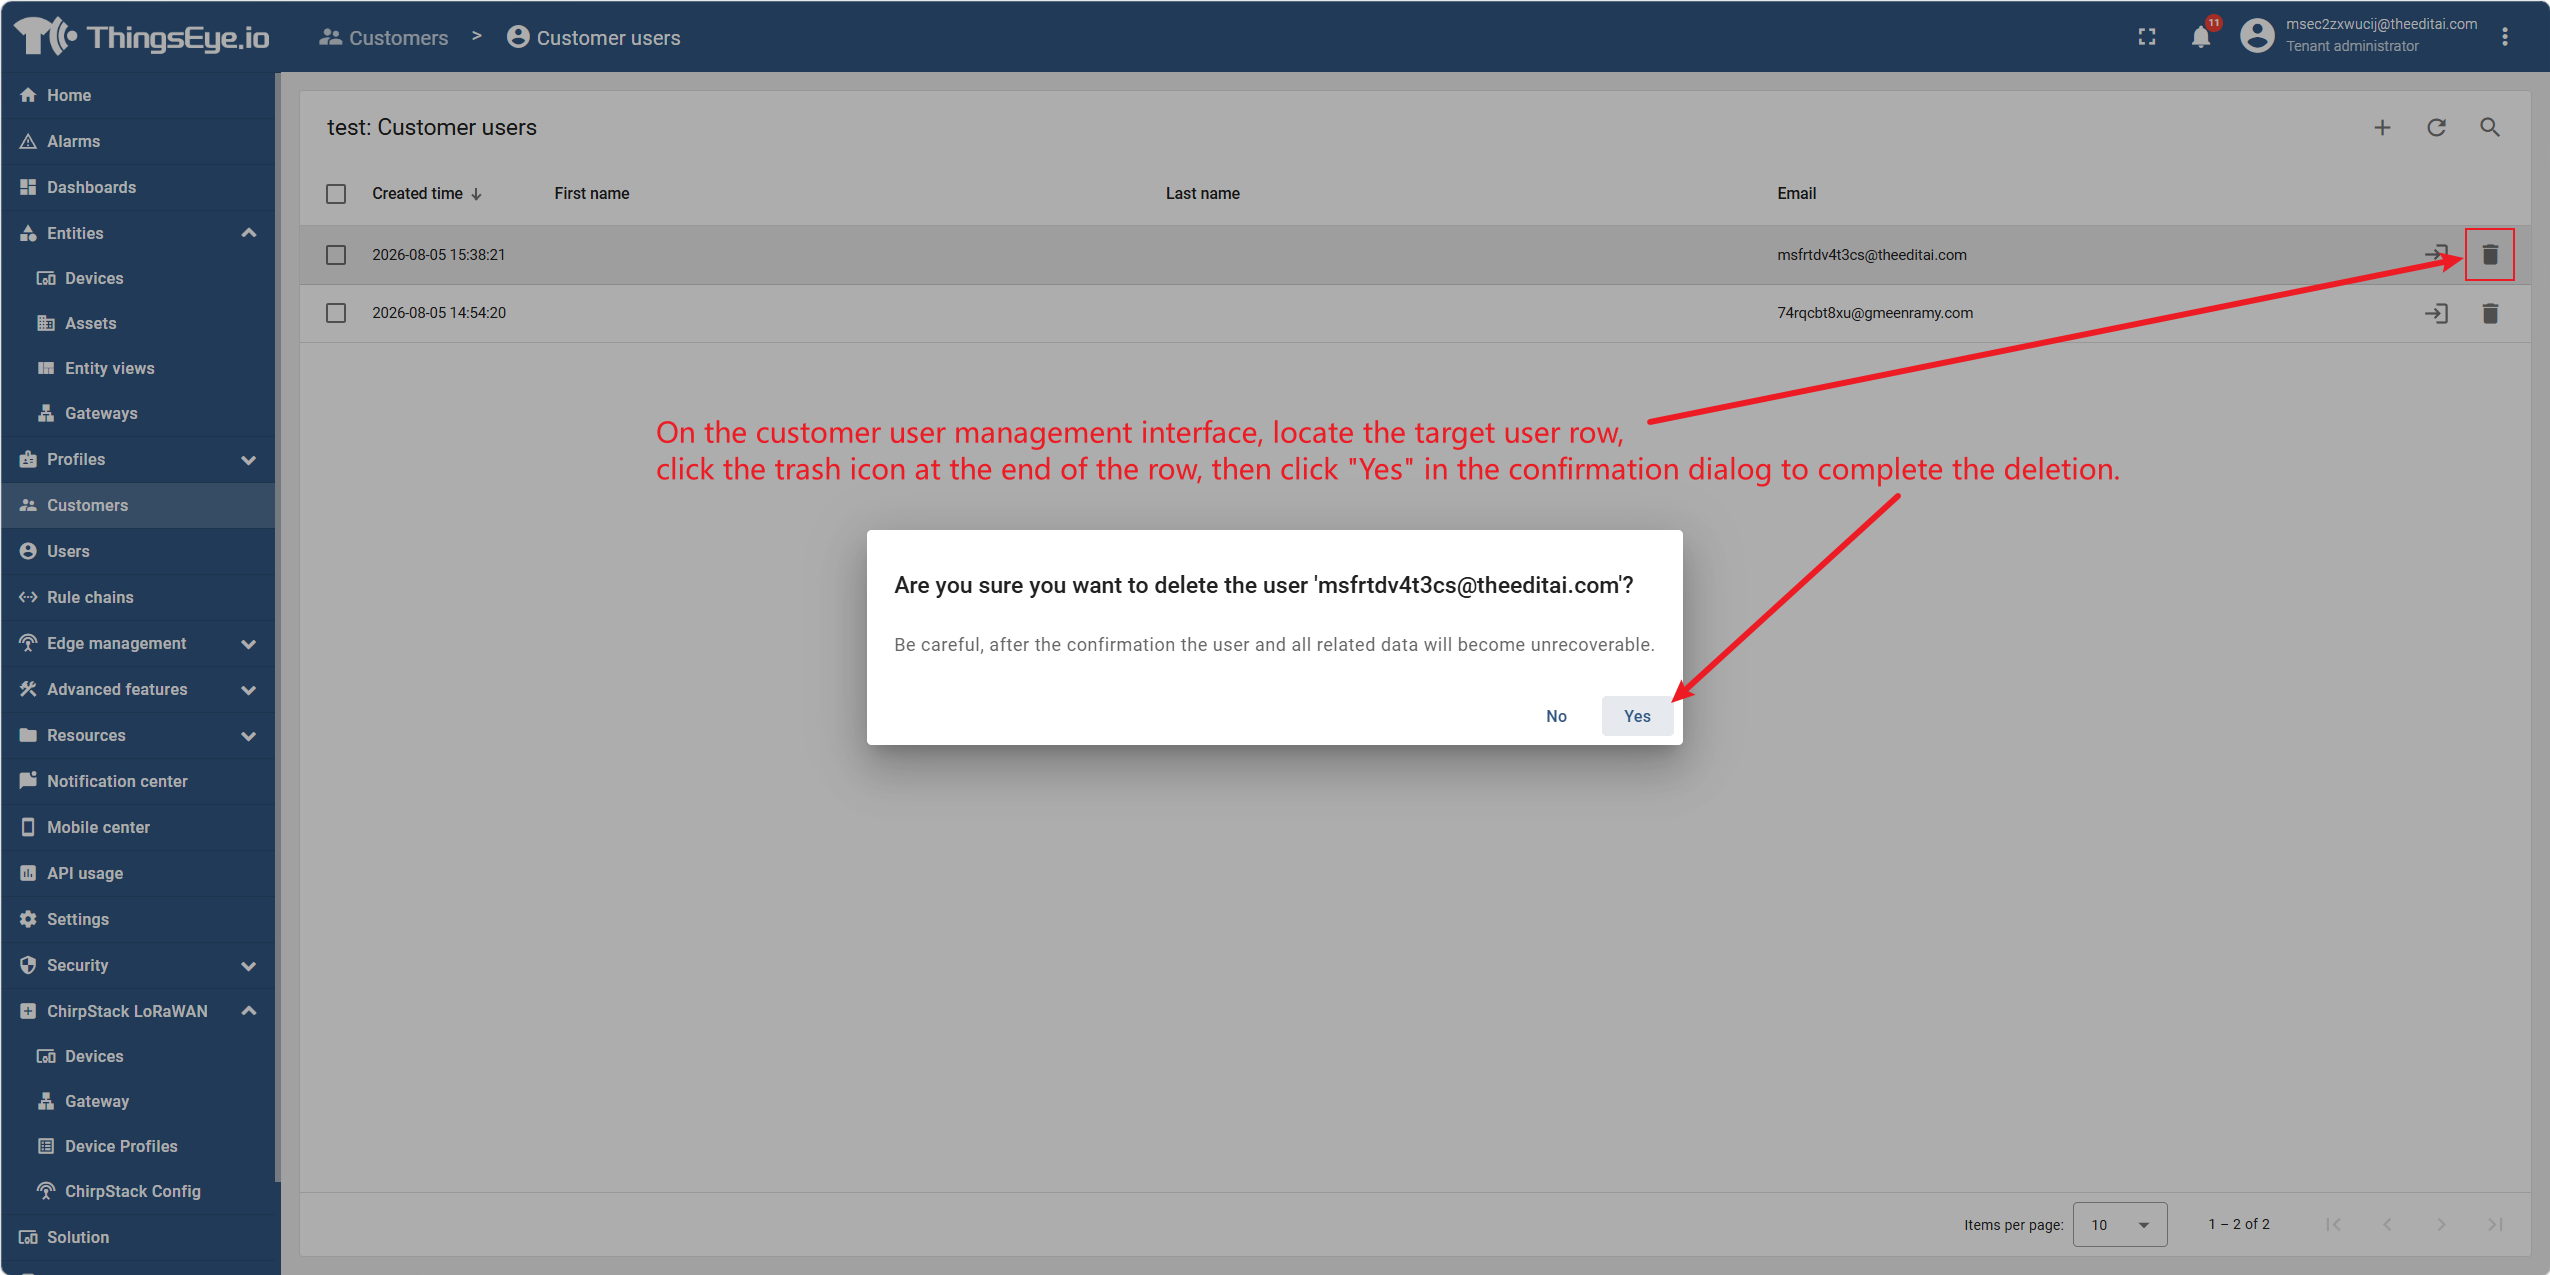
Bulk delete multiple users: Select one or more users to delete, click the trash can icon in the upper‑right corner of the page, and then click "Yes" in the confirmation dialog to delete all selected users at once.
Method 2: Delete from the user details page
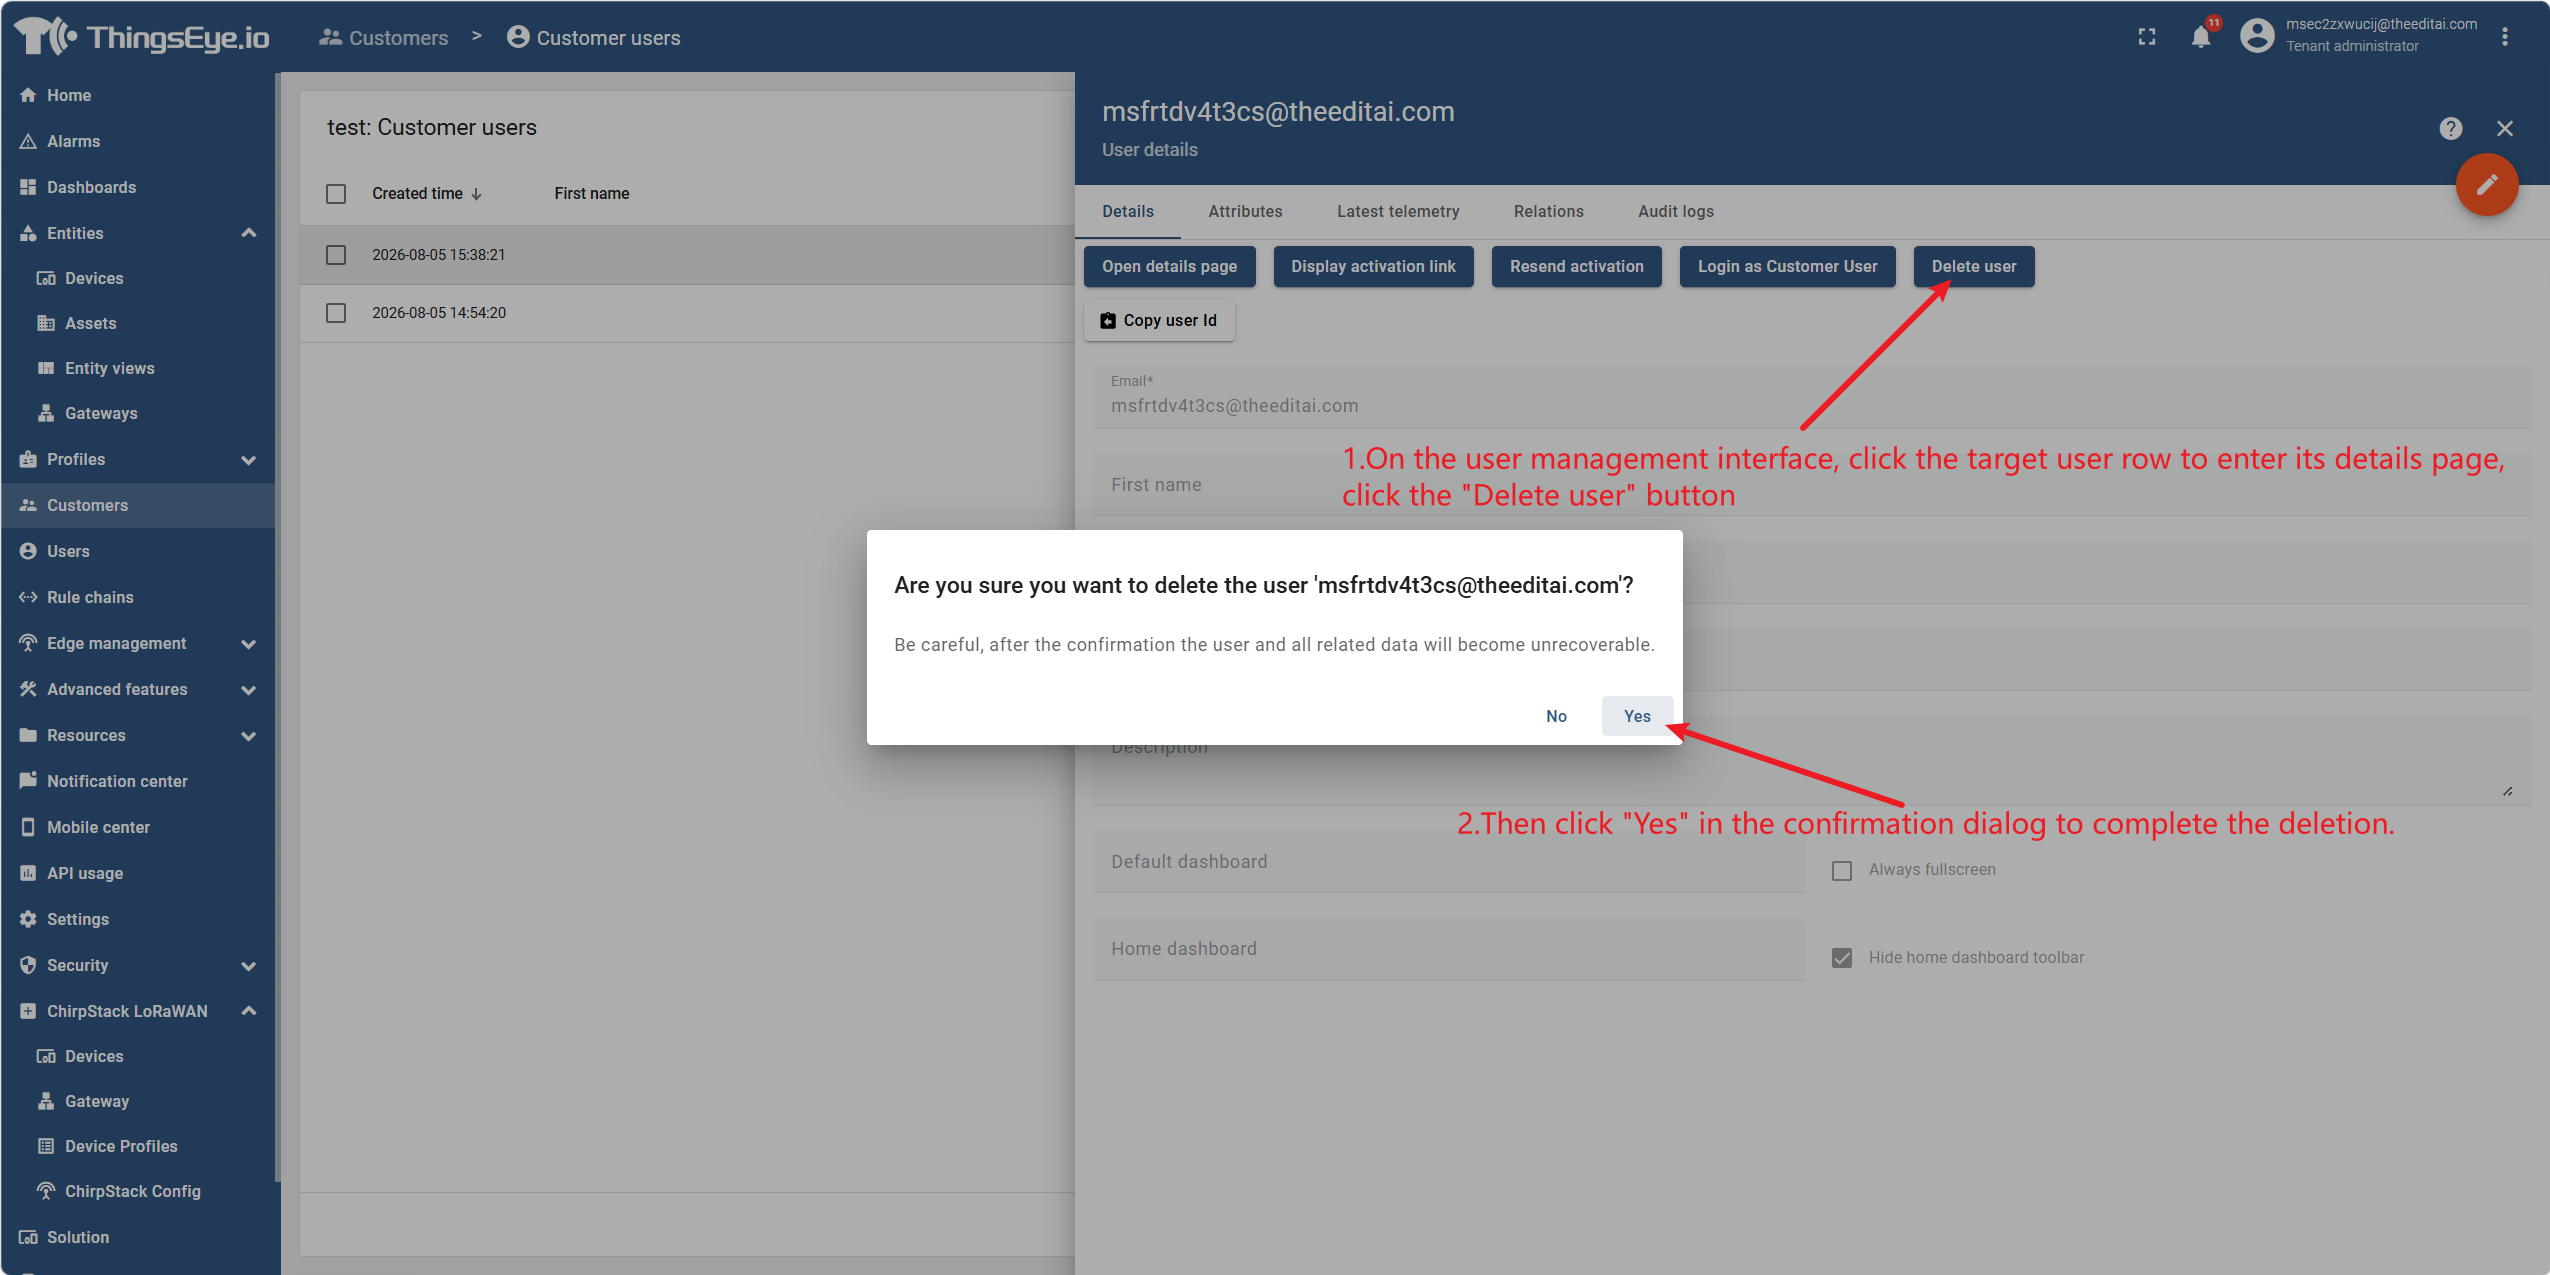
In the user management interface, click the row of the target user to go to its details page, click the "Delete User" button, and then click "Yes" in the confirmation dialog to complete the deletion.
Important Considerations
| Item | Description |
|---|---|
| Irreversibility | Deleting a user is irreversible; data cannot be recovered. |
| Cannot Delete Self | A logged‑in user cannot delete their own account. |
| Secondary Confirmation Required | Each deletion operation requires secondary confirmation in a pop‑up dialog to prevent accidental operations. |
| Assigned Entities Unaffected | Deleting a user does not affect devices, assets, or dashboards previously assigned to that user. |