ThingsEye Quick Start Guide
Intended audience: Tenant administrators performing initial deployment or debugging.
Quick main path:
- LoRaWAN devices: All-in-One network configuration / LAN configuration → log in to platform → import template → create and confirm gateway → register device → view dashboards.
- NB-IoT / Cat-1 / MQTT / HTTP / CoAP direct-connected devices, or external MQTT platform access: All-in-One network configuration / LAN configuration → log in to platform → import template → register / configure access → view dashboards.
Non-LoRaWAN devices skip “Create and Confirm Gateway” and LoRaWAN join parameter-related steps.
1. Prerequisites
Before starting, confirm: the All-in-One, power supply, and network cable are ready; a router or switch is available, and the computer and All-in-One are planned to connect to the same LAN; the platform access address, tenant administrator account, and password have been obtained; the general template package has been downloaded from the ThingsEye Wiki. Custom template customers should use their own template packages.
First determine the device onboarding method:
| Device Type | Basis for Judgment | Is a Local LoRaWAN Gateway Required? |
|---|---|---|
| LoRaWAN device | Has DevEUI / AppEUI / AppKey, uses LoRa RF | Required |
| NB-IoT / Cat-1 and other cellular devices | Uses cellular network, can fill in platform address and credentials | Not required |
| MQTT / HTTP / CoAP direct-connected devices | Device can directly fill in platform address and credentials | Not required |
| External MQTT platform access | Data comes from TTN, external ChirpStack, self-hosted broker | Not required locally, but the external platform requires a gateway |
If the device is a LoRaWAN device, additionally prepare: LoRaWAN gateway and login method for the gateway management UI; device DevEUI, AppEUI, AppKey; frequency band information for the device, gateway, and platform; gateway installation location and power/network conditions.
If the device is an NB-IoT, Cat-1, or other non-LoRaWAN device, prepare the platform address, access credentials, topics, and other parameters according to the corresponding device documentation. For specific onboarding steps, see the detailed manual.
2. All-in-One Network Configuration, Login, and Template Import
- Insert the network cable into the All-in-One network port, connect the other end to a router or switch, connect power, and power it on.
- It is recommended to set the All-in-One network to automatically obtain an IP address (DHCP). If a fixed IP is required, set a DHCP reservation on the router, or directly set a static IP, and record the IP.
- Ensure the computer and the All-in-One are on the same LAN or subnet, AP isolation is disabled on the router, and the firewall allows the platform access port.
- On the computer, run
ping All-in-One-IPto confirm it can be pinged successfully. - In a browser, access
http://All-in-One-IP:portand confirm the platform login page is displayed. - On the login page, enter the account and password, and click “Login”. For initial quick start, use the tenant administrator account.
- In the left menu, go to “Solutions” and click “Upload Folder”, then select the template folder.
- Find the target template in the template list, click “Install Now”, and confirm installation.
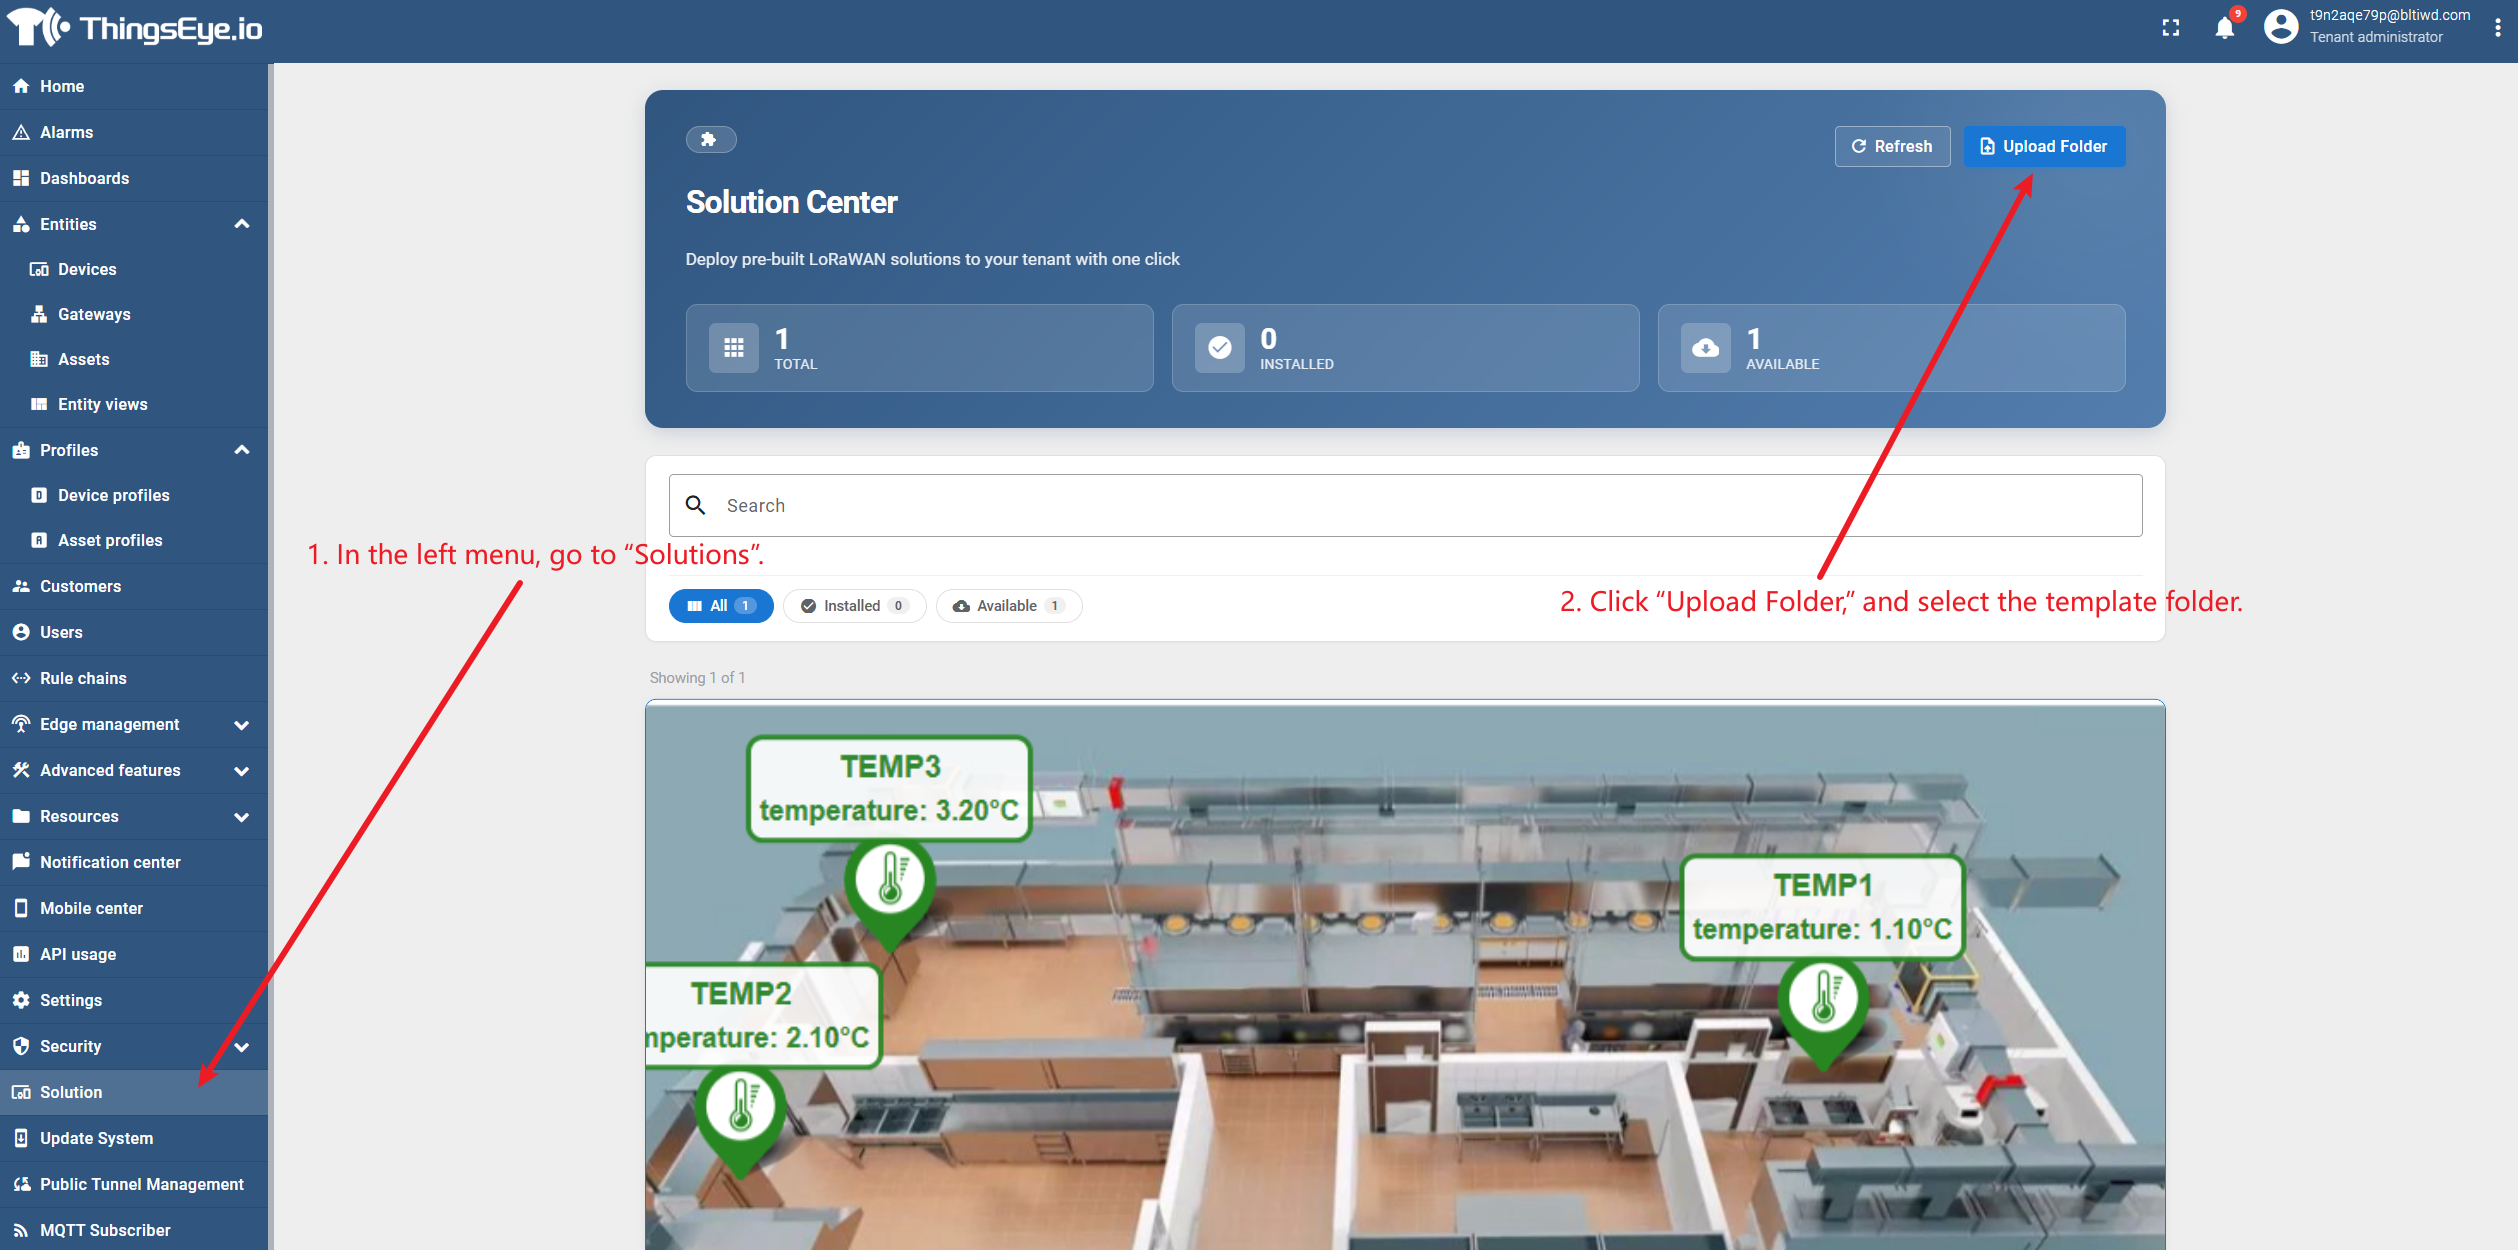
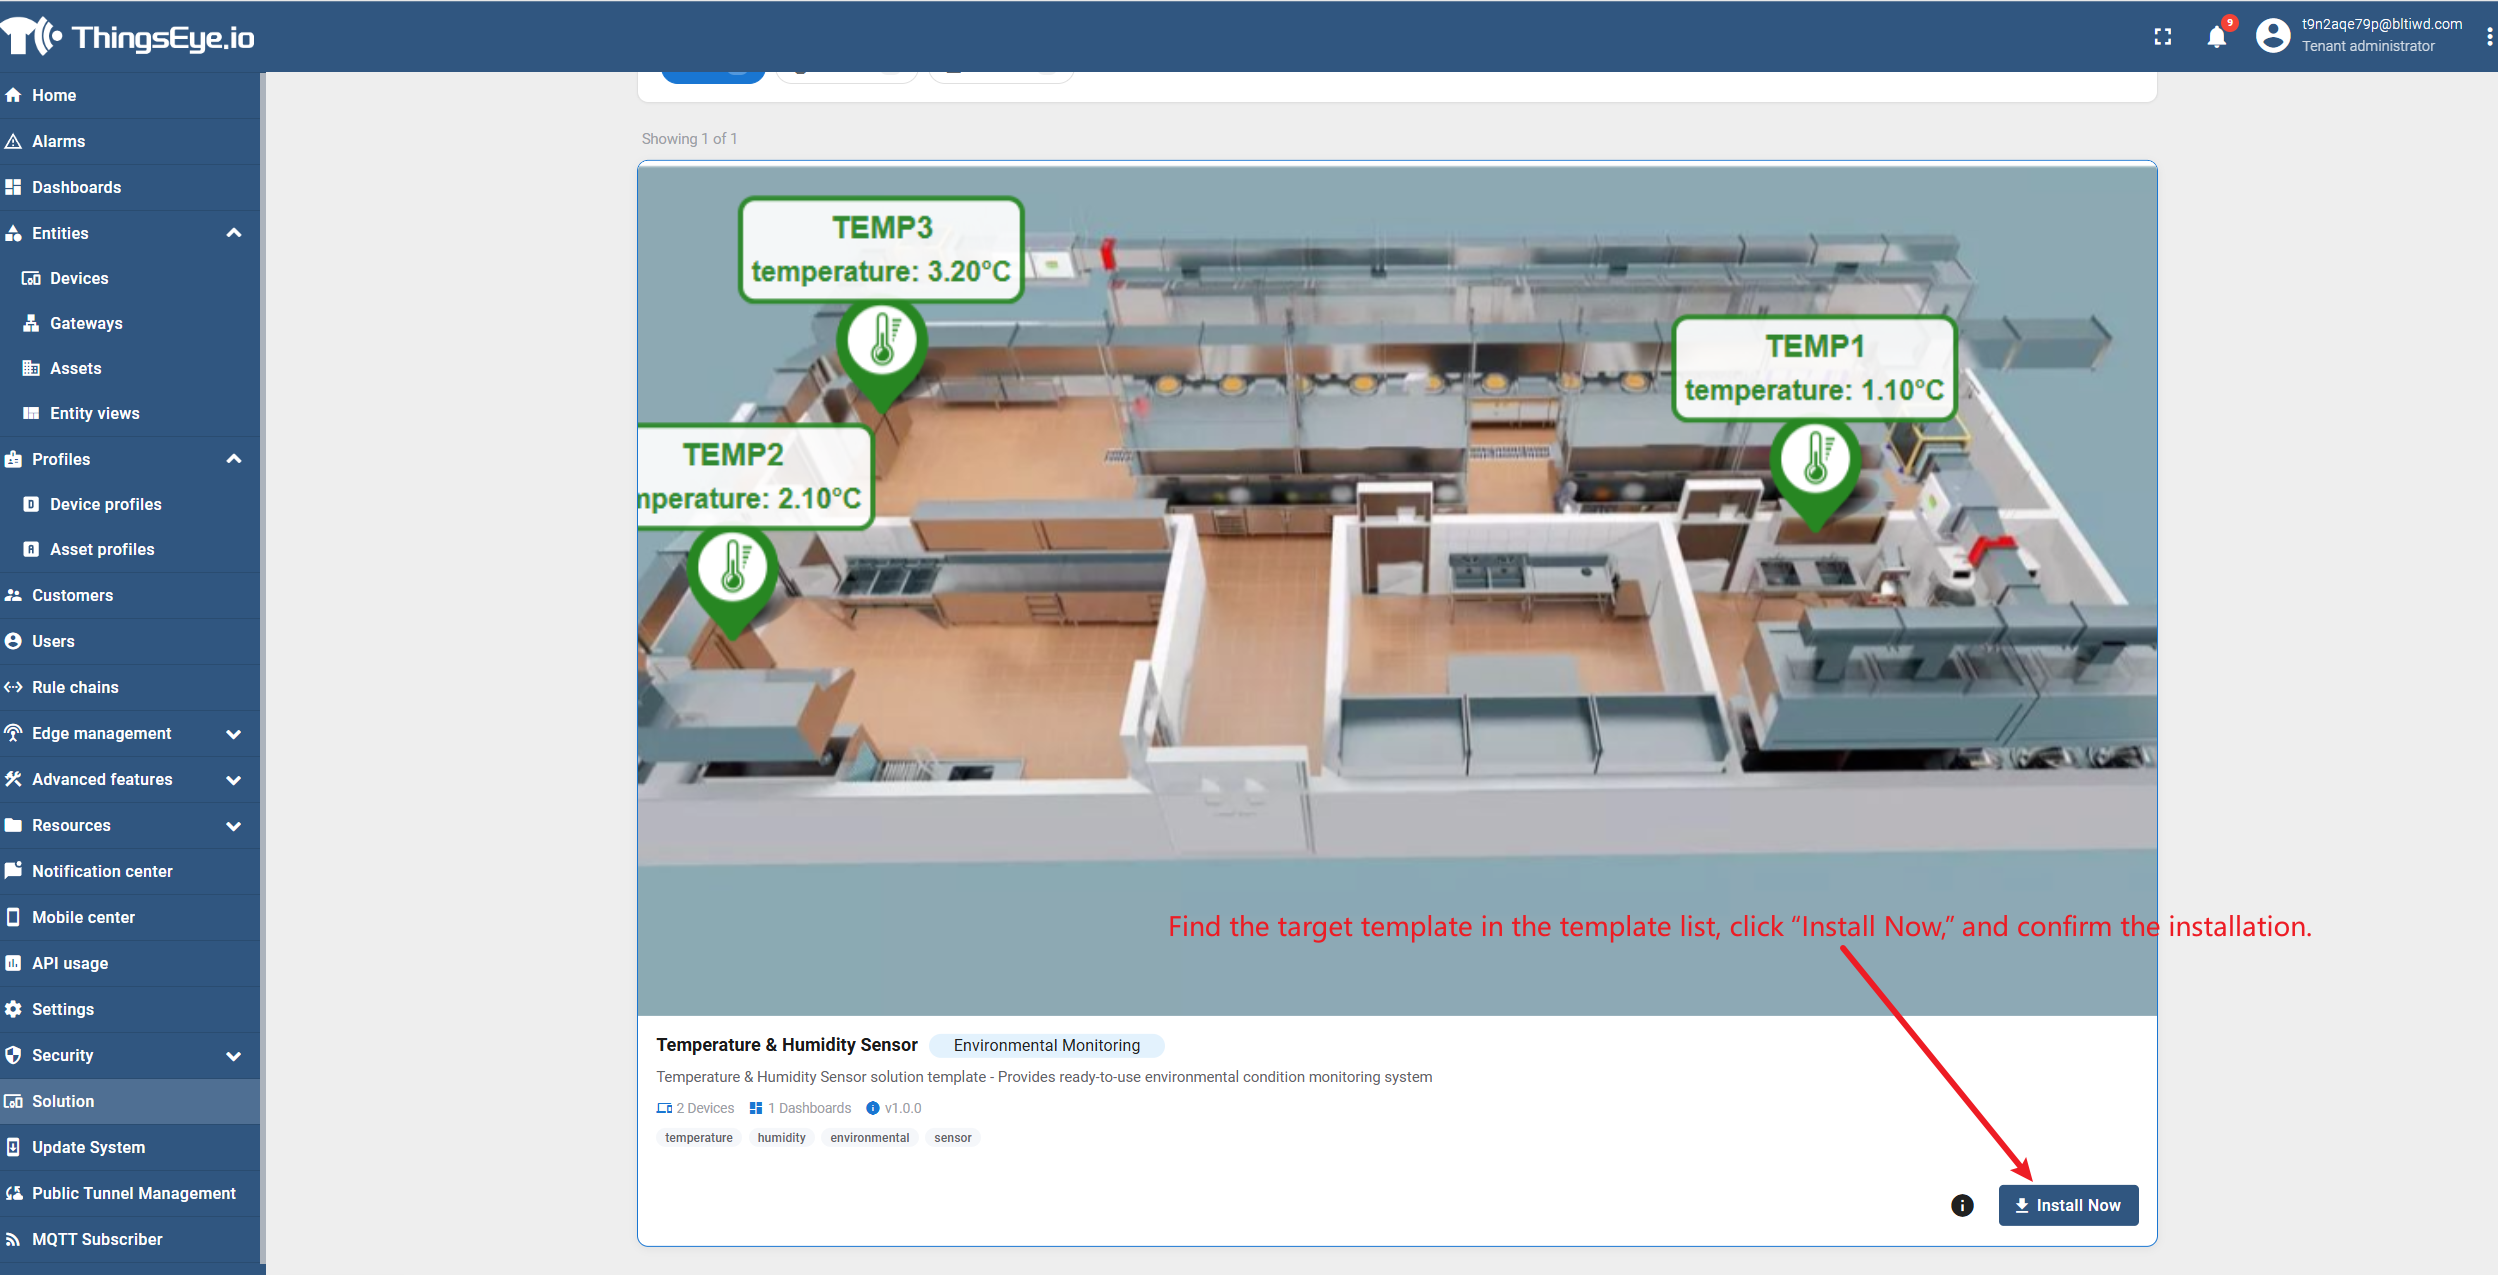
Upload and install template
After installation, device profile templates, rule chains, alarm rules, dashboards, asset configuration templates, devices, and assets should automatically appear or update in the platform.
Success criteria: The computer can ping the All-in-One, and the browser can open the platform login page; you successfully enter the platform console; you see the template under “Solutions → Installed”, and you see preset dashboards under “Dashboards”.
Note: Importing a template does not automatically create a LoRaWAN gateway. LoRaWAN devices must continue to Section 3. Non-LoRaWAN devices skip Section 3 and continue to Section 5.
3. Create and Confirm Gateway (Required Only for LoRaWAN Devices)
LoRaWAN devices only send LoRa RF and cannot connect directly to the All-in-One via IP. The gateway converts LoRa RF packets into Semtech UDP packets and sends them to the All-in-One. Without a gateway, the All-in-One cannot receive any LoRaWAN packets. If the device is an NB-IoT, Cat-1, MQTT / HTTP / CoAP direct-connected device, or data comes from an external MQTT platform, skip this section.
Create a gateway in the All-in-One:
- In the left menu, go to “Entities → Gateways” and click
+in the upper right corner. - Fill in the gateway EUI.
- After creation, confirm the gateway status is “Active”. Only when it displays “Active” is it considered online.
- If the status is not “Active”, first check gateway power, network, and whether the gateway UDP port corresponds to the device profile frequency band.
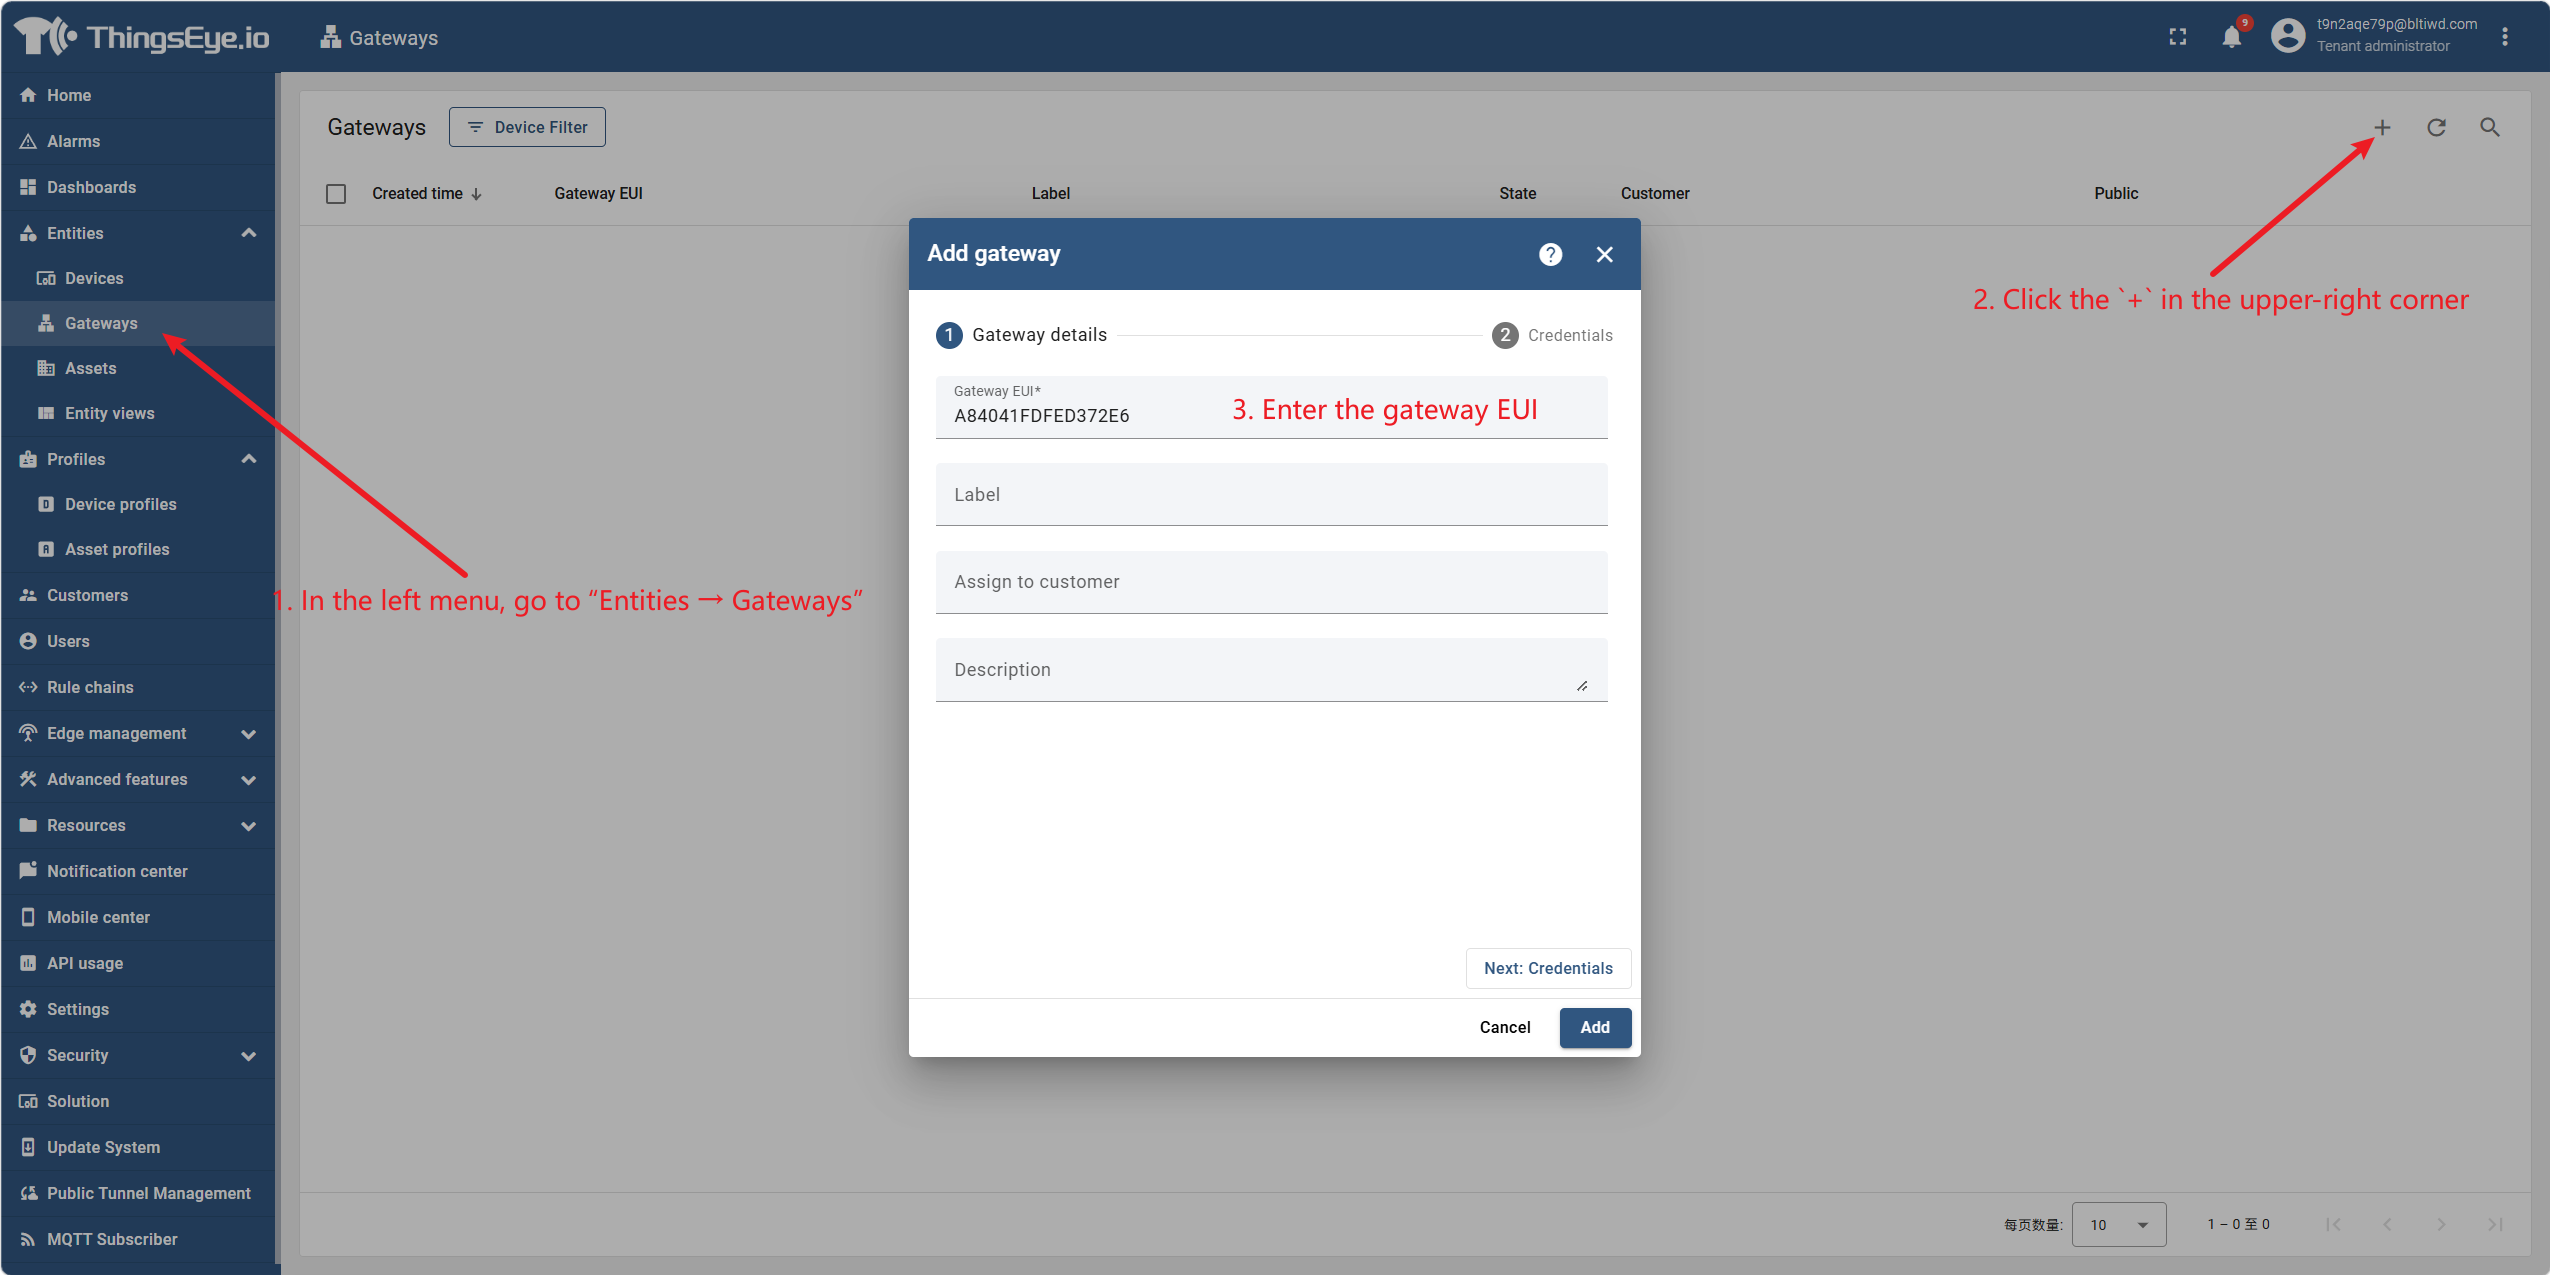
Register gateway
The gateway UDP port must correspond to the device profile frequency band; otherwise it may show online but receive no data. For specific packet forwarder configuration, see the detailed documentation or gateway instructions. This quick start guide does not cover it.
Success criteria: The gateway status displays “Active”. Actual packet reception also requires correct packet forwarder configuration.
4. LoRaWAN Device Onboarding
Prerequisite: The gateway has been created; the field device is within gateway coverage.
4.1 Create LoRaWAN Device Profile
If a usable LoRaWAN device profile already exists, skip this section.
Optional: Upload Decoder
- In the left sidebar, expand “Resources” and click “JavaScript Library”.
- Click “+” in the upper right corner, set “Mode” to “Module”, and fill in name, description, and other information.
- If the downloaded file is a
.jsfile, upload it directly; for other types, manually copy and paste the content. - The decoder must use ES5 syntax. If using a module, the JS can be used directly.
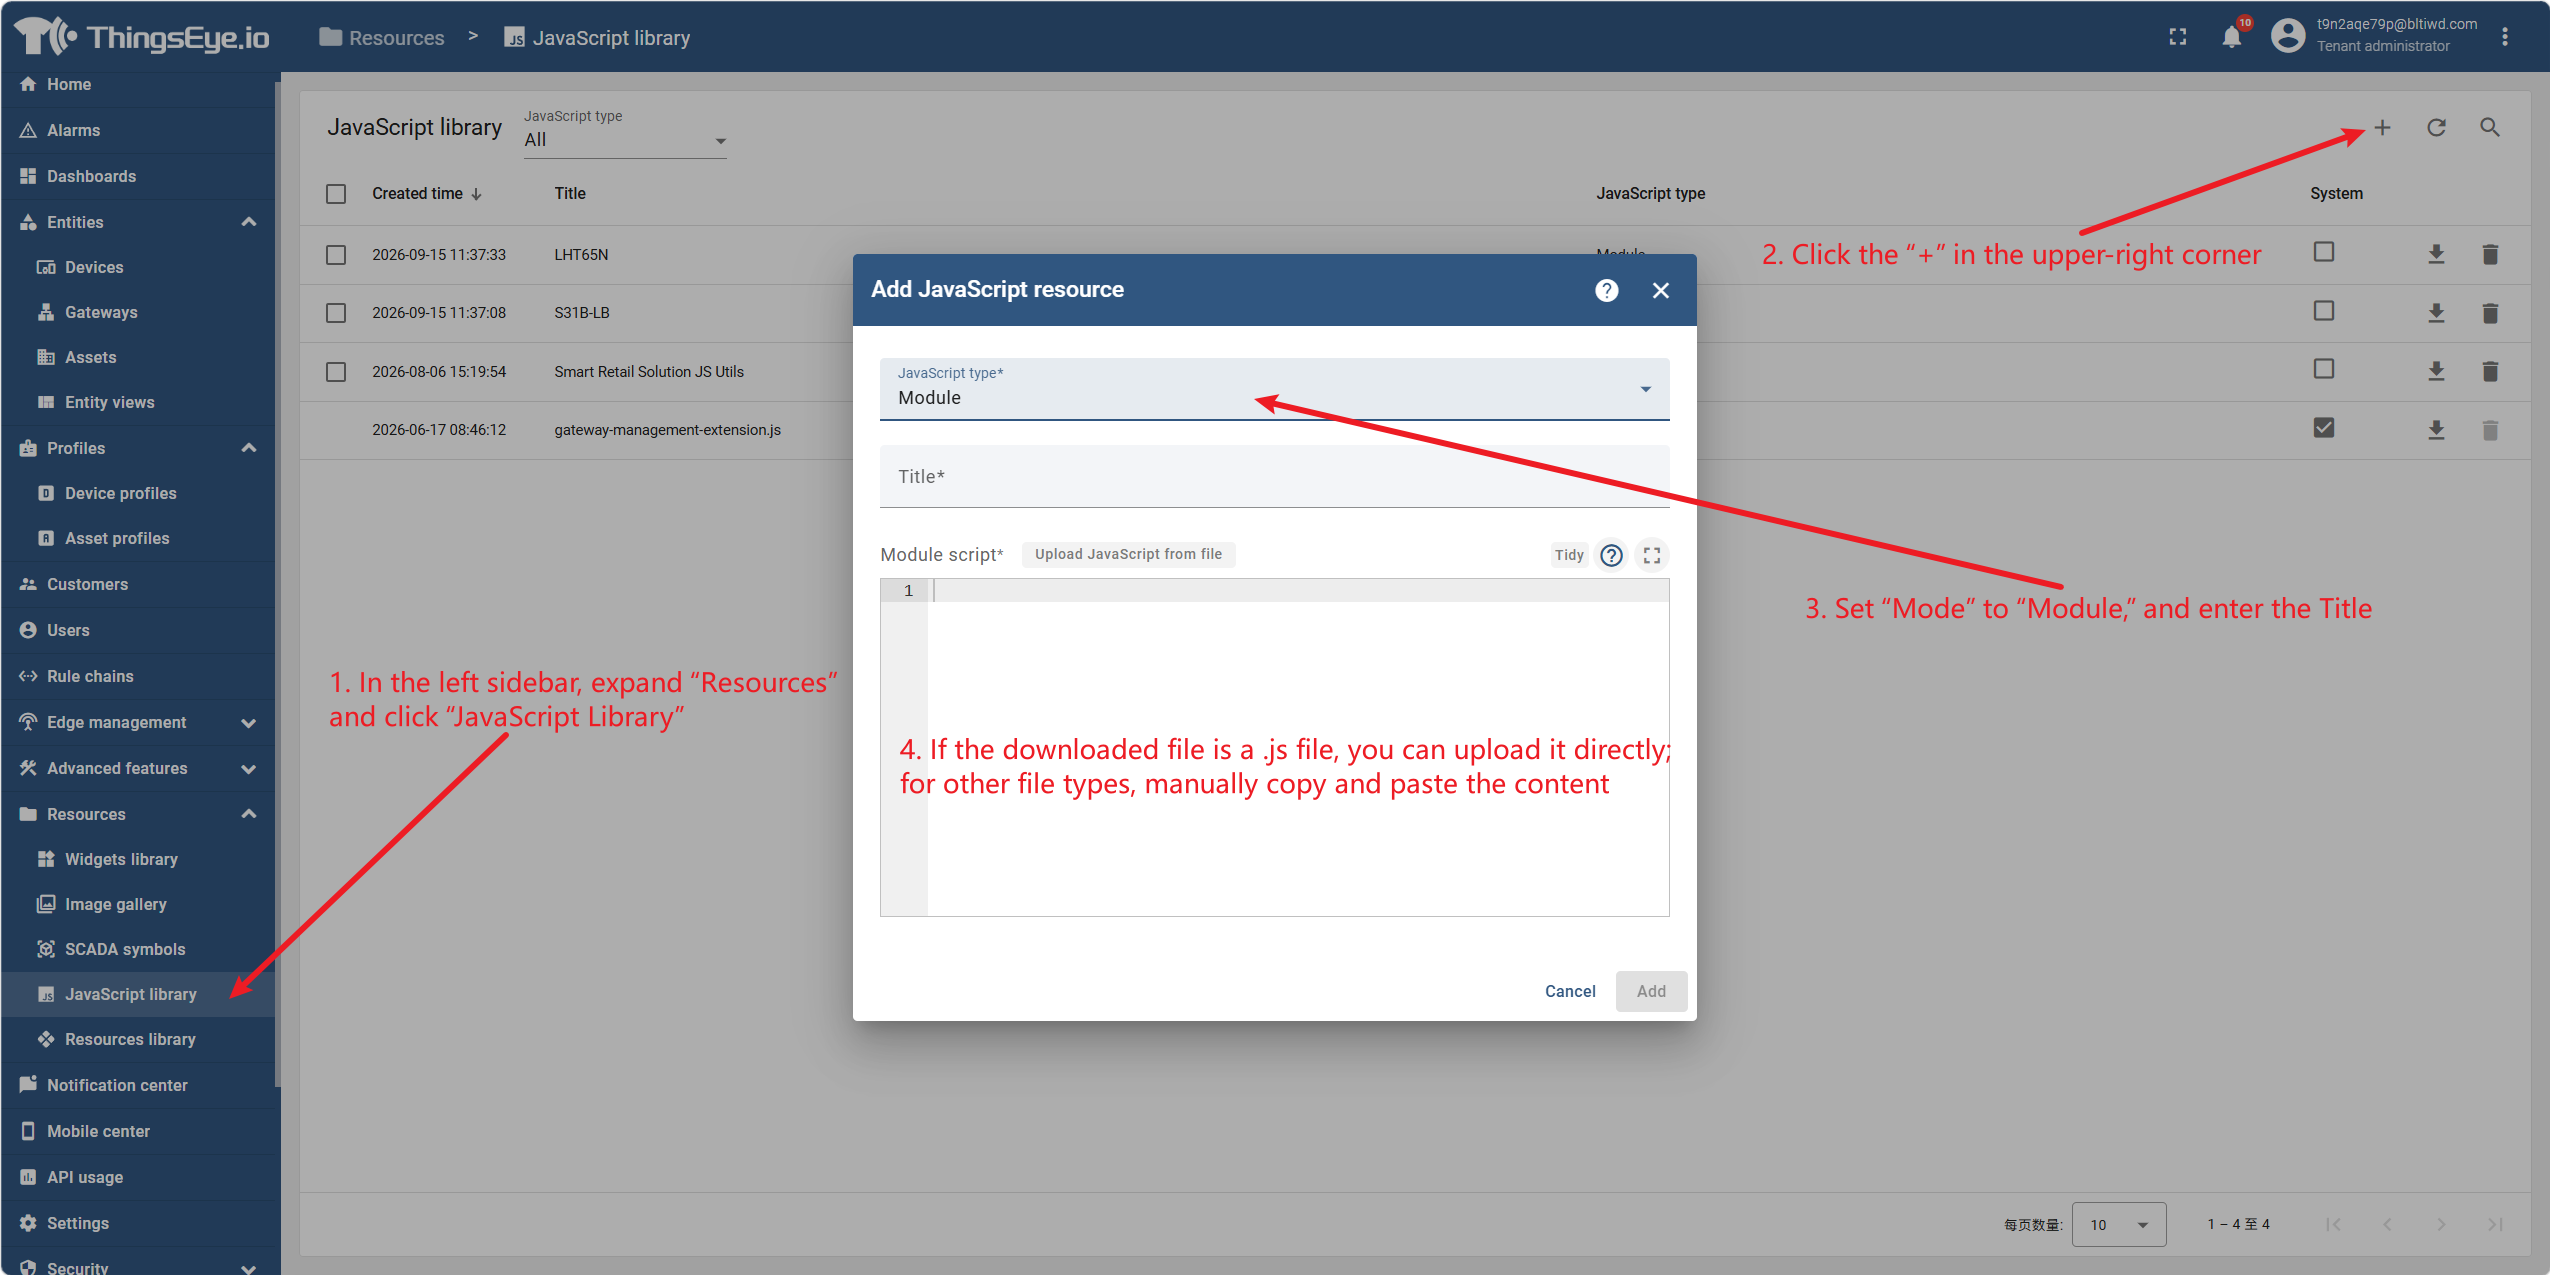
Create LoRaWAN Device Profile
- Go to “Configuration → Device Profiles”, click “+” in the upper right corner, and select “Create Device Profile”.
- Fill in the name and click “Next: Transport Configuration”.
- Set “Transport type” to LoRaWAN, and fill in Region, Regional parameters, Device class, and other parameters according to the gateway and field device.
- Optional: Select an uploaded decoder in Decoder; if not configured, the platform only displays raw data and does not parse it.
- Click “Add” to save.
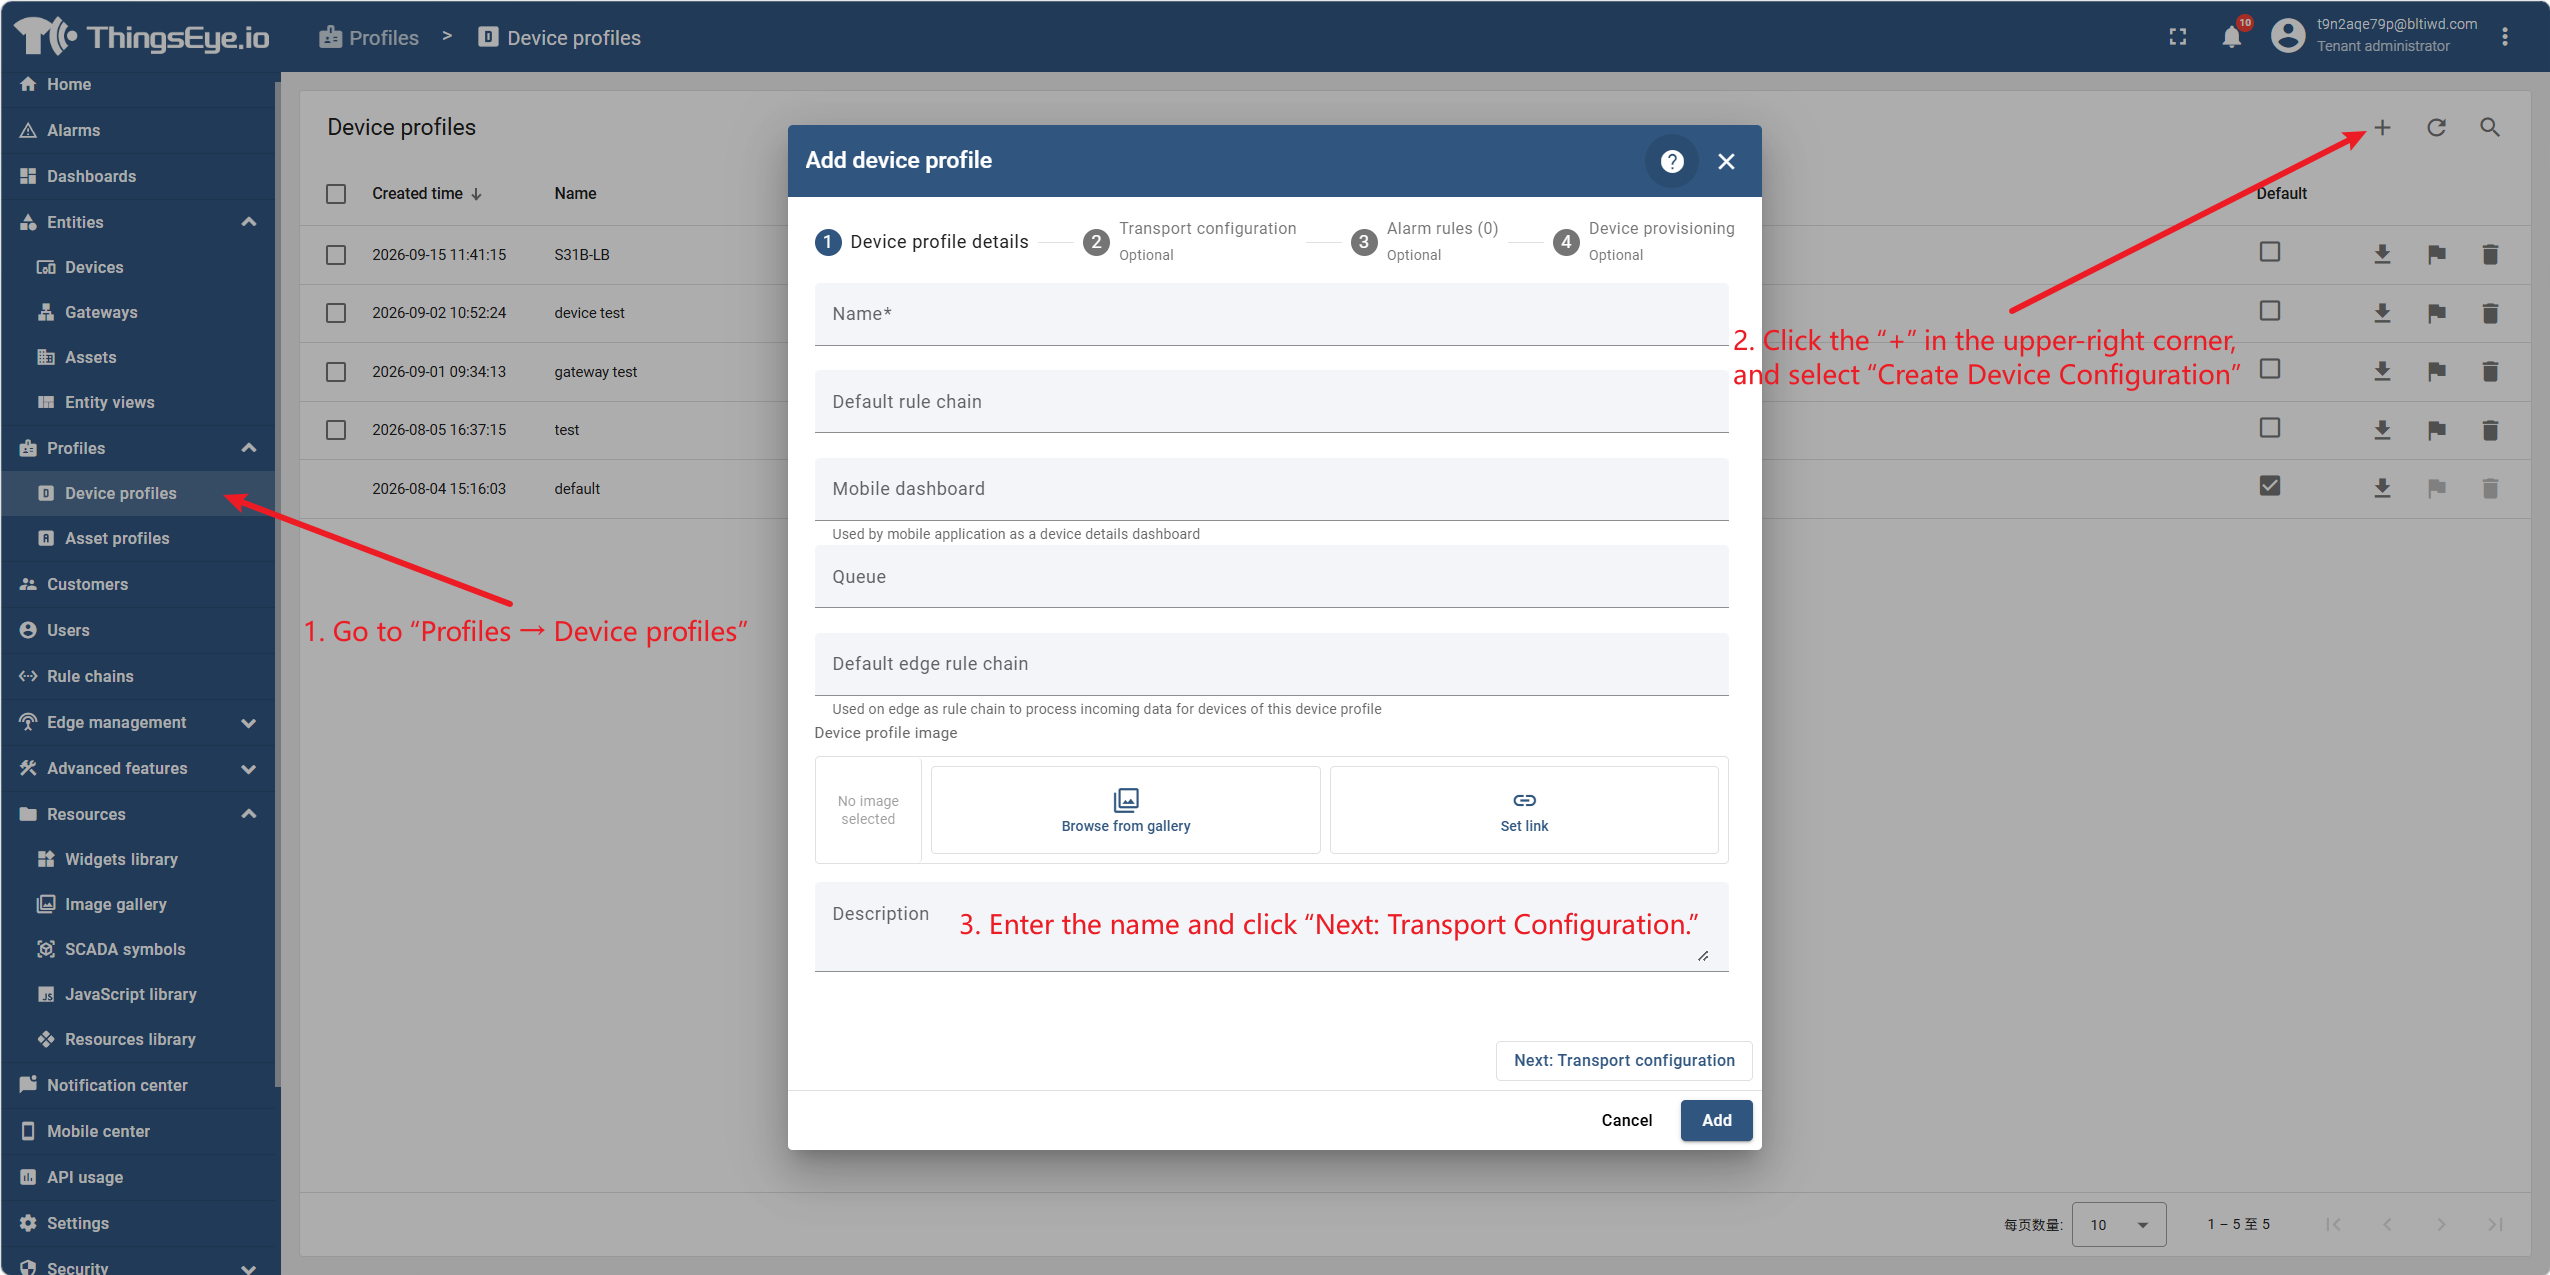
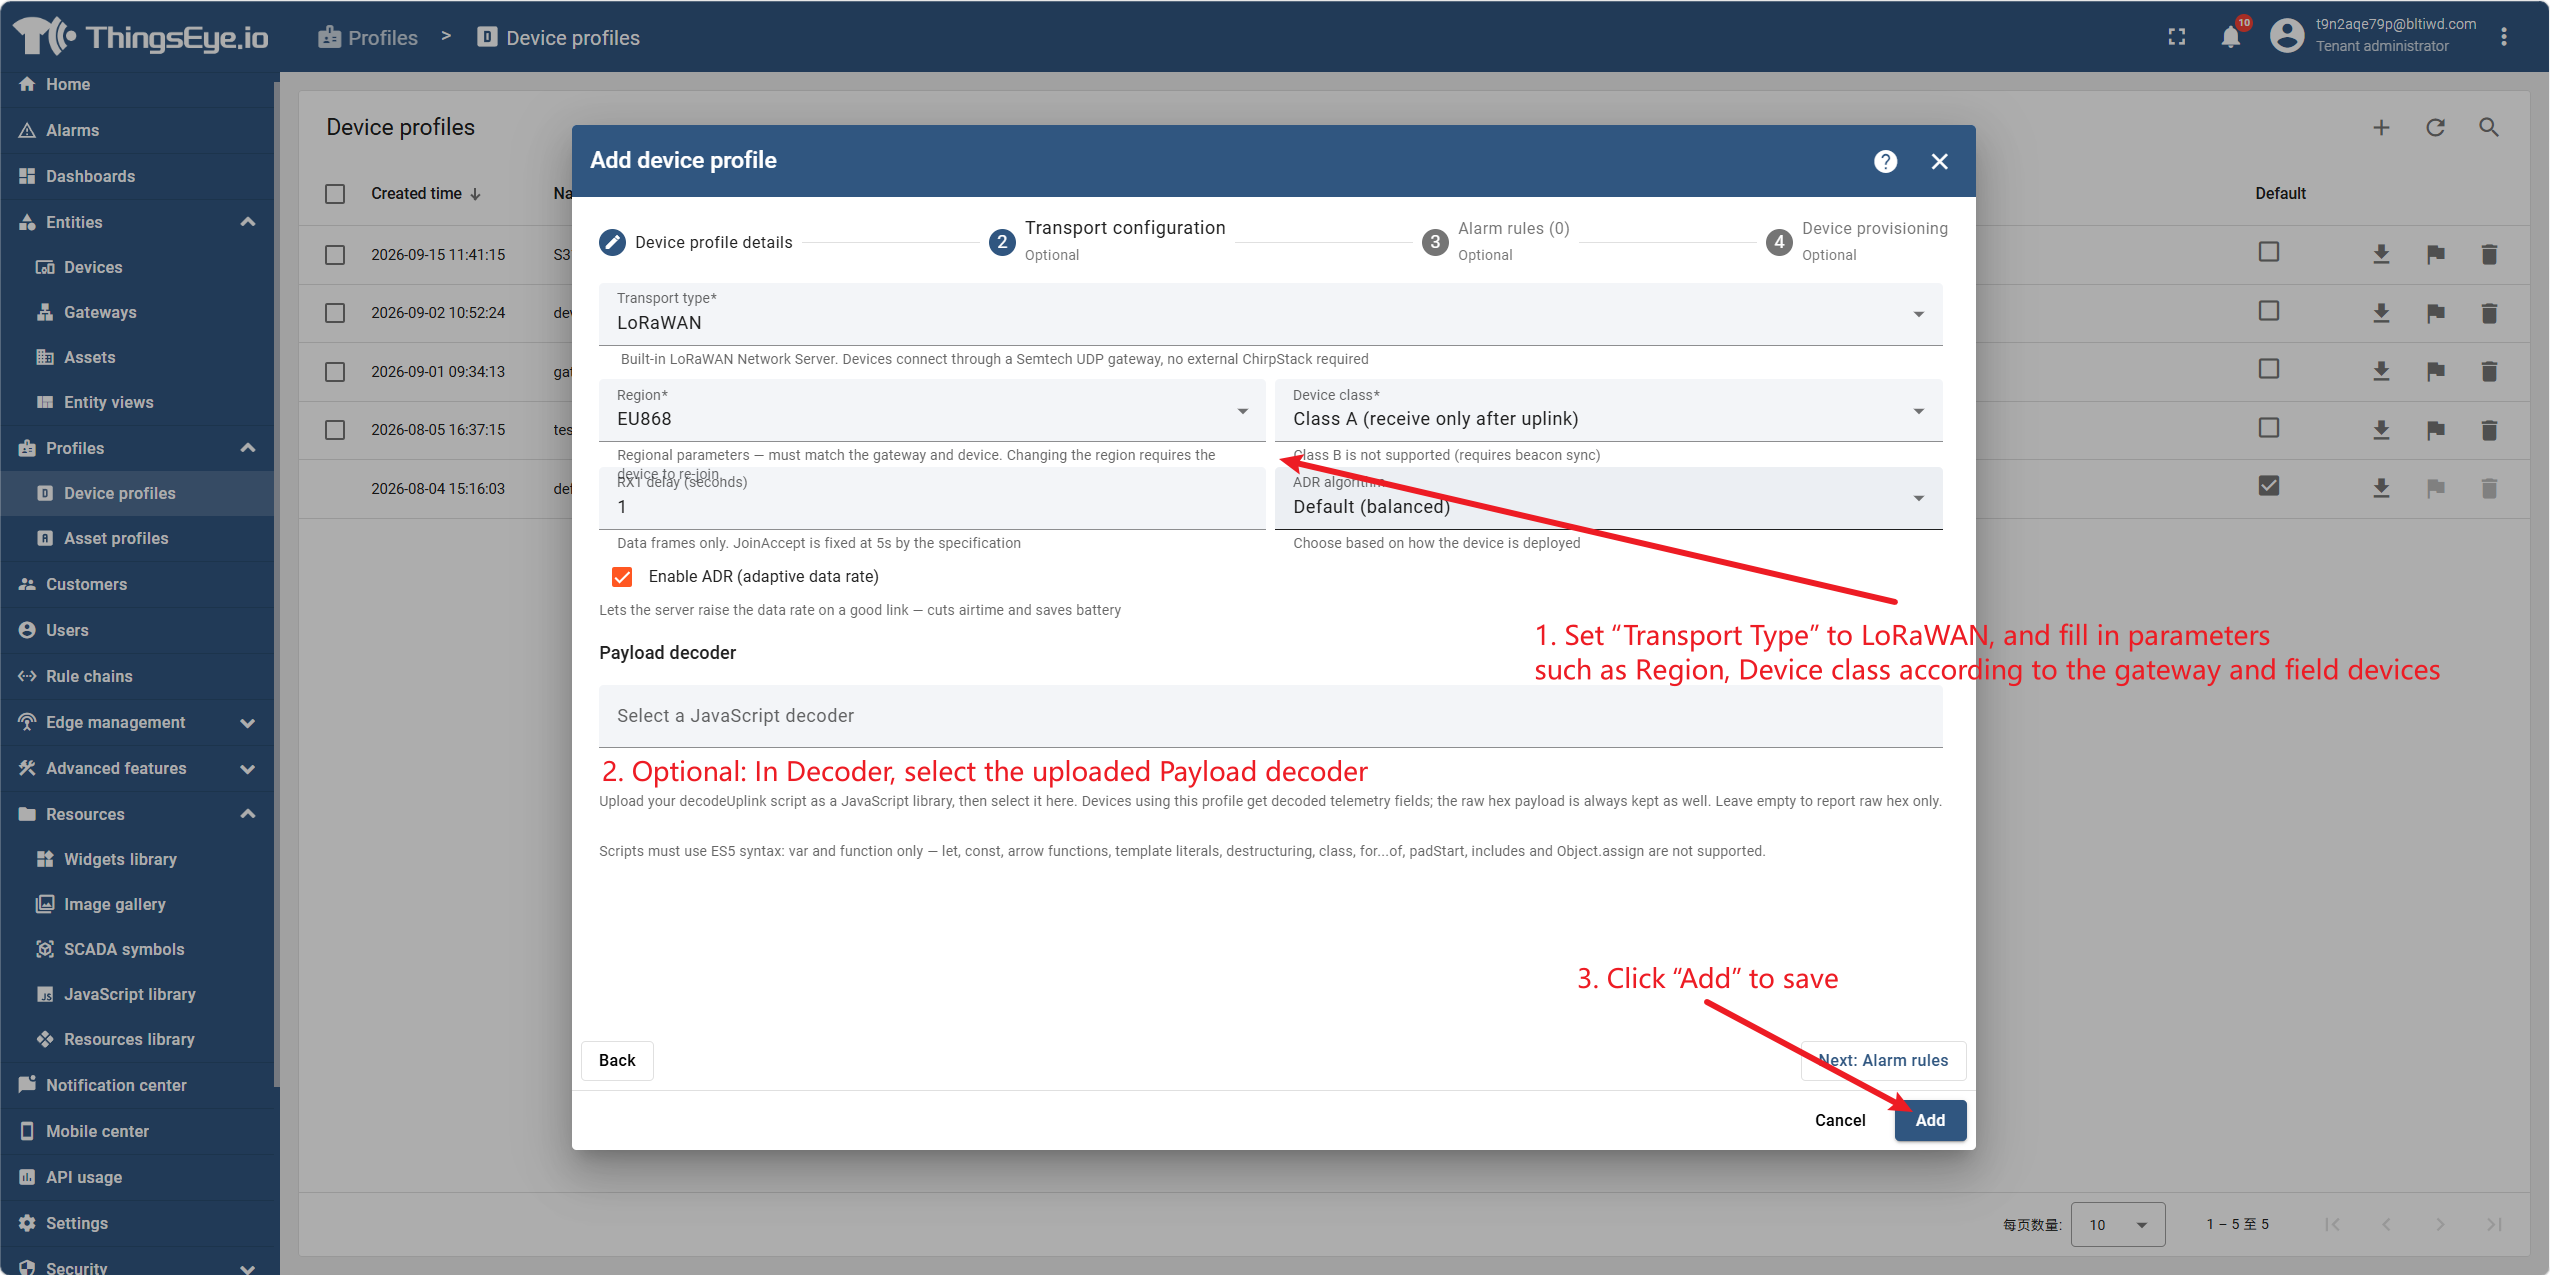
Create LoRaWAN device profile
4.2 Register LoRaWAN Device and Confirm Data
- In the platform left menu, go to “Entities → Devices”. Sample devices included with the template are for demo only and can be ignored or deleted.
- Click “Add Device”, fill in the device name, and select the LoRaWAN device profile created in 4.1 under “Device Profile”; if the template already has a usable LoRaWAN device profile preset, you can also select it directly.
- Click “Next: Credentials”, and fill in DevEUI, AppEUI, and AppKey. AppEUI and JoinEUI are equivalent; product packaging says AppEUI. LoRaWAN devices do not need to fill in “Platform Address”.
- Confirm the information and click “Add” to complete device creation.
- Power on the field device according to the device instructions, and trigger join or reset.
- Wait for the device status to become “Active”.
- Open device details, switch to the “Telemetry” tab, and confirm the latest data has appeared.
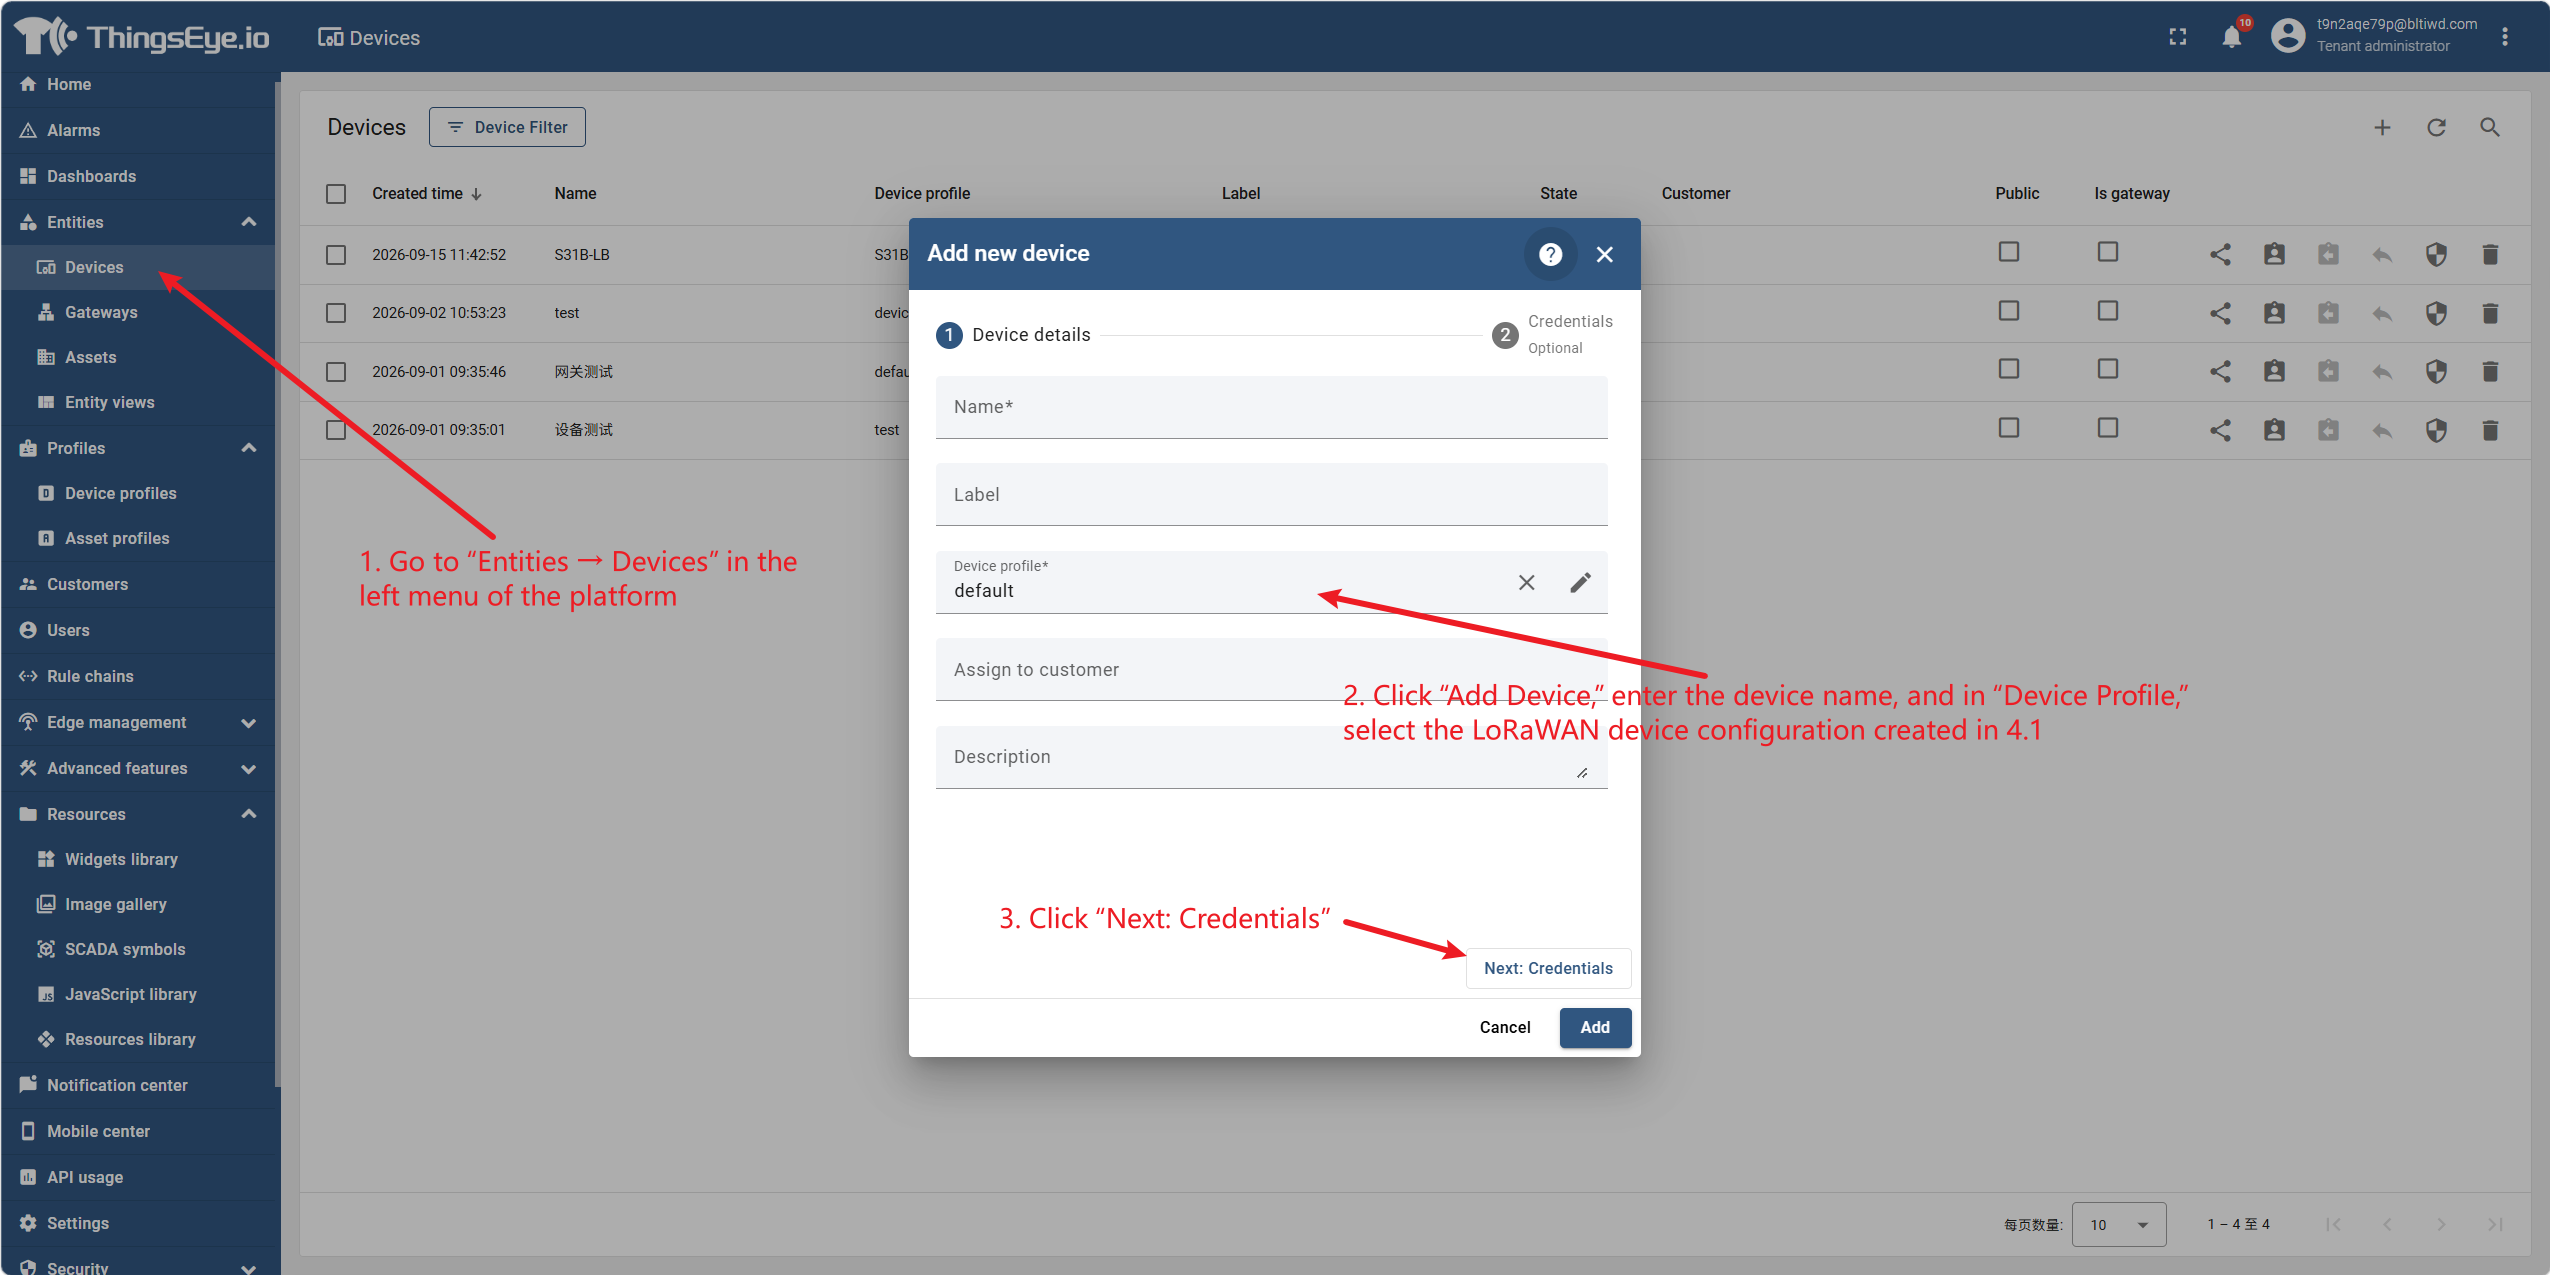
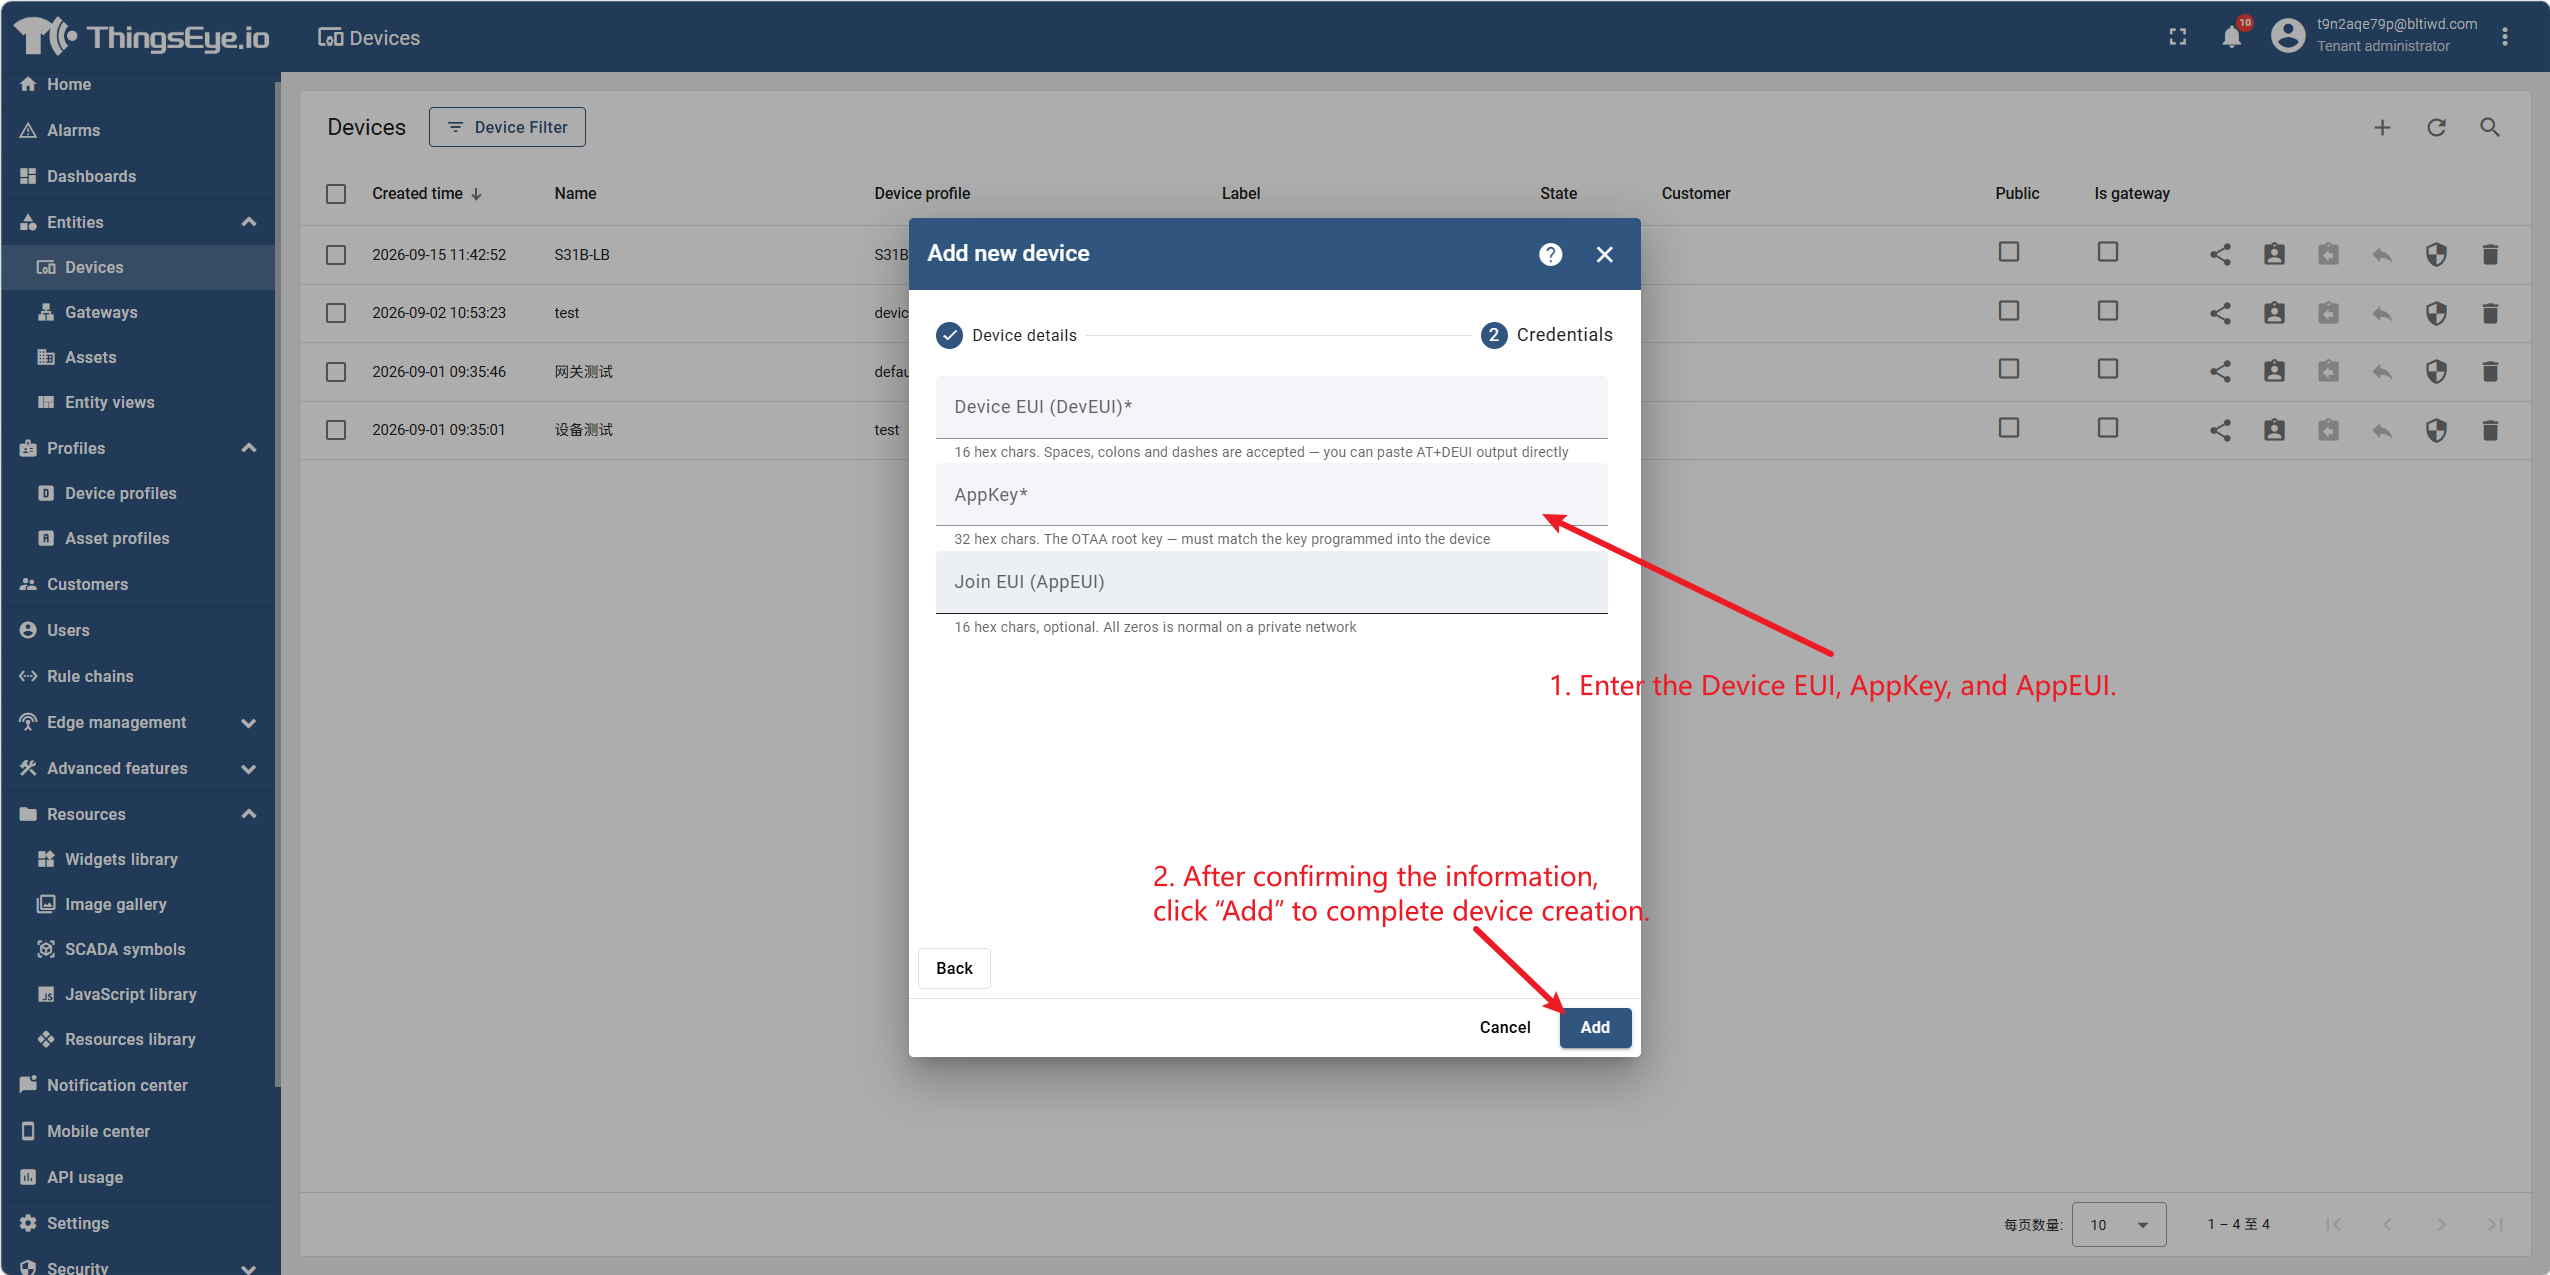
Register LoRaWAN device
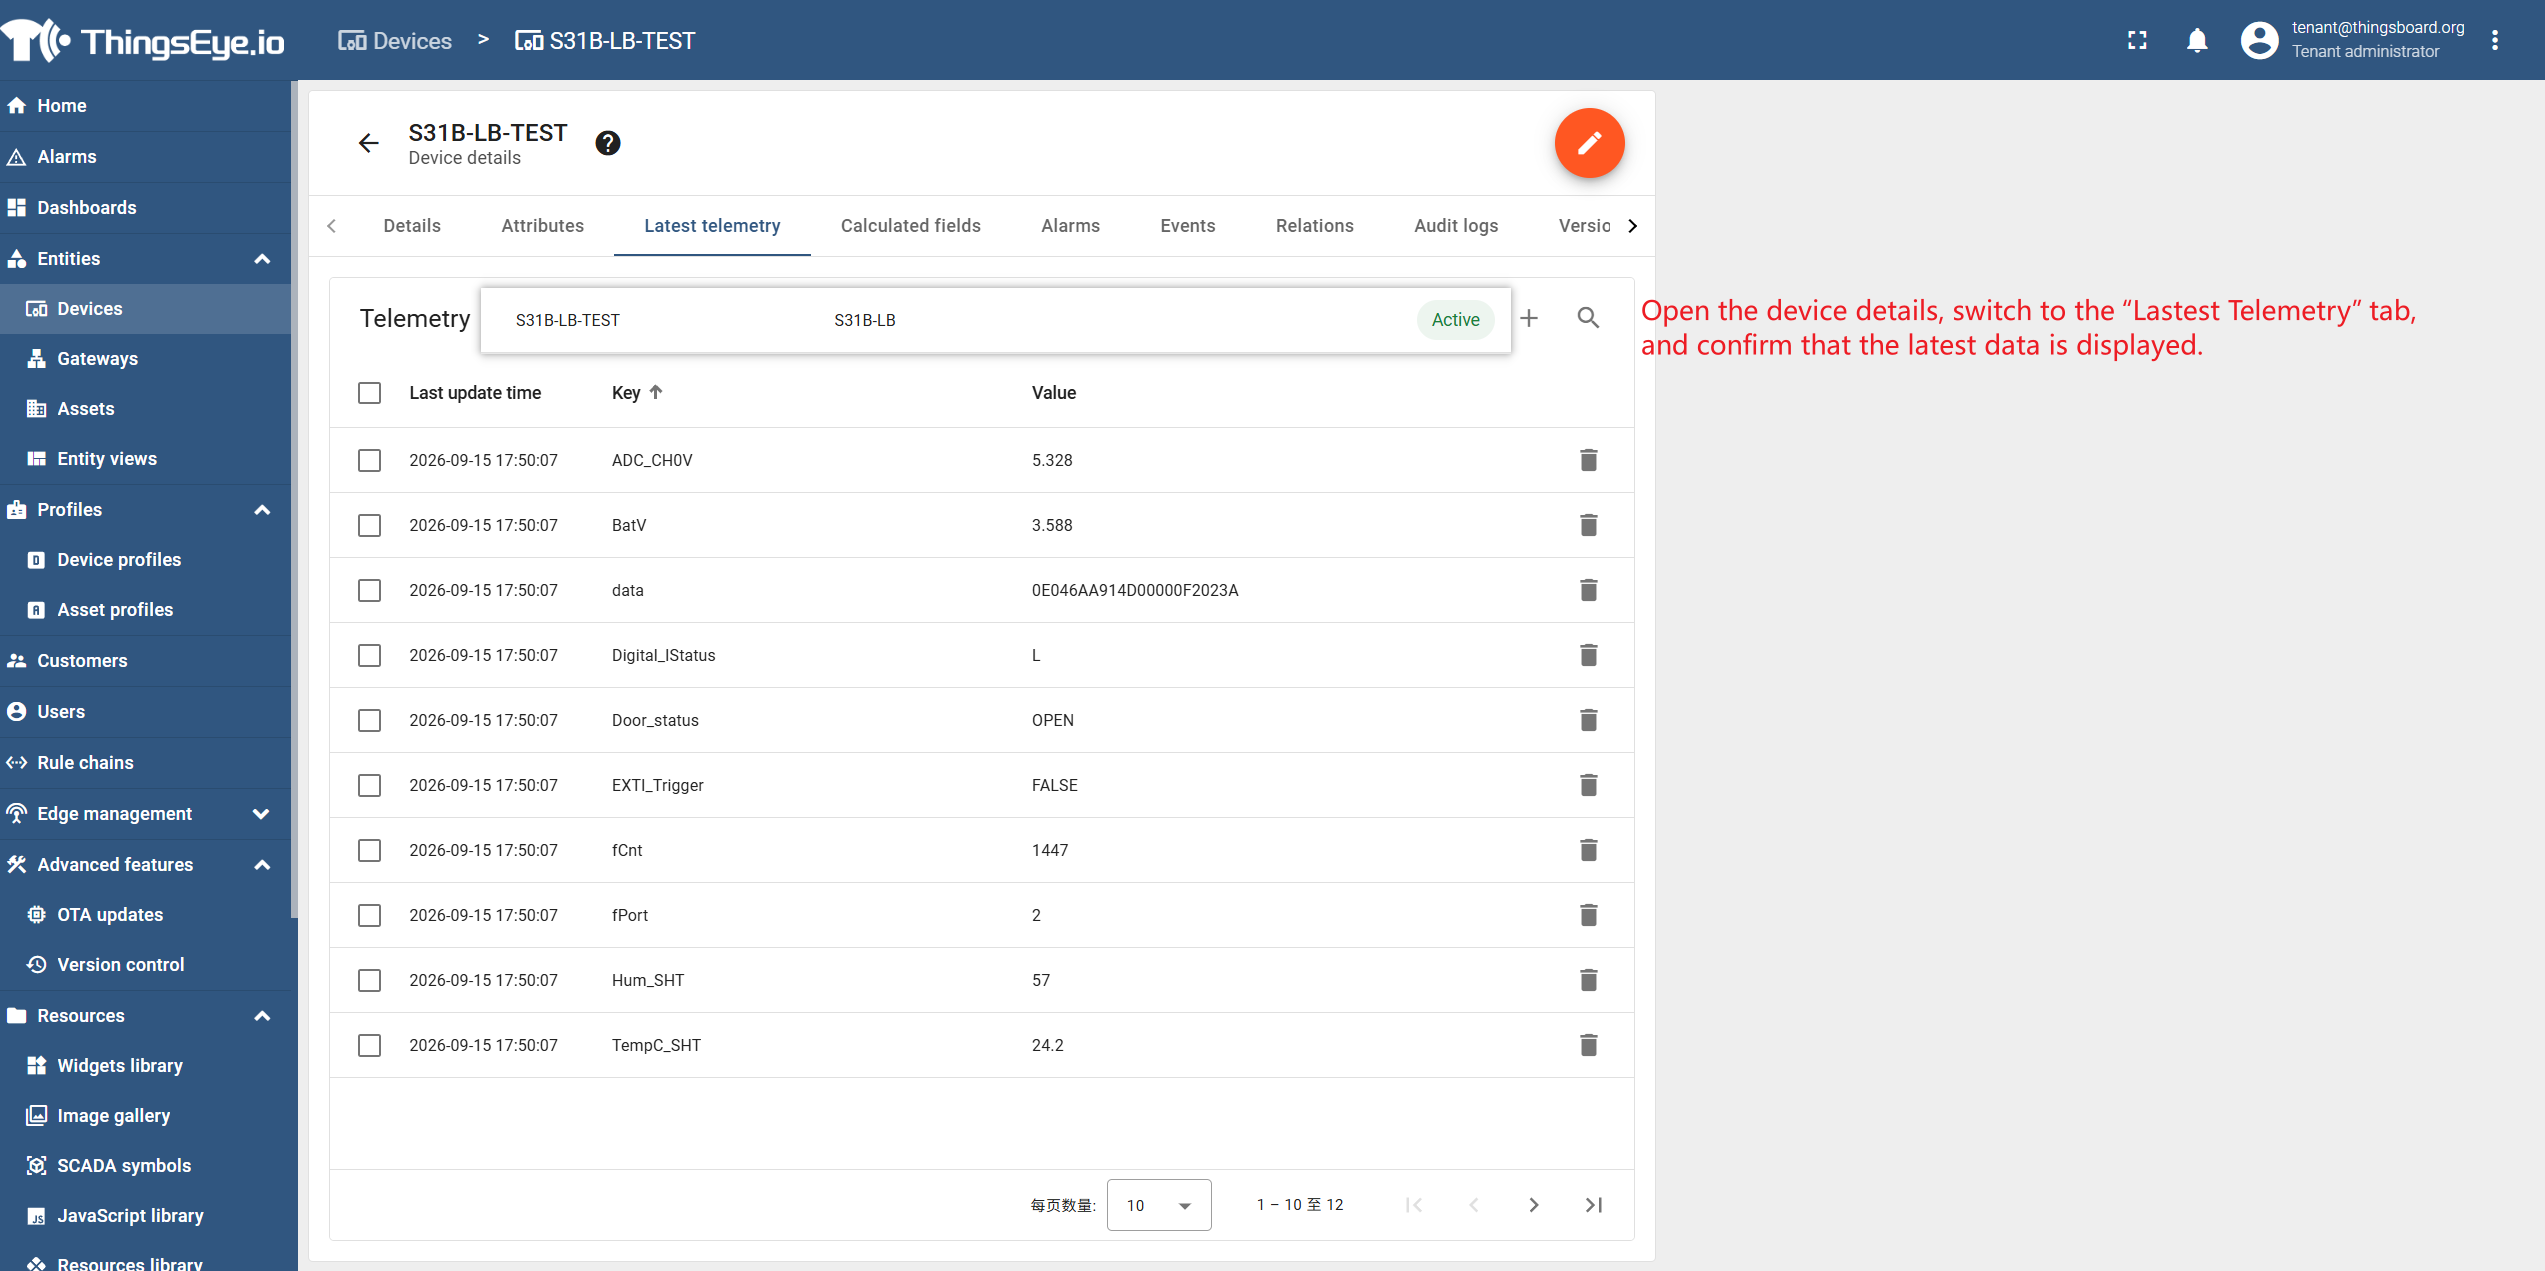
Success criteria: The device status is “Active”, and the latest telemetry data can be seen in device details.
Notes:
- Decoders can be downloaded from the GitHub repository dragino-end-node-decoder; find the corresponding sensor model. If you have questions, contact technical support.
- If telemetry contains only a hex string and no readable fields, check whether the decoder is attached to that LoRaWAN device profile and confirm the decoder uses ES5 syntax.
- Asset association and customer assignment are optional and can be skipped during quick start.
5. Non-LoRaWAN Device Onboarding
Applies to NB-IoT, Cat-1, MQTT, HTTP, CoAP direct-connected devices, and devices accessed through external MQTT platforms.
- No local LoRaWAN gateway is required; skip Section 3 “Create and Confirm Gateway”.
- In the platform left menu, go to “Entities → Devices” and click “Add Device”.
- Fill in the device name and select the corresponding device profile; if the template already has a usable profile preset, select it directly.
- Fill in access credentials, platform address, topics, and other parameters according to the device type. For specific parameters, see the corresponding device documentation or detailed manual.
- If data comes from an external MQTT platform (TTN, external ChirpStack, self-hosted broker), you can use “MQTT Subscriber” for access; see the detailed manual.
- After creation, confirm the device status is “Active”, and see data on the “Telemetry” page in device details.
- Go to “Dashboards” and confirm Value card or Time series chart shows values.
Success criteria: The device status is “Active”, the telemetry page has data, and the dashboard shows clear values.
Note: Specific registration steps for NB-IoT, Cat-1, and other devices are not covered; operate according to the corresponding device documentation.
6. View Dashboards and Optional Configuration
After installing the template, first distinguish between general templates and custom templates; data visualization expectations differ during quick start.
General Template
- General template preset dashboards are mainly created for sample devices and sample telemetry keys. After real devices are connected, key names may be inconsistent, causing widgets to display “No data”.
- When key name inconsistency occurs, it is recommended to adjust key name mapping or display alias. This process is relatively cumbersome; see the detailed documentation for specific steps. It is not covered in quick start.
Custom Template
- Custom templates are preset according to field devices, telemetry keys, and assignment relationships. After device onboarding and necessary configuration, data visualization is usually ready.
- If individual widgets do not display ideally, usually only minor adjustments are needed, such as adjusting dashboard widgets, time range, or display alias.
Go to the left menu “Dashboards” and open the dashboard preset by the template. If a widget displays “No data”, check in order: whether the device is online; whether the device has reported the corresponding data key; whether the data key name is exactly the same as the telemetry field; whether the time range covers the data reporting time; whether the device, asset, and dashboard are assigned or public in the same way; if it is a LoRaWAN device, additionally check whether the gateway is active, whether the device has joined, whether the frequency bands are consistent, and whether the decoder is effective.
If you want customers or regular users to also see data: assign the device, asset, and dashboard to the same customer; after regular users log in, they can view them in “Dashboards”. Note: The device, asset, and dashboard must be assigned or public in the same way; otherwise dashboard widgets will display “No data”.
If you have not used a template, or the template has no preset dashboard, you can manually create a minimal dashboard:
- In the left menu, click Dashboards. On the page, click the "+" in the upper right corner to add a dashboard.
- Click add new widget to add a widget. To quickly display a value, choose value card under card.
- Since there is only one device and for quick display, directly select the device just created and choose the value to display.
- Click add to add.
- Click save in the upper right corner to save.
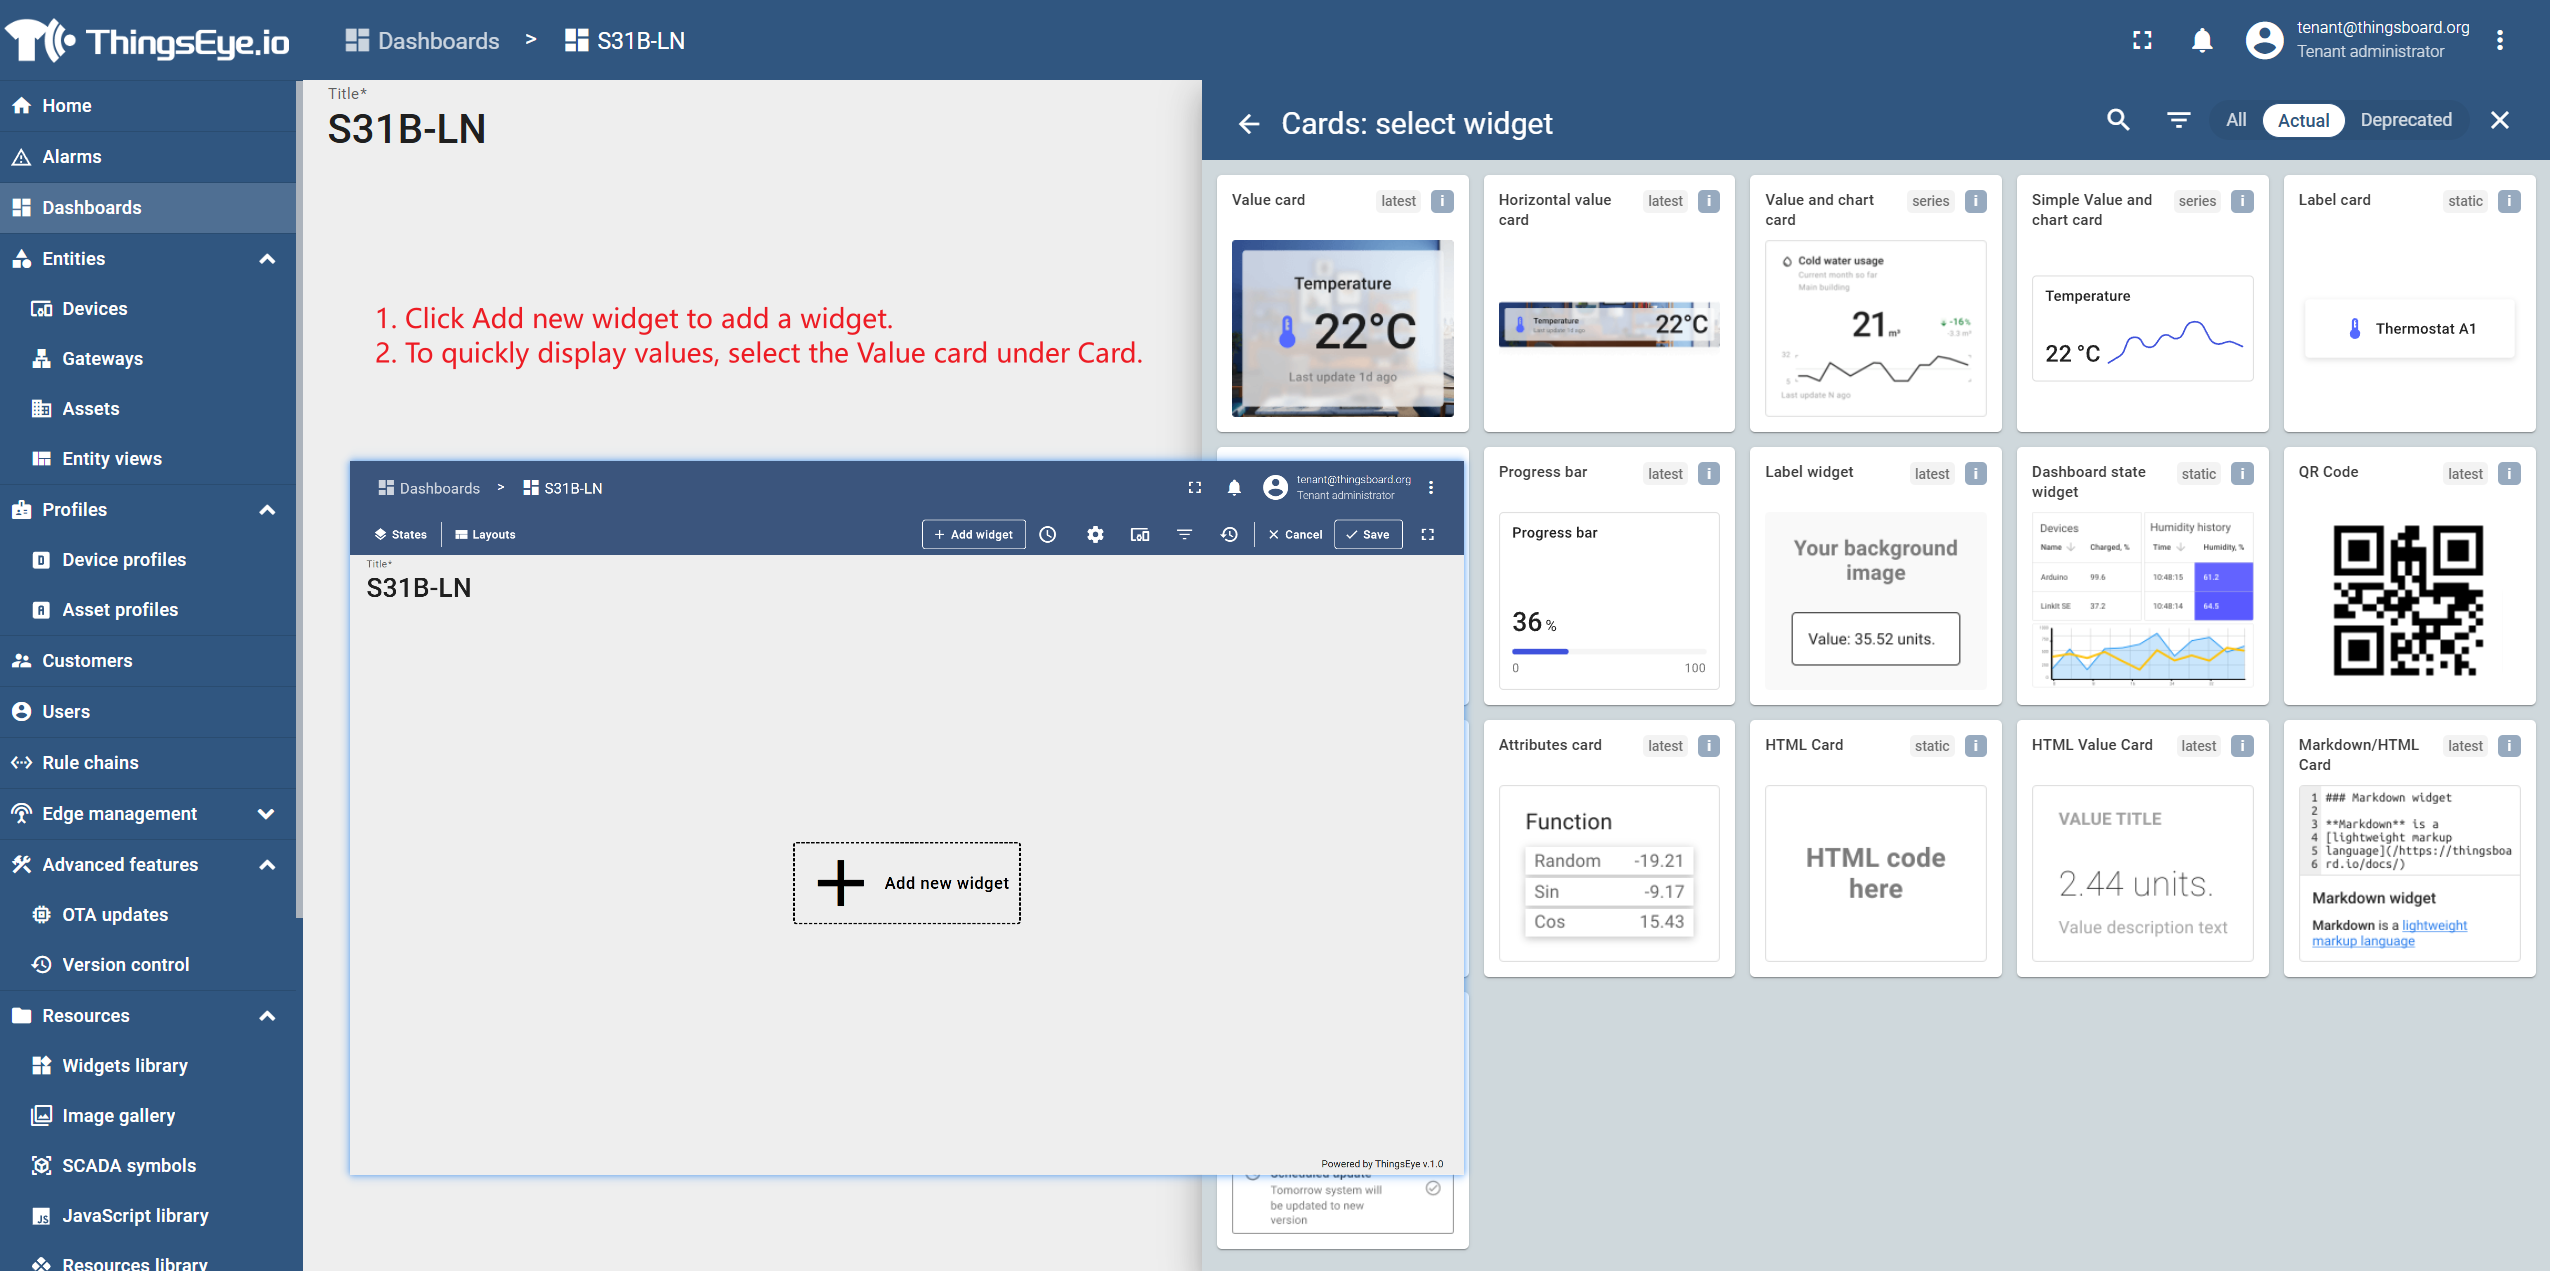
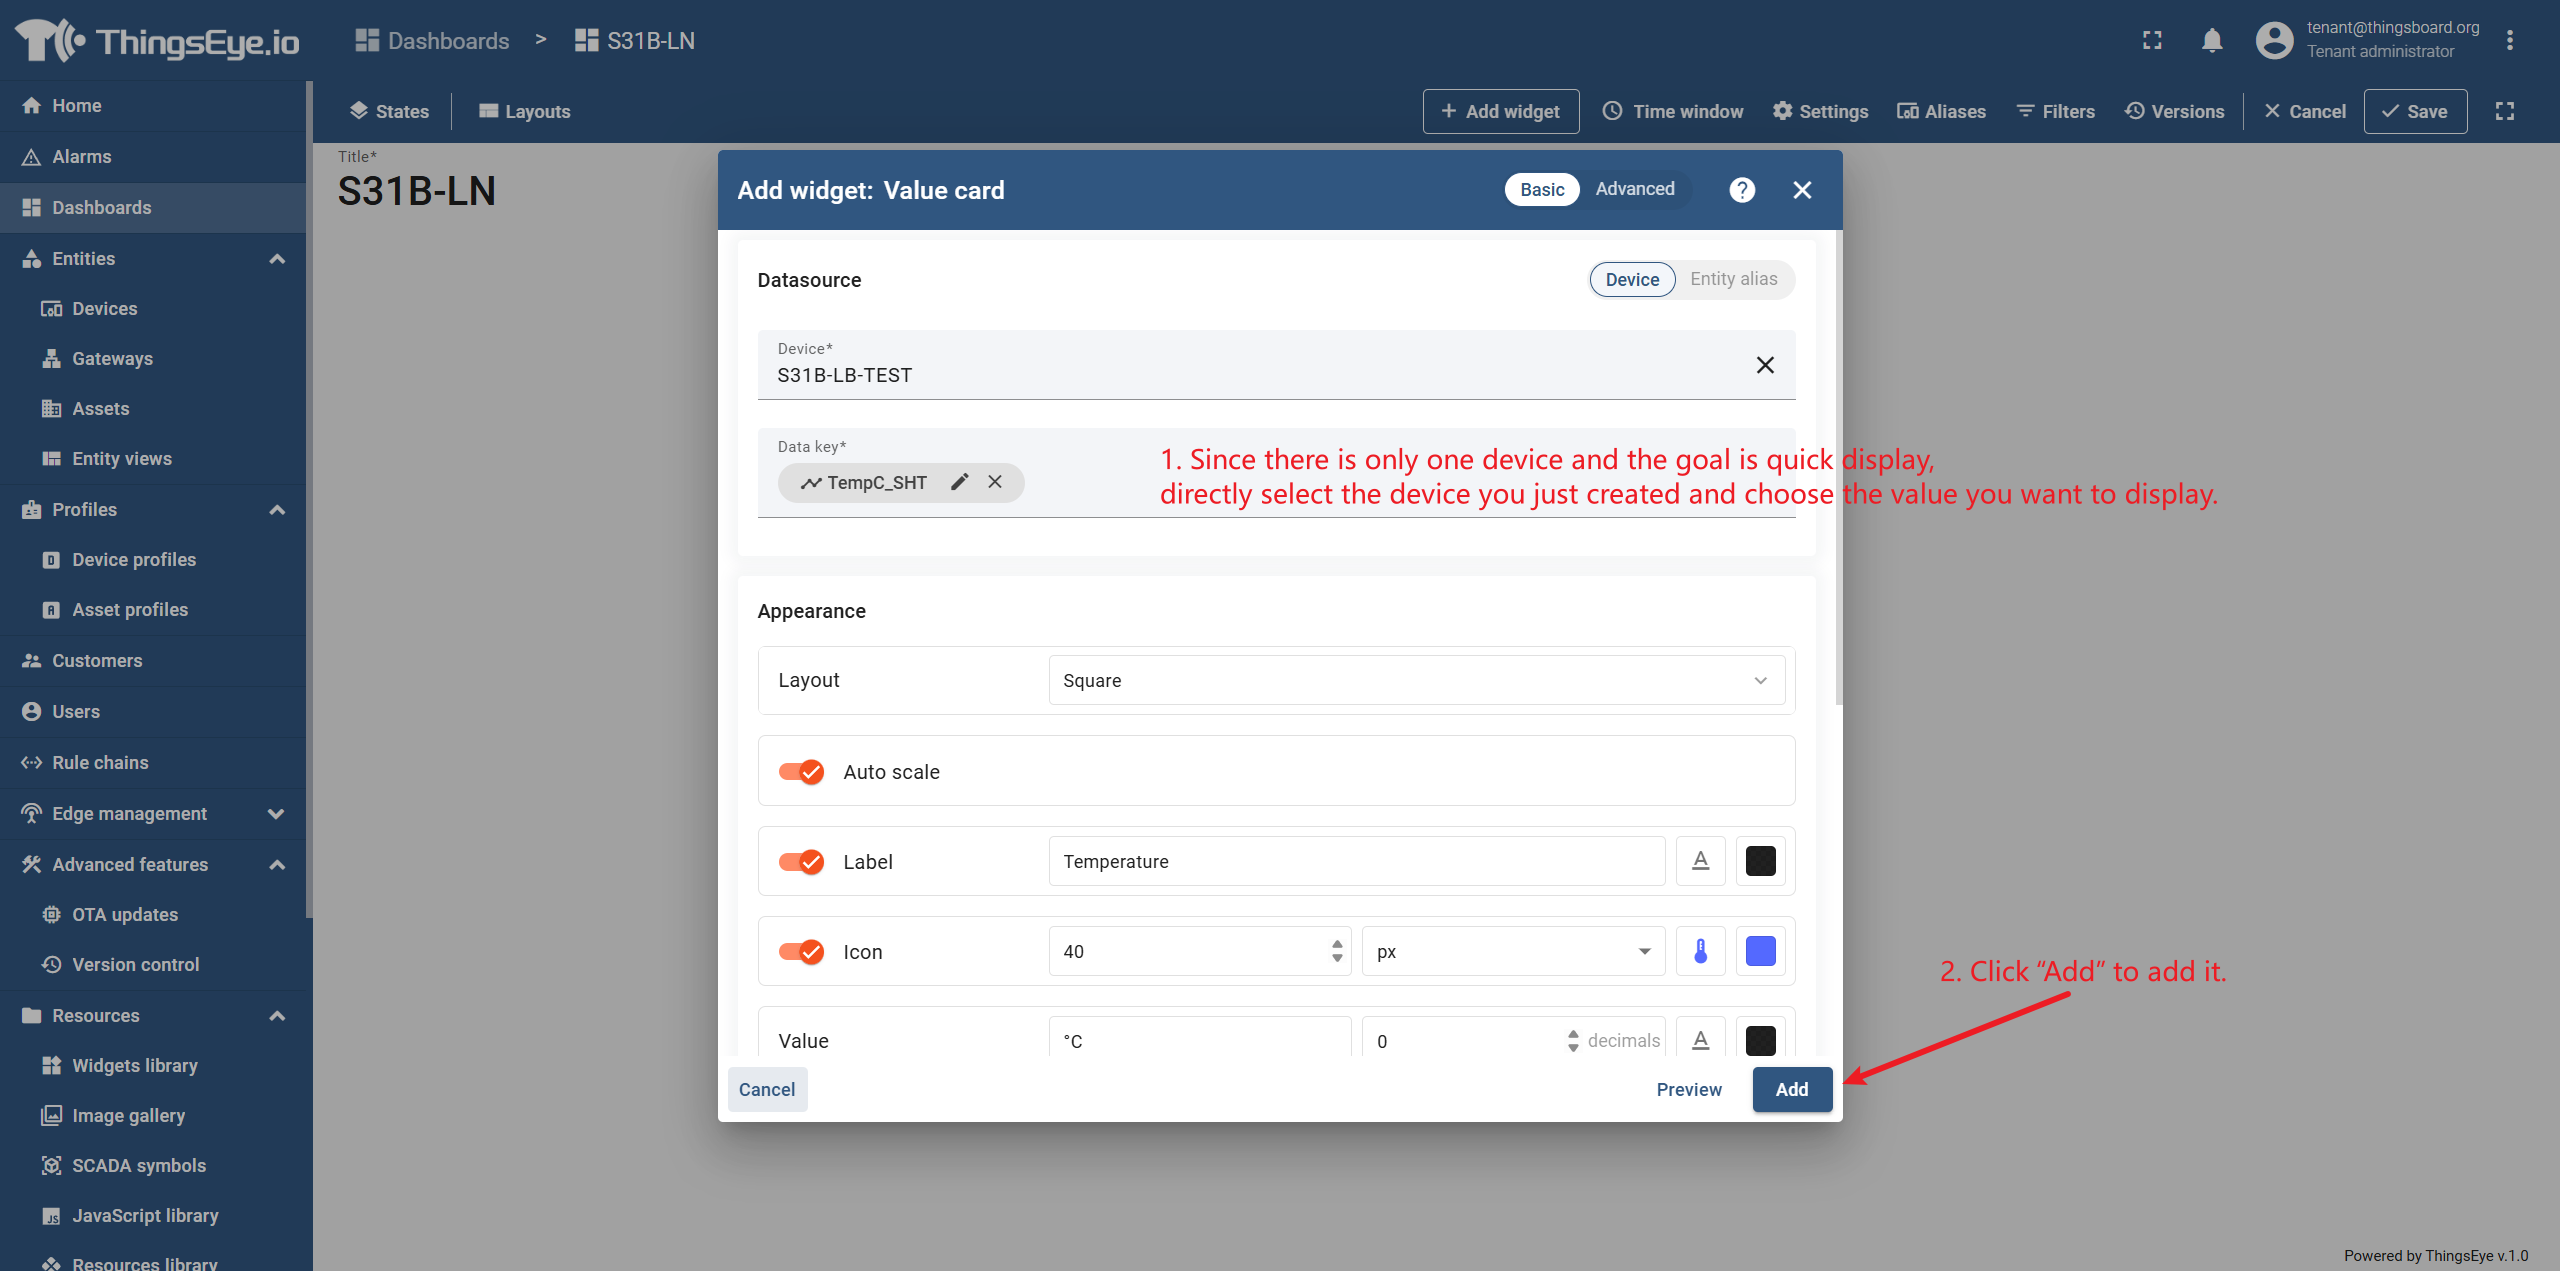
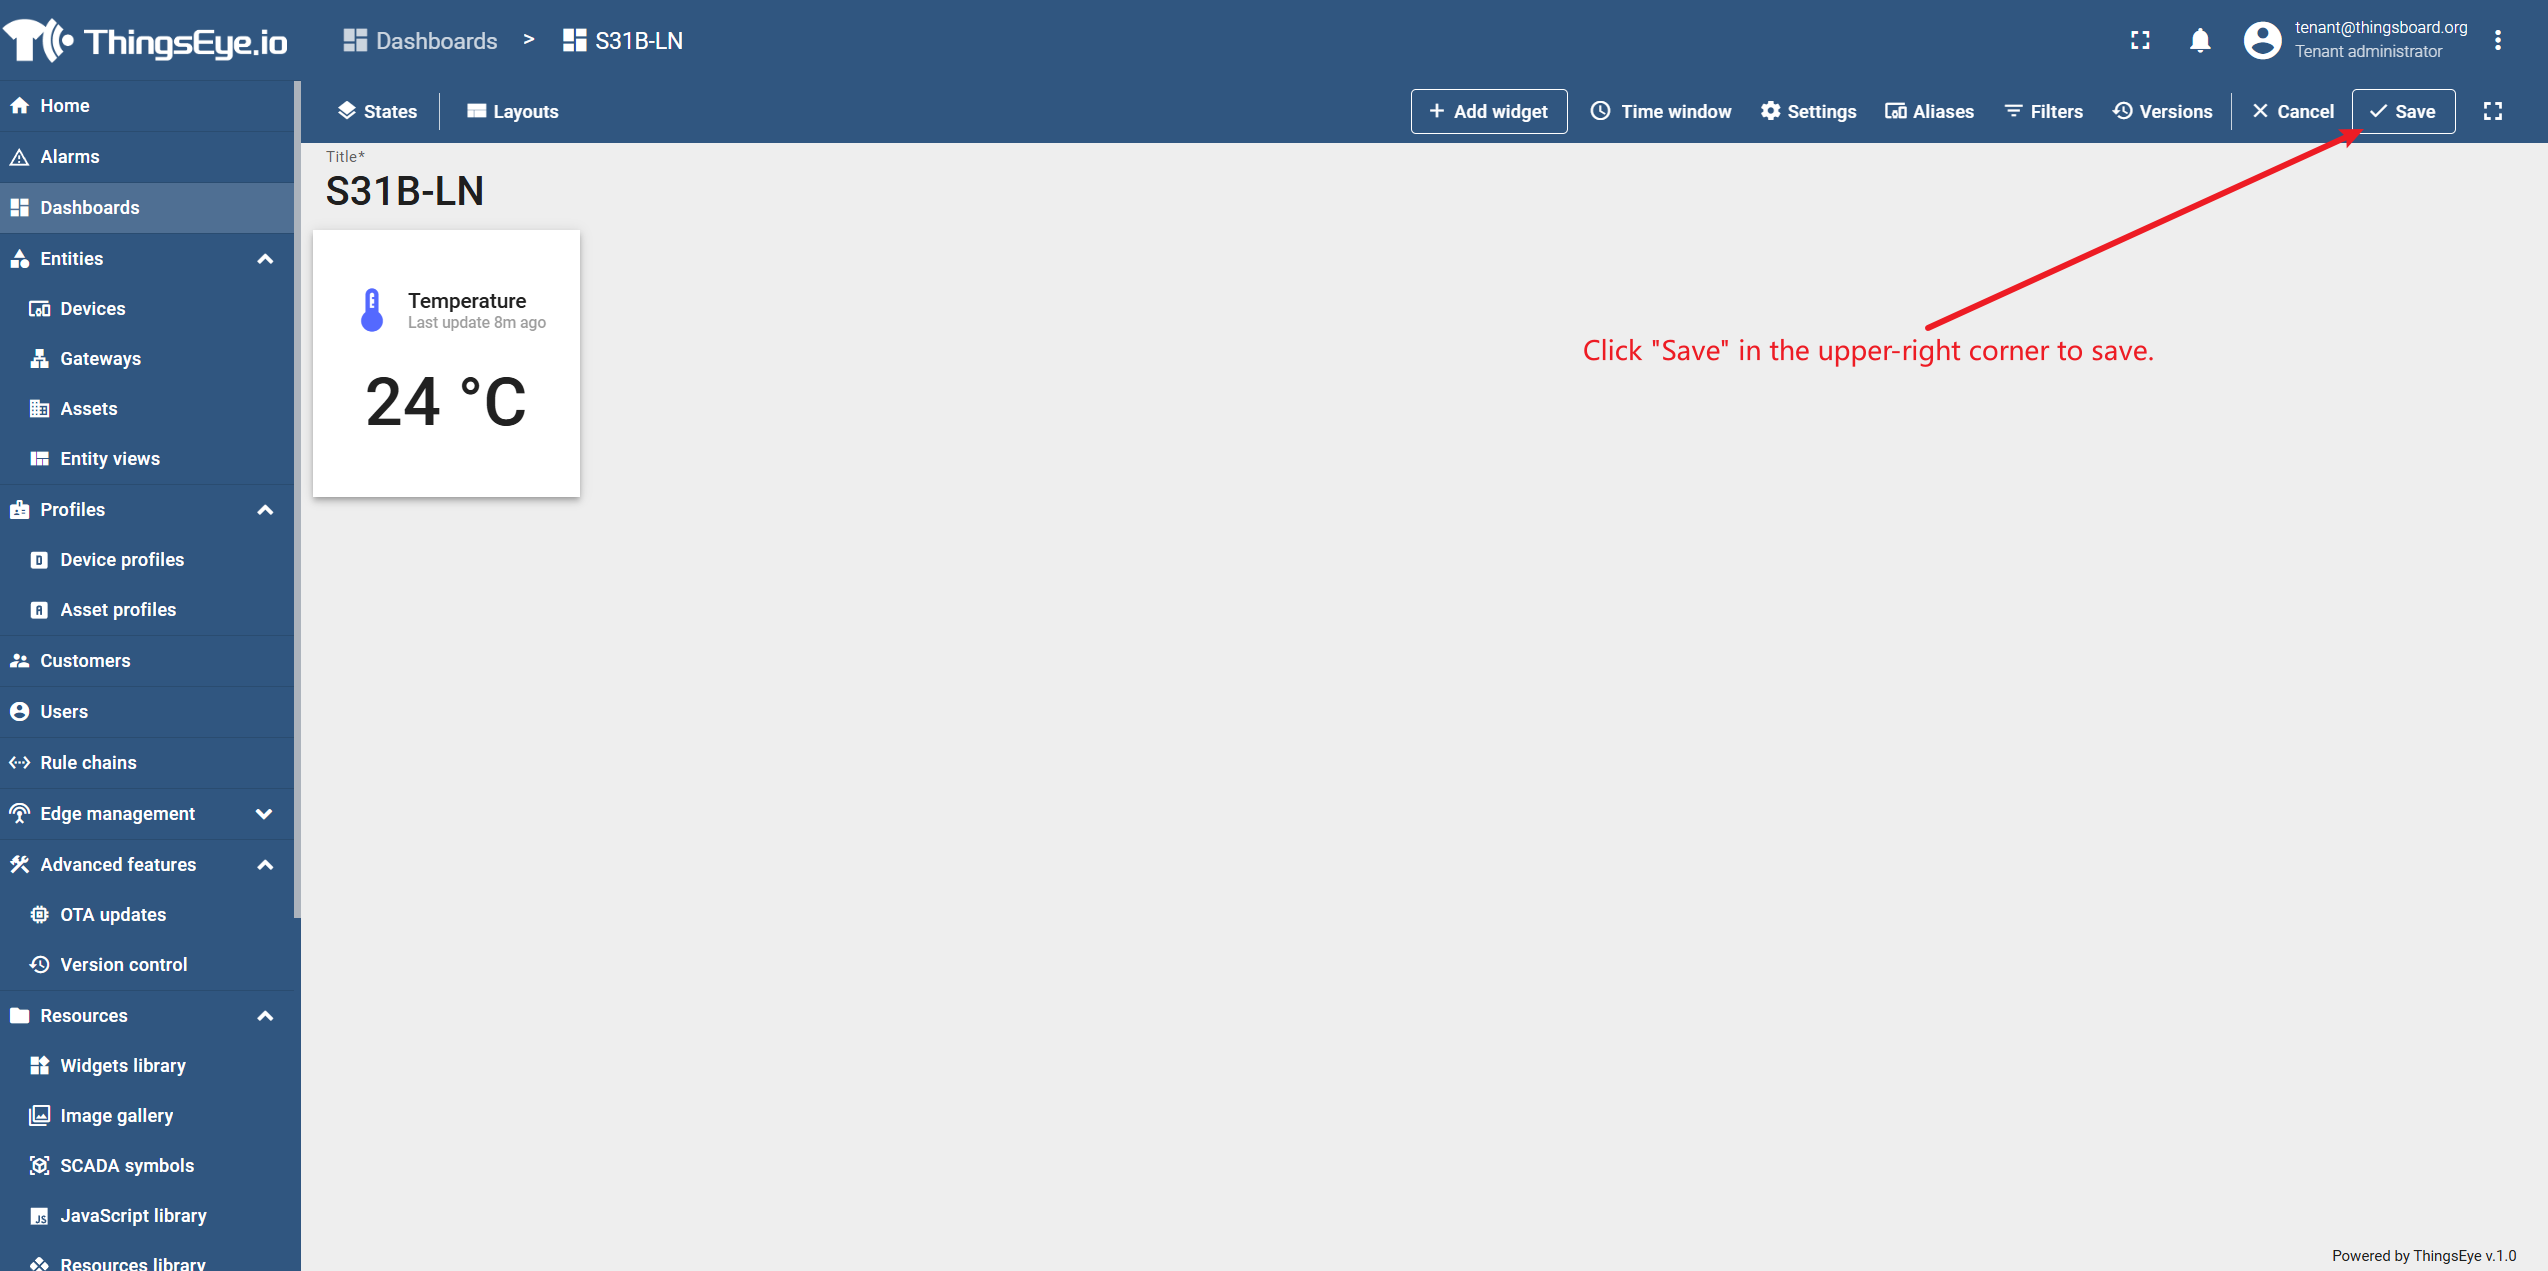
Quickly view values
Success criteria: Clear values can be seen on the dashboard.
Note: Asset association and customer assignment are optional and can be skipped during quick start.
7. FAQs and Acceptance Checklist
Quick FAQ:
| Symptom | First Checks |
|---|---|
| Browser cannot open the platform | Is the All-in-One powered on; are the computer and All-in-One on the same LAN; is the IP correct; is the port allowed; has the service started |
| All-in-One IP change causes the address to become invalid | Set a DHCP reservation on the router, or change to a static IP |
| Device does not come online | Is the device powered on; are the platform address and credentials correct; is the network reachable; is the firewall allowing access |
| LoRaWAN device does not come online | If it is a LoRaWAN device: is the gateway active; does the UDP port match the frequency band; has the device joined; are the frequency bands consistent in all three places; is the US915 / AU915 sub-band consistent |
| Gateway shows active but device has no data | If it is a LoRaWAN device: does the UDP port correspond to the device profile frequency band; is the sub-band consistent; has the device successfully joined; are DevEUI / AppEUI / AppKey correct |
| Telemetry exists but only hex | Is the decoder effective; does the decoder use ES5 syntax |
| Class A downlink does not take effect immediately | Class A only opens a receive window after an uplink, and downlinks are queued; use Class C if immediate downlink is needed |
| Dashboard has no data | Is the device active; does telemetry have data; are data keys consistent; is the time range correct; is the assignment method consistent |
| Regular users cannot see data | Are the device, asset, and dashboard assigned to the same customer or public in the same way |
Frequency Band Notes: The All-in-One uses channel-plan 10; US915 / AU915 uses sub-band 1 (channels 0–7), and the gateway must also be set to sub-band 1; otherwise it will not receive packets; the frequency band must be consistent in three places: the All-in-One UI, ChirpStack configuration, and multi-band bridge service. The three are factory-aligned; do not modify them individually; once the frequency band is modified, devices that have already joined must rejoin; do not directly modify the ChirpStack configuration.
Quick Acceptance Checklist:
- All-in-One connected to LAN, IP recorded or fixed;
- Computer can ping All-in-One;
- Browser can open platform login page;
- Successfully logged into platform using tenant administrator account;
- Solution template uploaded and installed successfully;
- If LoRaWAN device, gateway created and status “Active”;
- If LoRaWAN device, gateway packet forwarder configured, UDP port matches device profile frequency band (see detailed manual);
- If LoRaWAN device, device successfully joined;
- Device created or confirmed, credentials correct;
- Device status “Active”;
- Device telemetry page shows data;
- Dashboard Value card and Time series chart have data.
Quick Start Main Path: LoRaWAN devices follow “network configuration → login → import template → create and confirm gateway → register device → view dashboard”; non-LoRaWAN devices can skip the gateway and follow “network configuration → login → import template → register / configure access → view dashboard”.