Asset and Profile Management
Overview
Applicable Role: Tenant Administrator.
The Asset Management module is used to manage all assets under the current tenant. An asset is a logical grouping unit for devices, representing physical entities (such as production lines, workshops, buildings, vehicles, etc.), facilitating organisation, viewing, and device permission control according to business structure. Assets support hierarchical structures (can contain sub‑assets) and can associate multiple devices, enabling mapping between devices and business entities.
In addition, Asset Management provides the Asset Profile feature, allowing administrators to centrally define common configurations (such as default rule chains, queues, alarm rules, and calculated fields) for a group of similar assets, simplifying bulk configuration and maintenance for large numbers of assets. The relationship between an asset profile and assets is one‑to‑many; modifying a profile automatically affects all assets that reference it.
1. Create an Asset
Procedure
Step 1: Go to the asset management page
Expand "Entities" in the left navigation bar and click "Assets" to go to the asset list page.
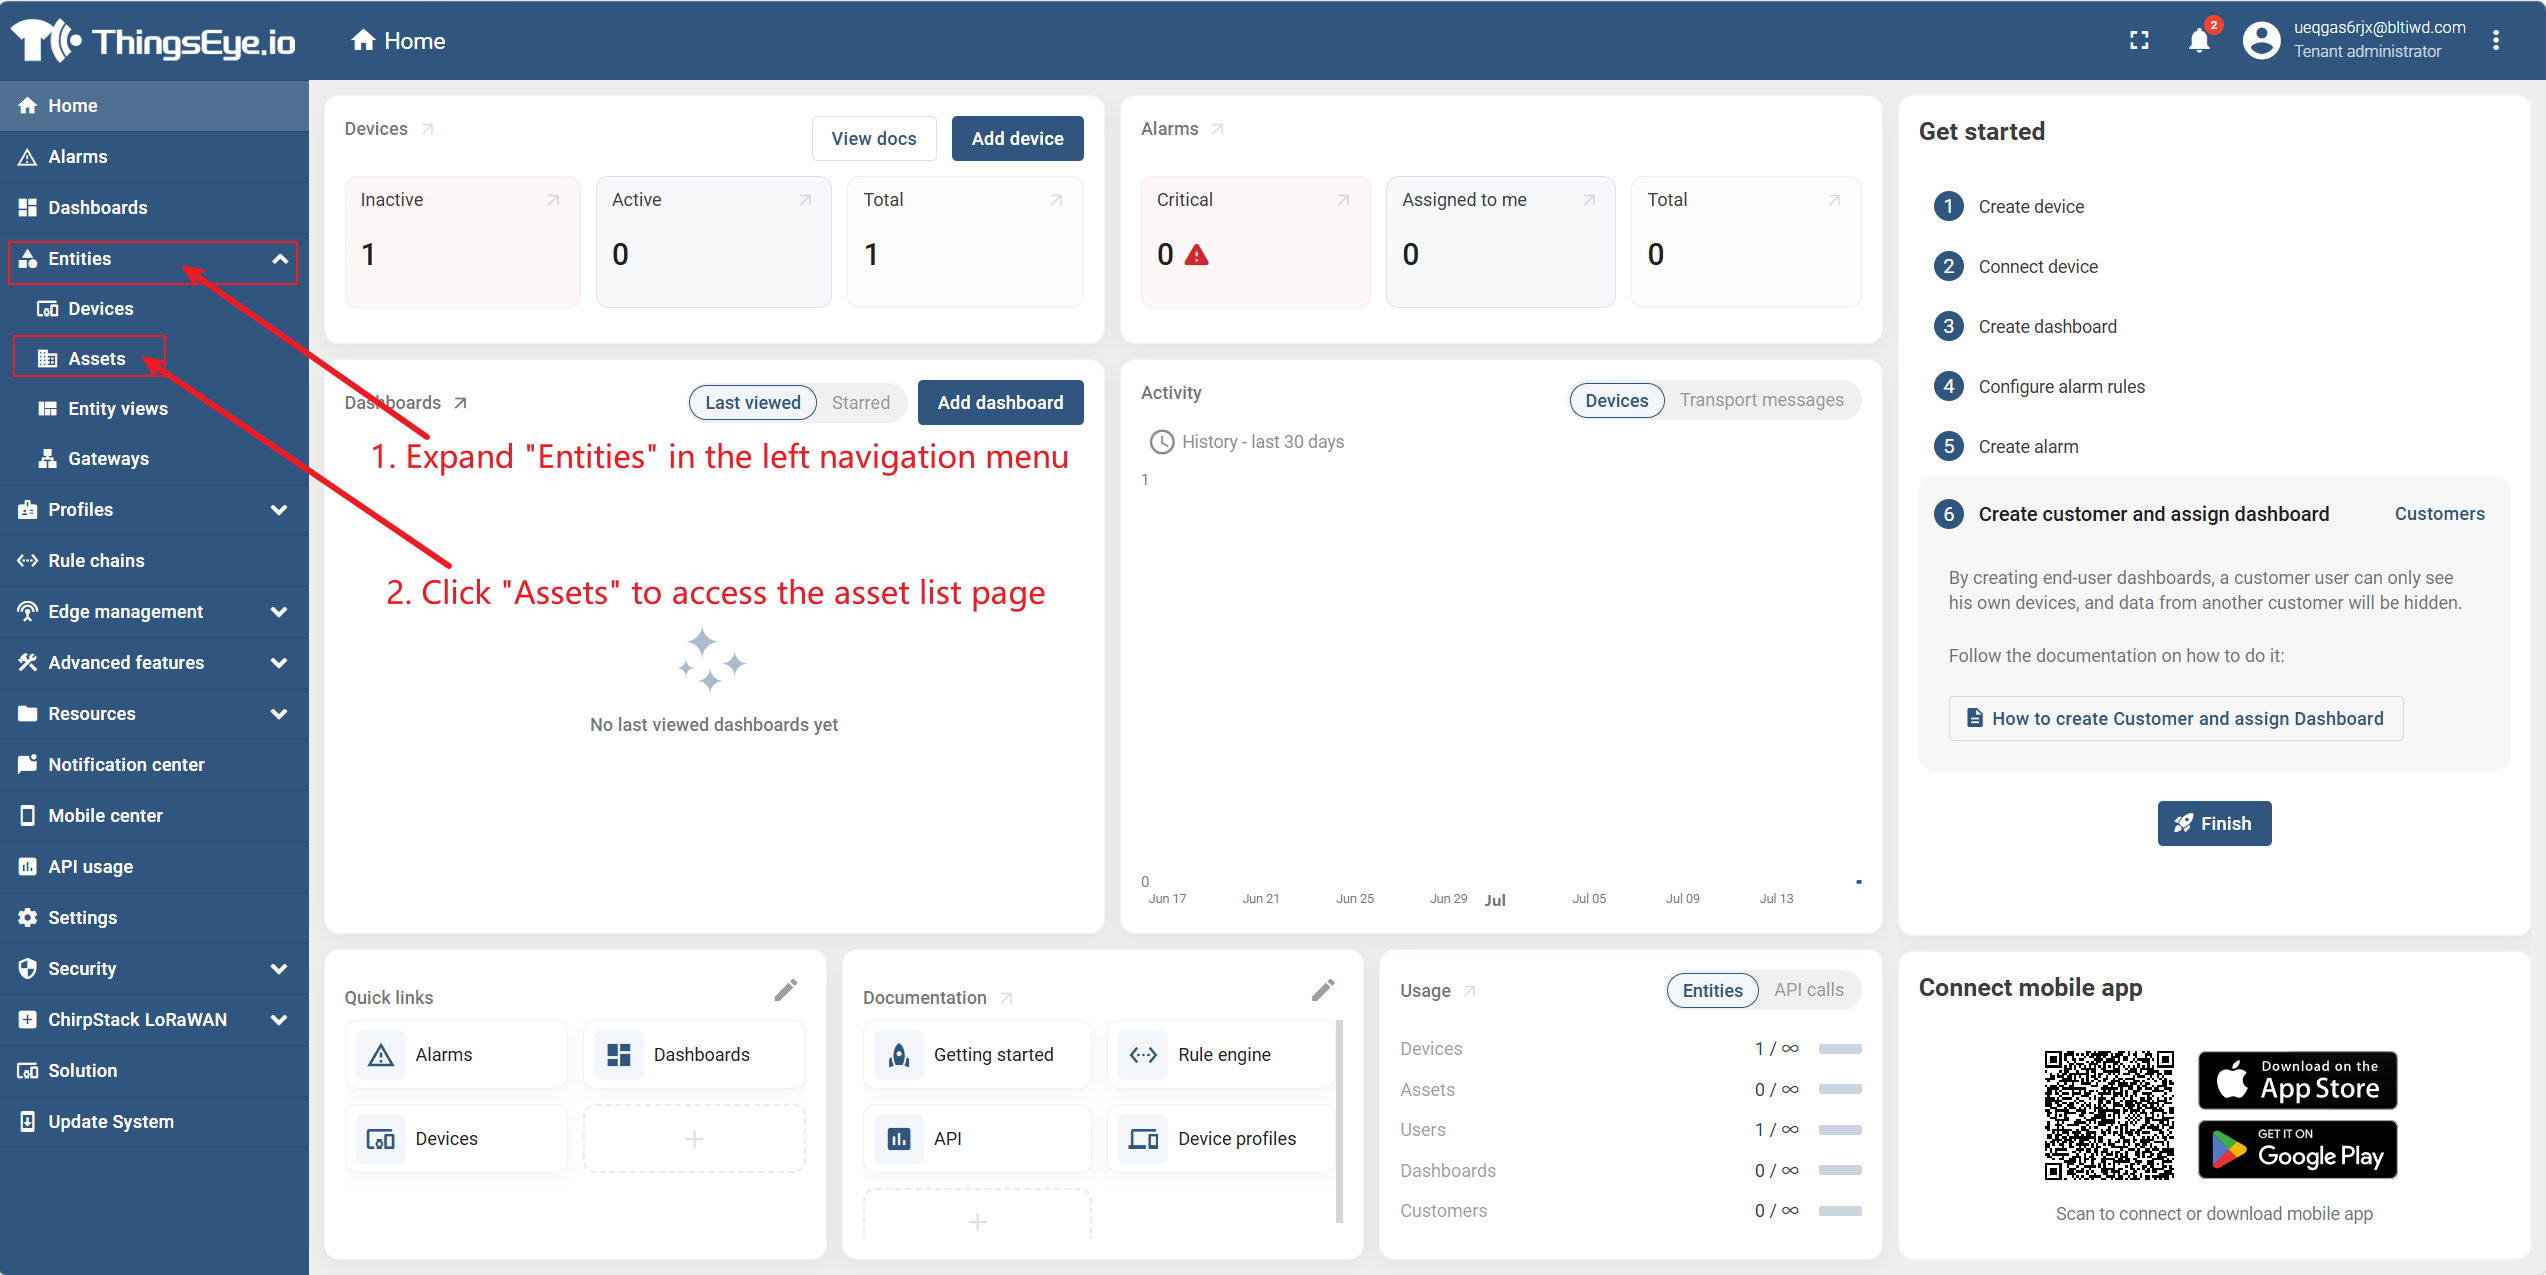
Step 2: Click "Add Asset"
Click the "Add Asset" button in the upper‑right corner of the asset list to open the "Create Asset" dialog.
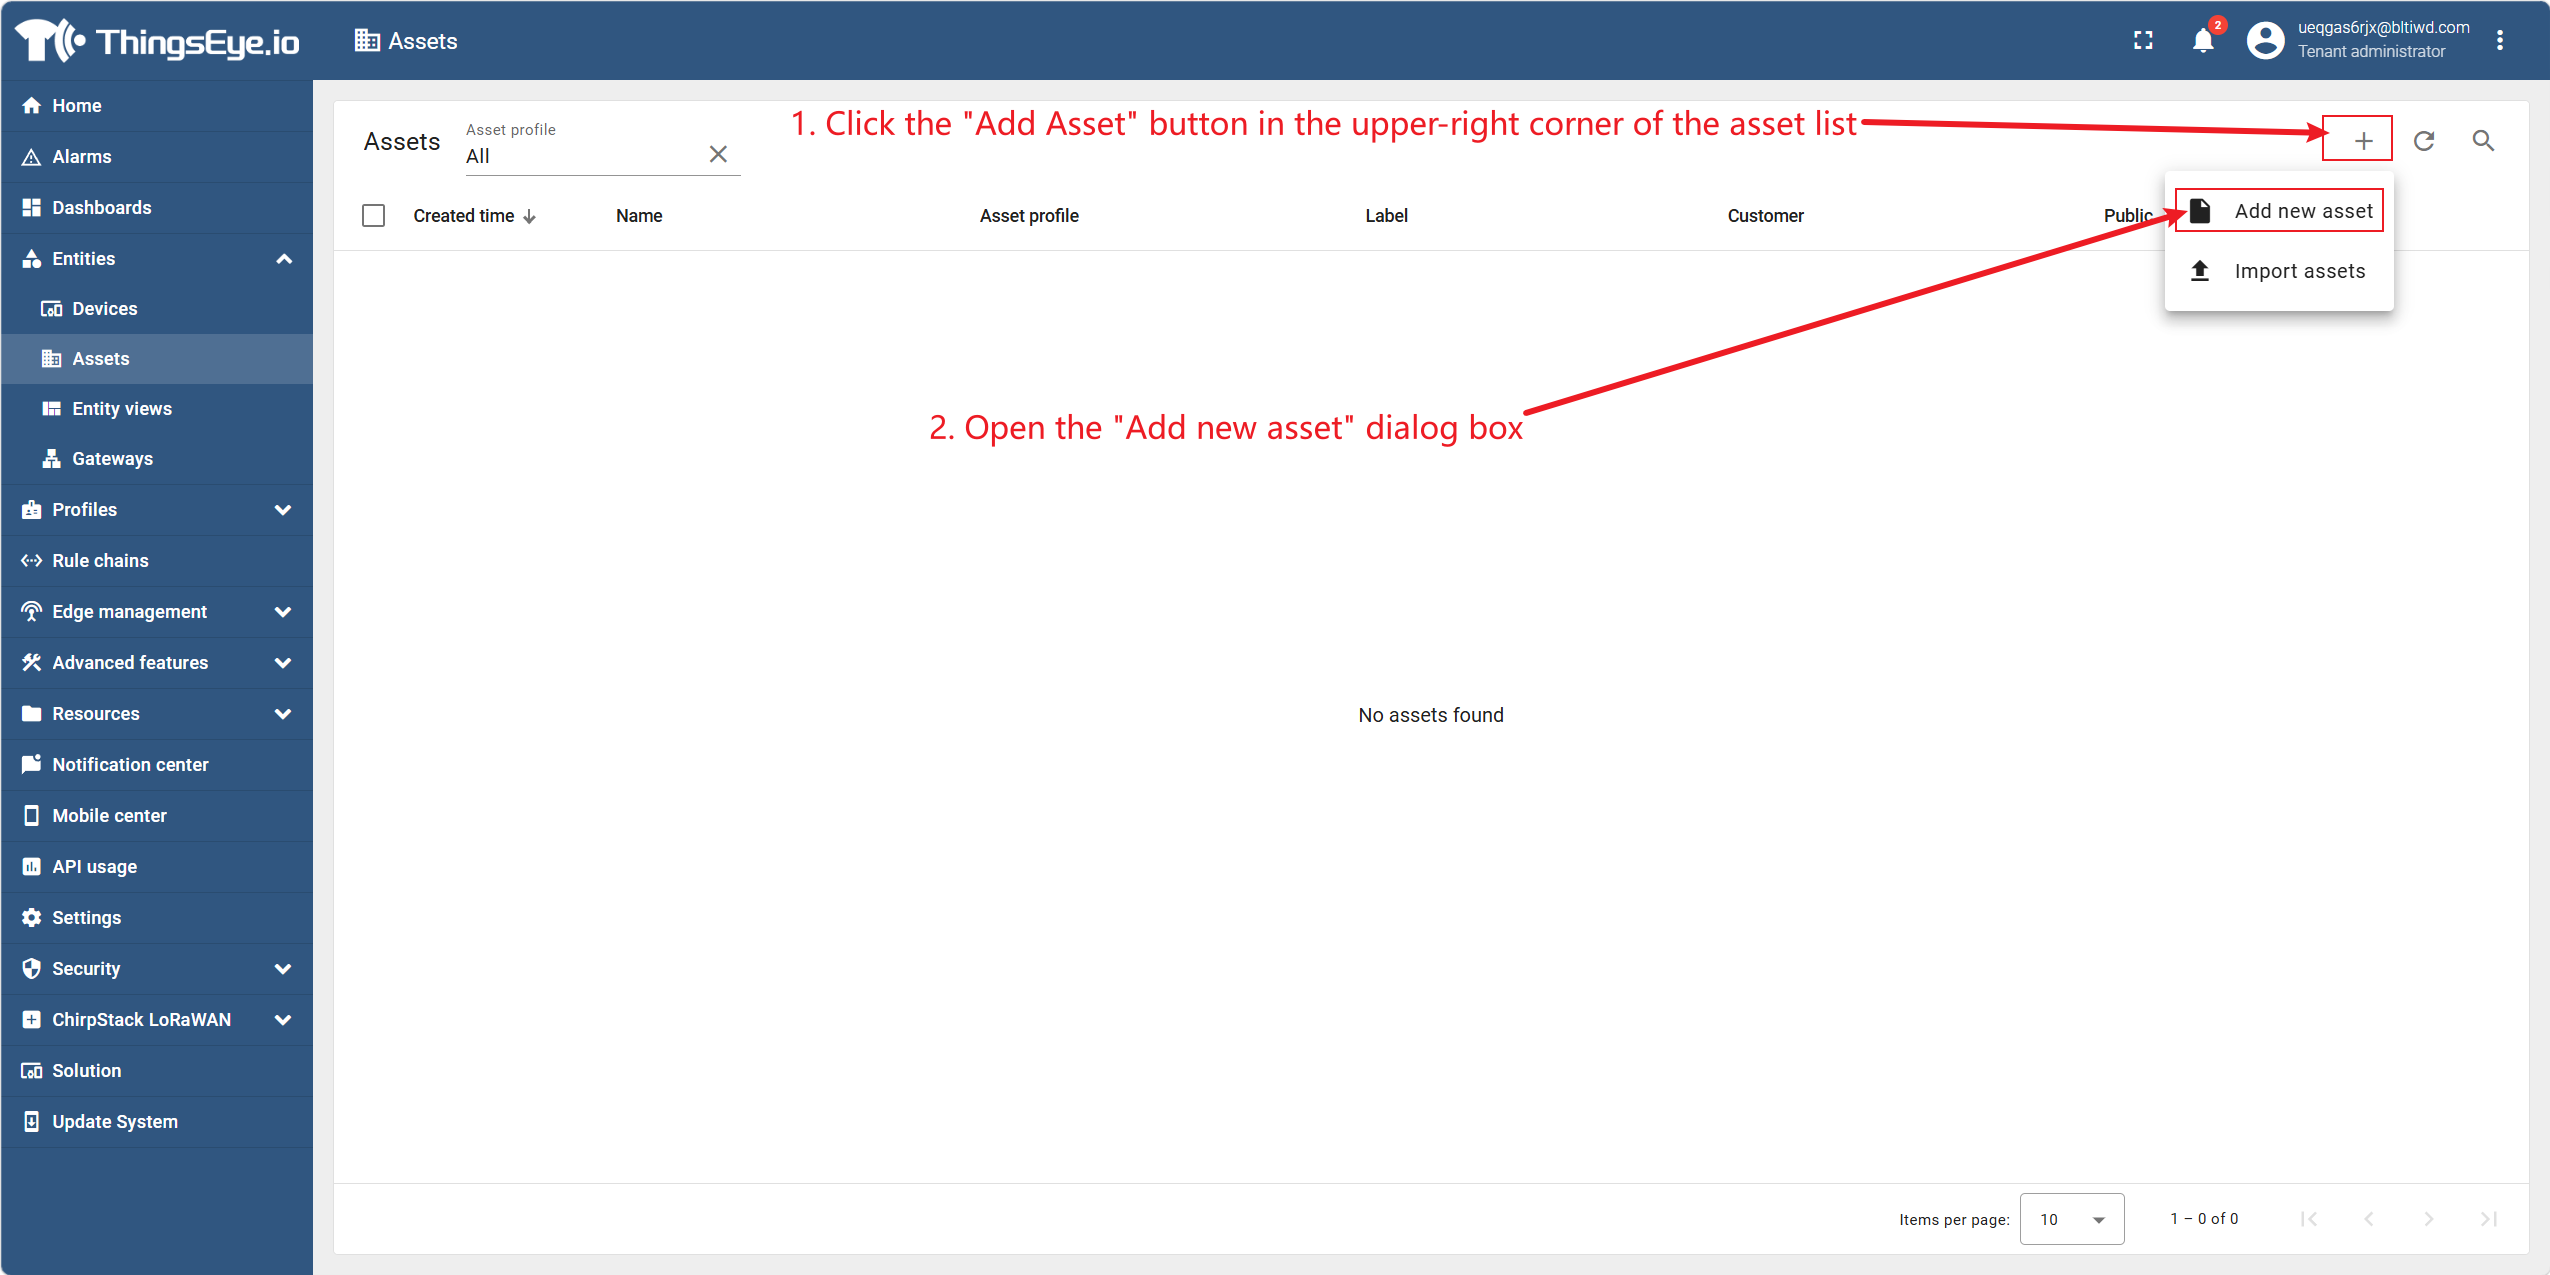
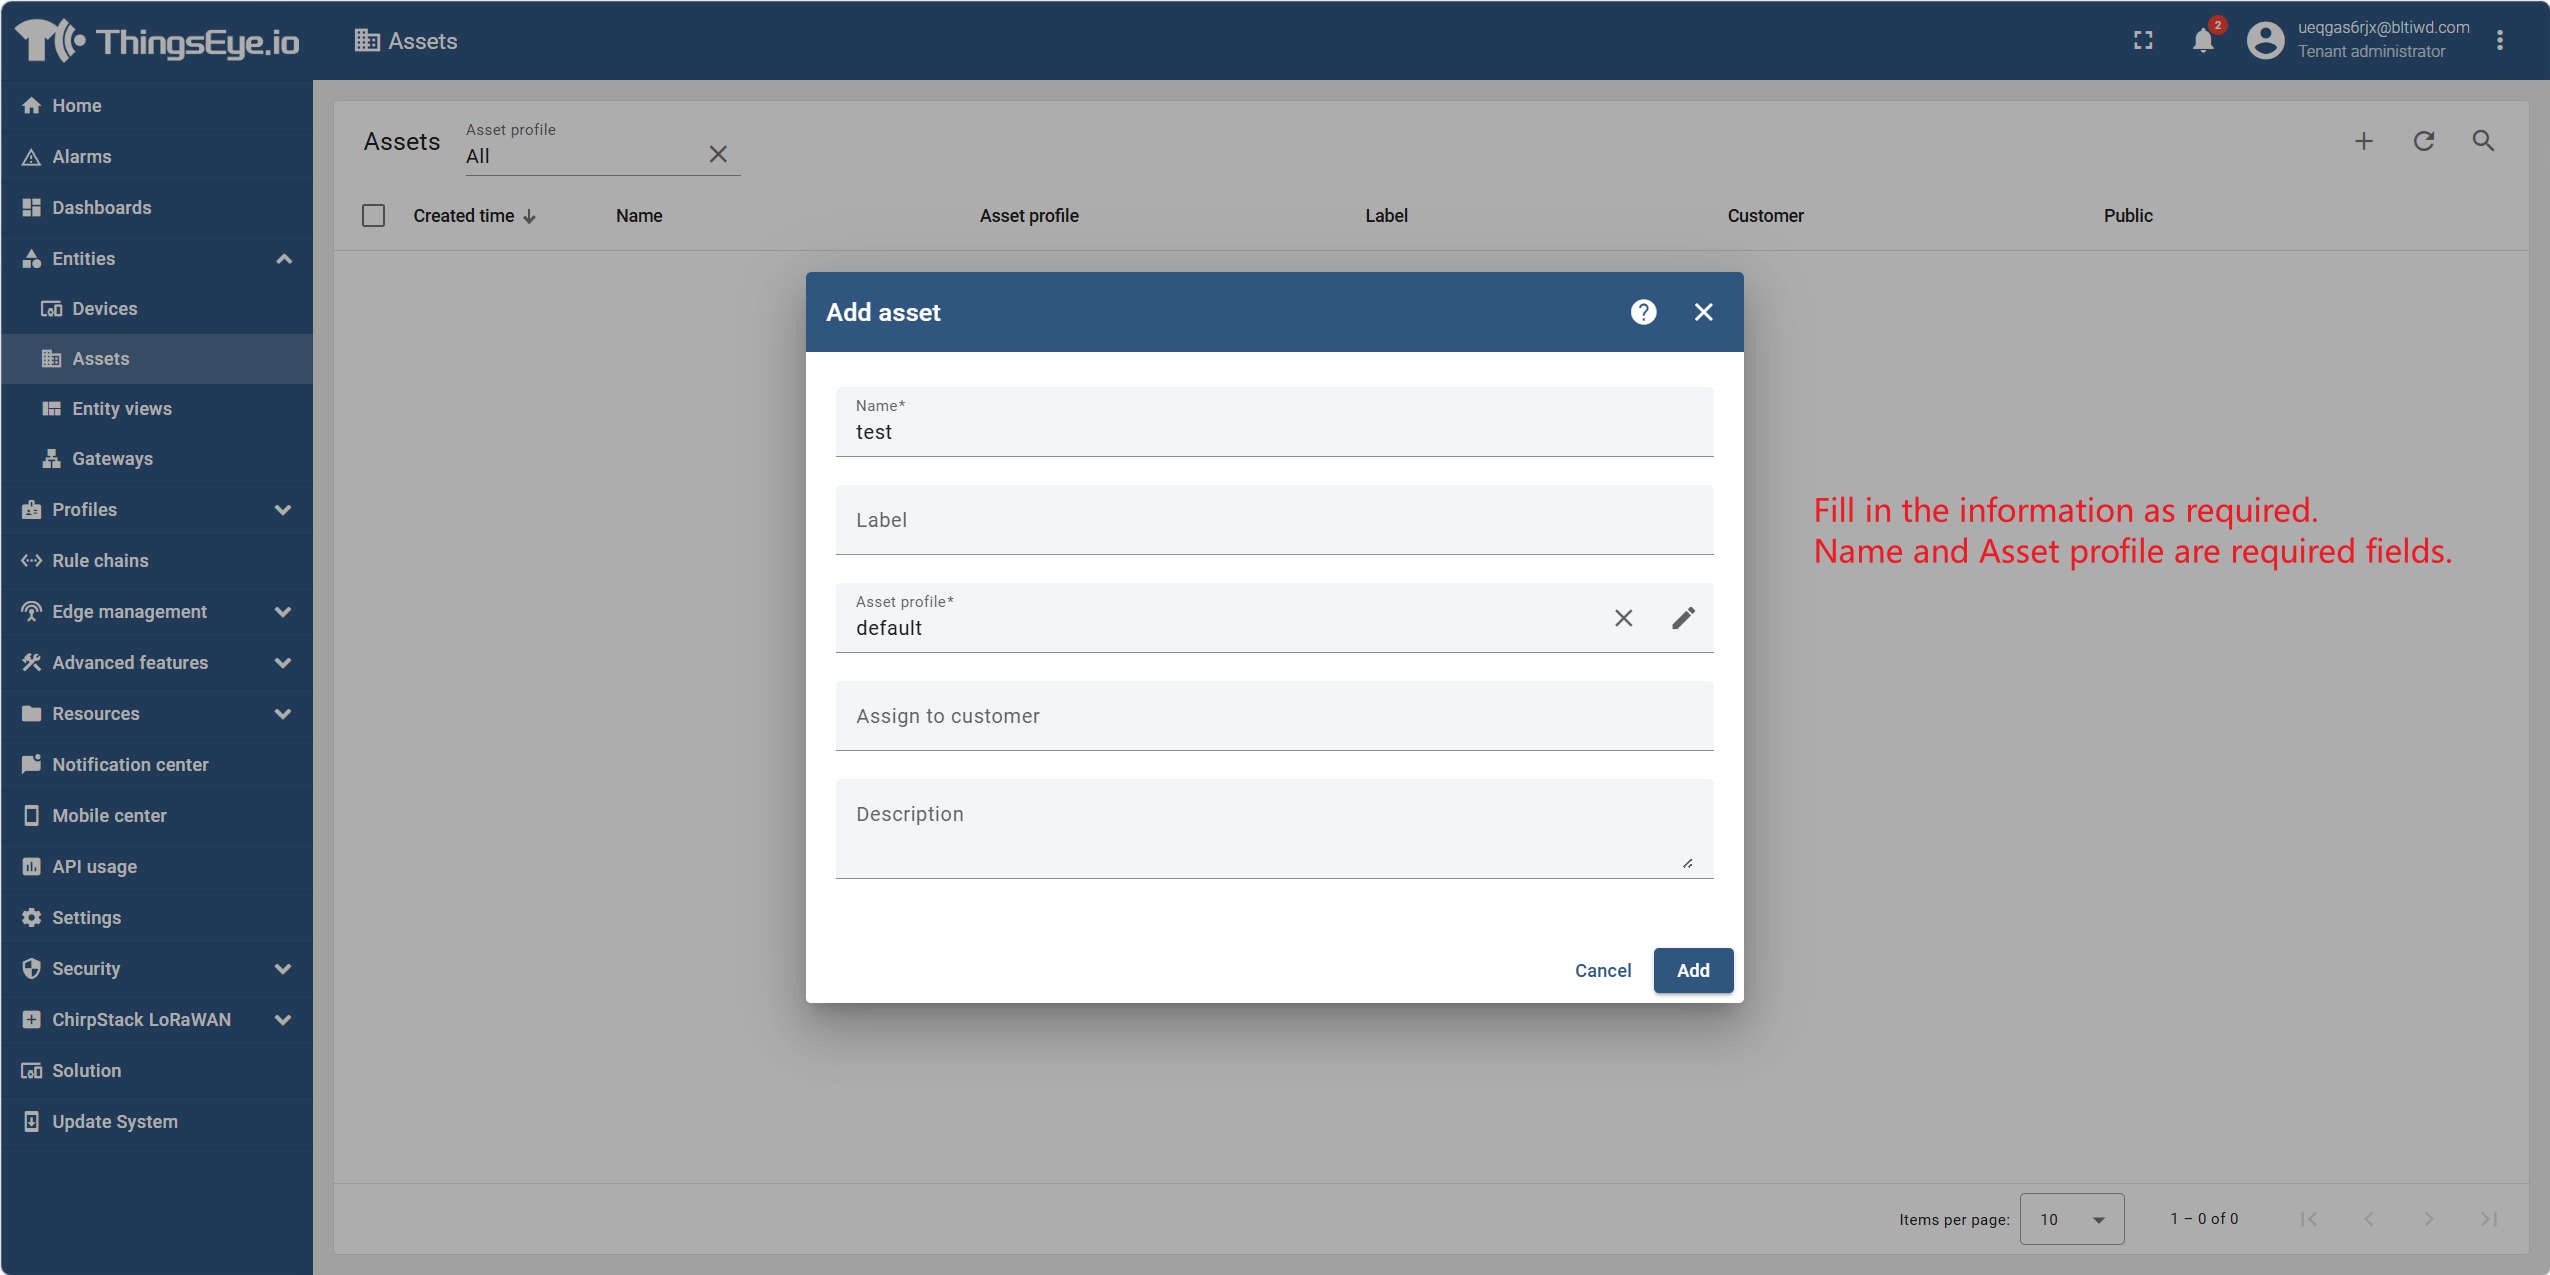
Step 3: Fill in the basic asset information
Fill in the following fields in the dialog:
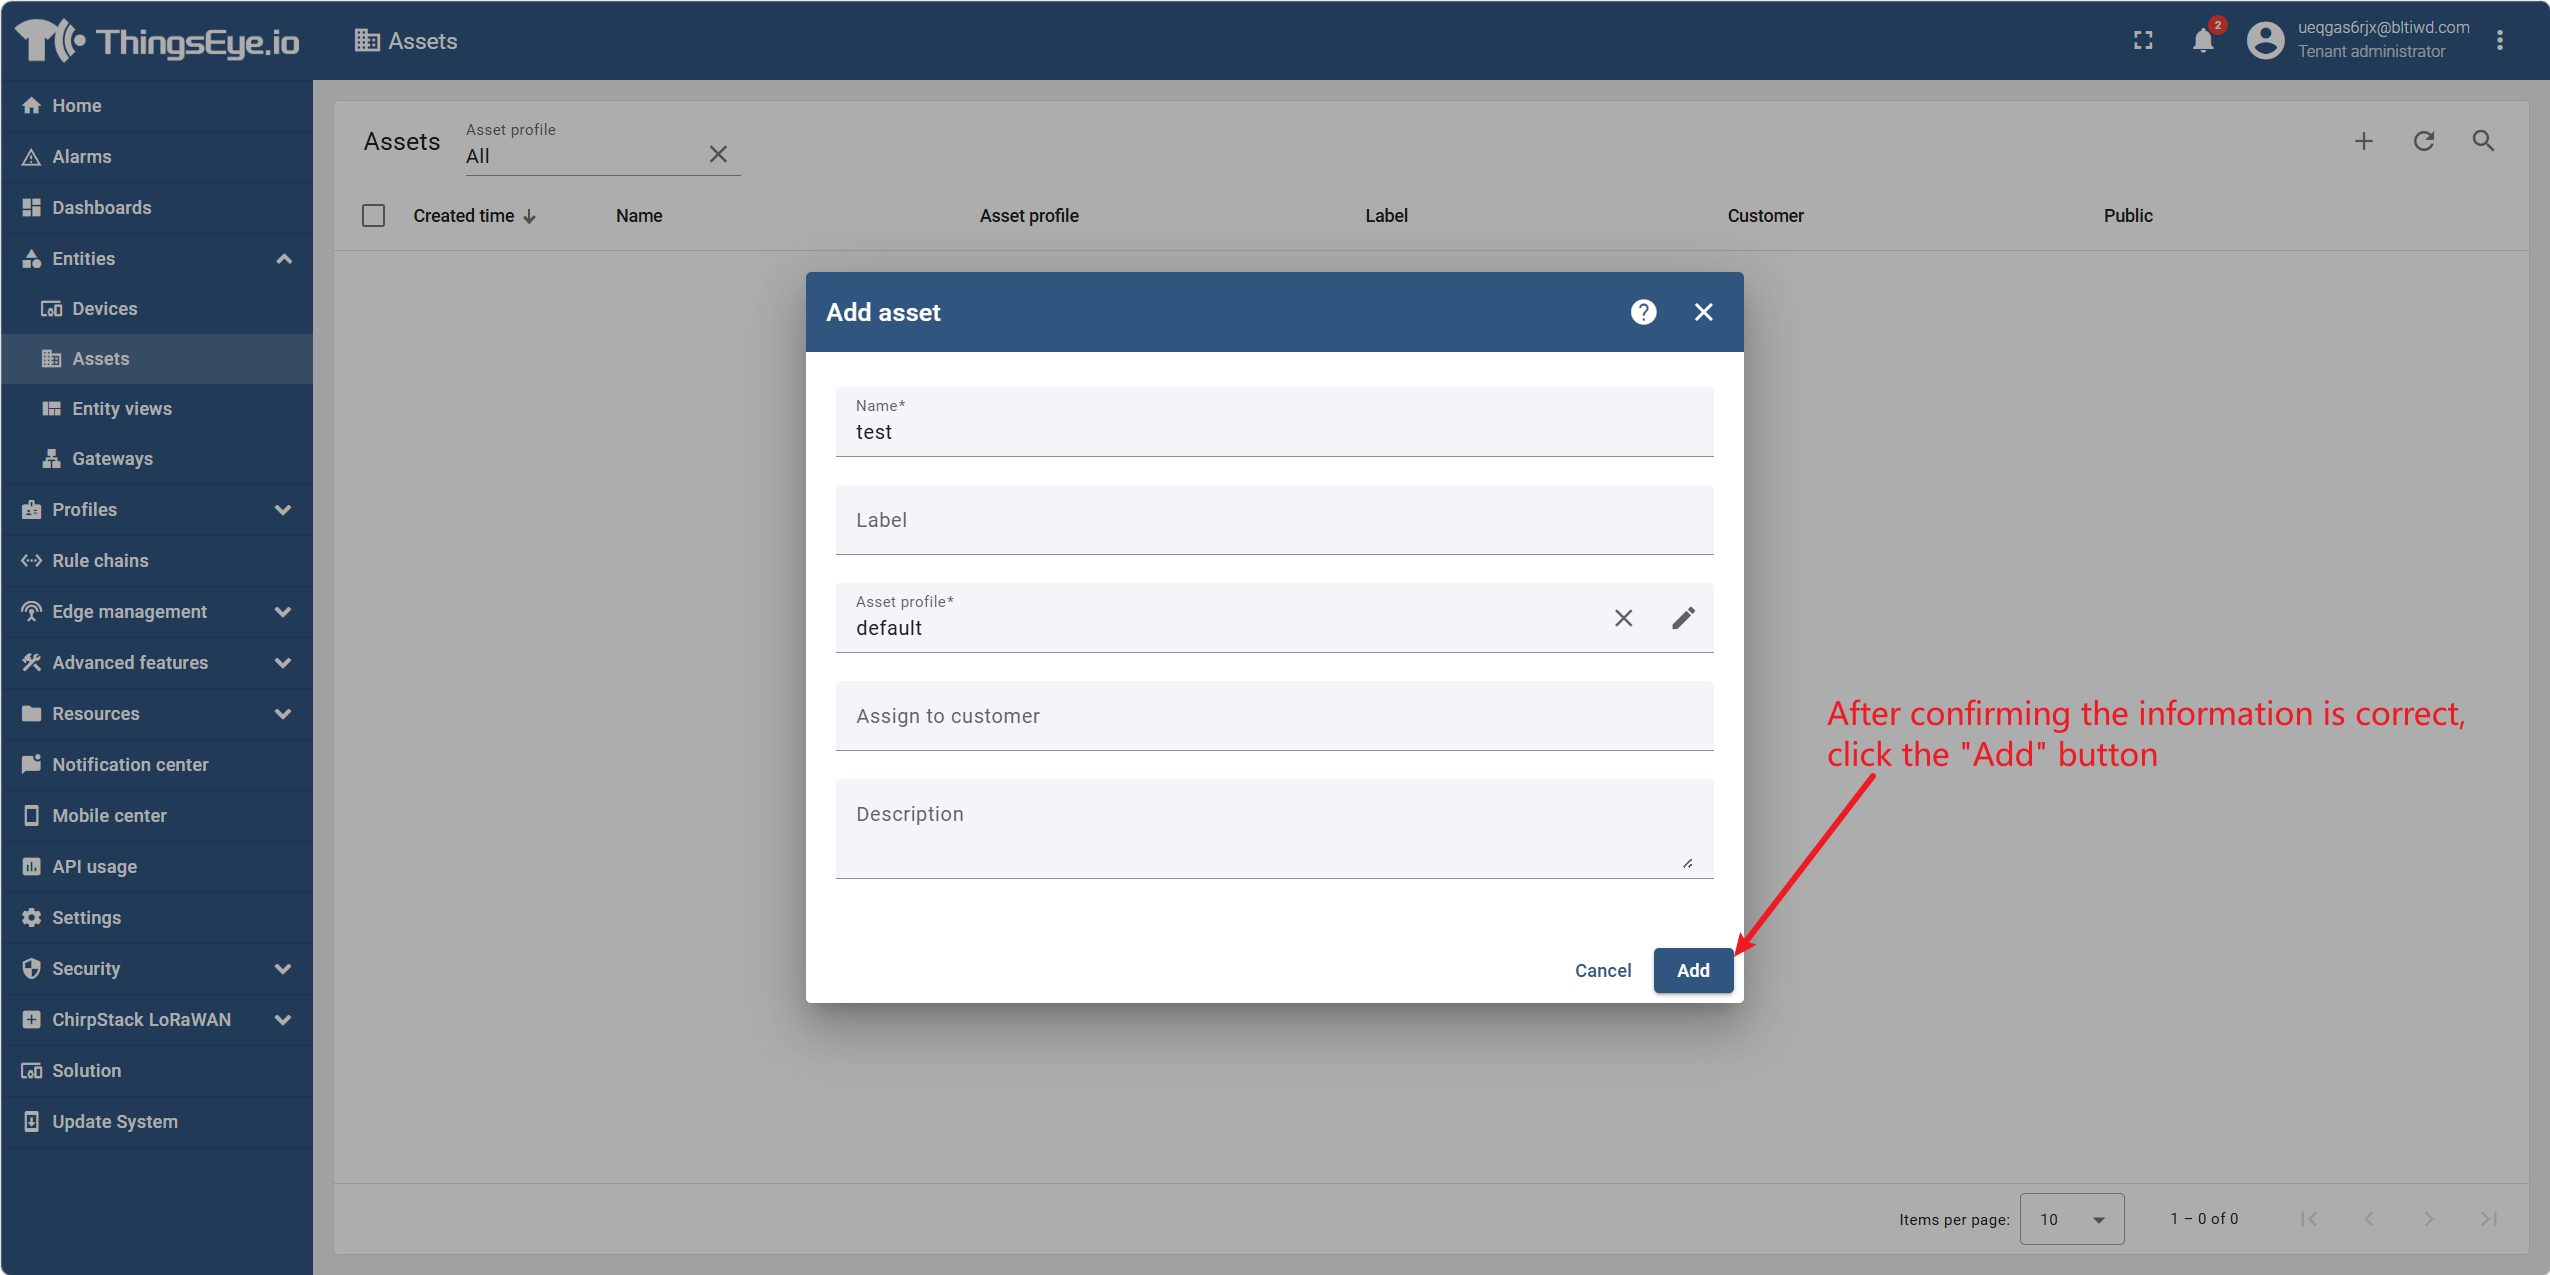
Step 4: Submit the creation
After confirming the information is correct, click the "Add" button. The system verifies the uniqueness of the asset name and completes the creation. The new asset will appear in the asset list.
2. Edit an Asset
Procedure
Step 1: Go to the asset management page
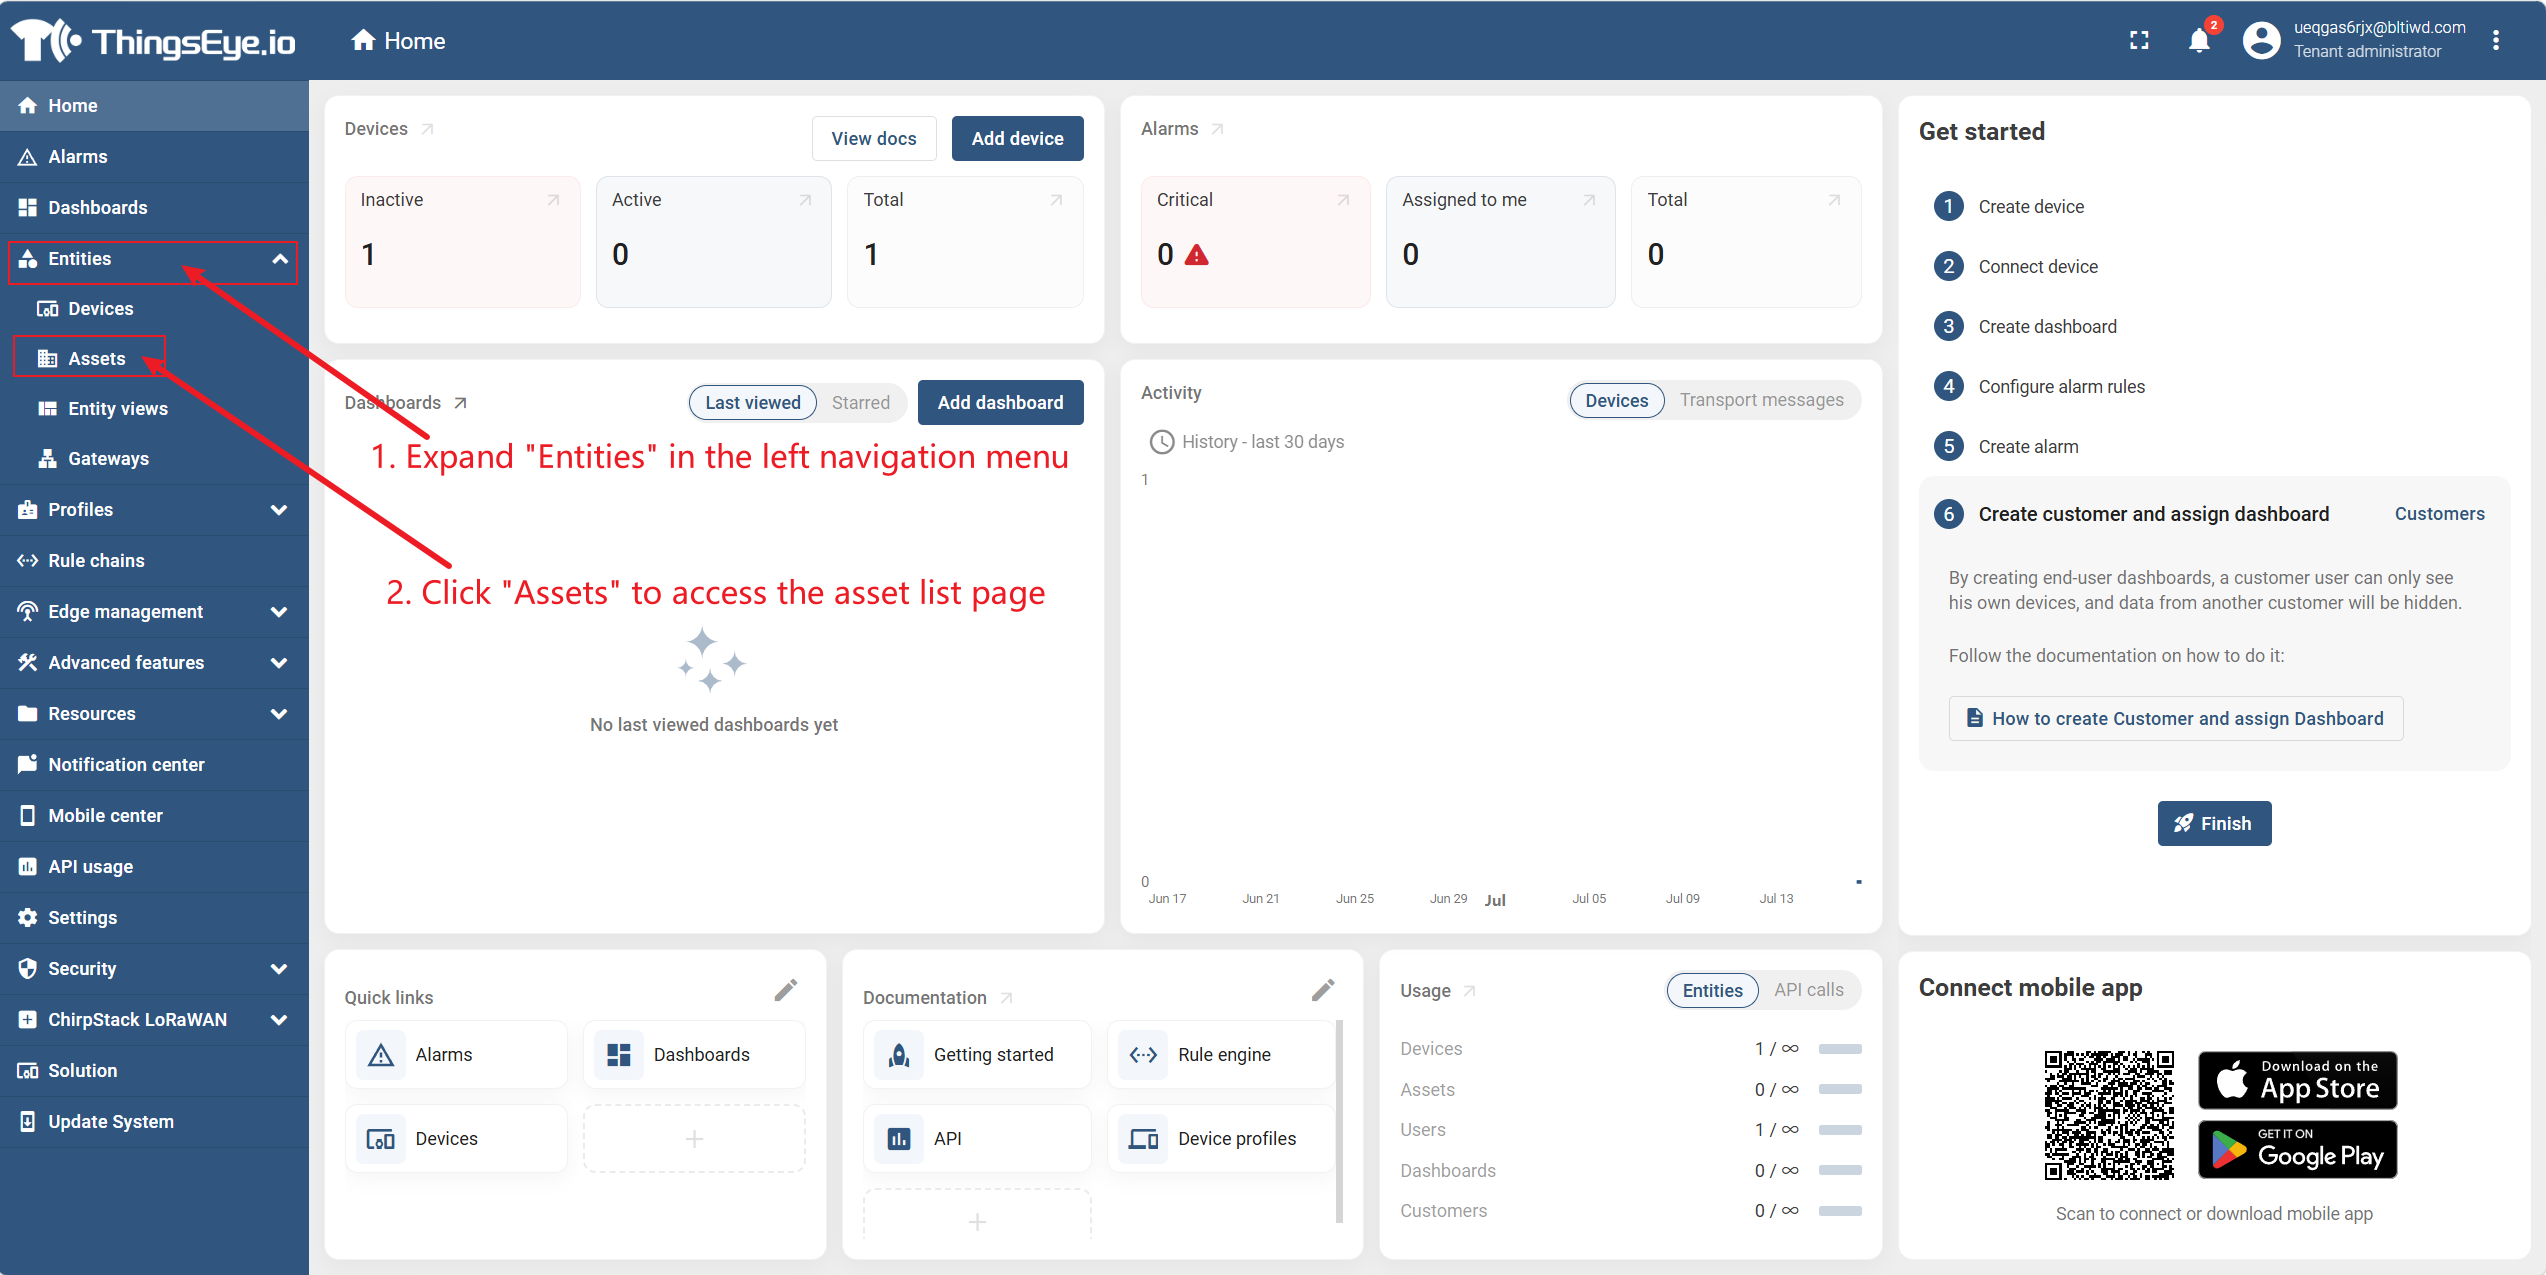
Expand "Entities" in the left navigation bar and click "Assets" to go to the asset list page.
Step 2: Locate the target asset
Find the asset you want to edit using the search box or by scrolling through the list.
Step 3: Open the asset edit interface
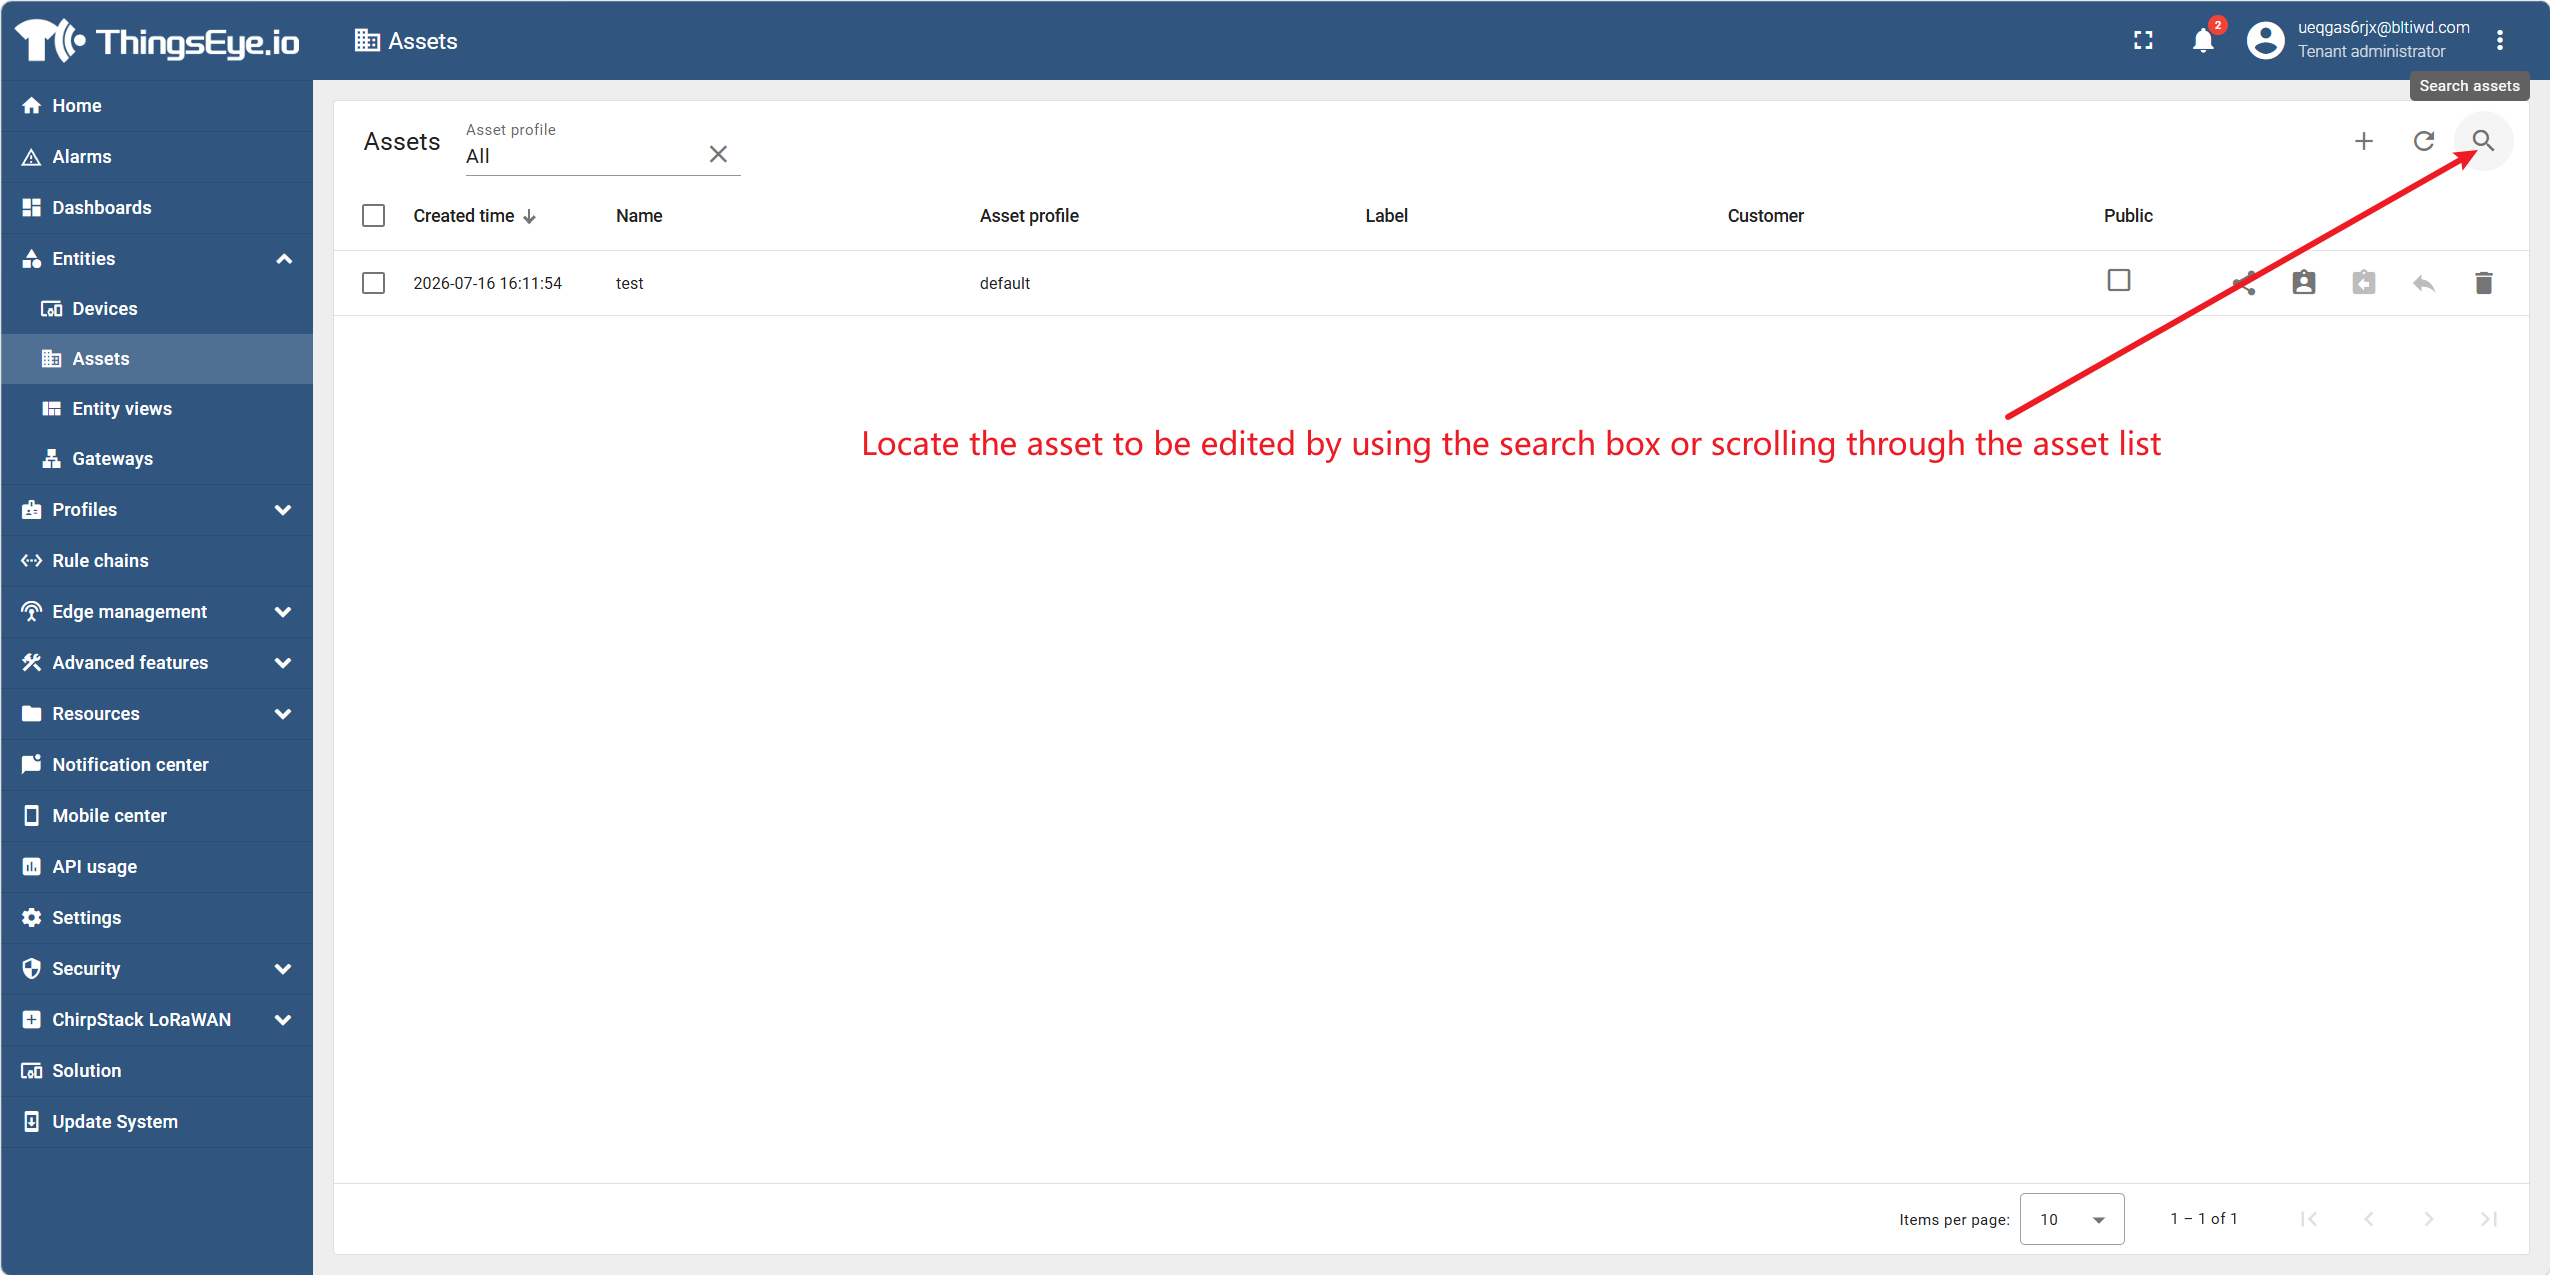
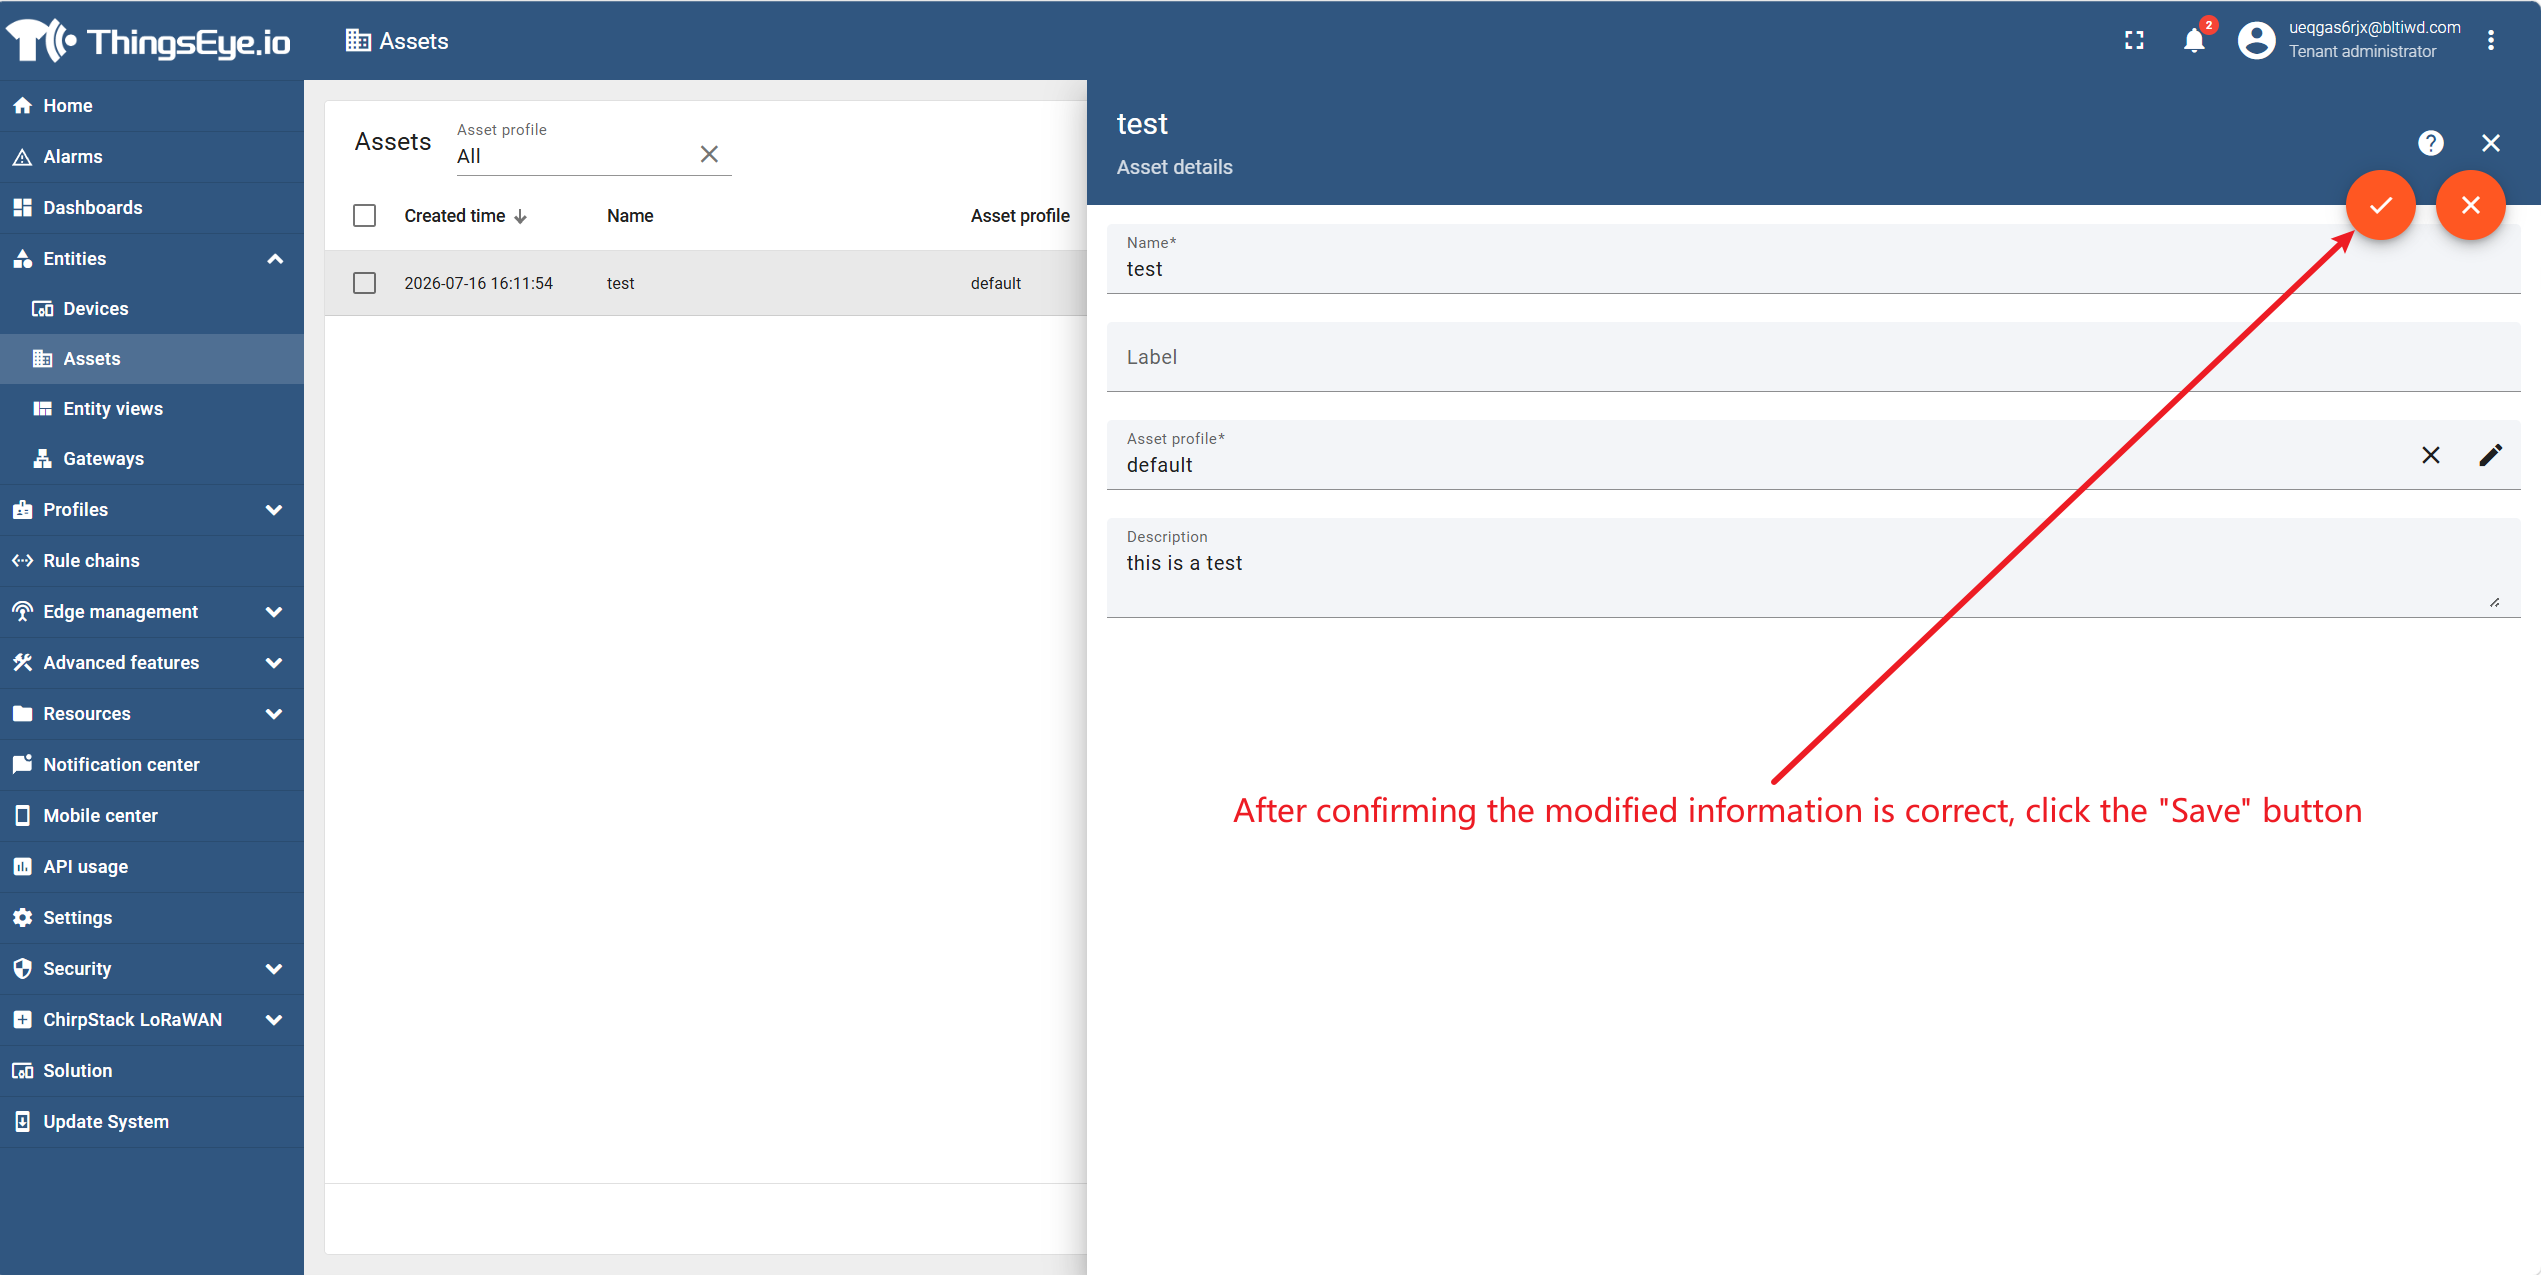
Click the orange pencil icon on the right side of the target asset row, or click the asset name to go to the asset details page and then click "Edit", to open the "Edit Asset" dialog.
Step 4: Modify asset information
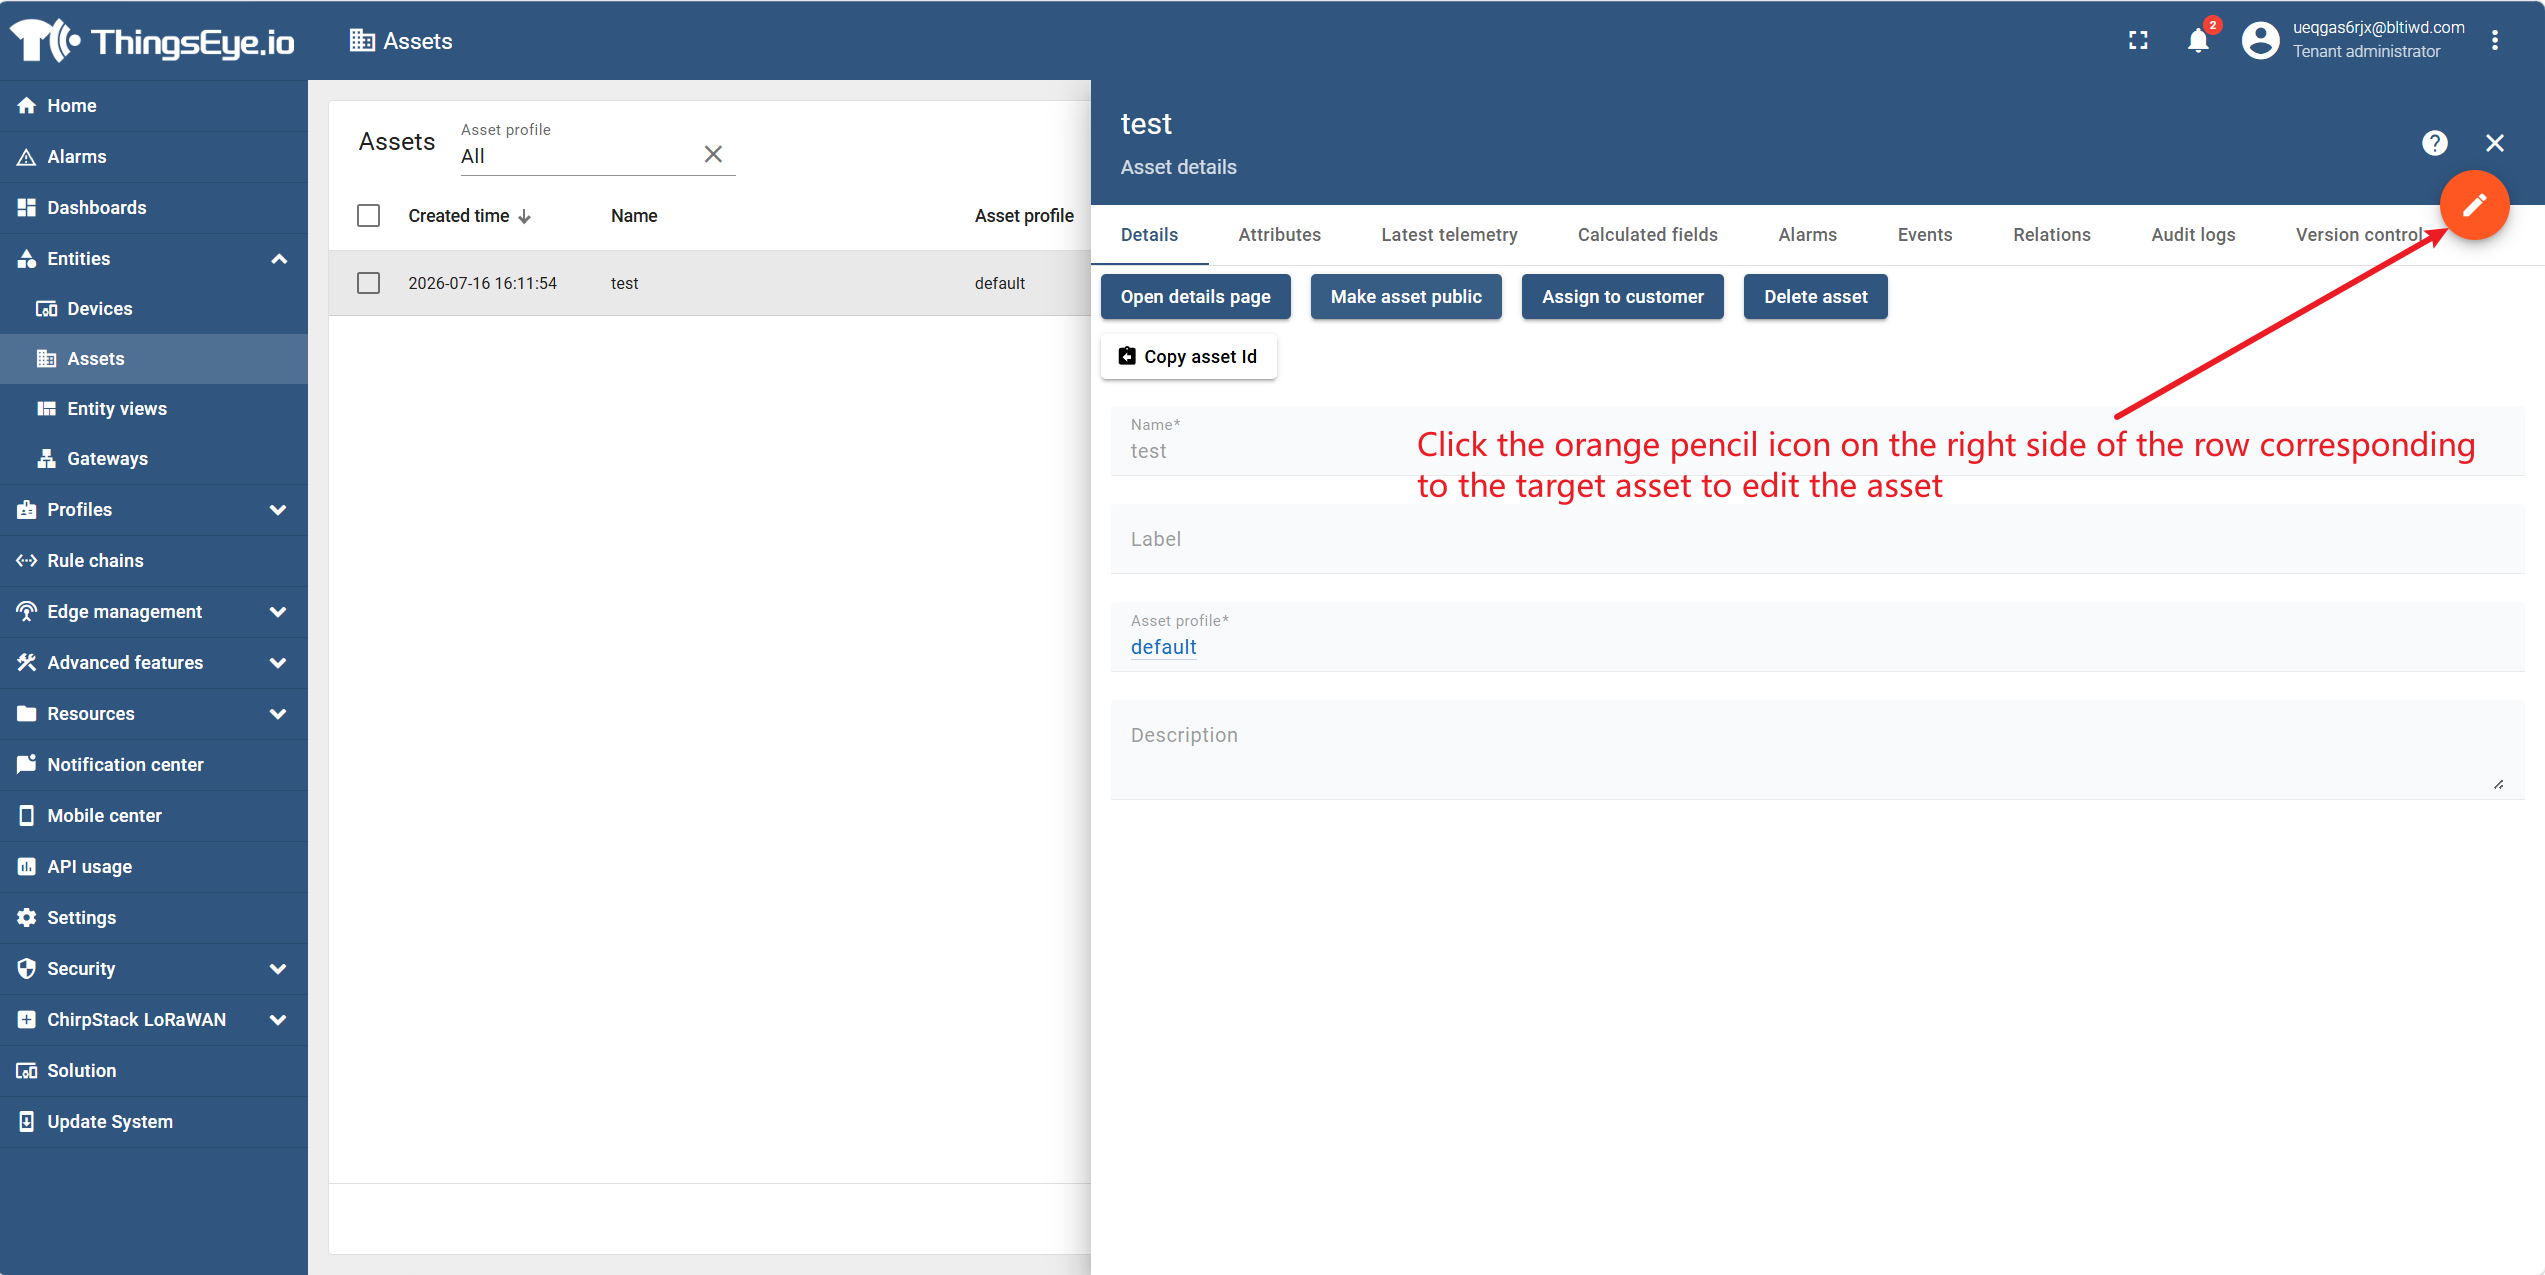
Modify the following fields in the dialog:
Step 5: Save changes
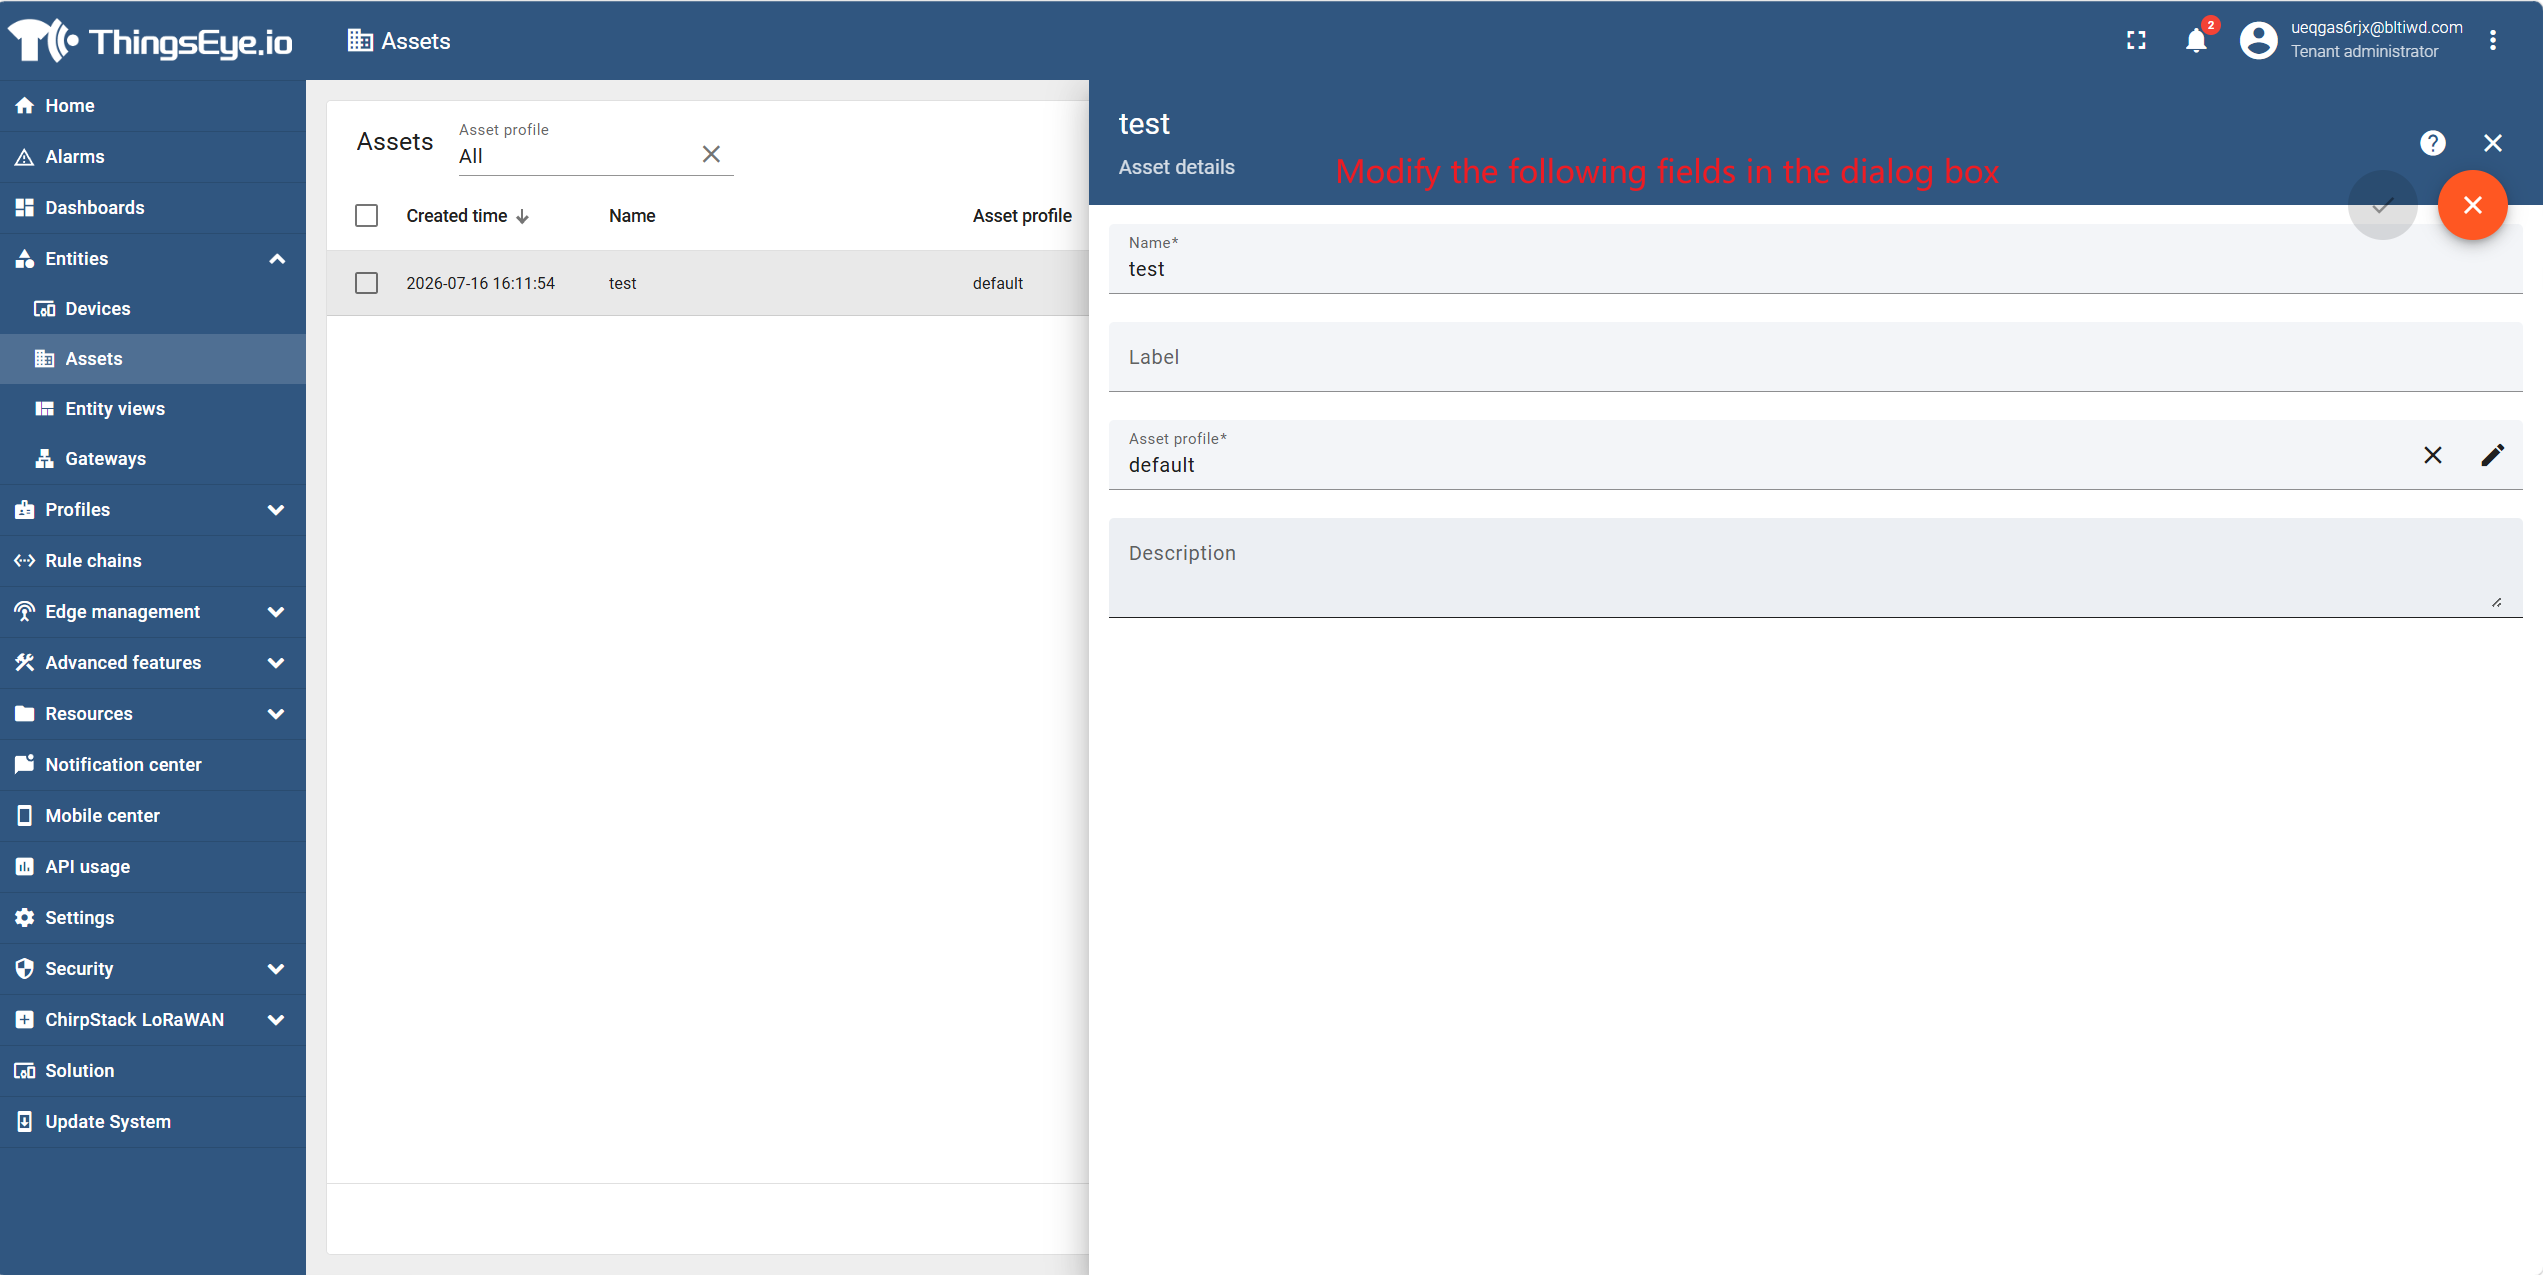
After confirming the modifications are correct, click the "Save" button. The system verifies the uniqueness of the asset name and completes the information update.
3. Associate Devices with an Asset
Procedure
Step 1: Go to the asset management page
Expand "Entities" in the left navigation bar and click "Assets" to go to the asset list page.
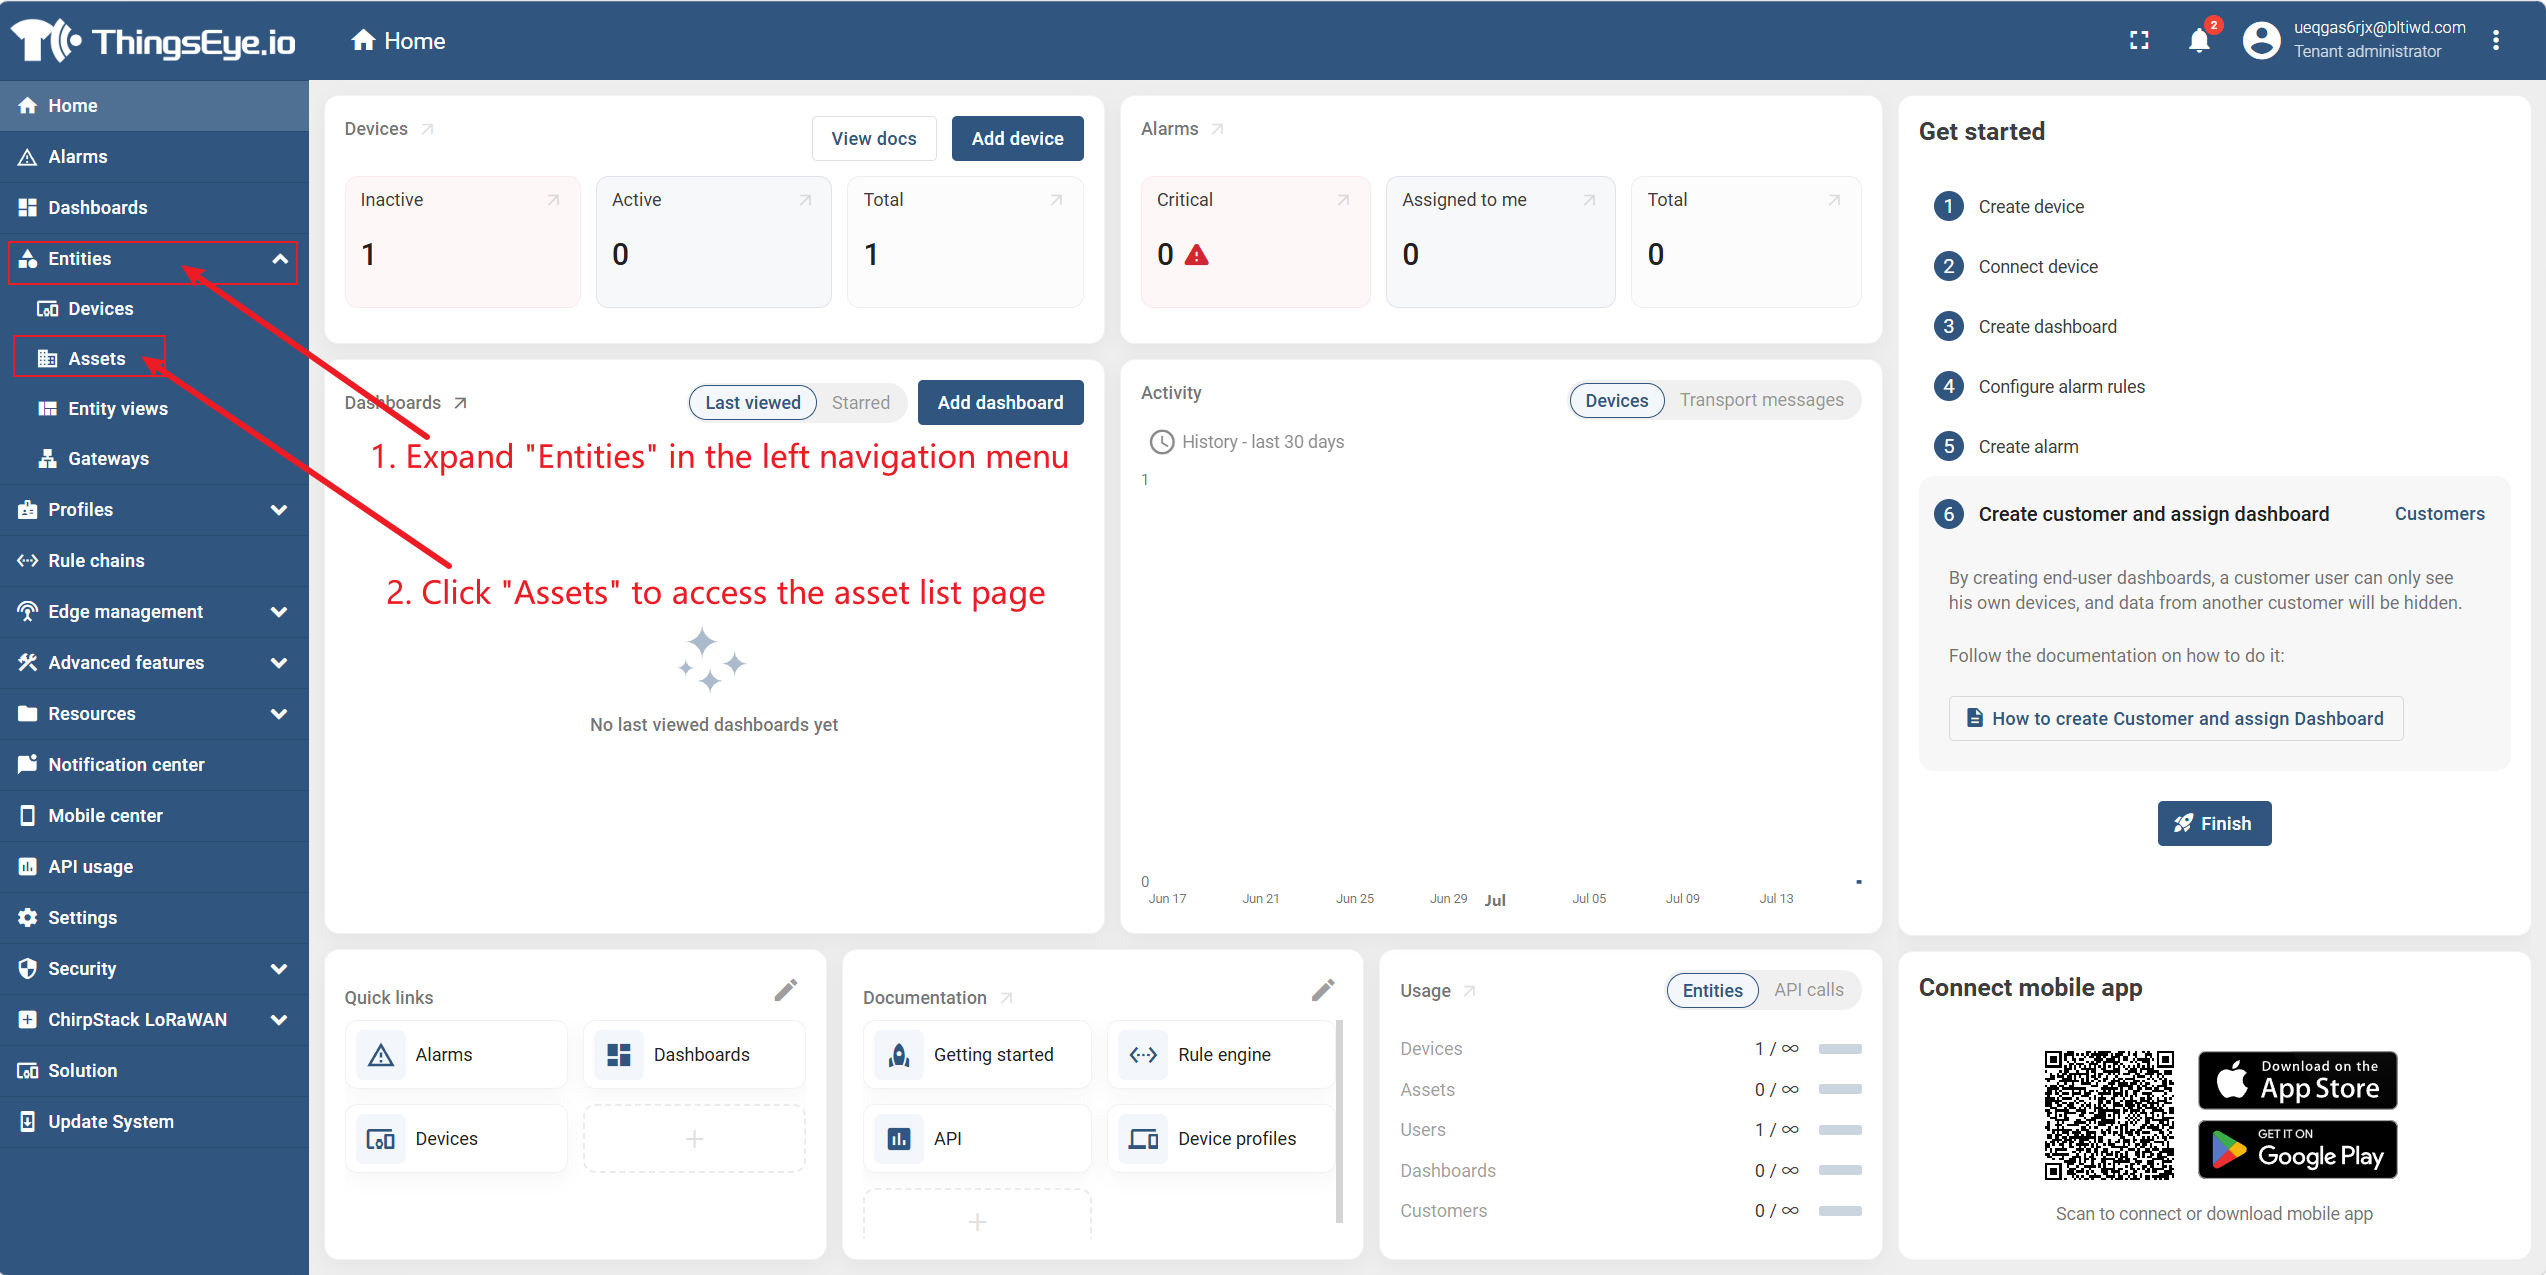
Step 2: Locate the target asset
Find the asset you want to associate devices with using the search box or by scrolling through the list.
Step 3: Go to the asset details page
Click the asset name of the target asset to go to the asset details page.
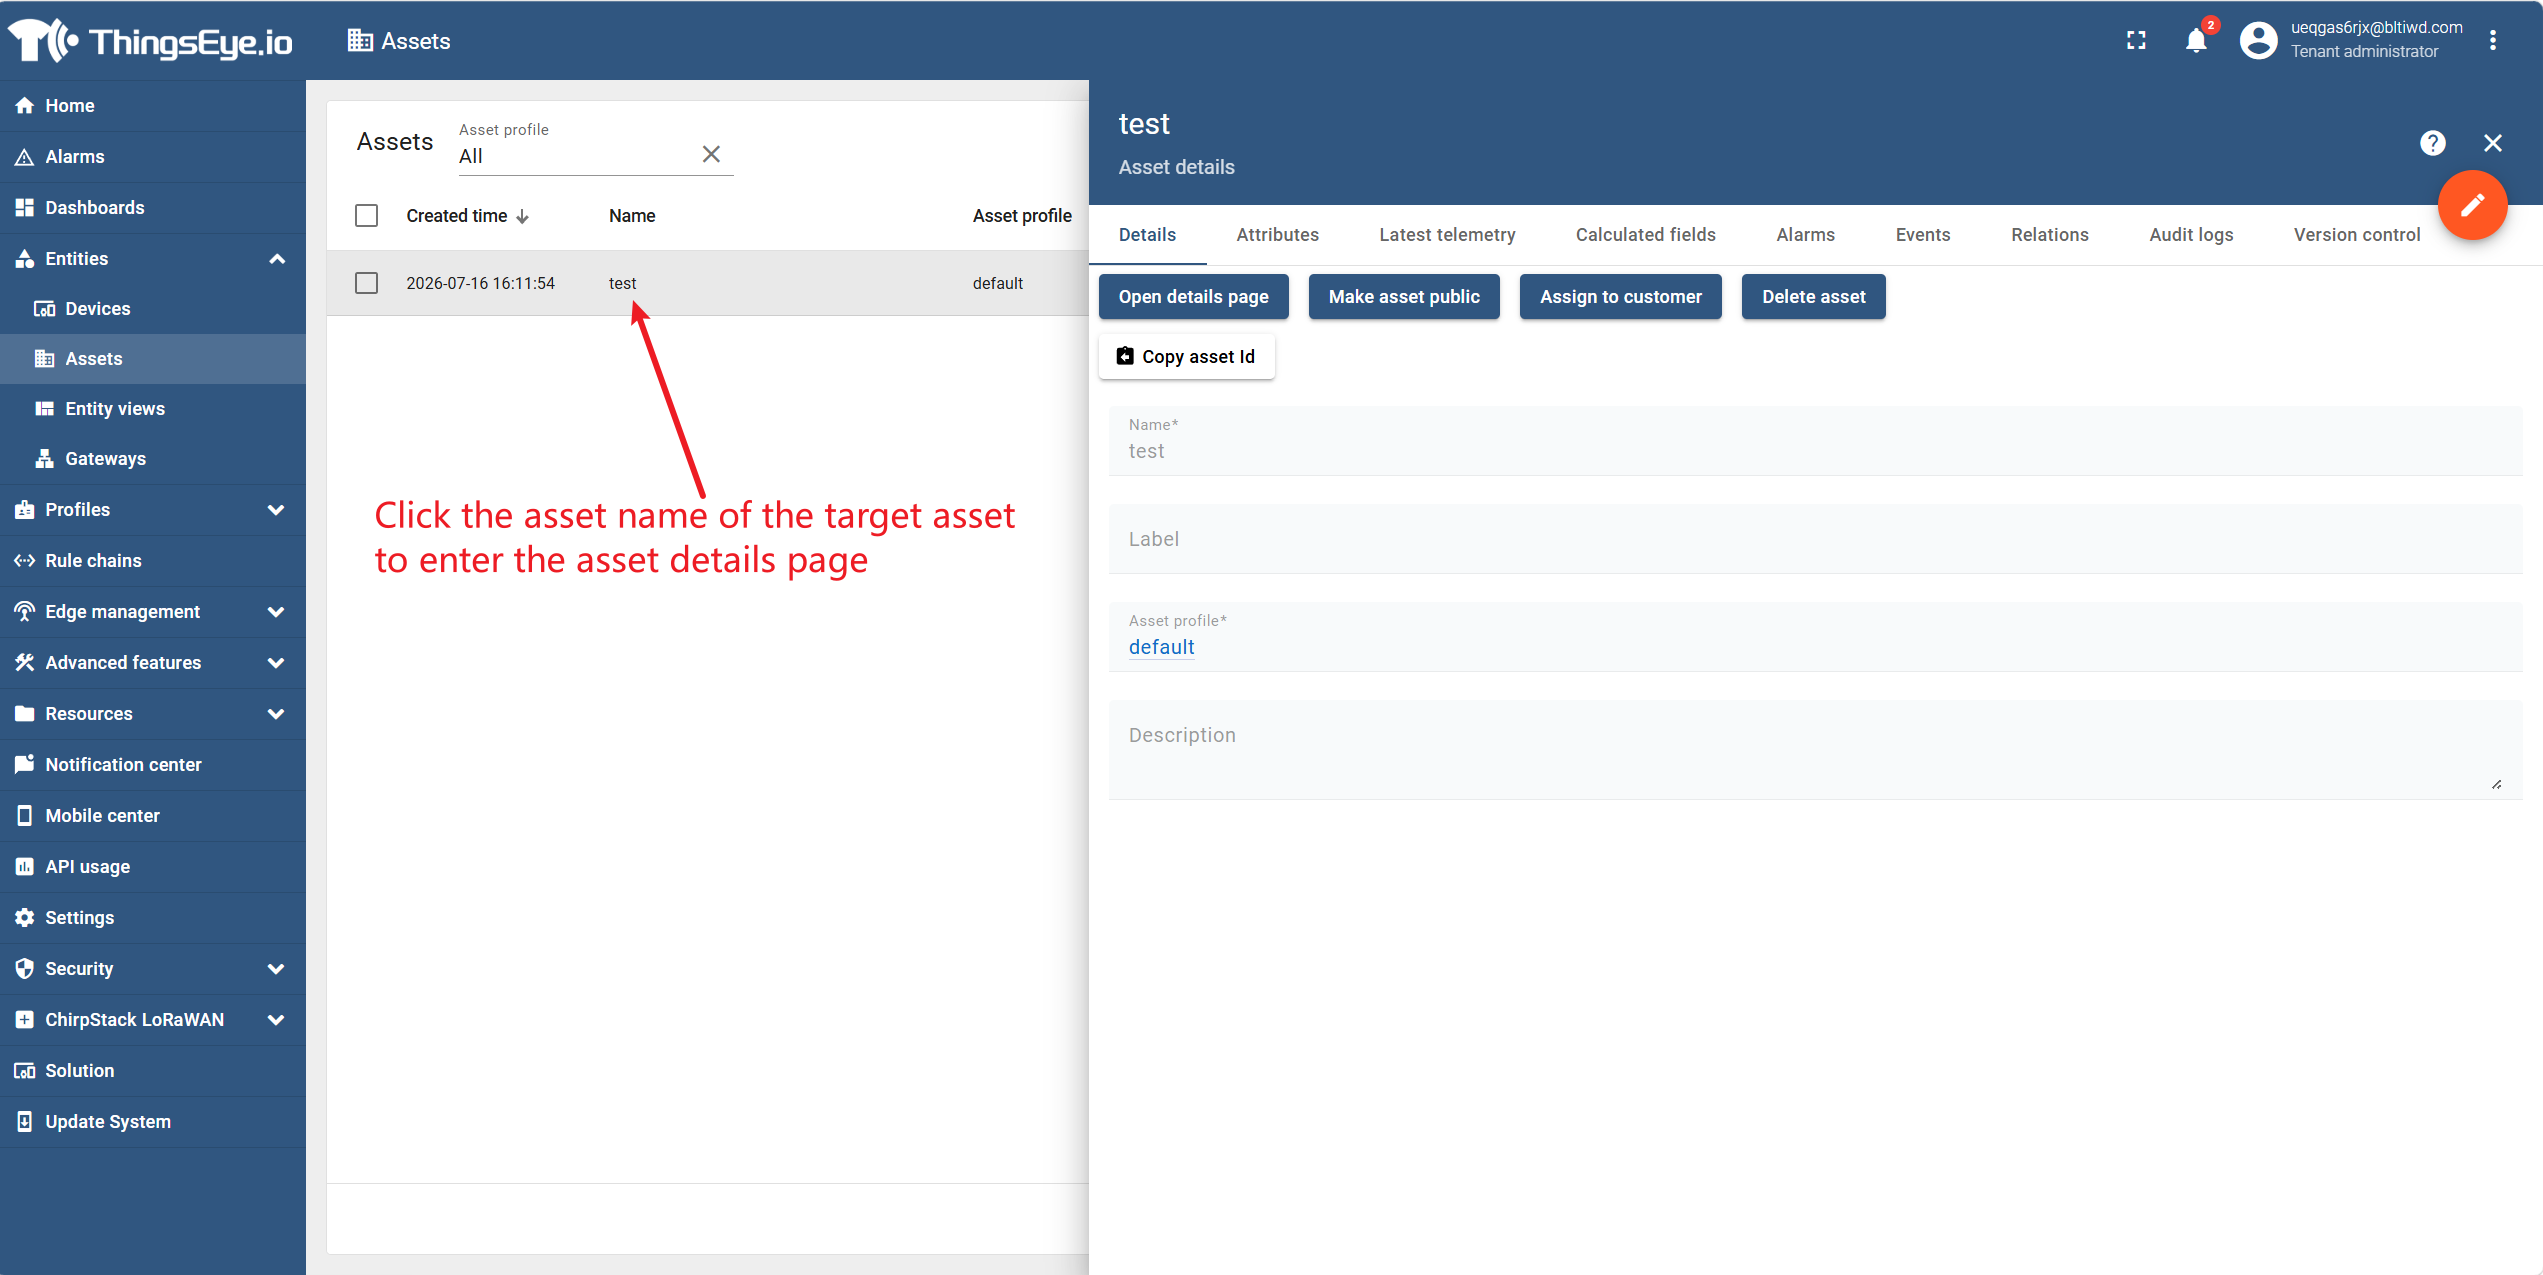
Step 4: Switch to the "Relations" tab
On the asset details page, click the "Relations" tab to go to the device association management area.
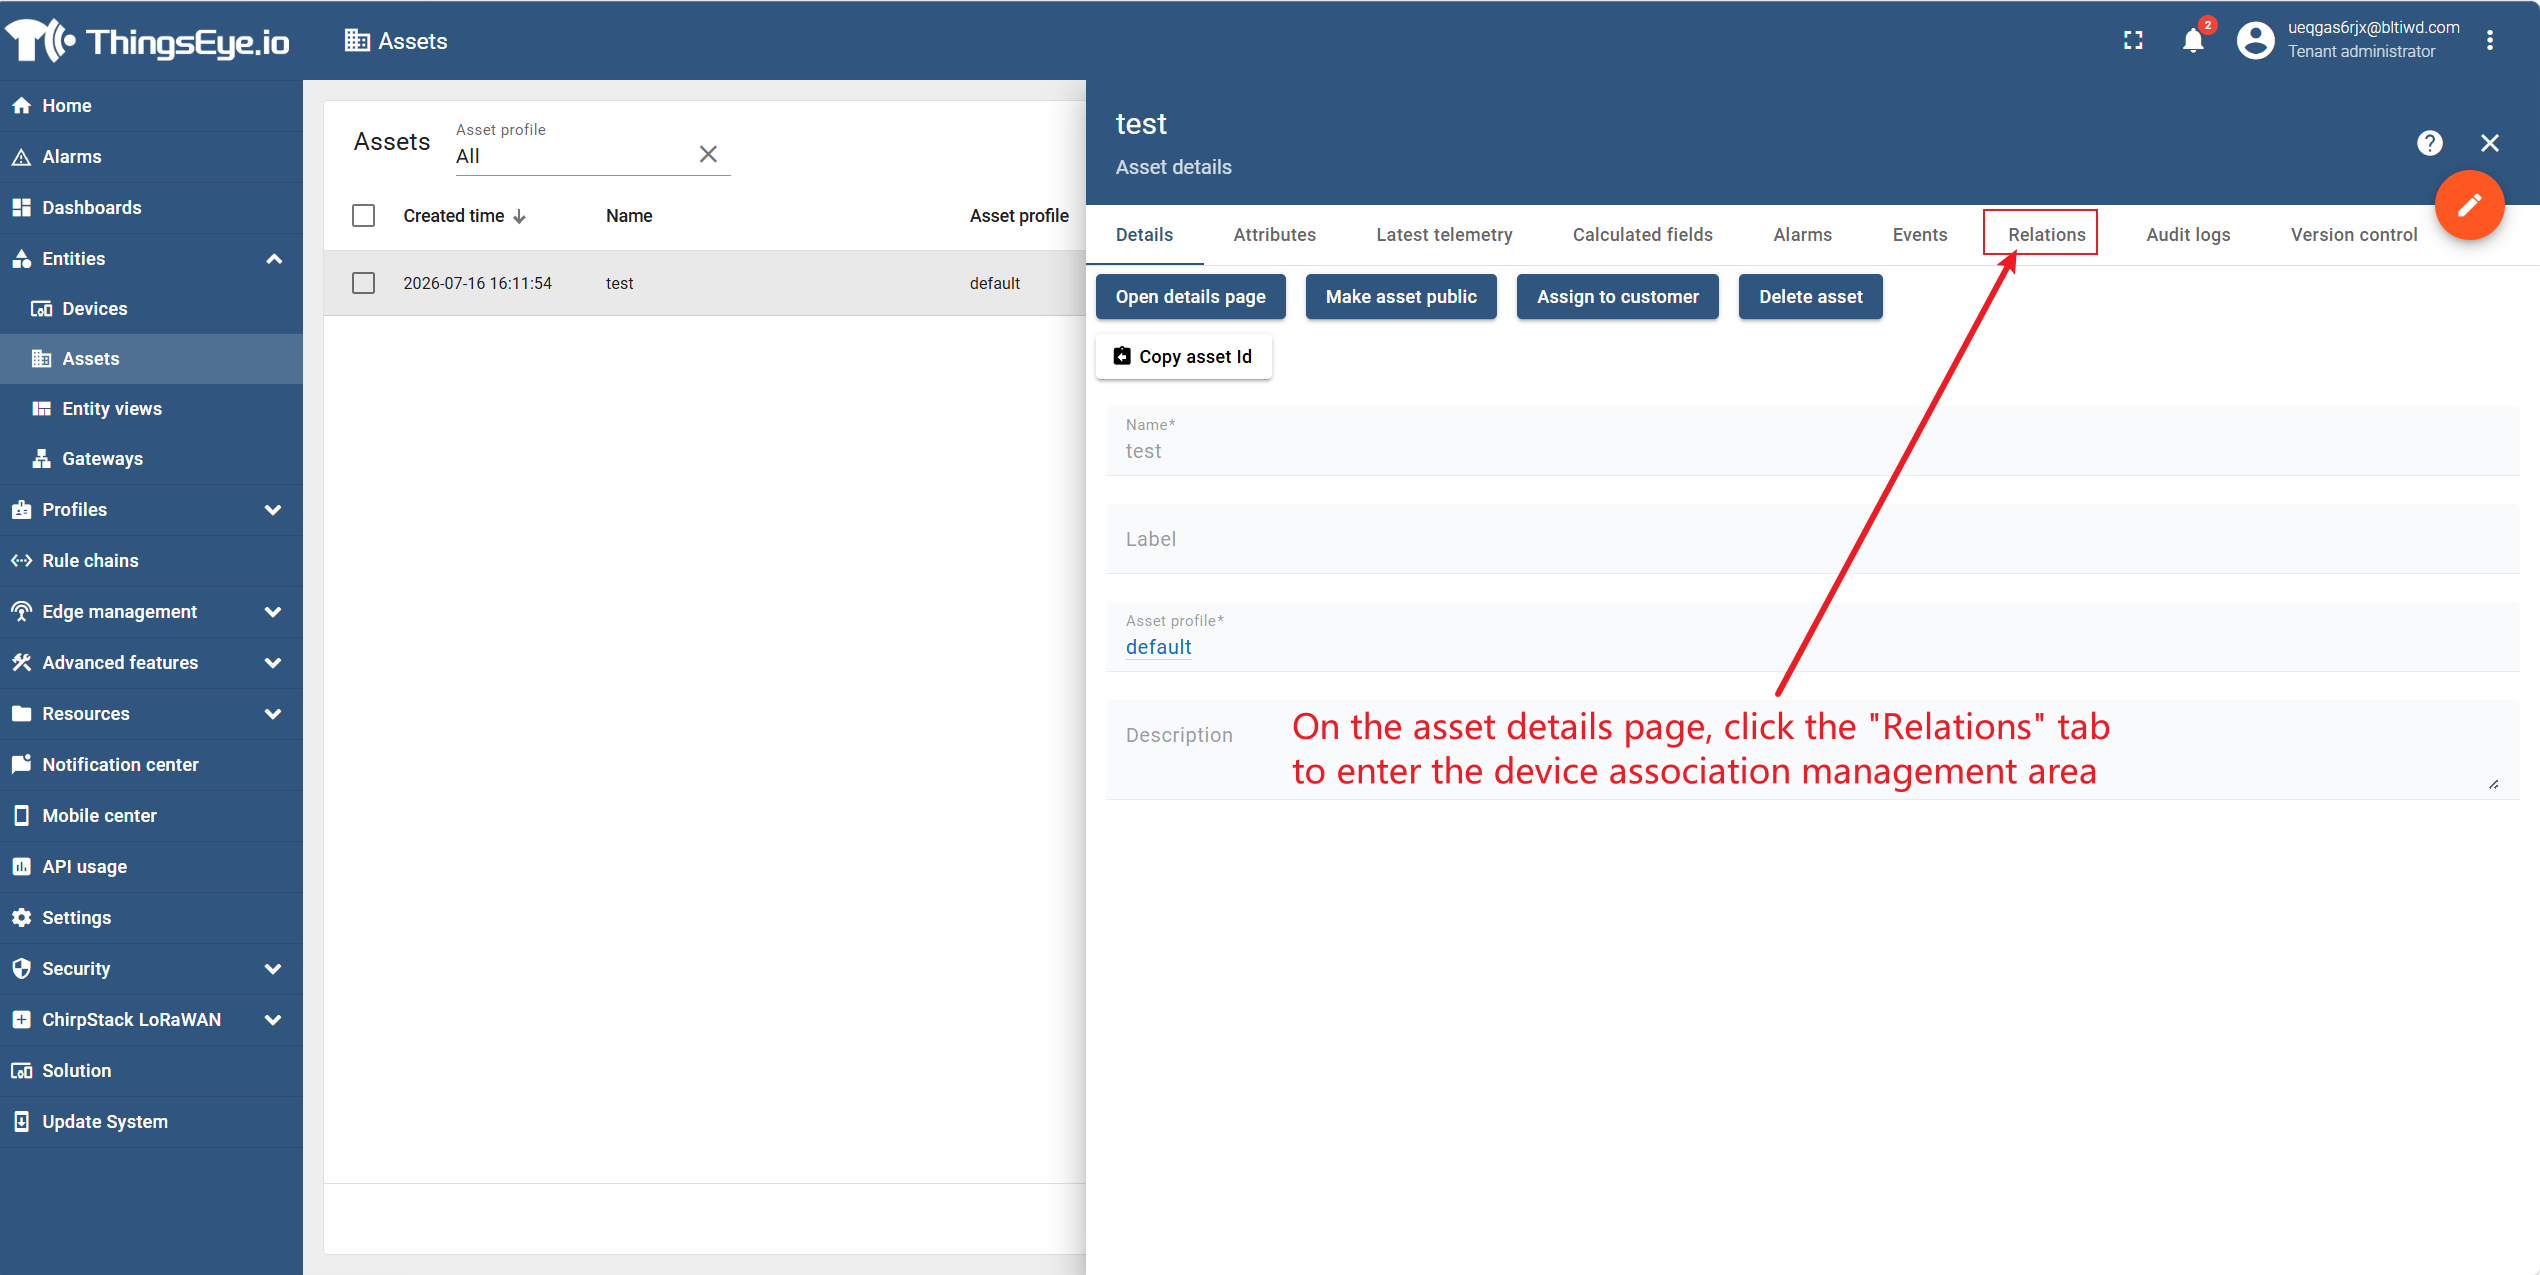
Step 5: Associate a device
Click the "Assign Device" button to open the "Assign Device" dialog.
In the dialog, select the device to associate from the dropdown list, or use the search box to search by device name.
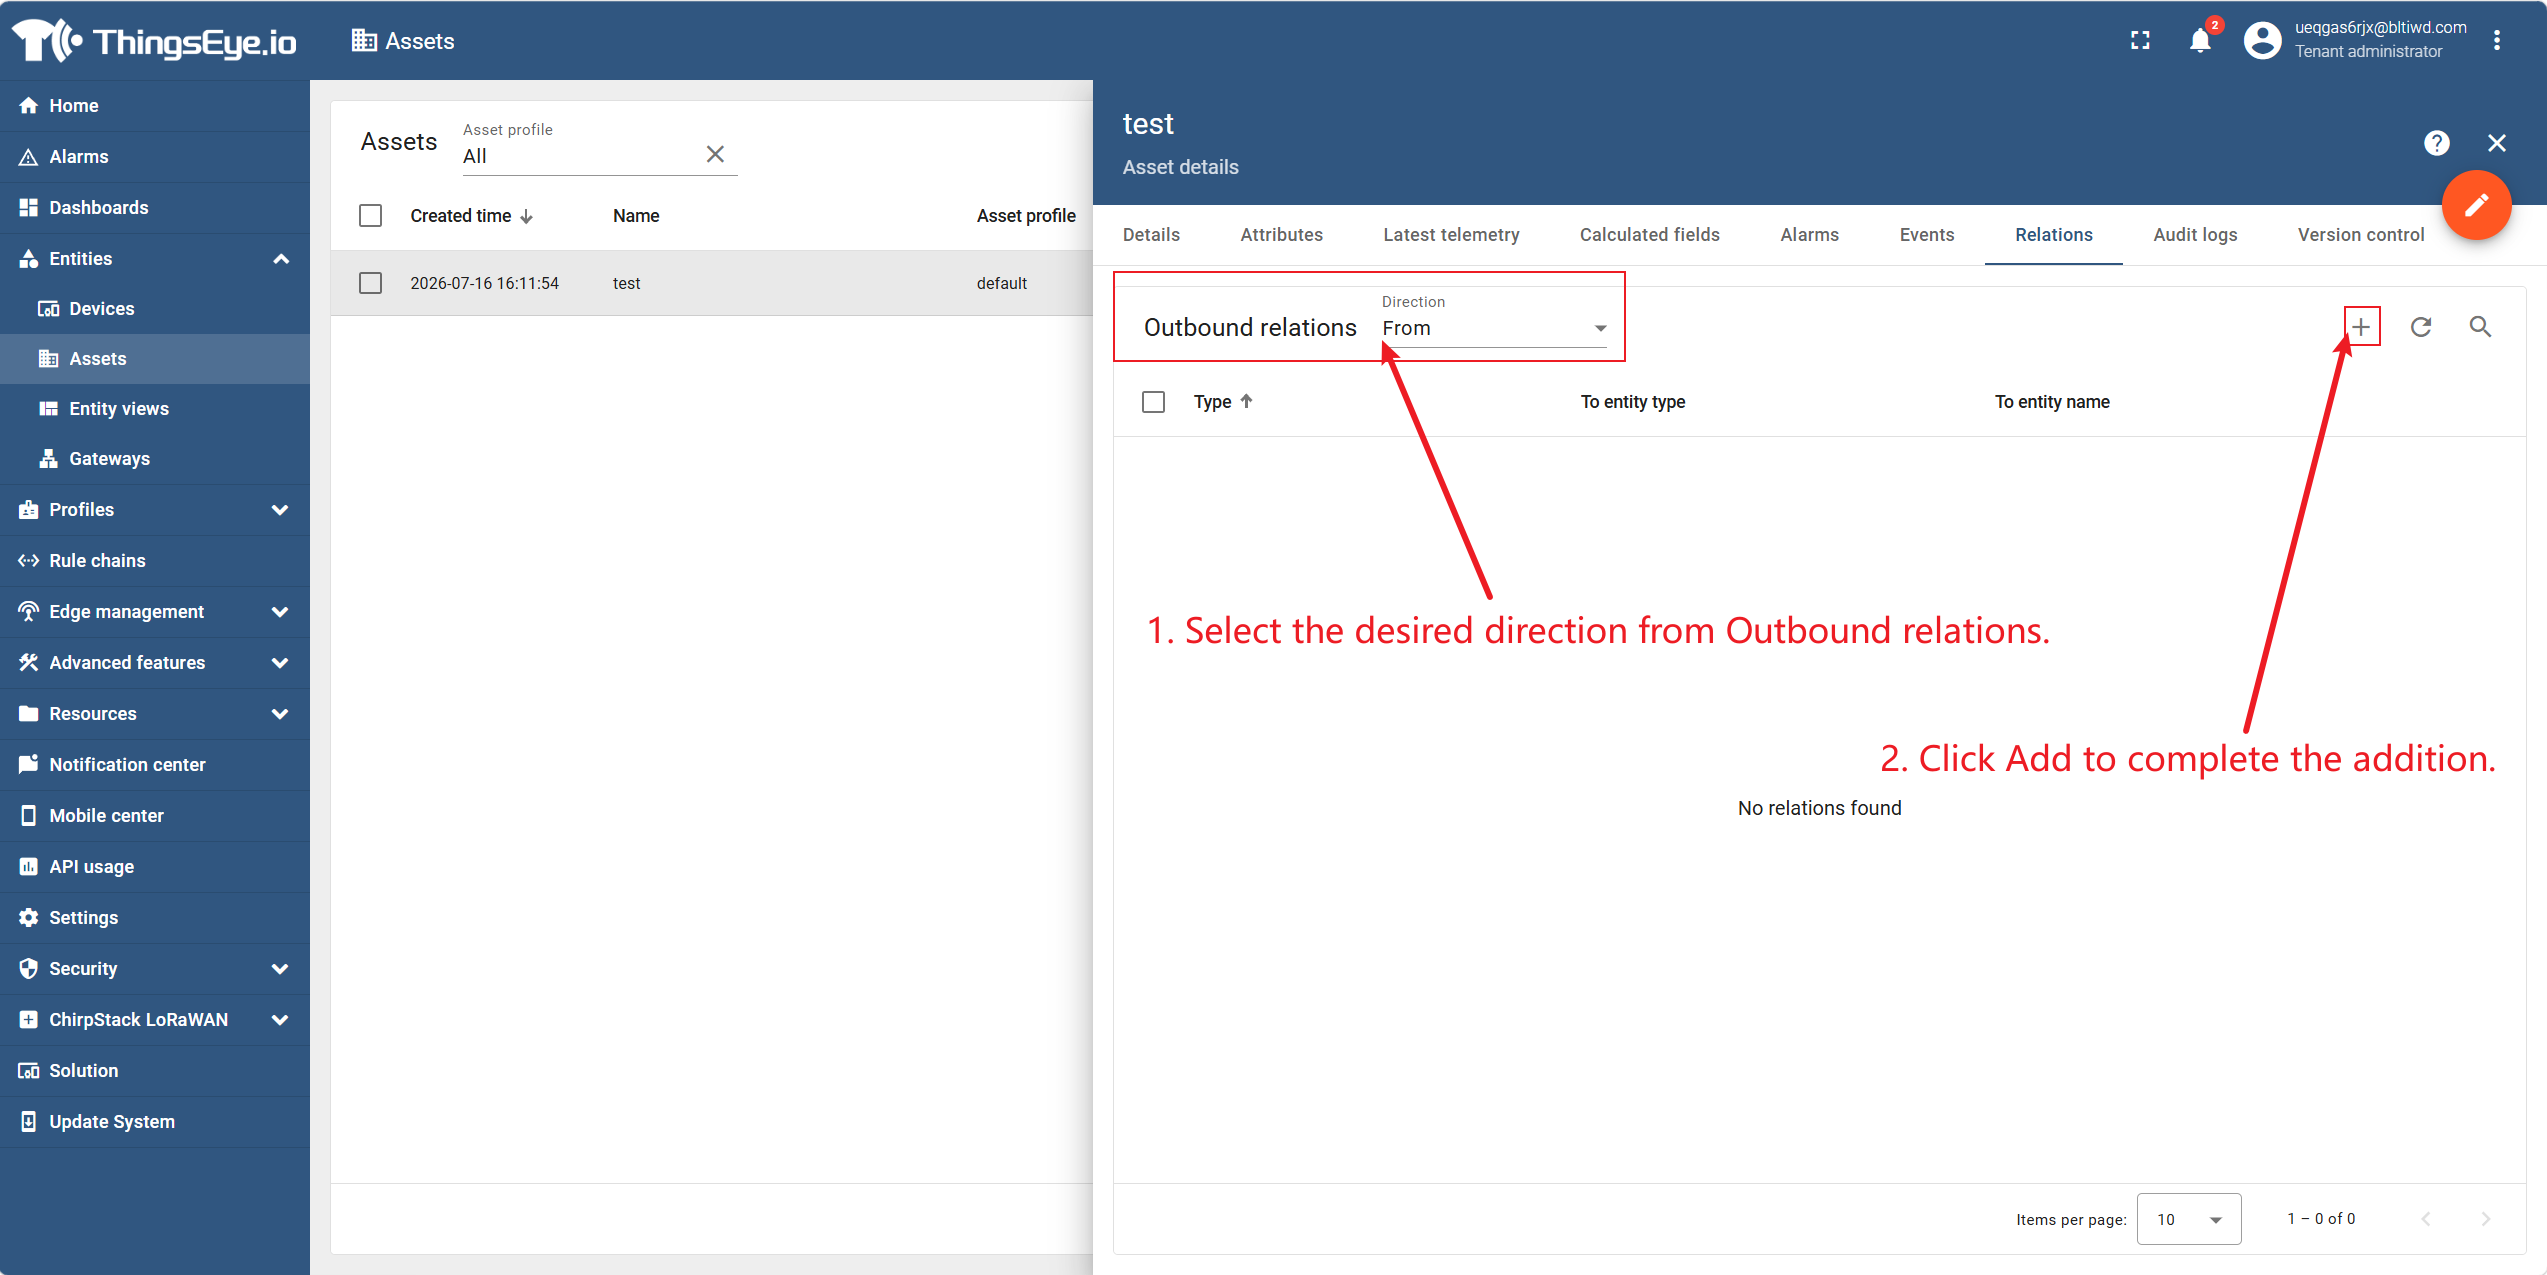

After successful association, the device will appear in the "Associated Devices" list.
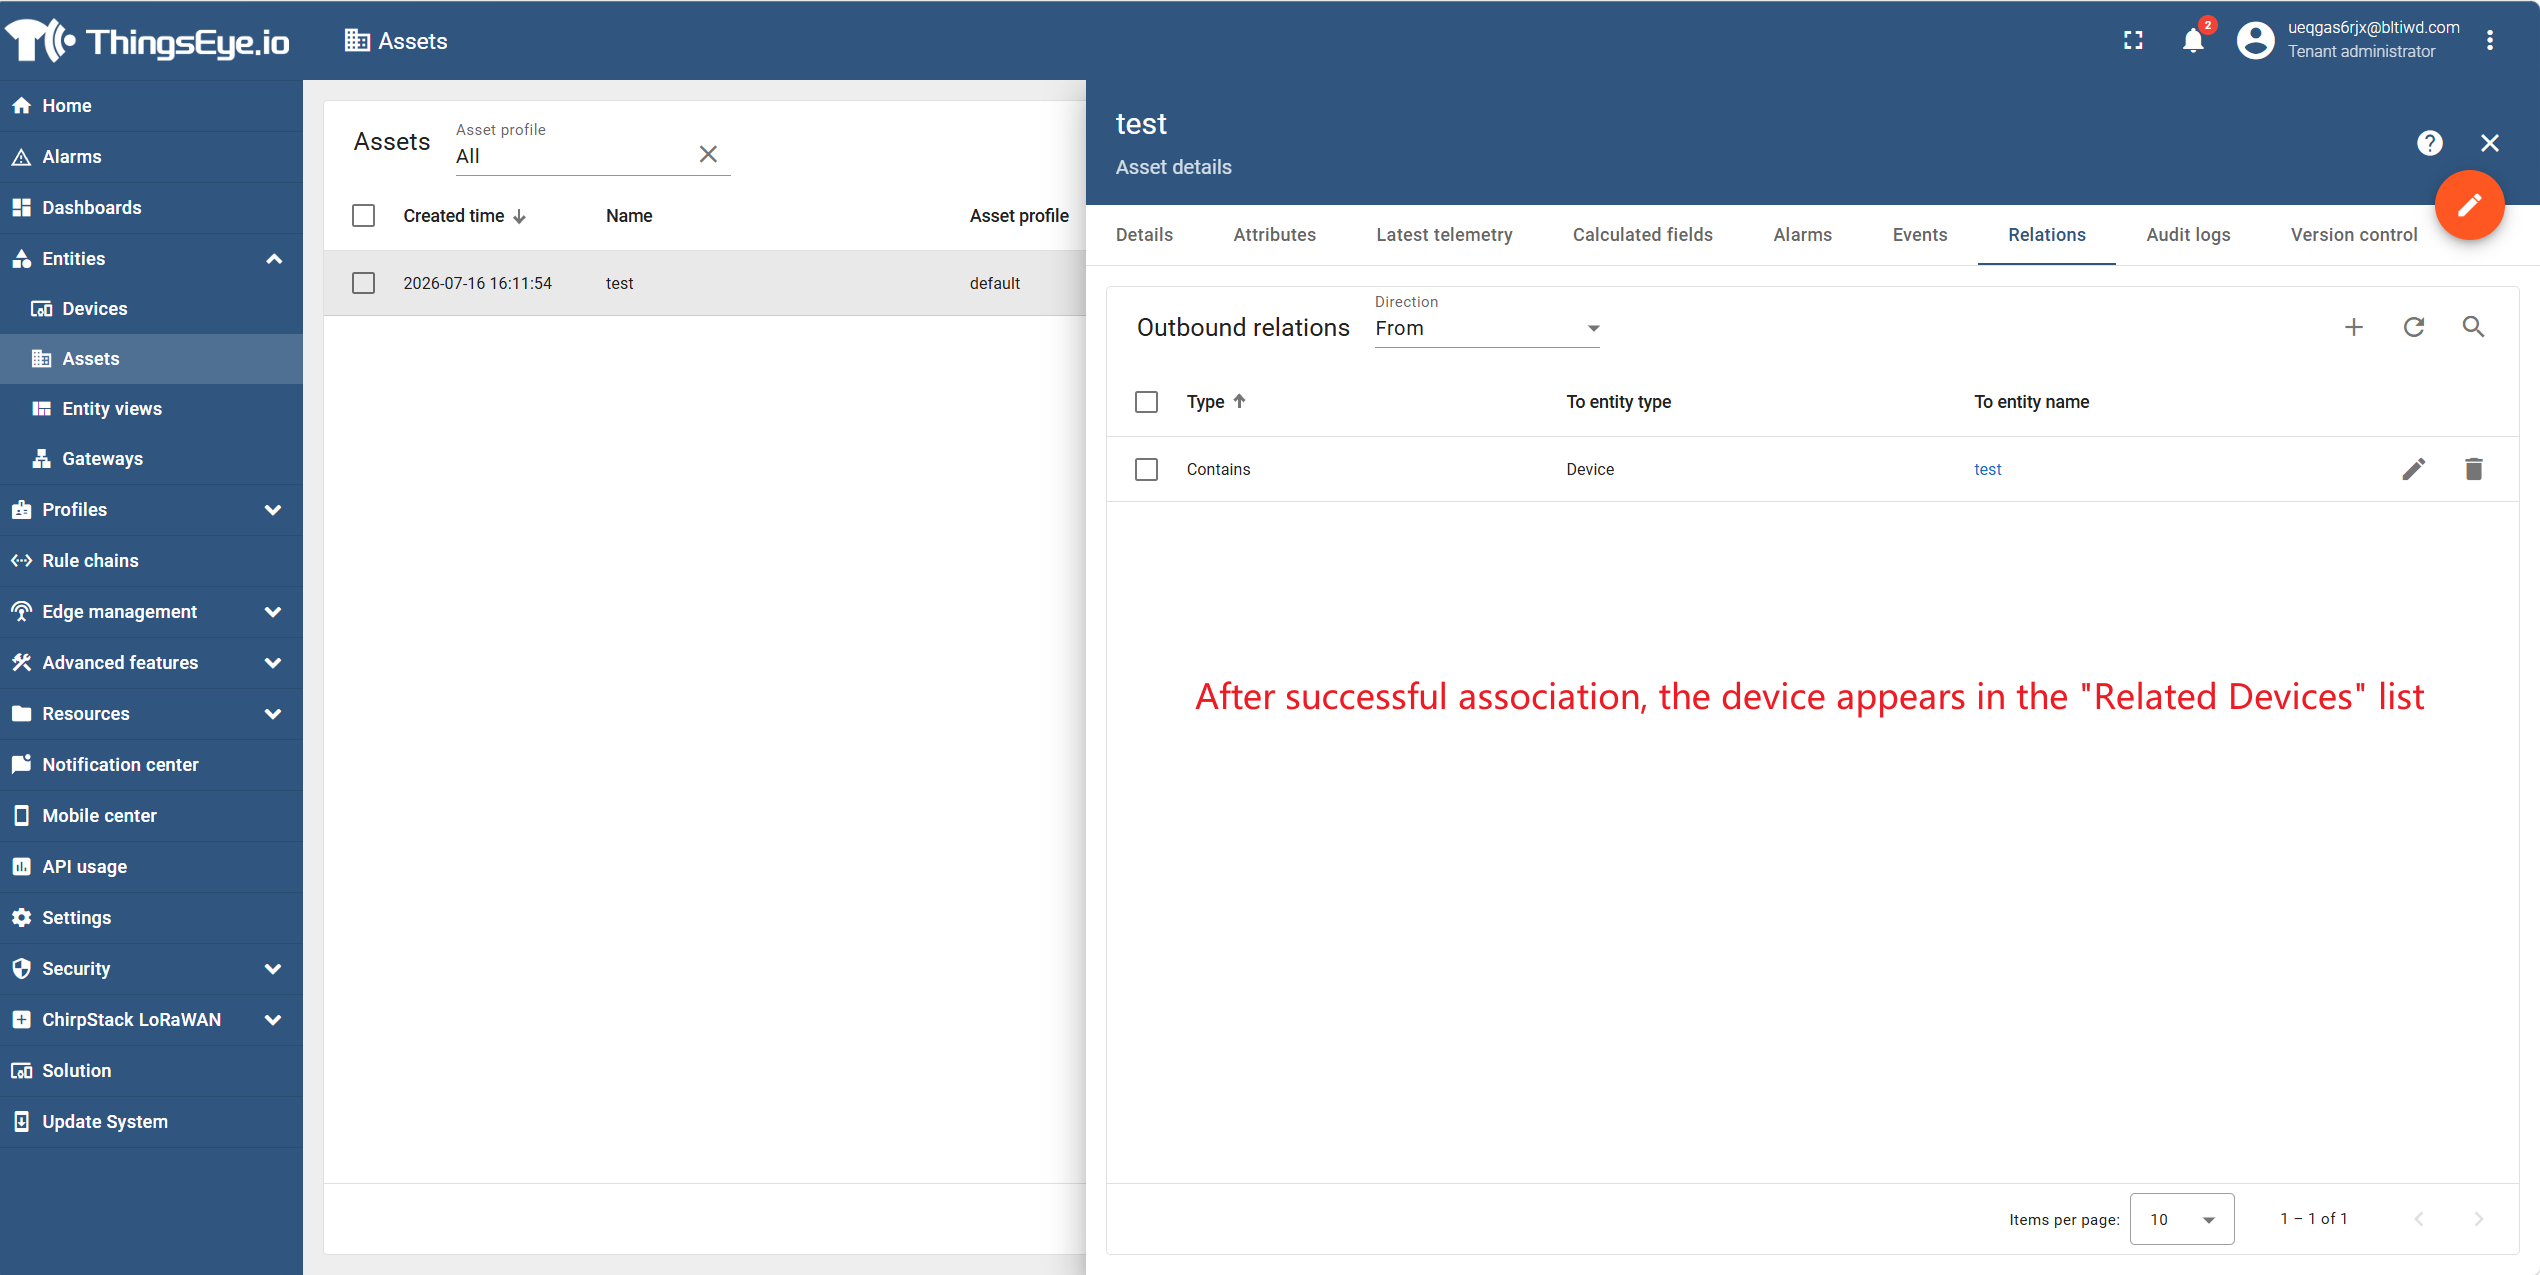
Note: A device can be associated with only one asset. To move a device from its current asset to another, you must first remove the existing association and then associate it with the new asset.
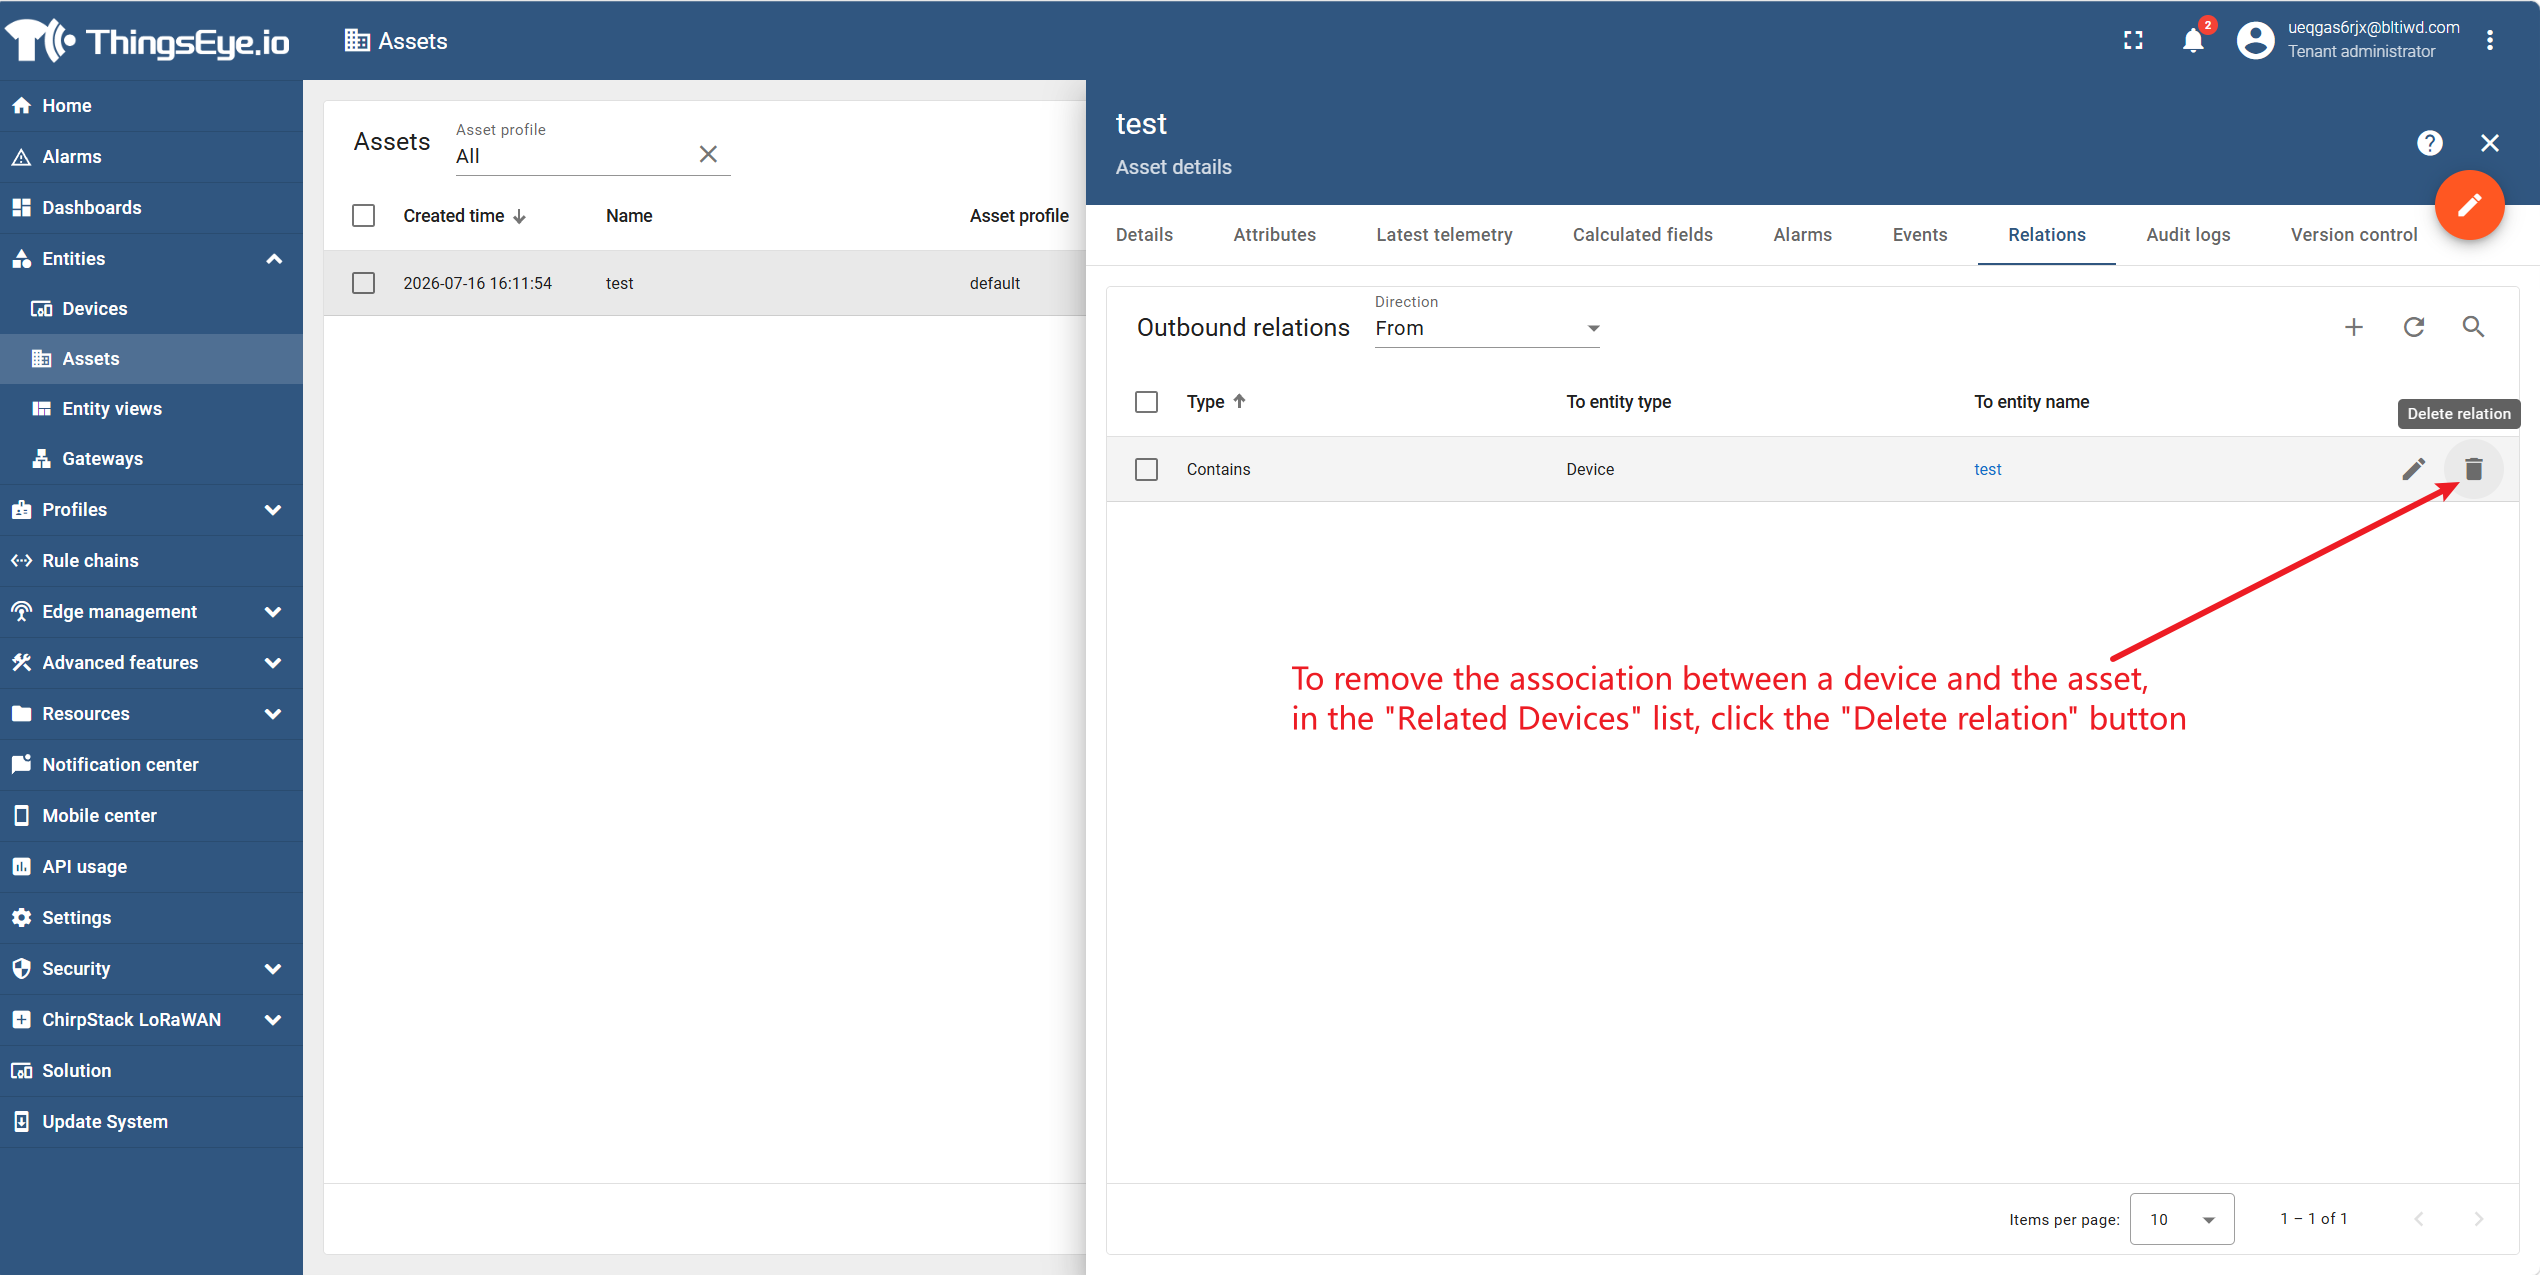
Step 6: Remove a device association
To remove the association between a device and the asset, click the "Delete Relation" button in the "Associated Devices" list.
Click "Yes" in the confirmation dialog to complete the operation.
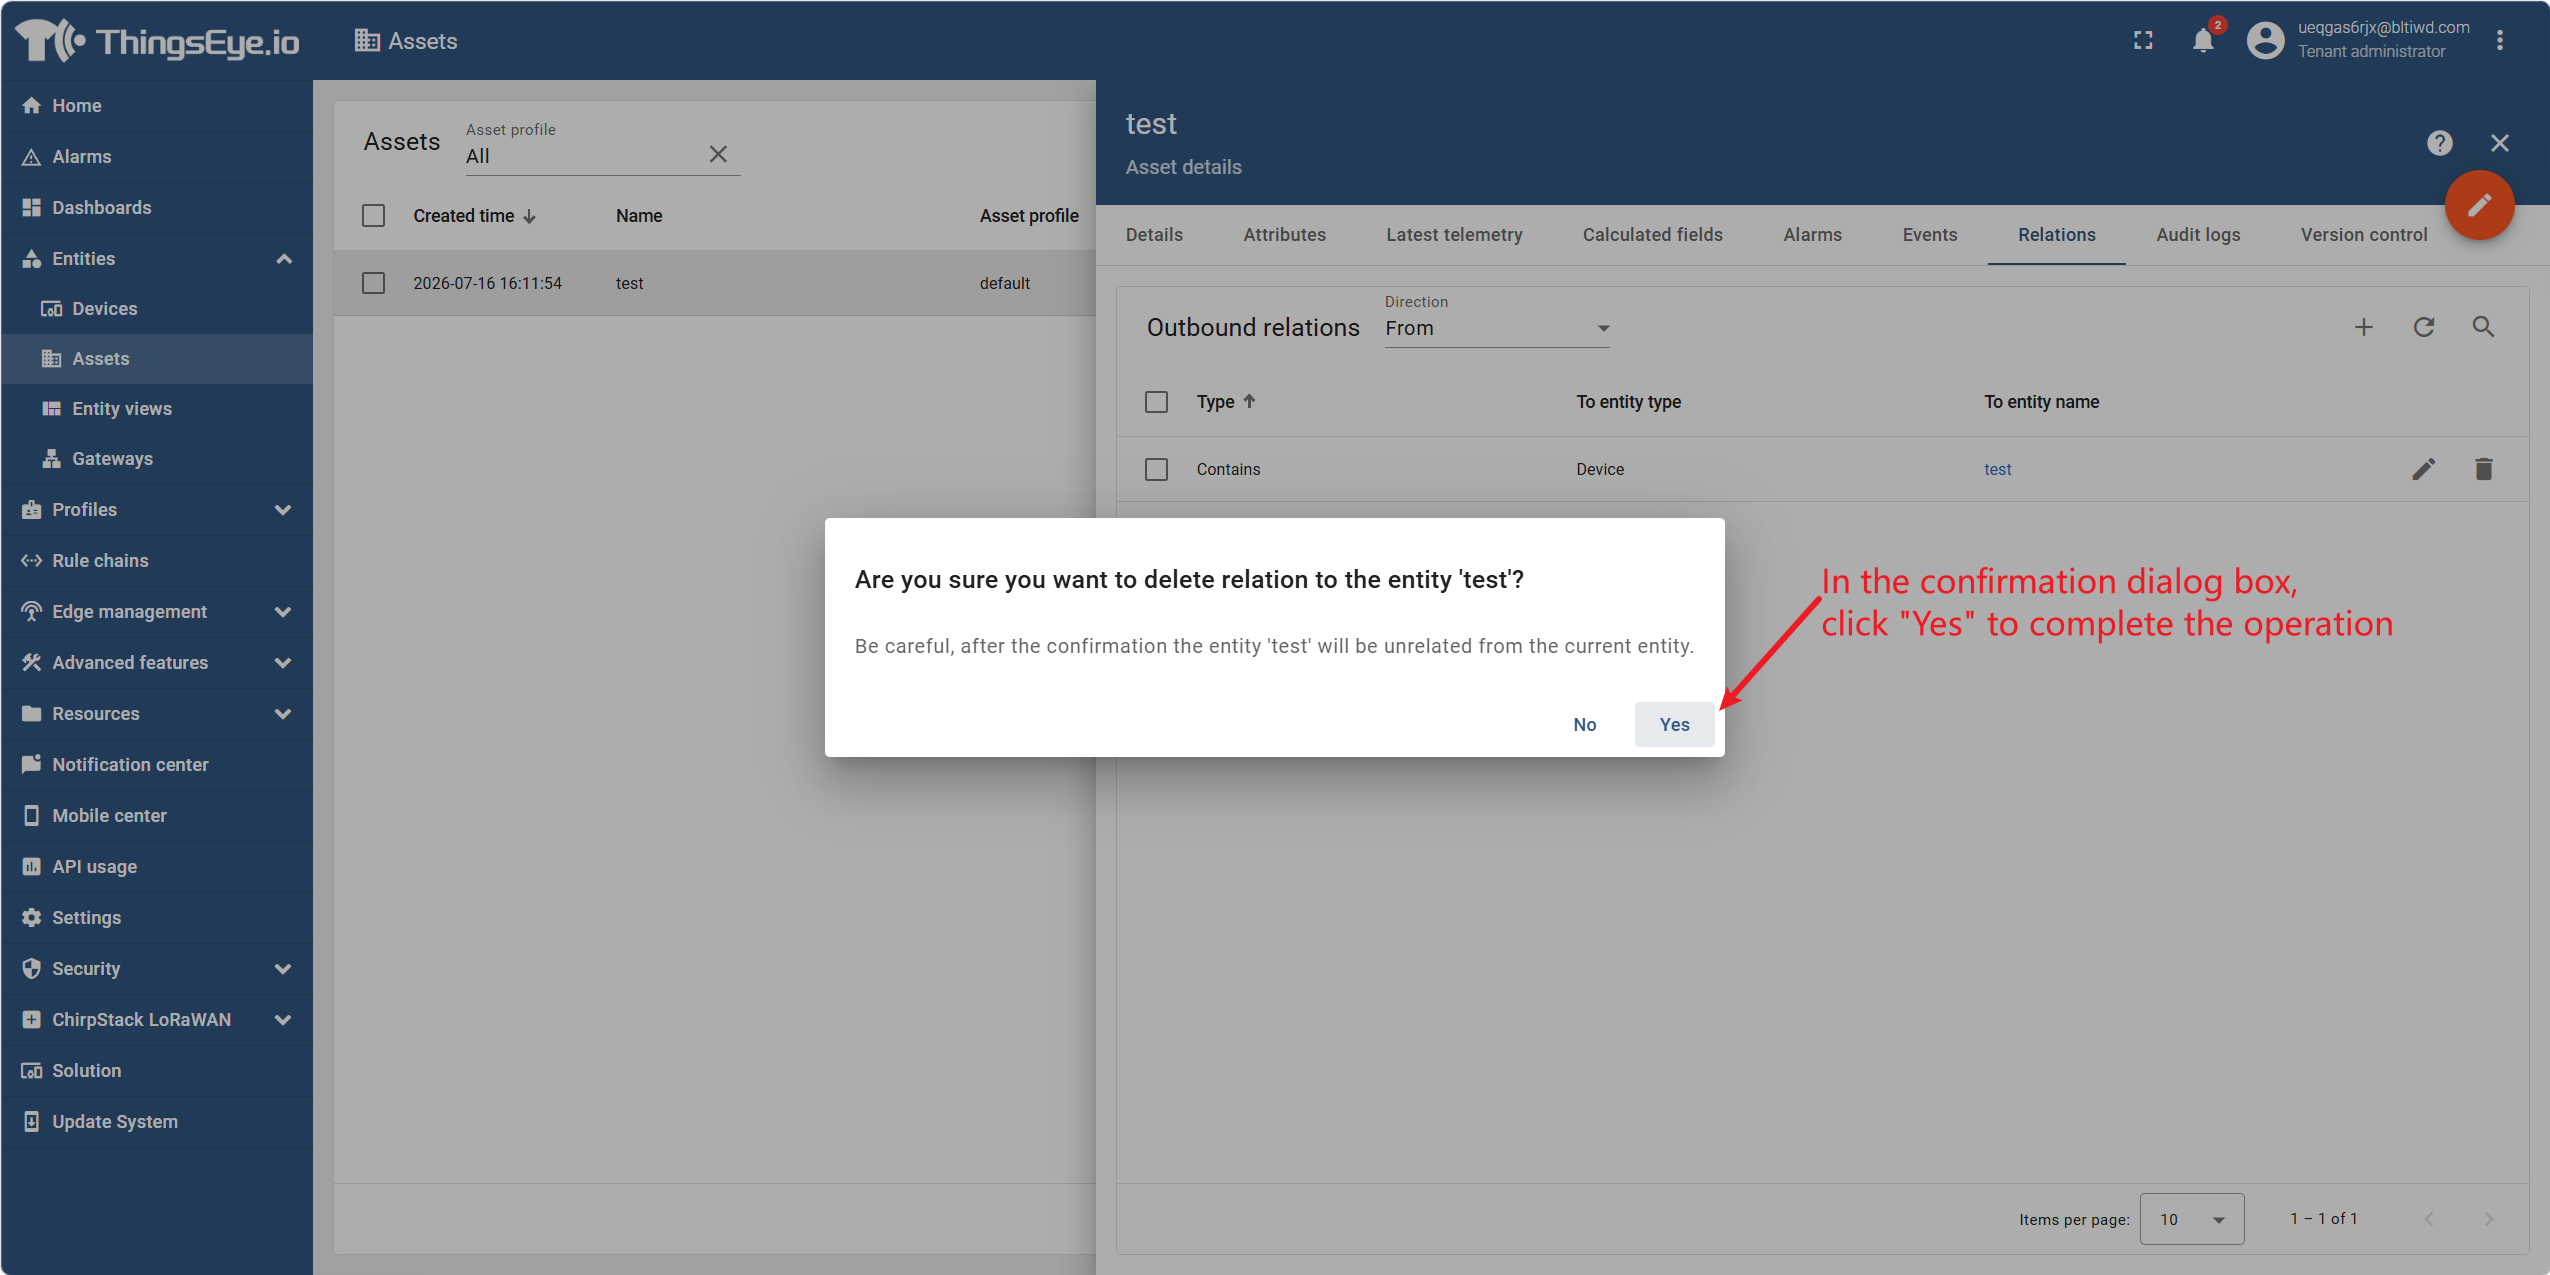
Note: Removing the association between a device and an asset does not delete the device itself; the device remains in the platform's device list.
4. Delete an Asset
Procedure
Important Note: Deletion is irreversible. Before deleting an asset, confirm that the asset and its sub‑assets are no longer needed. After an asset is deleted, its associated devices will be automatically unassociated, but the devices themselves will not be deleted.
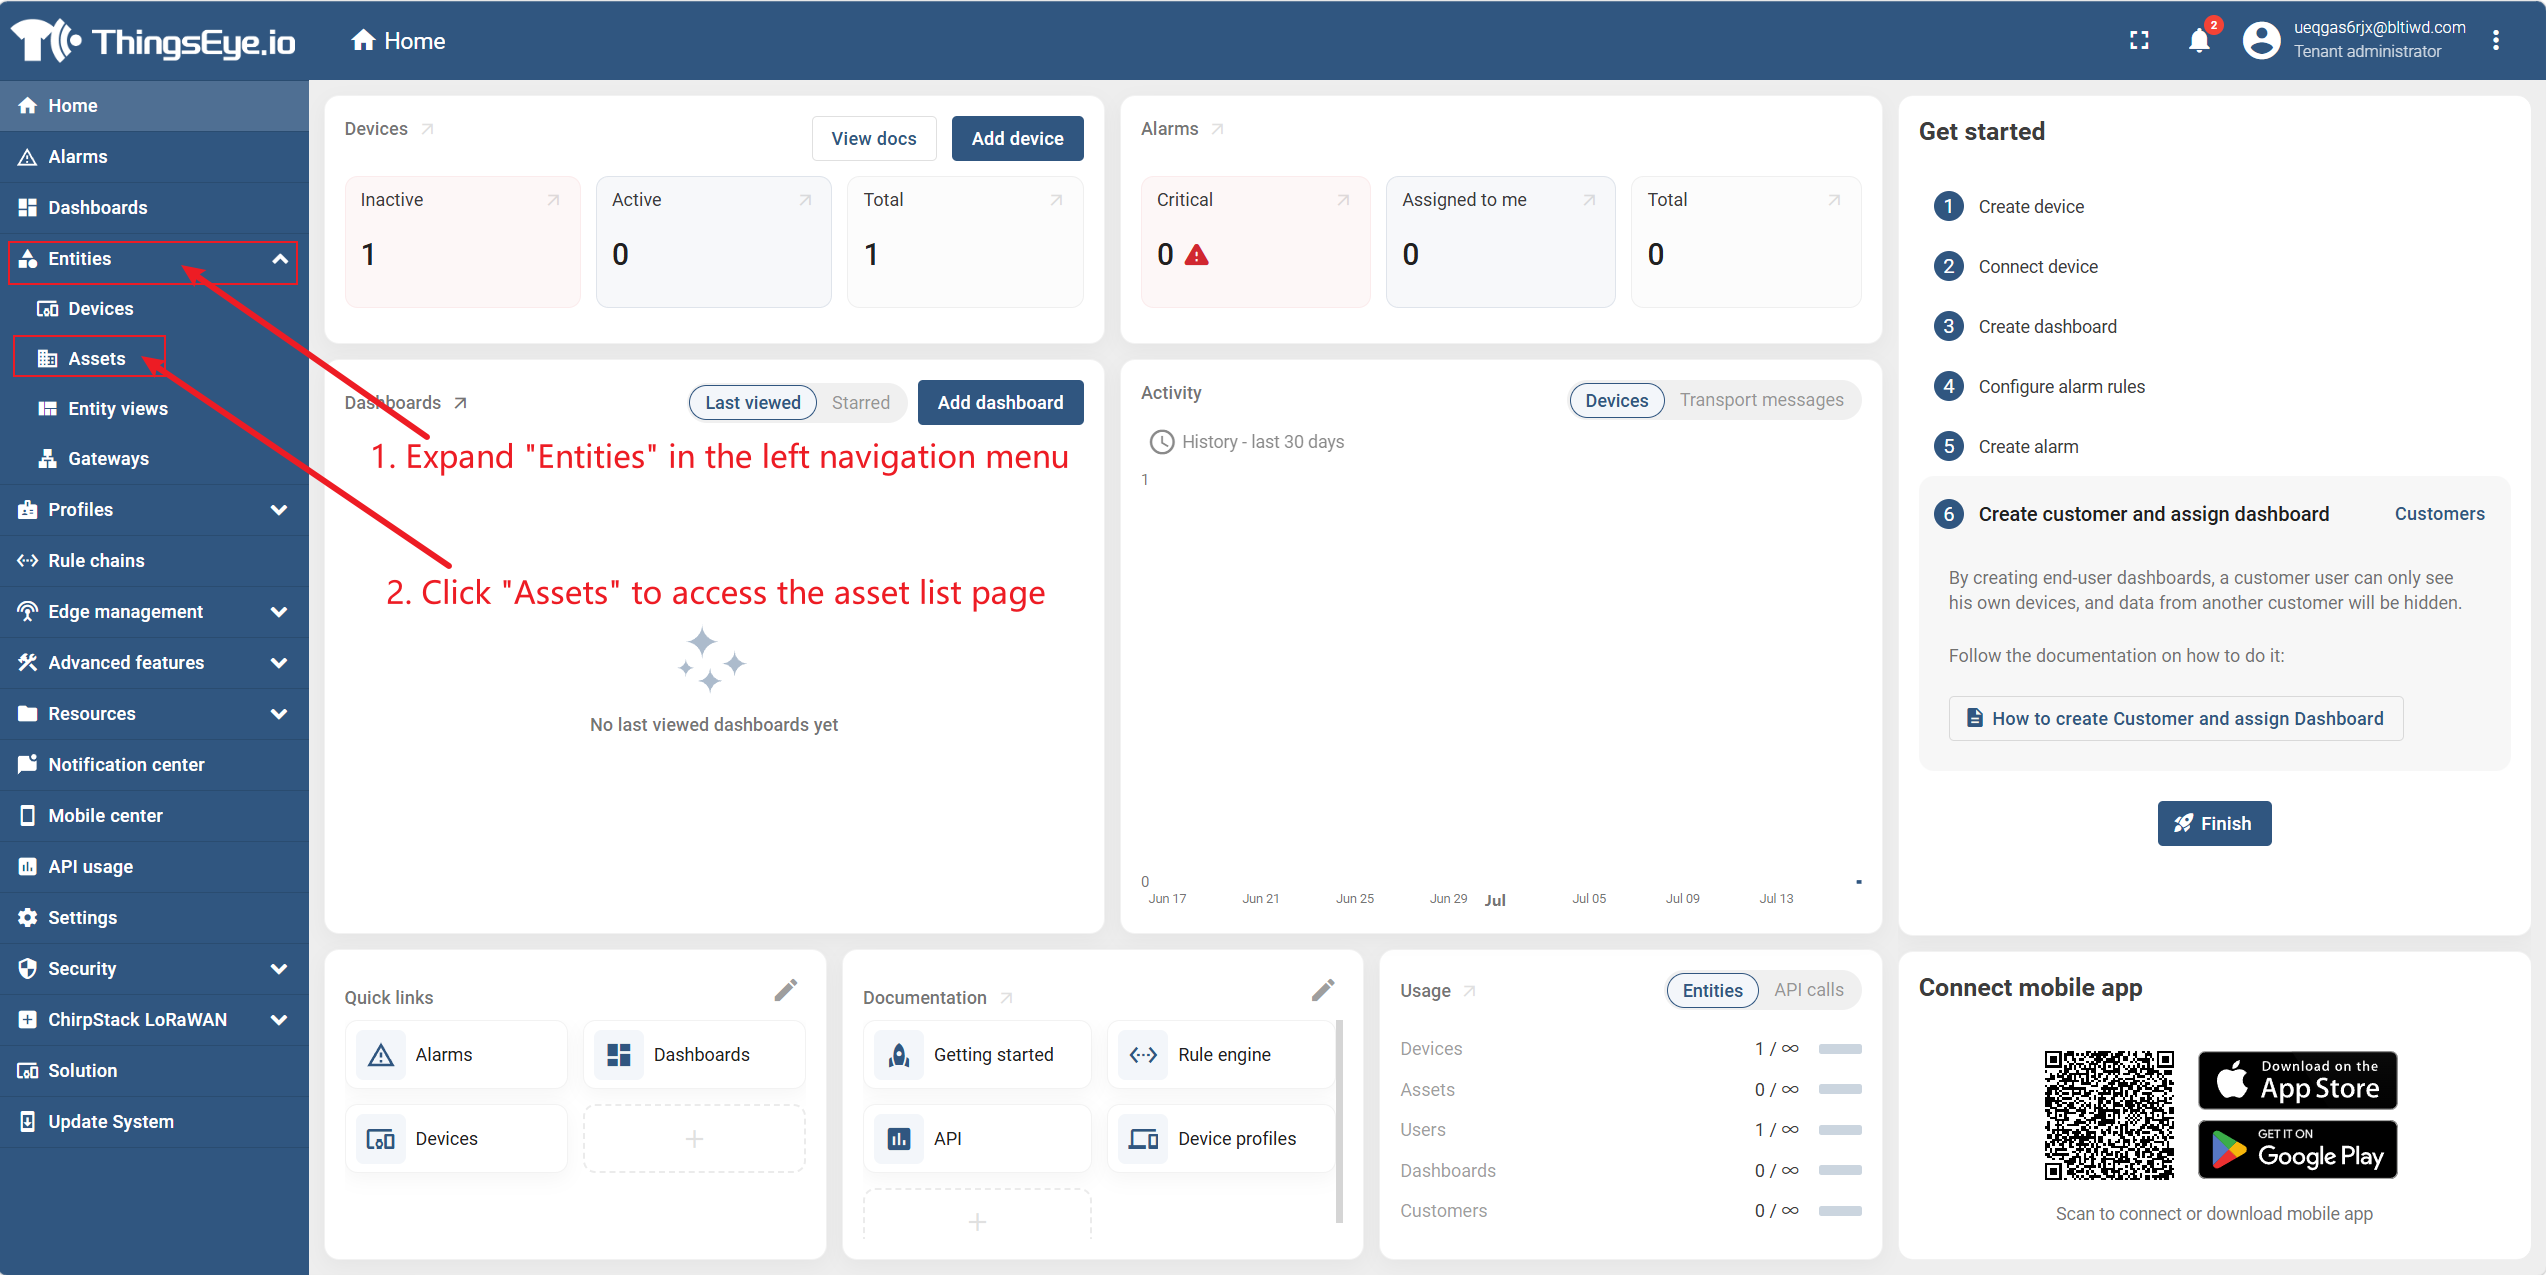
Step 1: Go to the asset management page
Expand "Entities" in the left navigation bar and click "Assets" to go to the asset list page.
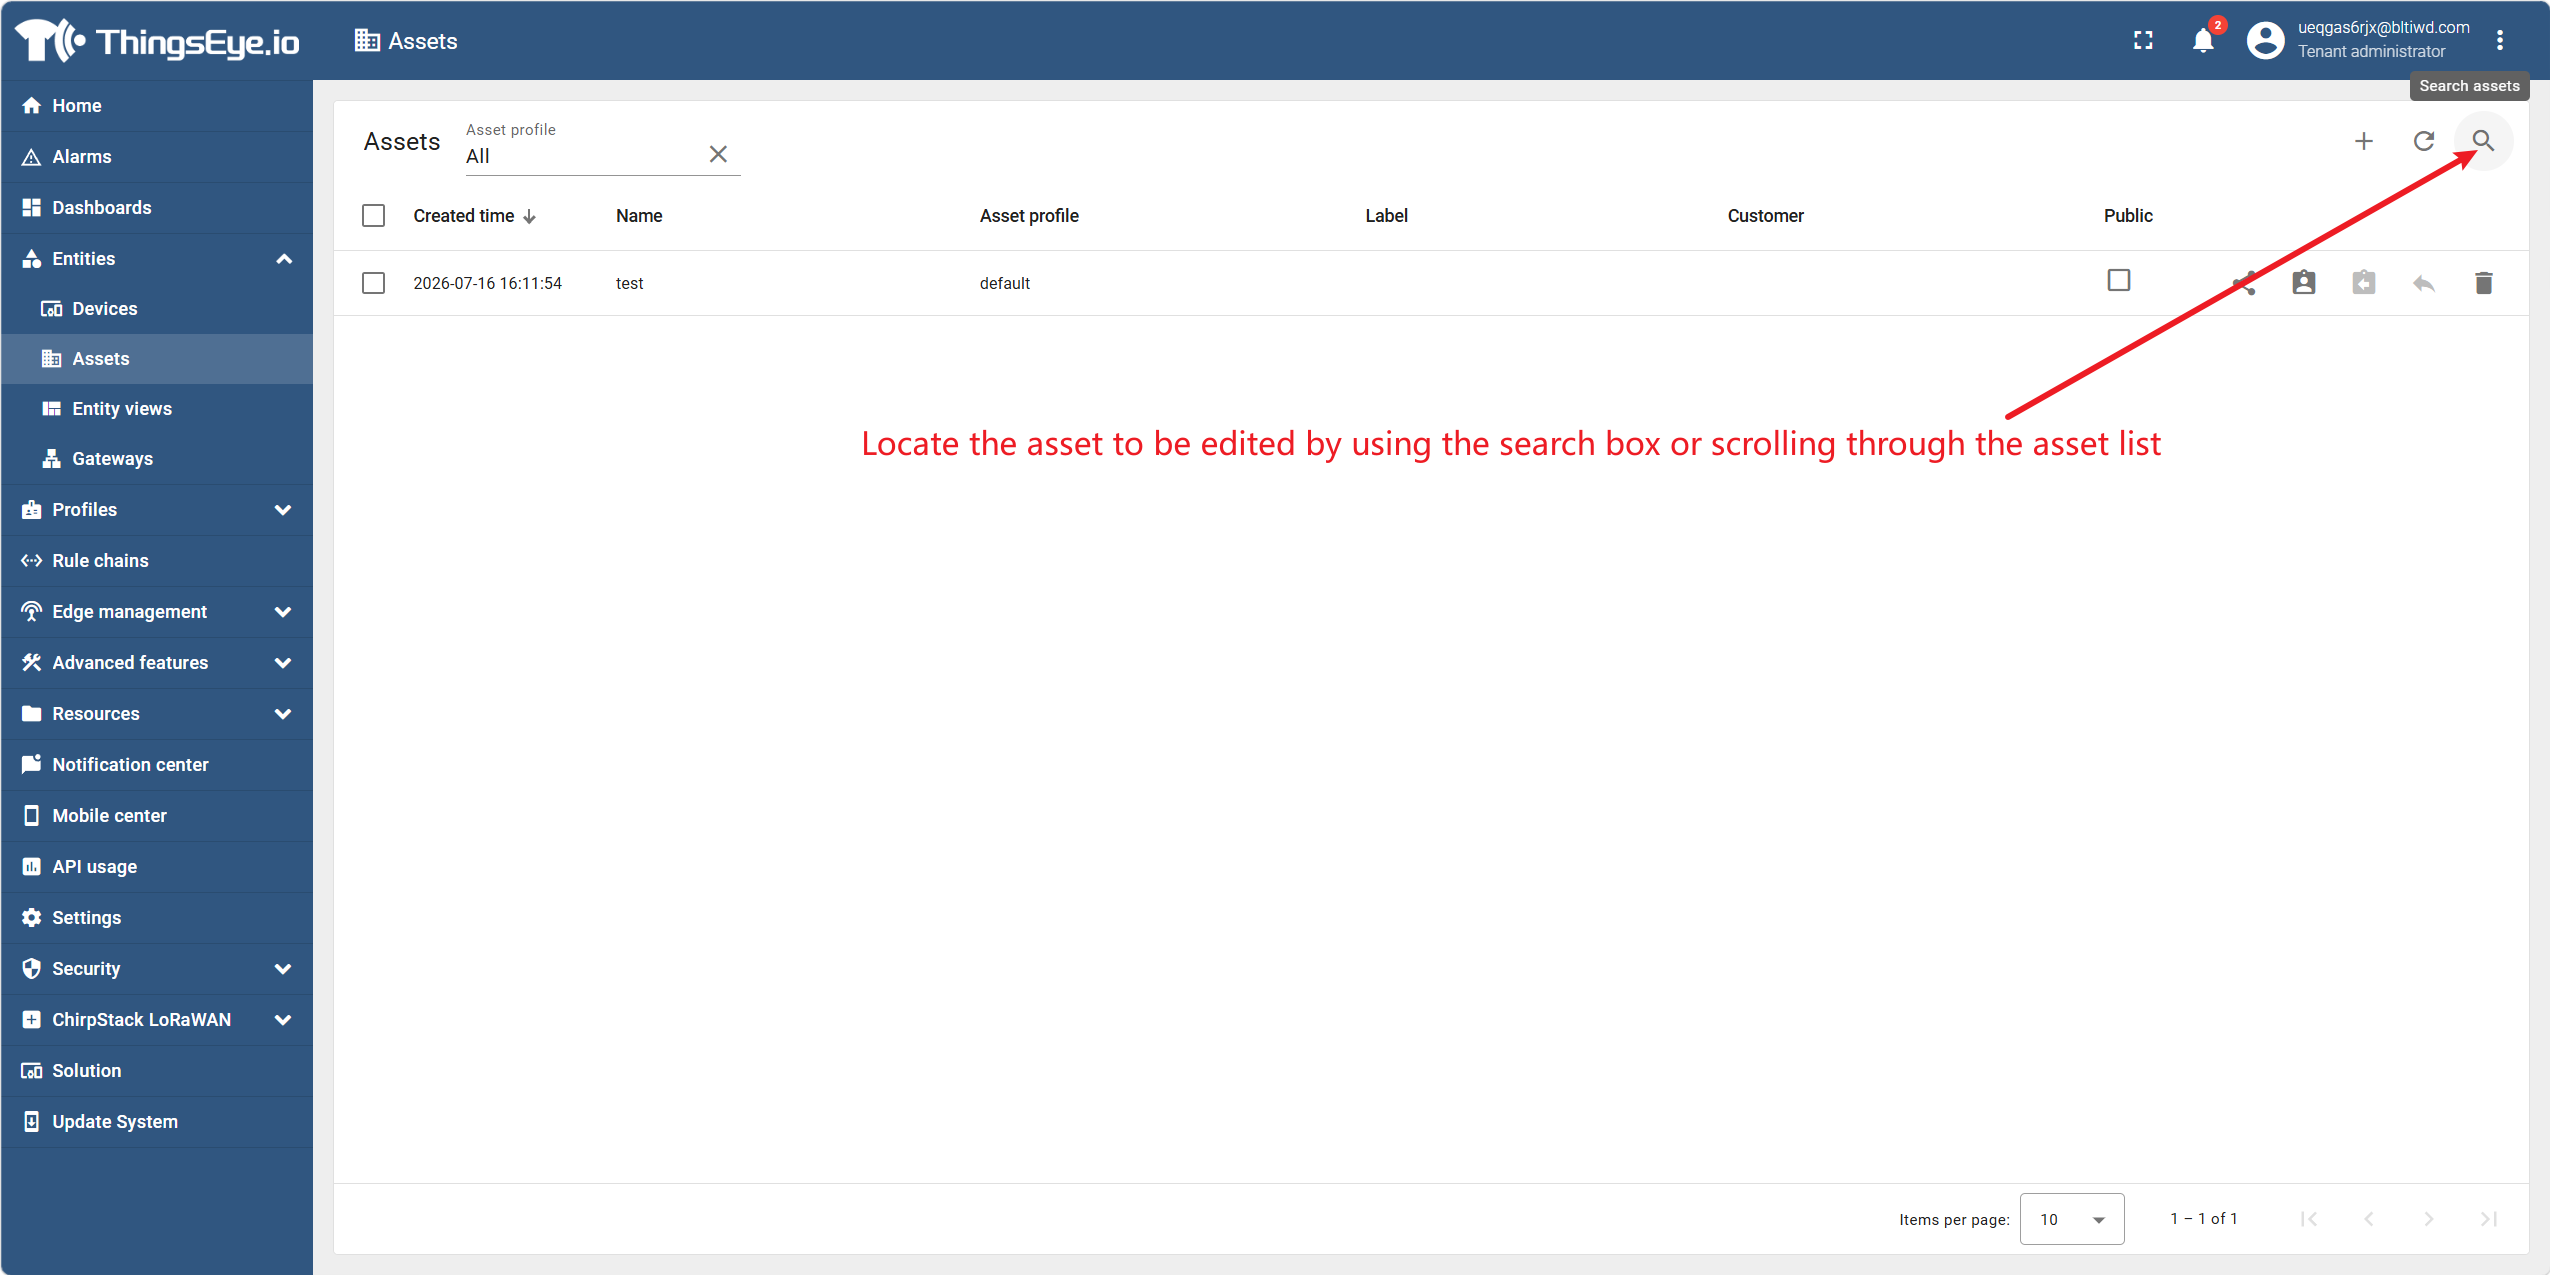
Step 2: Locate the target asset
Find the asset you want to delete using the search box or by scrolling through the list.
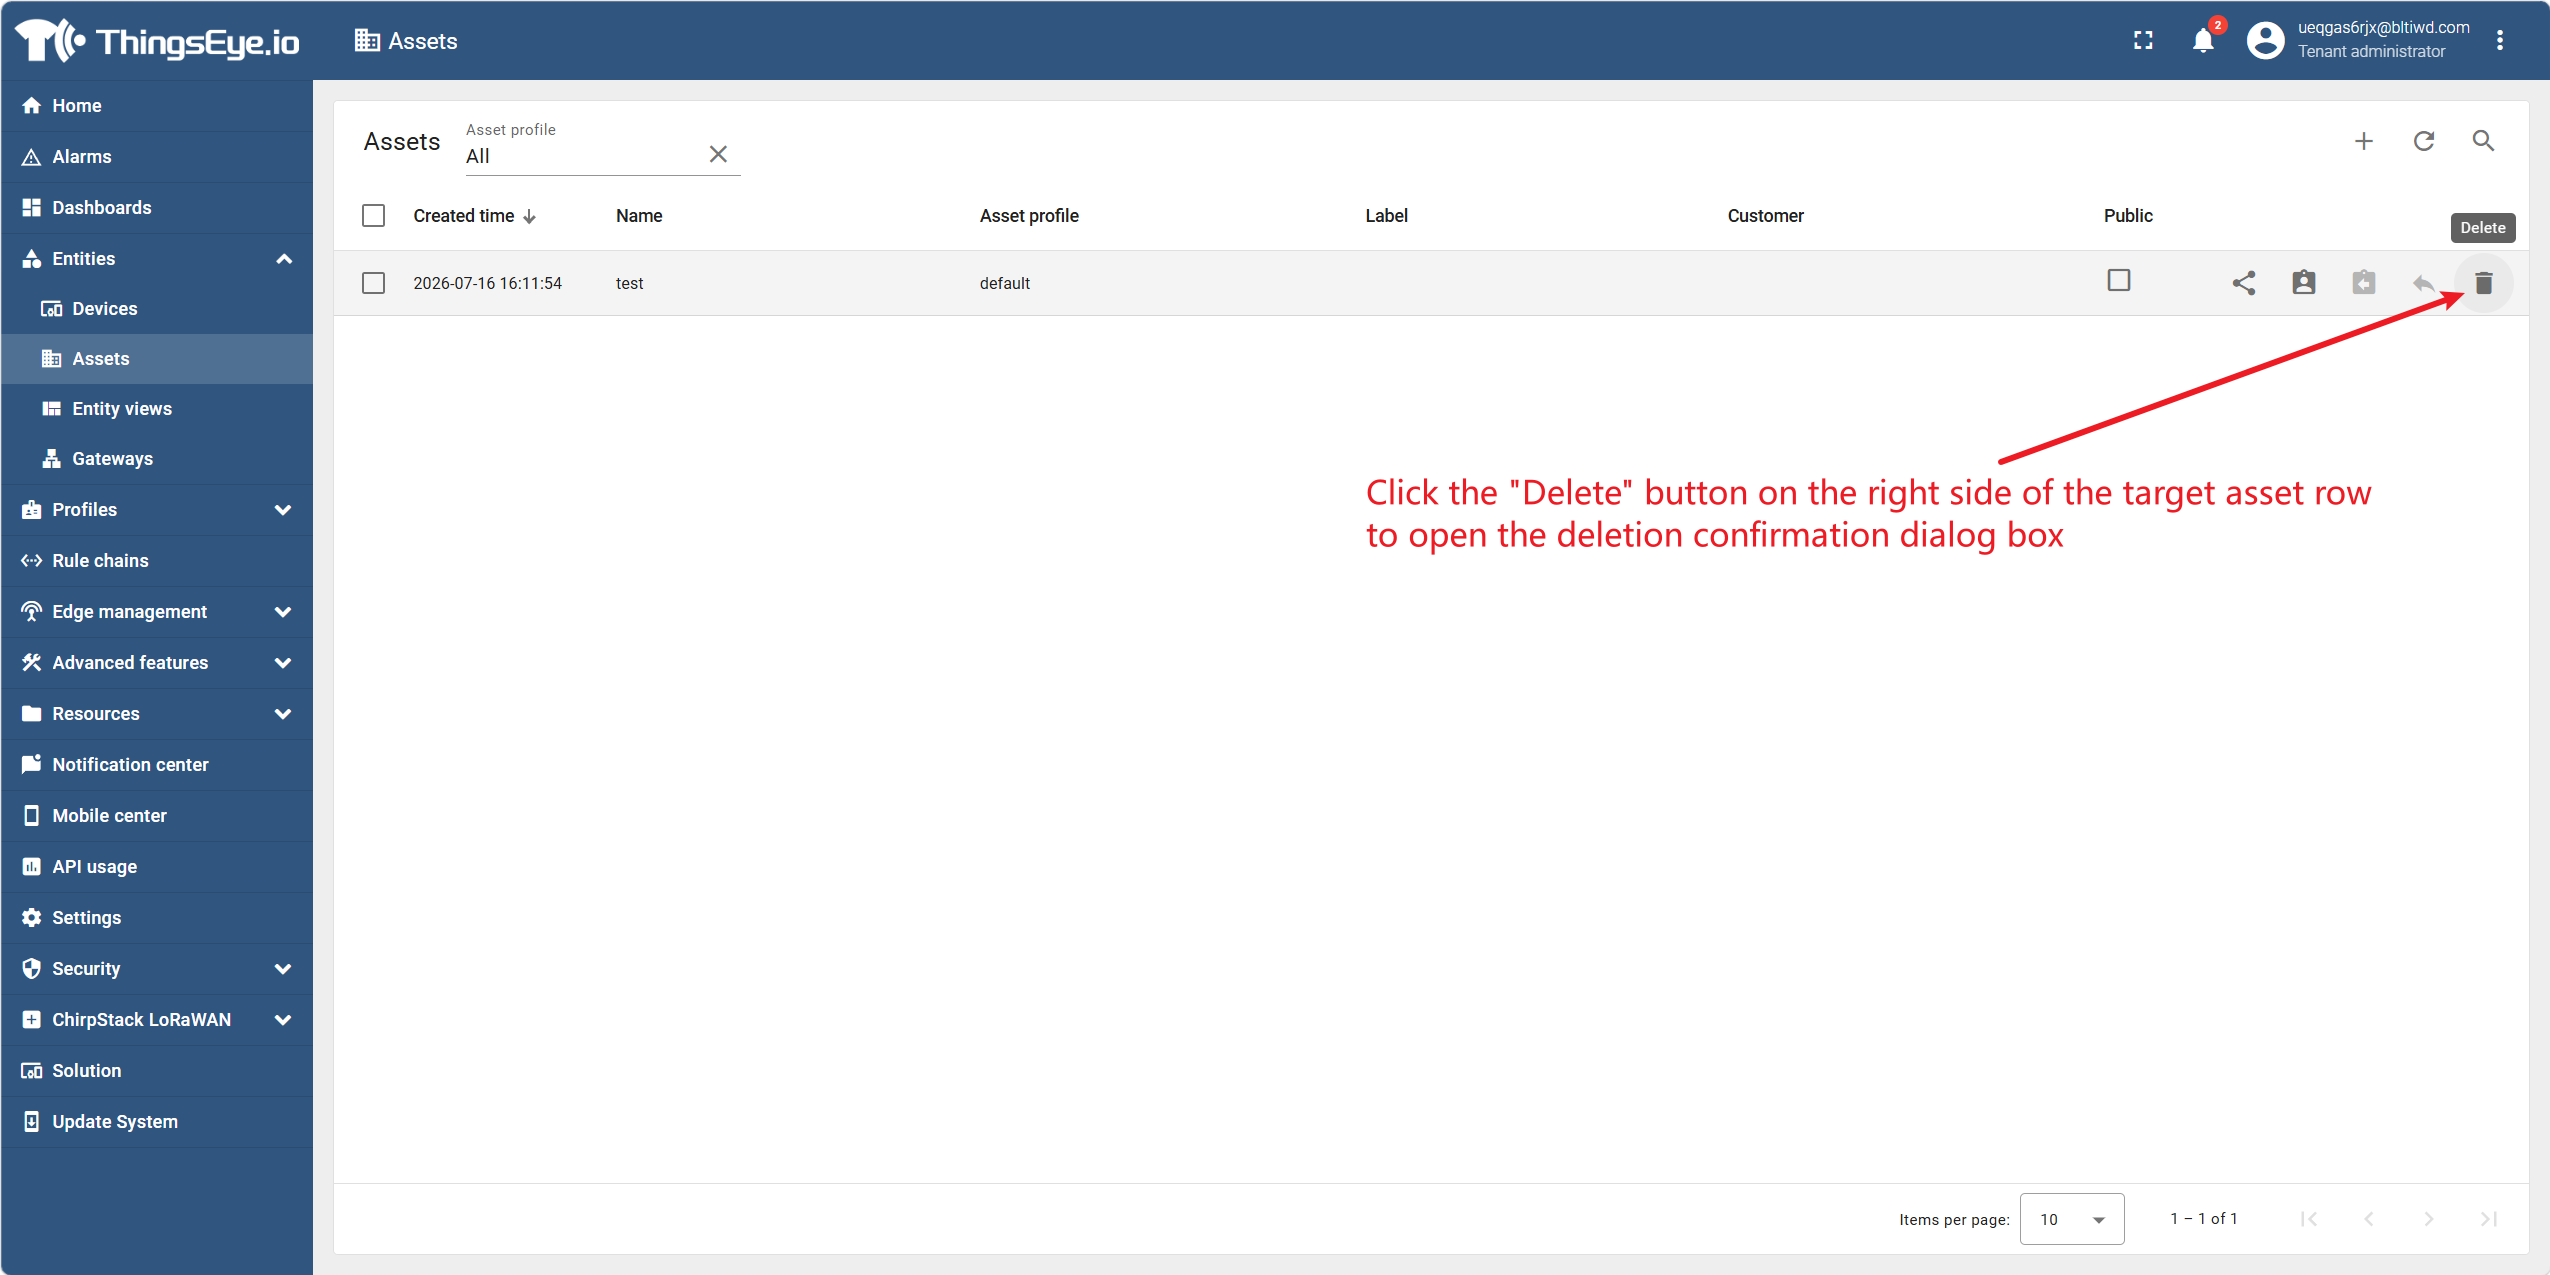
Step 3: Perform the deletion operation
Click the "Delete" button (trash can icon) on the right side of the target asset row to open the deletion confirmation dialog.
Step 4: Confirm the deletion
Read the prompt message in the confirmation dialog and confirm the irreversibility of the deletion operation. Click the "Yes" button to complete the deletion.
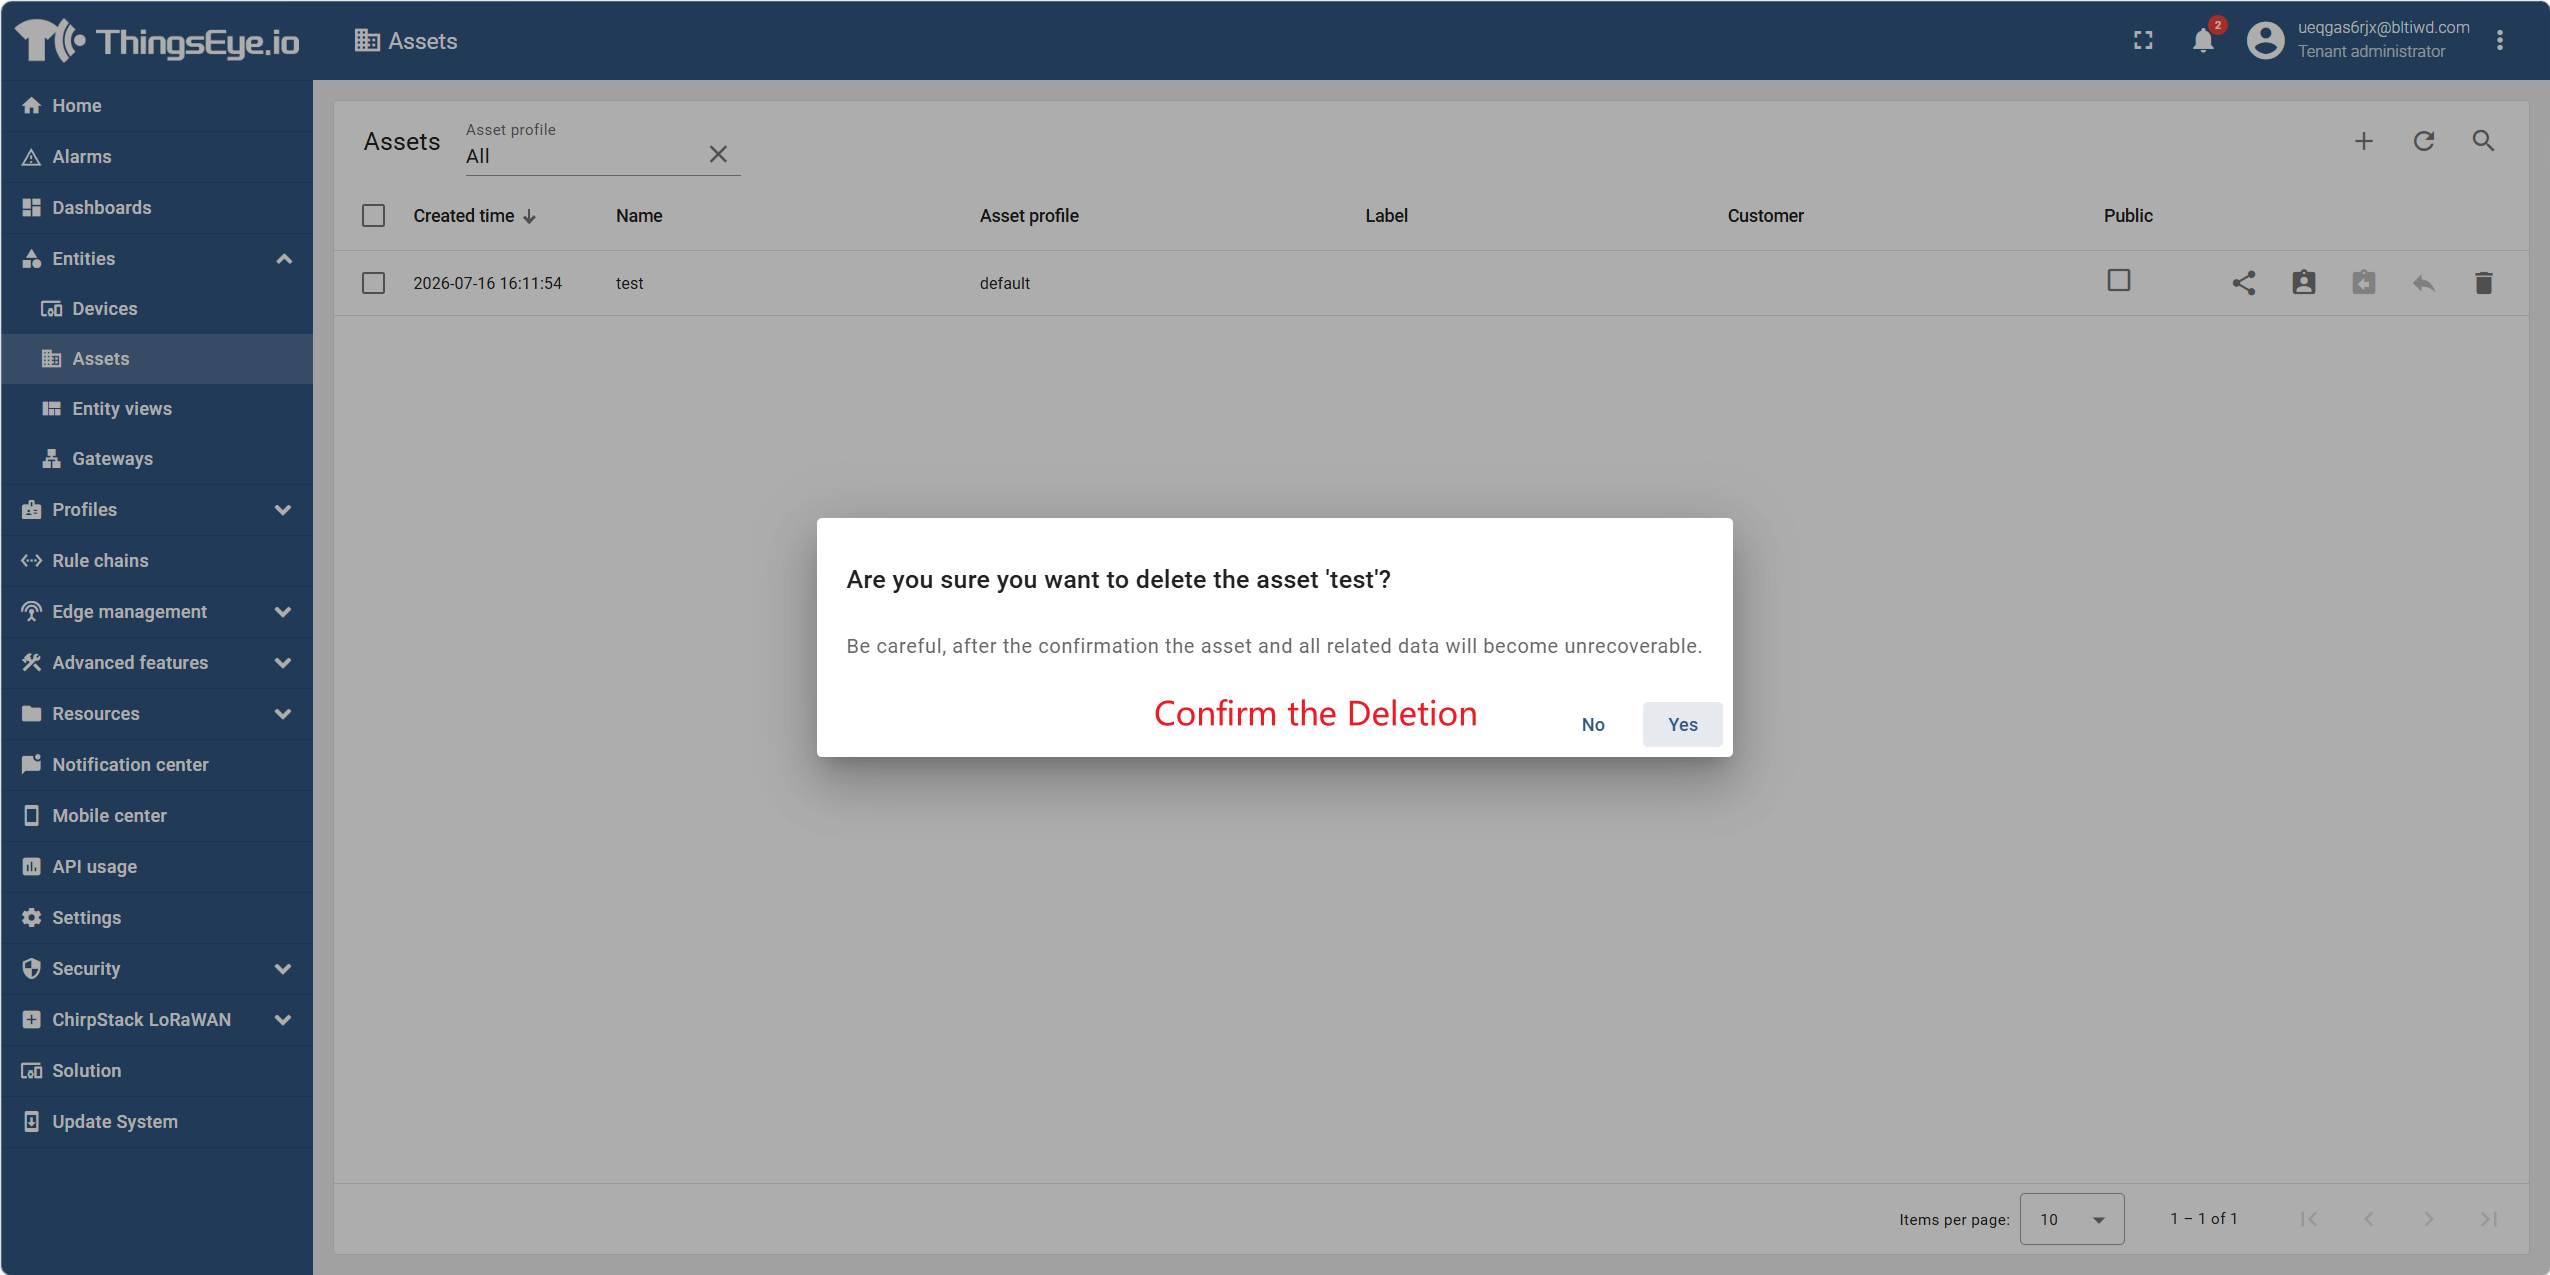
Note: Some platform versions require entering the asset name for secondary confirmation to prevent accidental operations. If the asset contains sub‑assets, the system may prompt you to delete or move the sub‑assets first; follow the instructions in the dialog.
5. Create an Asset Profile
Background
The Asset Profile feature allows Tenant Administrators to centrally define and manage common settings for a group of similar assets — such as rule chains, queues, alarm rules, and calculated fields. By pre‑defining these configurations, when creating assets later, you only need to select the corresponding profile to inherit all settings, eliminating the need to configure each parameter individually. The relationship between asset profiles and assets is one‑to‑many: one profile can be assigned to multiple assets.
Procedure
Step 1: Go to the asset profile page and open the creation dialog
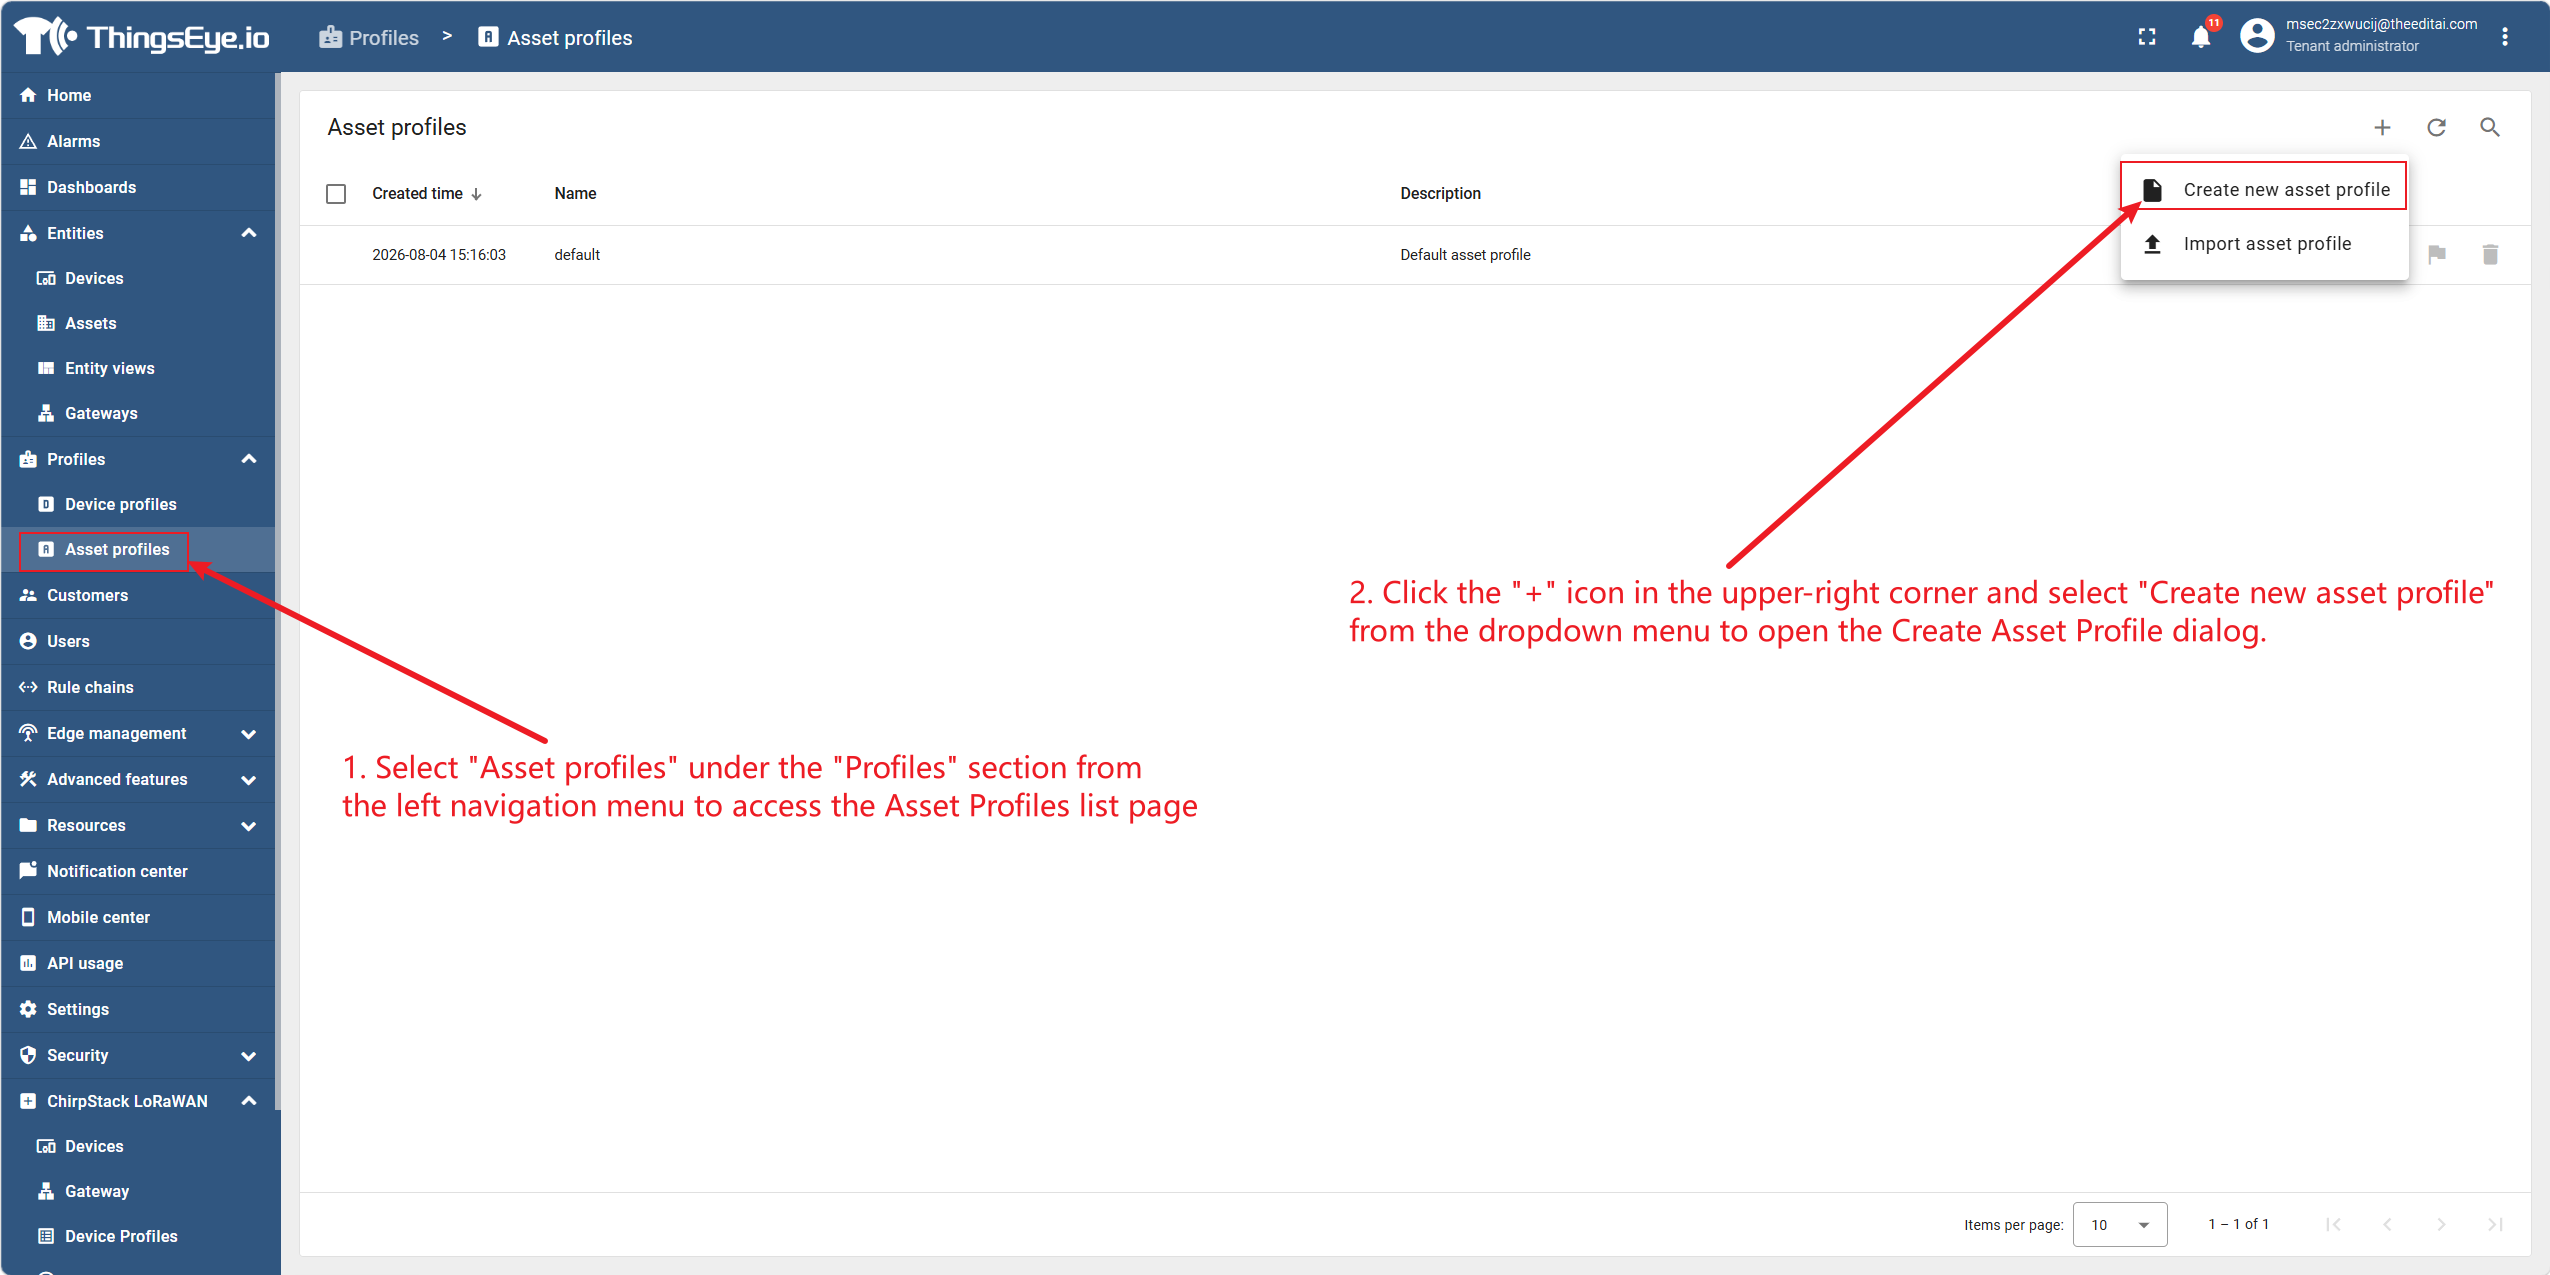
Select "Asset Profiles" from the "Profiles" section of the left navigation bar to go to the asset profile list page. Click the "+" icon in the upper‑right corner, select "Create New Asset Profile" from the dropdown menu, and open the creation dialog.
Step 2: Fill in basic information and complete the creation
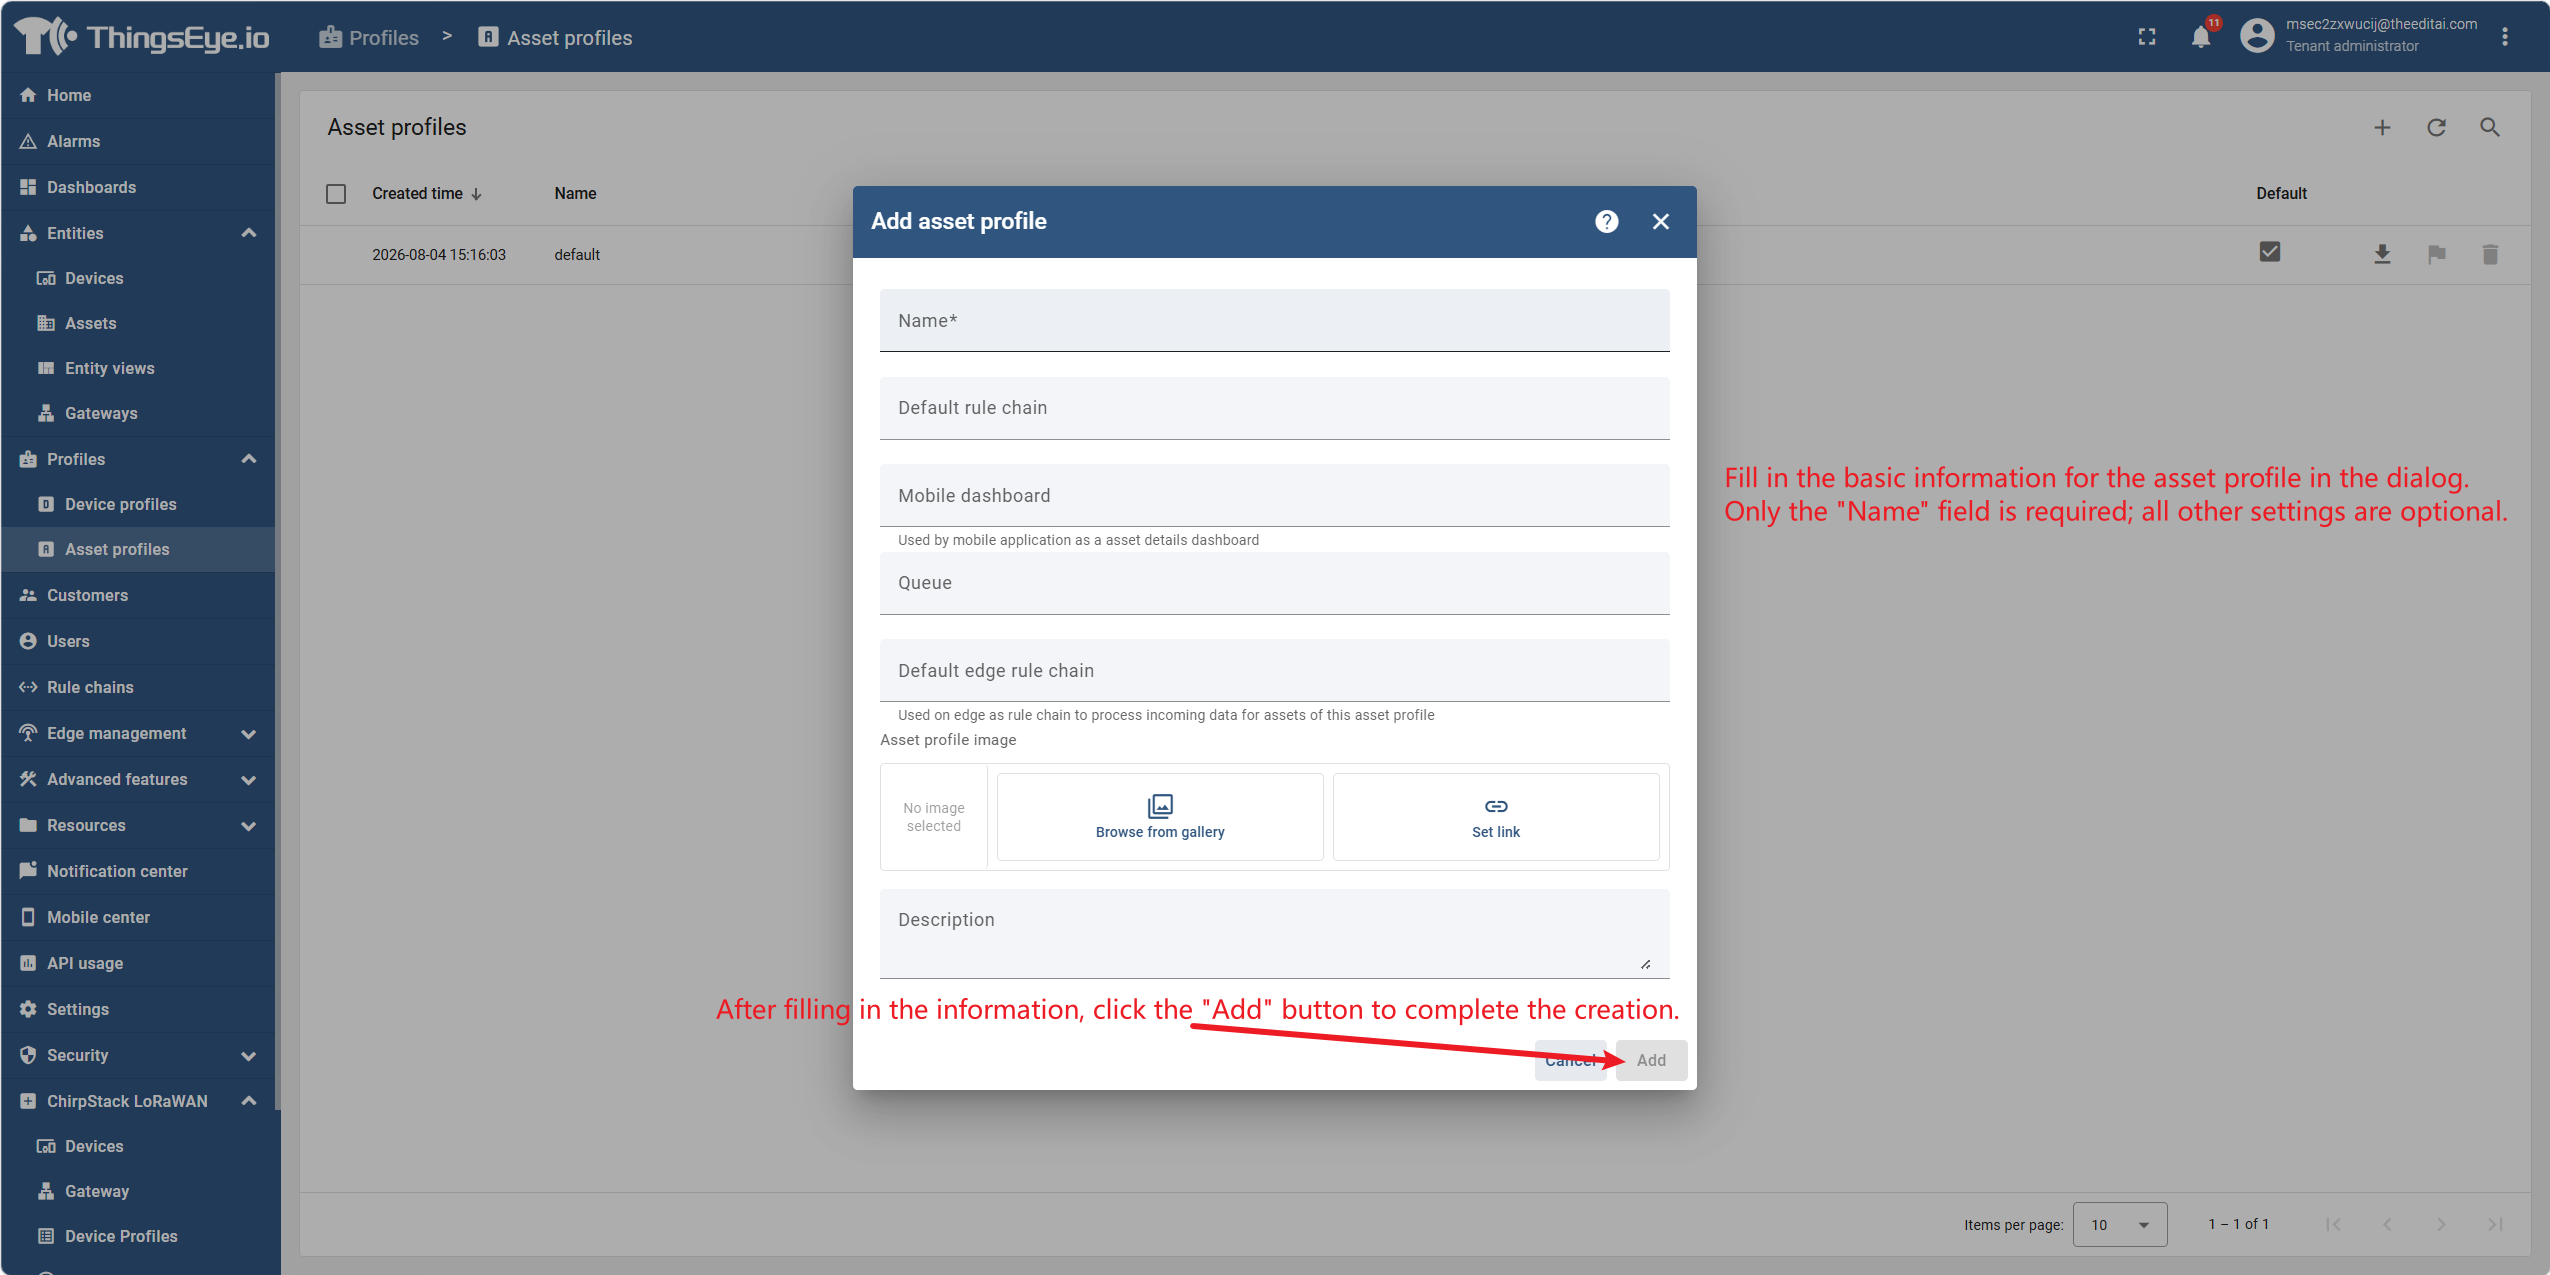
Fill in the basic information of the asset profile in the dialog. Only the "Name" field is required; all other settings are optional.
| Field | Description | Required | Example |
|---|---|---|---|
| Name | The unique identifier name of the asset profile | Yes | Building Asset Profile |
| Default Rule Chain | The rule chain that processes all asset messages under this profile. Dedicated rule chains can be assigned to different asset types to isolate processing logic | No | Building Processing Rule Chain |
| Queue | The queue that stores messages. Dedicated queues can be assigned to high‑priority assets to prevent them from being blocked by high‑traffic assets | No | high-priority-queue |
| Alarm Rules | Alarm conditions applicable to all assets under this profile | No | — |
| Calculated Fields | Formulas that derive metrics from asset telemetry or attributes | No | — |
Note: The Name field is required and cannot be left empty. Other fields can be modified after creation through the various tabs on the details page.
After filling in the information, click the "Add" button to complete the creation. Once created successfully, the new asset profile will appear in the asset profile list.
Supplementary Note: Full Configuration Items
After creating an asset profile, Tenant Administrators can further configure the following advanced options on the details page:
| Tab | Configuration Content |
|---|---|
| Details | Name, Default Rule Chain, Mobile Dashboard, Queue, Default Edge Rule Chain, configuration image, and description |
| Calculated Fields | Formulas that derive metrics from asset telemetry or attributes |
| Alarm Rules | Alarm conditions, severity levels, and actions applicable to all assets under this profile |
| Audit Logs | Operation history performed on this profile |
| Version Control | Git‑based export and restore for backup and collaboration |
Field Notes: "Mobile Dashboard" refers to the dashboard used by the mobile application on the details page of assets under this profile, and is unrelated to the user login dashboard. "Default Edge Rule Chain" is only relevant when using ThingsEye Edge.
Important Considerations
| Item | Description |
|---|---|
| Name Uniqueness | Asset profile names must be unique within the tenant. |
| Rule Chain Isolation | Assigning dedicated rule chains to different asset types prevents the root rule chain from becoming overly complex and isolates processing logic for each asset type. |
| Queue Isolation | Assigning dedicated queues to high‑priority assets ensures their message processing is not blocked by high‑traffic assets. |
| Configuration Inheritance | Alarm rules and calculated fields are shared by all assets using this profile. Asset‑level configurations and profile‑level configurations take effect in parallel and do not override each other. |
6. Edit an Asset Profile
Procedure
Step 1: Enter asset profile edit mode
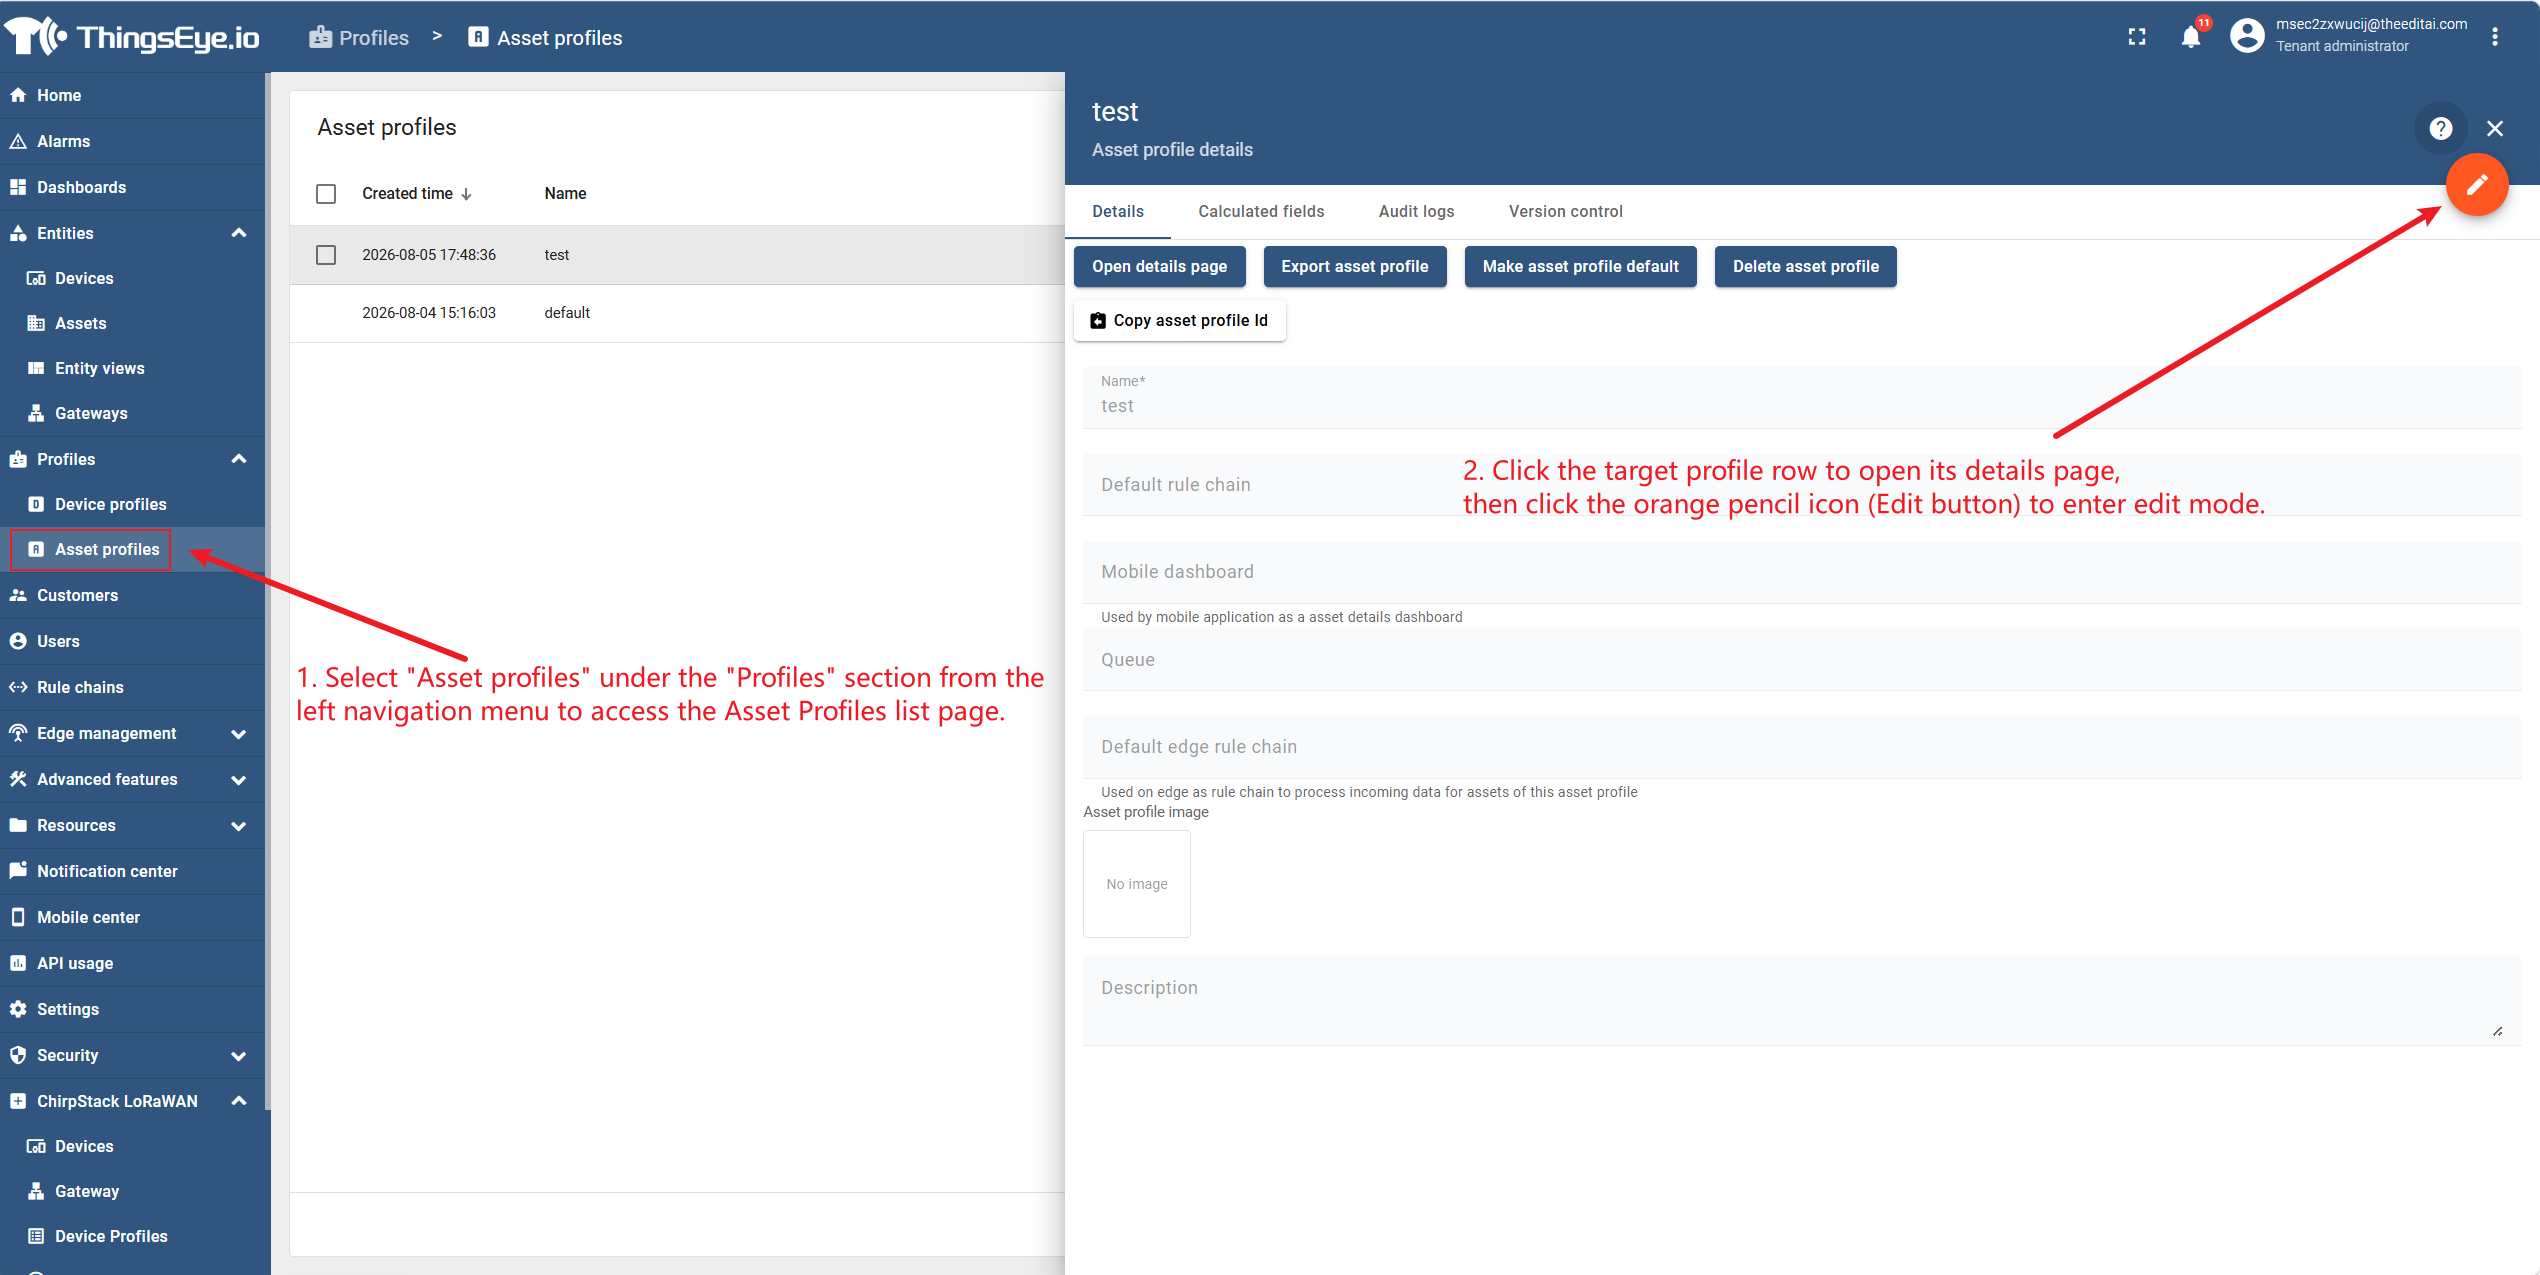
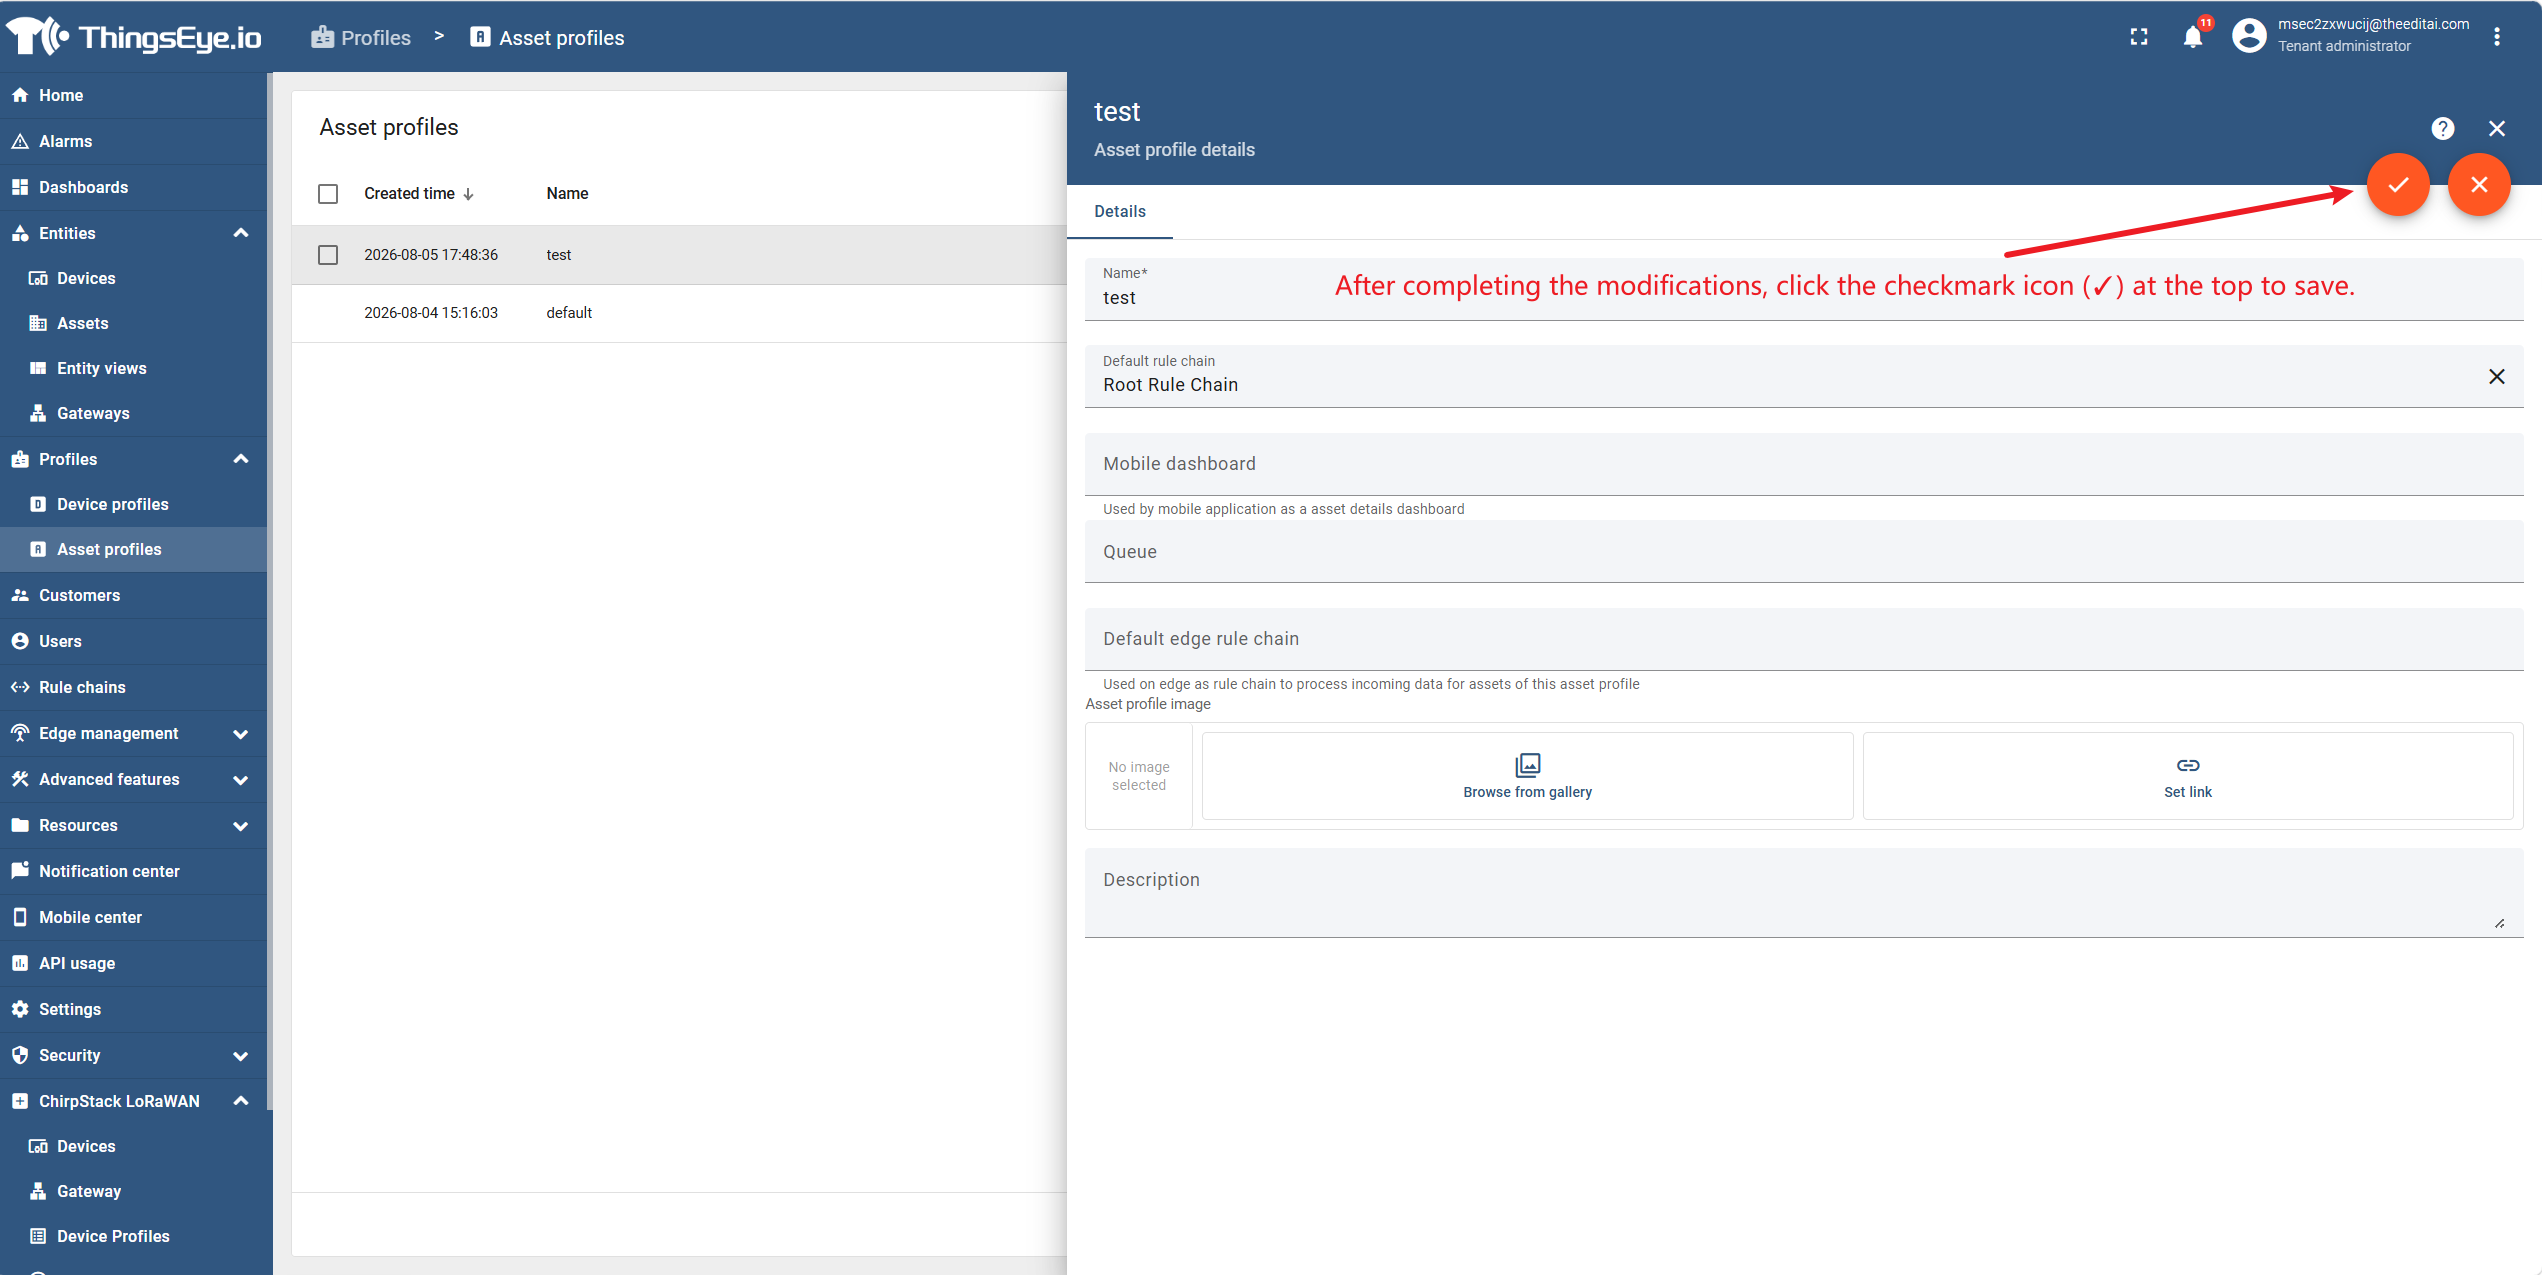
Select "Asset Profiles" from the "Profiles" section of the left navigation bar to go to the asset profile list page. Click the row of the target profile to go to its details page, then click the orange pencil icon (edit button) to enter edit mode.
Step 2: Modify profile information
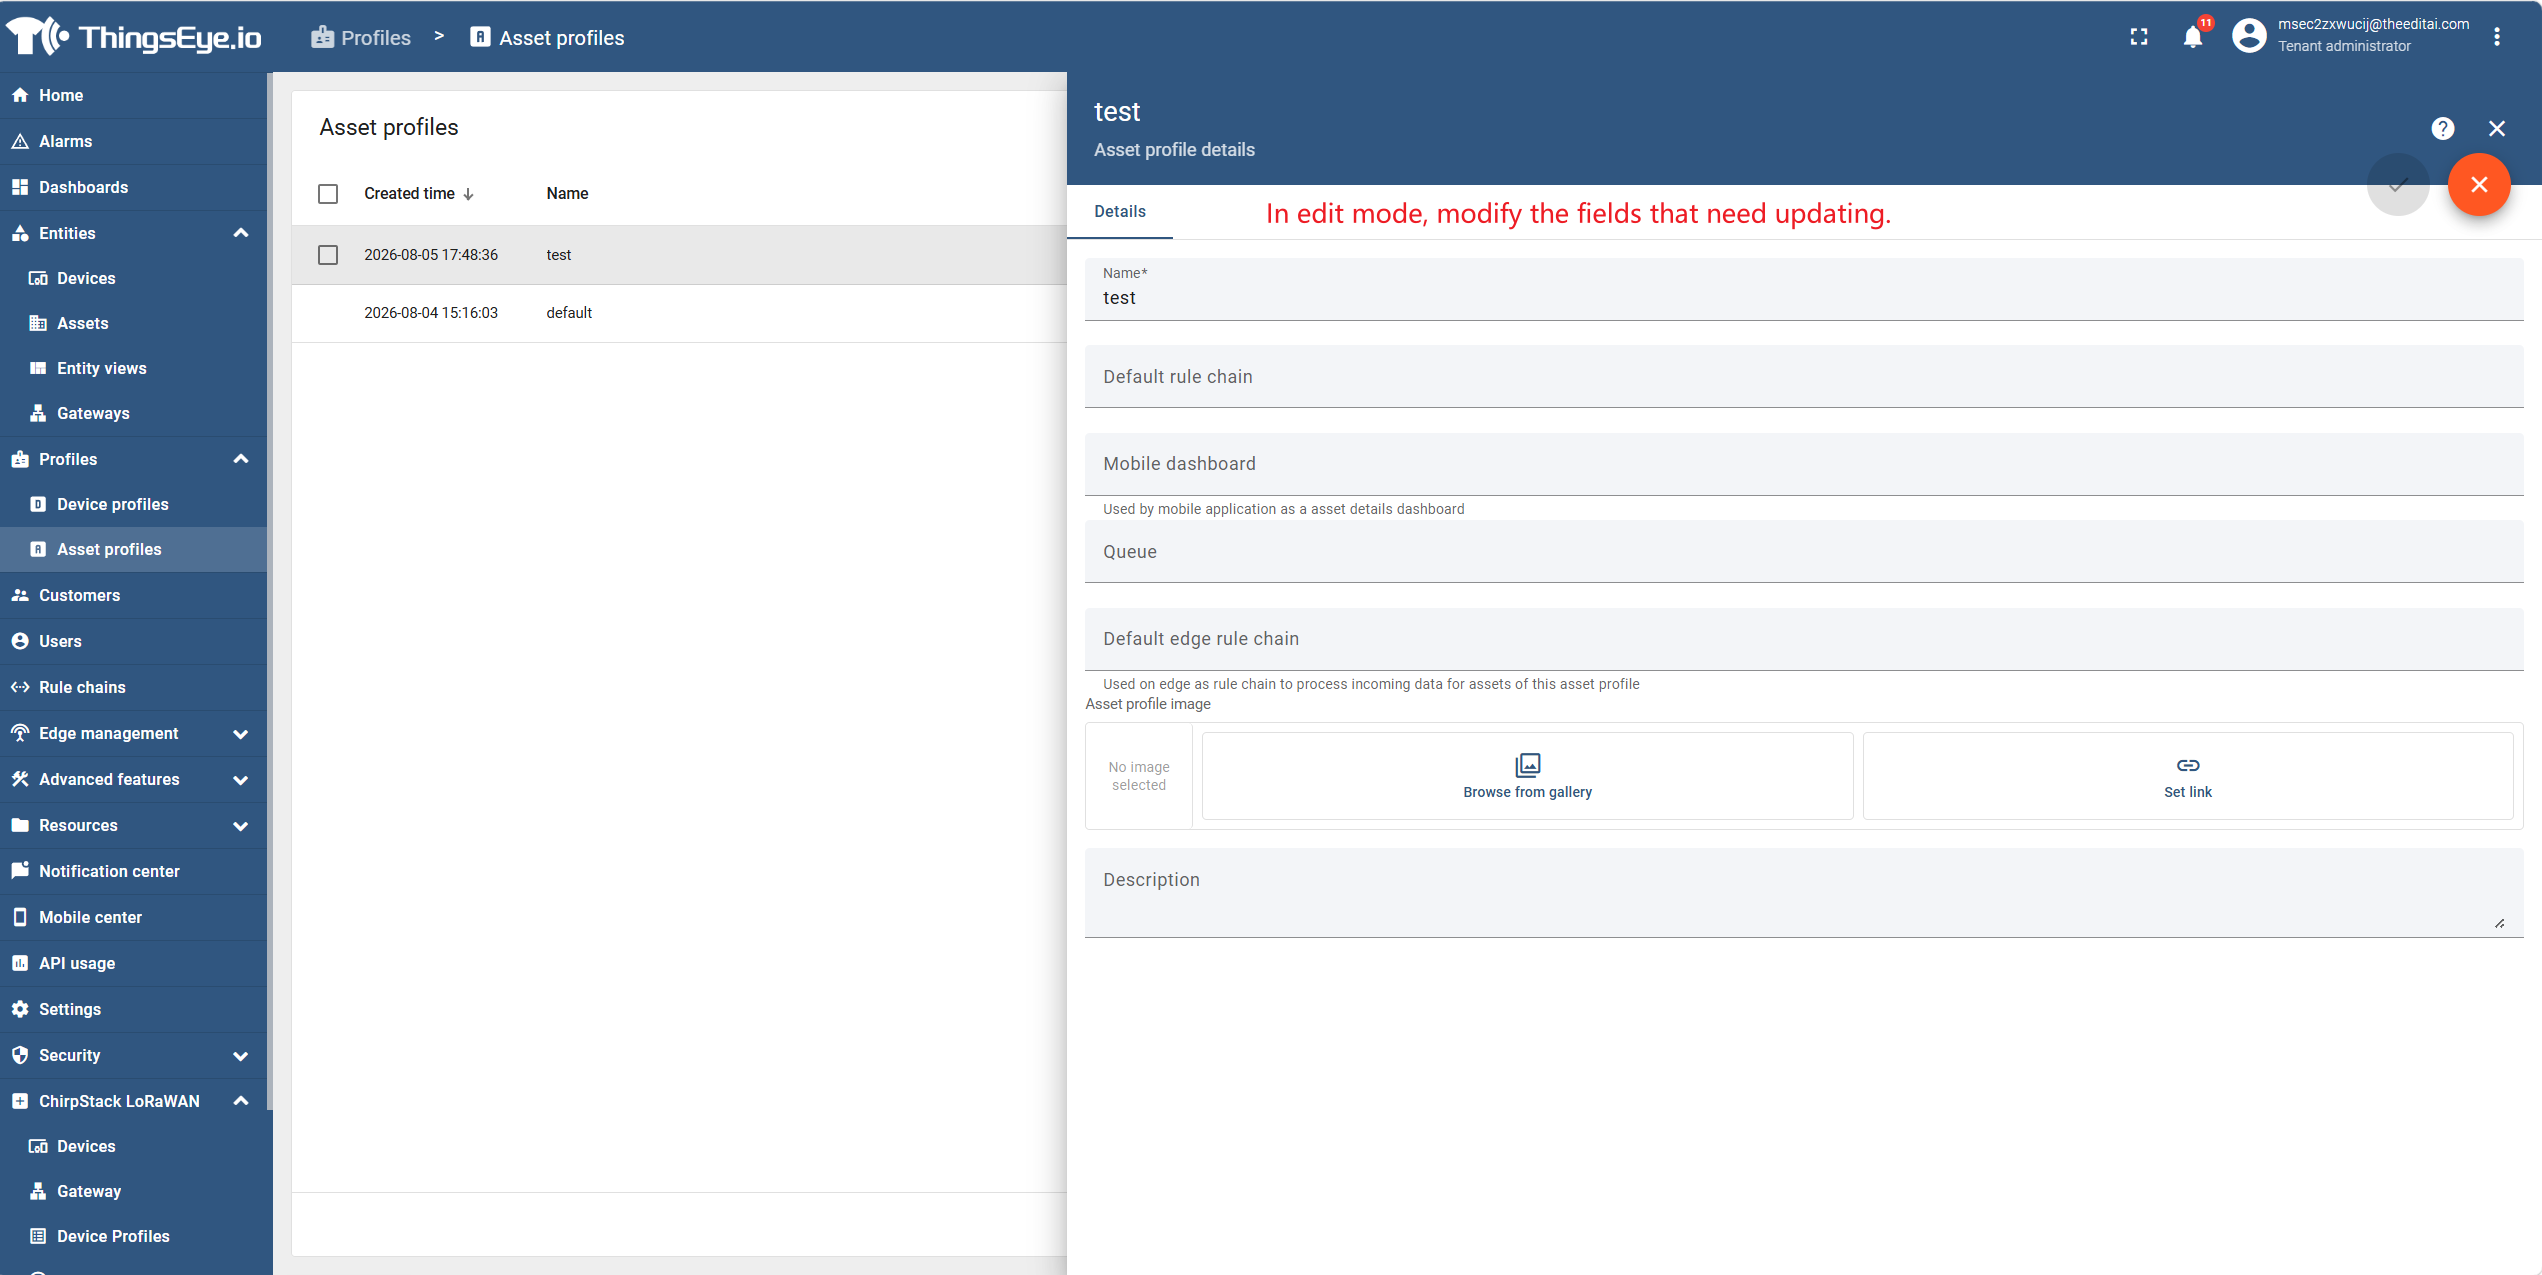
In edit mode, modify the fields that need updating. Field descriptions are as follows:
| Field | Description | Required | Example |
|---|---|---|---|
| Name | The unique identifier name of the asset profile | Yes | Building Asset Profile |
| Default Rule Chain | The rule chain that processes all asset messages under this profile | No | Building Processing Rule Chain |
| Queue | The queue that stores messages | No | high-priority-queue |
| Mobile Dashboard | The dashboard used by the mobile application on the details page of assets under this profile | No | Asset Details Dashboard |
| Default Edge Rule Chain | Only relevant when using ThingsEye Edge | No | edge-rule-chain |
Note: The Name field is required and cannot be left empty. "Mobile Dashboard" refers to the dashboard used by the mobile application on the details page of assets under this profile, and is unrelated to the user login dashboard.
Step 3: Save changes
After modification, click the checkmark icon (✓) at the top to save. To discard changes, click the "✕" button to exit edit mode.
Editing Other Advanced Configuration Items
In addition to basic information, the asset profile details page provides multiple independent configuration tabs where Tenant Administrators can edit various advanced settings:
| Tab | Configuration Content |
|---|---|
| Calculated Fields | Formulas that derive metrics from asset telemetry or attributes |
| Alarm Rules | Alarm conditions, severity levels, and actions applicable to all assets under this profile |
| Audit Logs | Operation history performed on this profile |
| Version Control | Git‑based export and restore for backup and collaboration |
Each tab is saved independently; modifications only affect the configuration items within that tab.
Important Considerations
| Item | Description |
|---|---|
| Name Uniqueness | Asset profile names must be unique within the tenant. |
| Rule Chain Isolation | Assigning dedicated rule chains to different asset types prevents the root rule chain from becoming overly complex. |
| Queue Isolation | Assigning dedicated queues to high‑priority assets ensures their message processing is not blocked by high‑traffic assets. |
| Configuration Inheritance | Alarm rules and calculated fields are shared by all assets using this profile. Asset‑level configurations and profile‑level configurations take effect in parallel and do not override each other. |
7. Delete an Asset Profile
There are two ways to delete an asset profile:
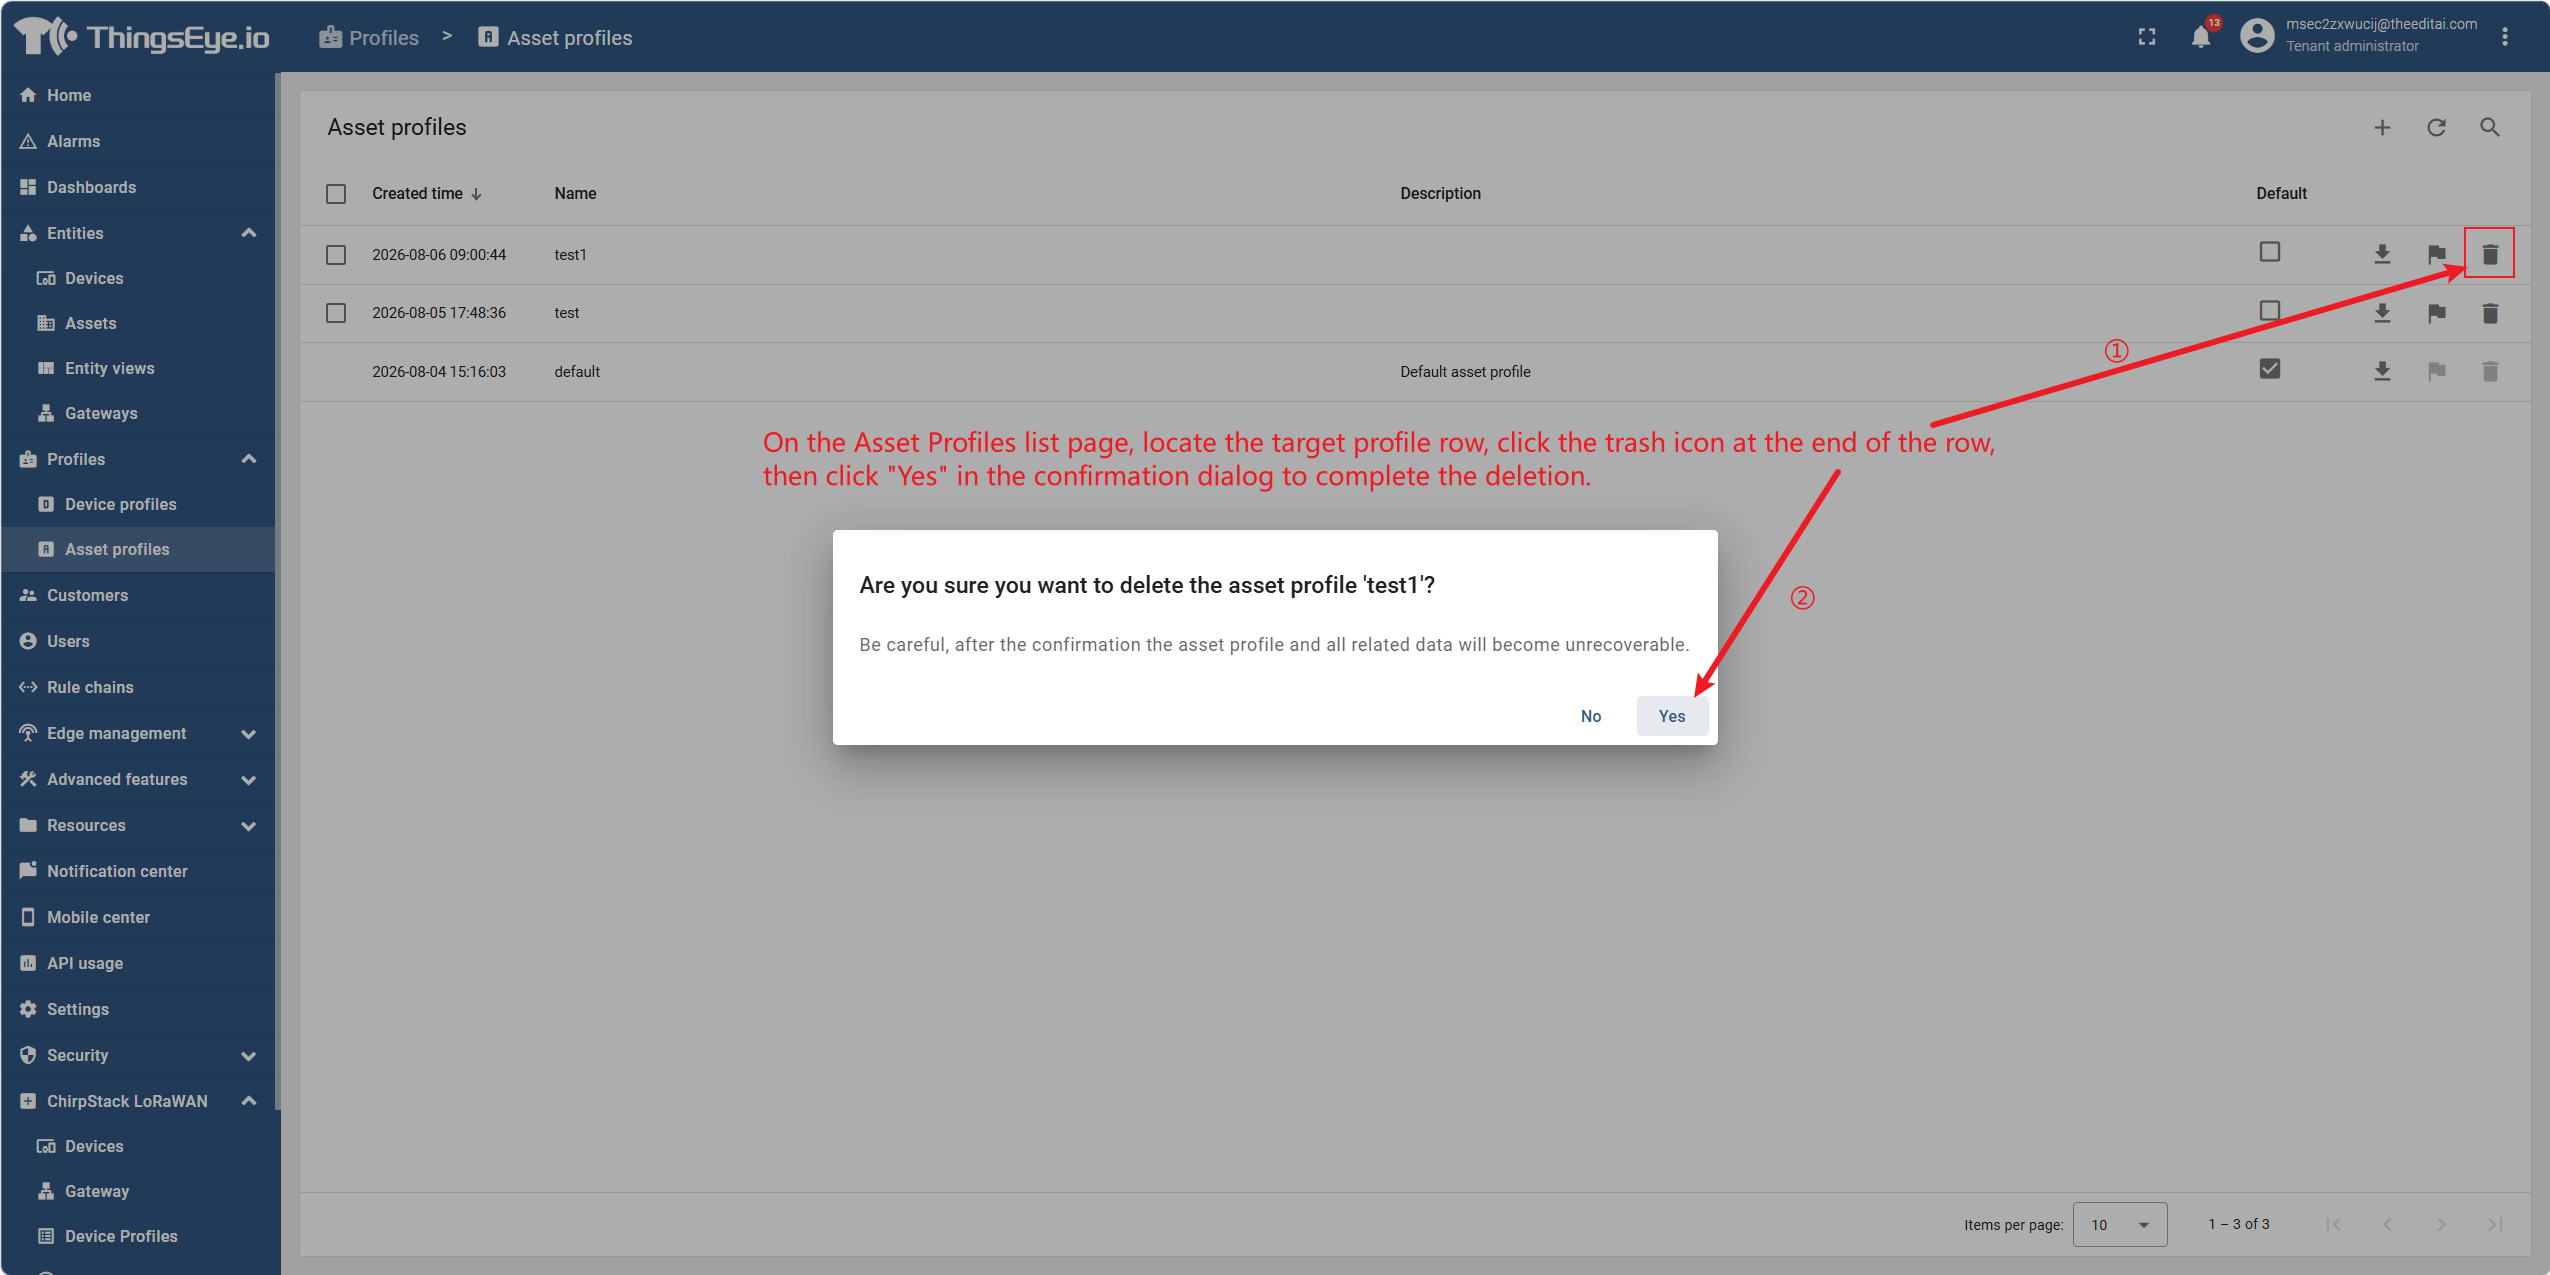
Method 1: Delete directly from the list page
On the asset profile list page, locate the row of the target profile, click the trash can icon at the end of the row, then click "Yes" in the confirmation dialog to complete the deletion.
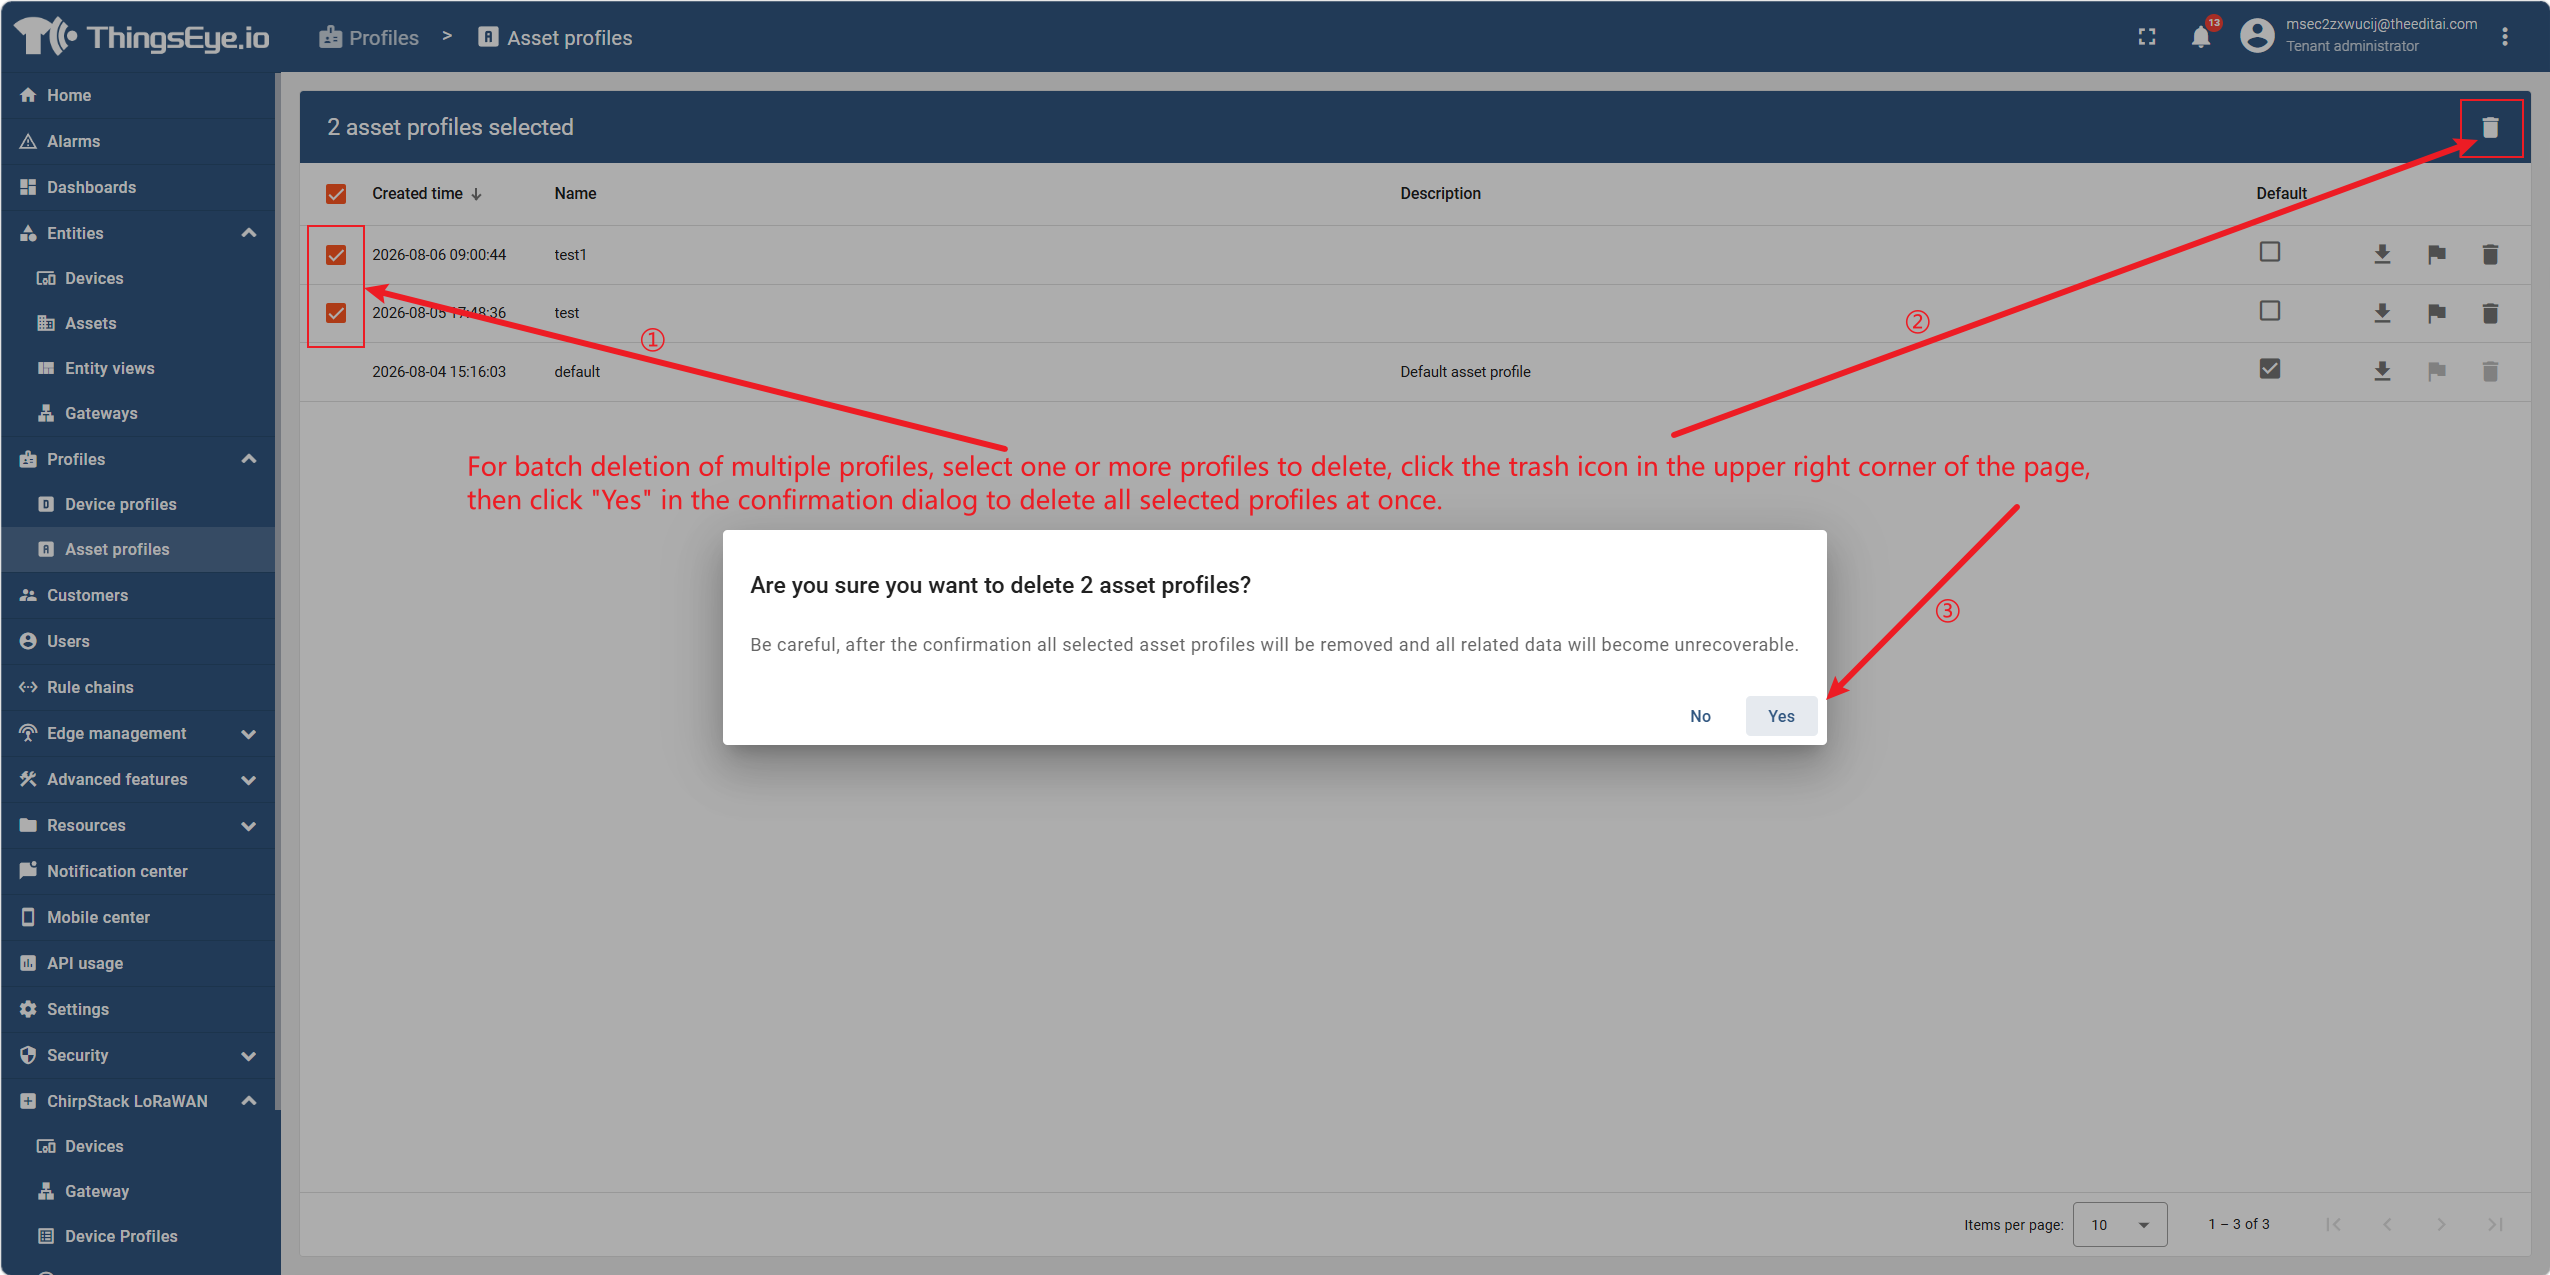
Bulk delete multiple profiles: Select one or more profiles to delete, click the trash can icon in the upper‑right corner of the page, then click "Yes" in the confirmation dialog to delete all selected profiles at once.
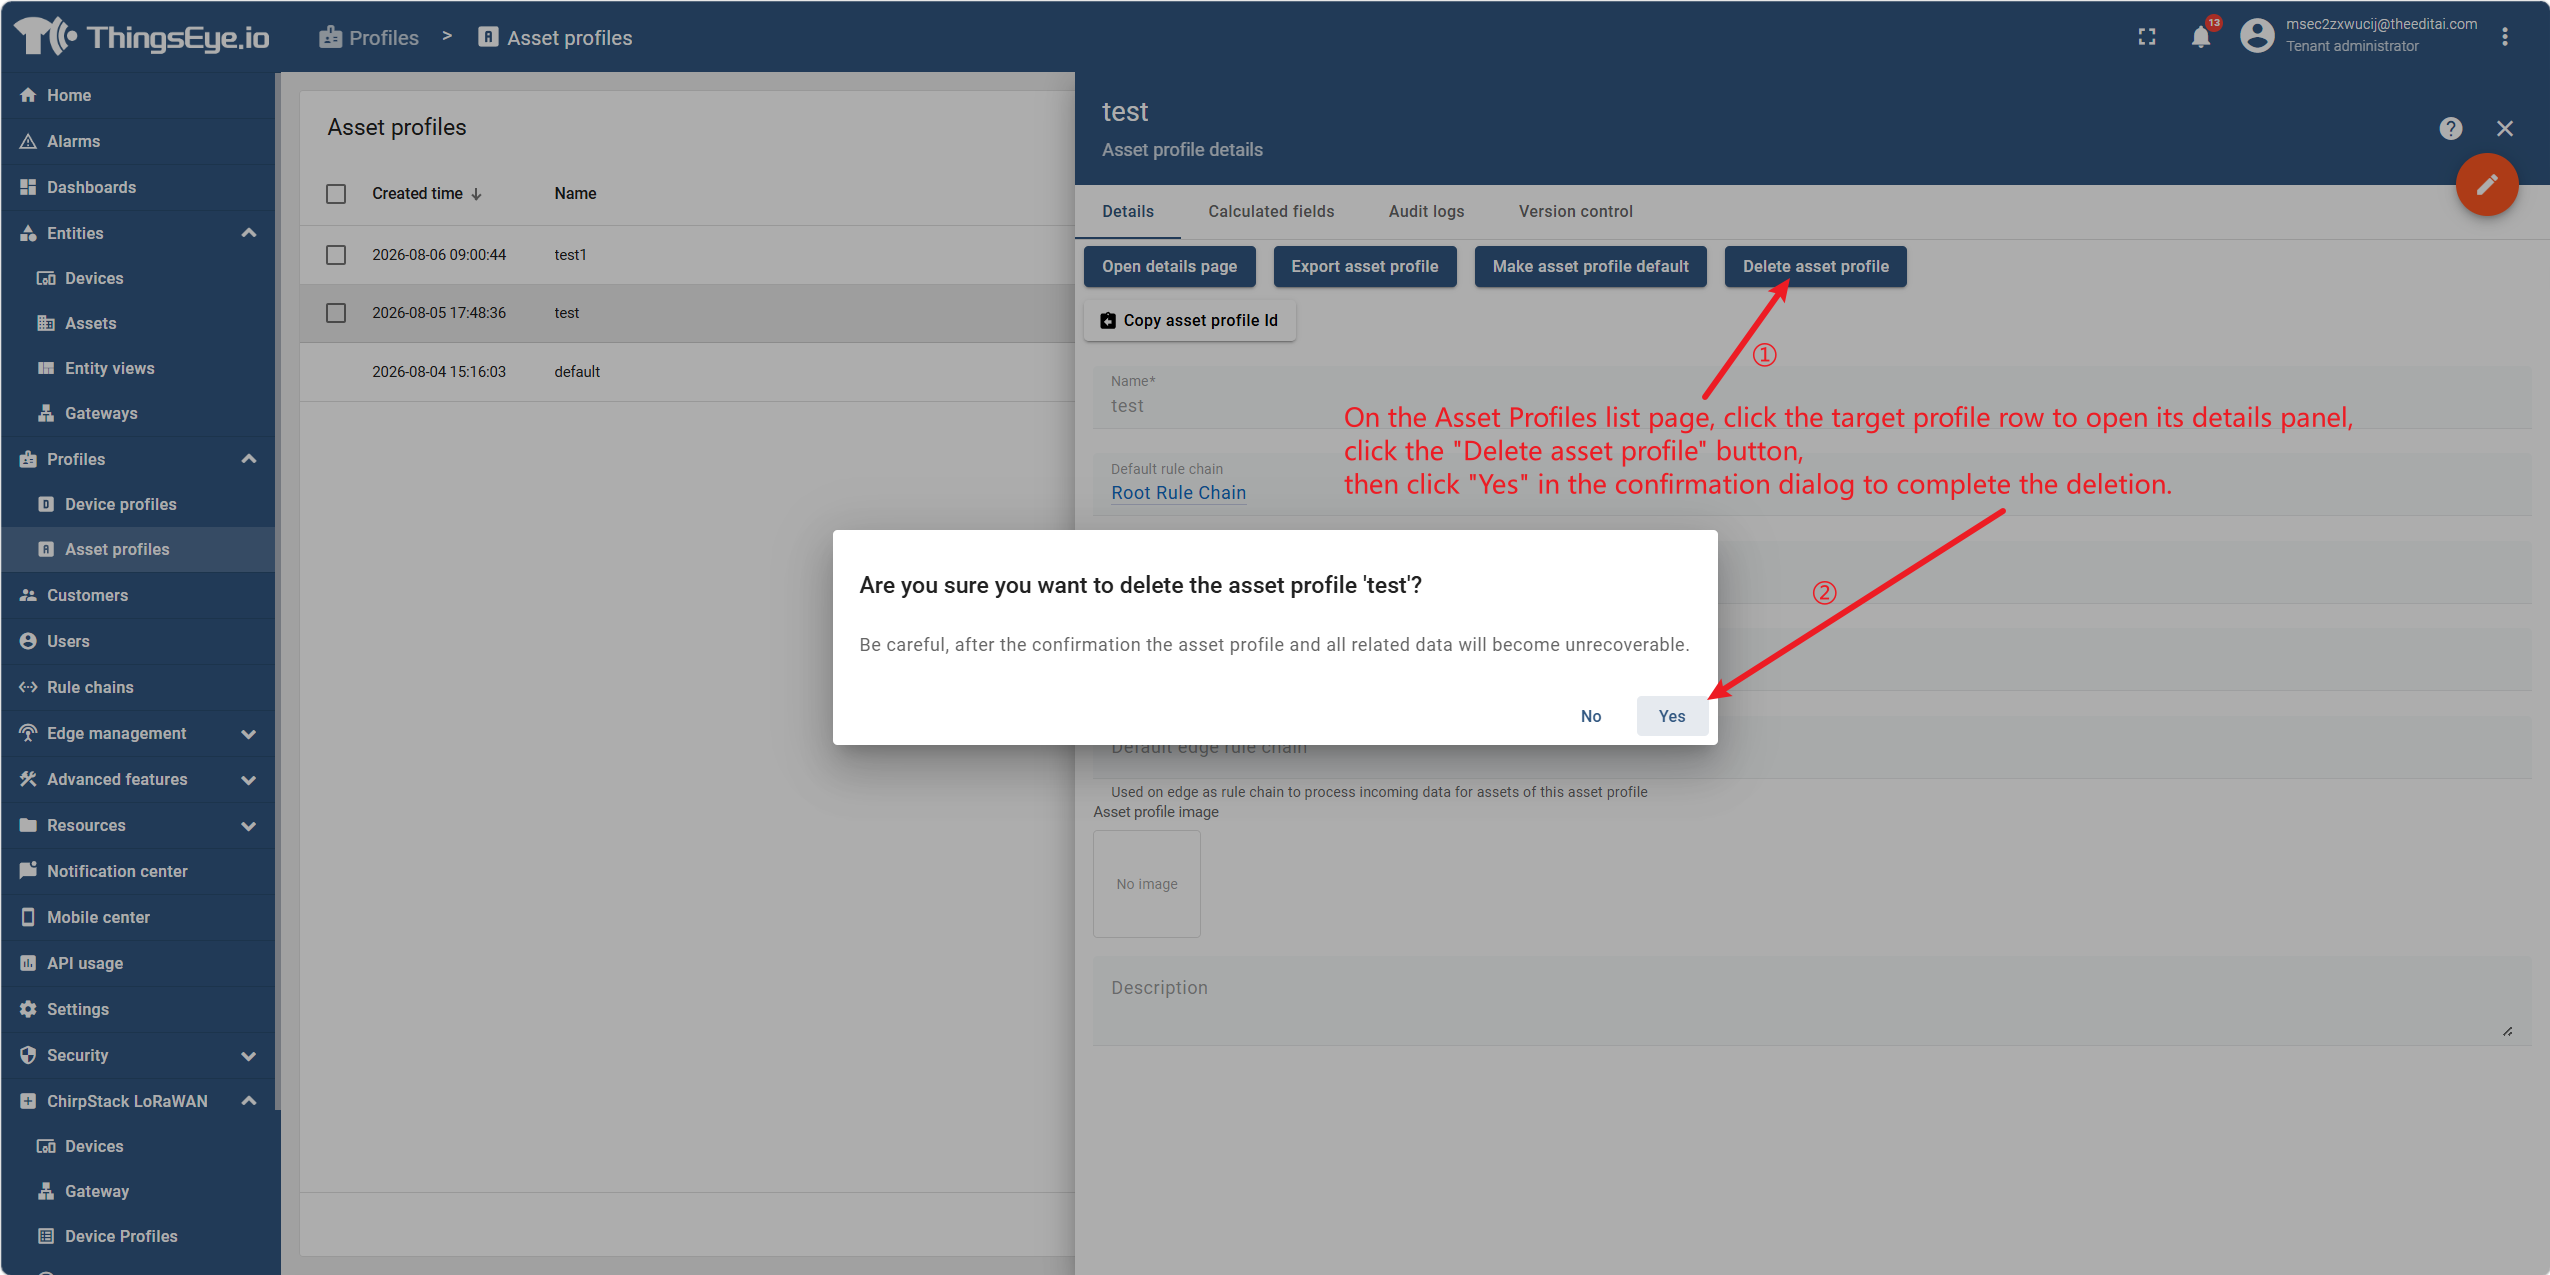
Method 2: Delete from the details page
On the asset profile list page, click the row of the target profile to go to its details panel, click the "Delete Asset Profile" button, then click "Yes" in the confirmation dialog to complete the deletion.
Important Considerations
| Item | Description |
|---|---|
| Irreversibility | Deleting an asset profile is irreversible; data cannot be recovered. |
| Secondary Confirmation | Each deletion operation requires secondary confirmation in a pop‑up dialog to prevent accidental operations. |
| Profiles Referenced by Assets | If an asset profile is referenced by assets, you must first migrate those assets to other profiles before deletion; otherwise, asset operation may be affected. |
| Profiles Referenced by Dashboards | If an asset profile is referenced by a dashboard (e.g., as a data source), dashboard components may fail to display data after deletion. Confirm that the profile is not referenced by any dashboard before deletion. |
| Impact Scope | Deleting a profile does not affect the existence of assets already created using that profile, but those assets will lose the profile configuration (e.g., alarm rules, calculated fields). Their associated devices, alarms, dashboards, and other entities are not affected. |